User Manual
Page 3
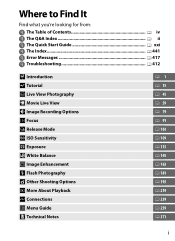
Where to Find It Find what you're looking for from: i The Table of Contents 0 iv i The Q&A Index 0 ii i The Quick Start Guide 0 xxi i The Index 0 441 i Error Messages 0 417 i Troubleshooting 0 412 X Introduction s Tutorial x Live View Photography y Movie Live View d Image Recording Options N Focus k Release Mode S ISO Sensitivity Z Exposure r White Balance J Image Enhancement l Flash Photography t Other Shooting Options I More About Playback Q Connections U Menu Guide n Technical Notes 0 1 0 15 0 45 0 59 0 79 0 91 0 103 0 109 0 115 0 145 0 163 0 181 0 193 0 219 0 239 0 259 0 371 i
Where to Find It Find what you're looking for from: i The Table of Contents 0 iv i The Q&A Index 0 ii i The Quick Start Guide 0 xxi i The Index 0 441 i Error Messages 0 417 i Troubleshooting 0 412 X Introduction s Tutorial x Live View Photography y Movie Live View d Image Recording Options N Focus k Release Mode S ISO Sensitivity Z Exposure r White Balance J Image Enhancement l Flash Photography t Other Shooting Options I More About Playback Q Connections U Menu Guide n Technical Notes 0 1 0 15 0 45 0 59 0 79 0 91 0 103 0 109 0 115 0 145 0 163 0 181 0 193 0 219 0 239 0 259 0 371 i
User Manual
Page 4
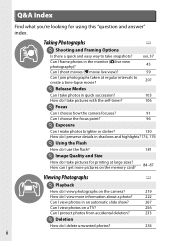
... I make photos brighter or darker? 130 How do I preserve details in shadows and highlights? 174, 176 i Using the Flash How do I use the flash? 181 i Image Quality and Size How do I delete unwanted photos? 234 ii Can I frame photos in the monitor (C live view)? Can I join photographs taken at large sizes...
... I make photos brighter or darker? 130 How do I preserve details in shadows and highlights? 174, 176 i Using the Flash How do I use the flash? 181 i Image Quality and Size How do I delete unwanted photos? 234 ii Can I frame photos in the monitor (C live view)? Can I join photographs taken at large sizes...
User Manual
Page 7
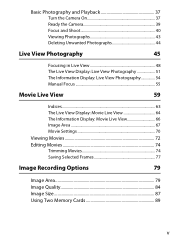
... 54 Manual Focus 55 Movie Live View 59 Indices 63 The Live View Display: Movie Live View 64 The Information Display: Movie Live View 66 Image Area 67 Movie Settings 70 Viewing Movies 72 Editing Movies 74 Trimming Movies 74 Saving Selected Frames 77...
... 54 Manual Focus 55 Movie Live View 59 Indices 63 The Live View Display: Movie Live View 64 The Information Display: Movie Live View 66 Image Area 67 Movie Settings 70 Viewing Movies 72 Editing Movies 74 Trimming Movies 74 Saving Selected Frames 77...
User Manual
Page 9
White Balance 145 White Balance Options 145 Fine-Tuning White Balance 148 Choosing a Color Temperature 152 Preset Manual 154 Image Enhancement 163 Picture Controls 163 Selecting a Picture Control 163 Modifying Existing Picture Controls 165 Creating Custom Picture Controls 169 Sharing Custom Picture Controls 172 Preserving ...
White Balance 145 White Balance Options 145 Fine-Tuning White Balance 148 Choosing a Color Temperature 152 Preset Manual 154 Image Enhancement 163 Picture Controls 163 Selecting a Picture Control 163 Modifying Existing Picture Controls 165 Creating Custom Picture Controls 169 Sharing Custom Picture Controls 172 Preserving ...
User Manual
Page 10
More About Playback 219 Viewing Images 219 Full-Frame Playback 219 Thumbnail Playback 219 Playback Controls 220 Photo Information 222 Taking a Closer Look: Playback Zoom 231 Protecting Photographs from Deletion 233 ... Multiple Pictures 251 Creating a DPOF Print Order: Print Set 254 Viewing Photographs on TV 256 HDMI Options 257 Menu Guide 259 D The Playback Menu: Managing Images 259 Playback Folder 260 Hide Image 260 Playback Display Options 261 Copy Image(s 262 Image Review 265 After Delete 266 viii
More About Playback 219 Viewing Images 219 Full-Frame Playback 219 Thumbnail Playback 219 Playback Controls 220 Photo Information 222 Taking a Closer Look: Playback Zoom 231 Protecting Photographs from Deletion 233 ... Multiple Pictures 251 Creating a DPOF Print Order: Print Set 254 Viewing Photographs on TV 256 HDMI Options 257 Menu Guide 259 D The Playback Menu: Managing Images 259 Playback Folder 260 Hide Image 260 Playback Display Options 261 Copy Image(s 262 Image Review 265 After Delete 266 viii
User Manual
Page 13
...Menu: Camera Setup 325 Format Memory Card 326 Monitor Brightness 326 Image Dust Off Ref Photo 327 Flicker Reduction 329 Time Zone and Date 329 Language 330 Auto Image Rotation 331 Battery Info 332 Image Comment 333 Copyright Information 334 Save/Load Settings 335 Virtual Horizon 337... Retouch Menu: Creating Retouched Copies 341 D-Lighting 344 Red-Eye Correction 345 Trim 346 Monochrome 347 Filter Effects 348 Color Balance 349 Image Overlay 350 NEF (RAW) Processing 353 Resize 355 Quick Retouch 357 Straighten 357 Distortion Control 358 Fisheye 358 Color Outline 359 Color...
...Menu: Camera Setup 325 Format Memory Card 326 Monitor Brightness 326 Image Dust Off Ref Photo 327 Flicker Reduction 329 Time Zone and Date 329 Language 330 Auto Image Rotation 331 Battery Info 332 Image Comment 333 Copyright Information 334 Save/Load Settings 335 Virtual Horizon 337... Retouch Menu: Creating Retouched Copies 341 D-Lighting 344 Red-Eye Correction 345 Trim 346 Monochrome 347 Filter Effects 348 Color Balance 349 Image Overlay 350 NEF (RAW) Processing 353 Resize 355 Quick Retouch 357 Straighten 357 Distortion Control 358 Fisheye 358 Color Outline 359 Color...
User Manual
Page 20
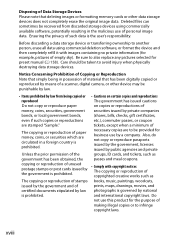
... or transferring ownership to another person, erase all data using commercially available software, potentially resulting in possession of material that deleting images or formatting memory cards or other device may be provided for preset manual (0 158). Notice Concerning Prohibition of Copying or Reproduction... private groups, ID cards, and tickets, such as passes and meal coupons. • Comply with images containing no private information (for the purpose of personal image data. Unless the prior permission of the government has been obtained, the copying or reproduction of Data...
... or transferring ownership to another person, erase all data using commercially available software, potentially resulting in possession of material that deleting images or formatting memory cards or other device may be provided for preset manual (0 158). Notice Concerning Prohibition of Copying or Reproduction... private groups, ID cards, and tickets, such as passes and meal coupons. • Comply with images containing no private information (for the purpose of personal image data. Unless the prior permission of the government has been obtained, the copying or reproduction of Data...

User Manual
Page 22
...users in Europe and Africa: http://www.europe-nikon.com/support/ • For users in your area. Additional information may be held liable for contact information: http://imaging.nikon.com/ xx A Life-Long Learning As part of Nikon's "Life-Long Learning" commitment to ongoing product... support and education, continually-updated information is functioning normally. Nikon will not be available from product malfunction. A ...
...users in Europe and Africa: http://www.europe-nikon.com/support/ • For users in your area. Additional information may be held liable for contact information: http://imaging.nikon.com/ xx A Life-Long Learning As part of Nikon's "Life-Long Learning" commitment to ongoing product... support and education, continually-updated information is functioning normally. Nikon will not be available from product malfunction. A ...

User Manual
Page 26
... shoe 2 Release mode dial (for optional flash unit 380 lock release 103 9 Accessory shoe cover 380 3 T button 10 Power switch 26 Image quality 84 11 Shutter-release button........... 40, 41 Image size 87 12 E button Two-button reset 193 Exposure compensation .........130 4 Eyelet for camera strap xxi Two-button reset 193 5 U button...
... shoe 2 Release mode dial (for optional flash unit 380 lock release 103 9 Accessory shoe cover 380 3 T button 10 Power switch 26 Image quality 84 11 Shutter-release button........... 40, 41 Image size 87 12 E button Two-button reset 193 Exposure compensation .........130 4 Eyelet for camera strap xxi Two-button reset 193 5 U button...

User Manual
Page 30
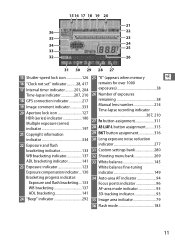
... of intervals for interval timer photography...........204 Focal length (non-CPU lenses) .....214 3 Flash sync indicator 299 4 Flexible program indicator 118 5 Exposure mode 117 6 Image size 87 7 Image quality 84 8 White balance 145 White balance fine-tuning indicator 151 9 Exposure indicator 123 Exposure compensation indicator 130 Bracketing progress indicator: Exposure and flash...
... of intervals for interval timer photography...........204 Focal length (non-CPU lenses) .....214 3 Flash sync indicator 299 4 Flexible program indicator 118 5 Exposure mode 117 6 Image size 87 7 Image quality 84 8 White balance 145 White balance fine-tuning indicator 151 9 Exposure indicator 123 Exposure compensation indicator 130 Bracketing progress indicator: Exposure and flash...

User Manual
Page 34
... 164 9 HDR indicator 177 HDR exposure differential 180 10 Multiple exposure indicator.......... 196 11 Autofocus mode indicator 91 12 Eye-Fi connection indicator .......... 339 13 Image quality 84 Secondary slot function 89 14...
... 164 9 HDR indicator 177 HDR exposure differential 180 10 Multiple exposure indicator.......... 196 11 Autofocus mode indicator 91 12 Eye-Fi connection indicator .......... 339 13 Image quality 84 Secondary slot function 89 14...
User Manual
Page 35
... memory X 16 "Clock not set" indicator.......... 28, 417 17 Interval timer indicator..........201, 204 Time-lapse indicator 207, 210 18 GPS connection indicator 217 19 Image comment indicator 333 20 Aperture lock icon 127 HDR (series) indicator 180 Multiple exposure (series) indicator 197 21 Copyright information indicator 334 22 Exposure and... balance fine-tuning indicator 149 34 Auto-area AF indicator 94 Focus points indicator 96 AF-area mode indicator 93 3D-tracking indicator 93 35 Image area indicator 79 36 Flash mode 183 11
... memory X 16 "Clock not set" indicator.......... 28, 417 17 Interval timer indicator..........201, 204 Time-lapse indicator 207, 210 18 GPS connection indicator 217 19 Image comment indicator 333 20 Aperture lock icon 127 HDR (series) indicator 180 Multiple exposure (series) indicator 197 21 Copyright information indicator 334 22 Exposure and... balance fine-tuning indicator 149 34 Auto-area AF indicator 94 Focus points indicator 96 AF-area mode indicator 93 3D-tracking indicator 93 35 Image area indicator 79 36 Flash mode 183 11
User Manual
Page 49
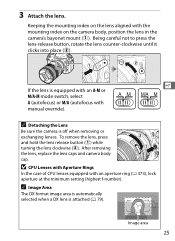
... of CPU lenses equipped with manual override). To remove the lens, press and hold the lens release button (q) while turning the lens clockwise (w). A Image Area The DX format image area is automatically selected when a DX lens is off when removing or exchanging lenses. Being careful not to press the lens-release button... the mounting index on the camera body, position the lens in the camera's bayonet mount (q). A Detaching the Lens Be sure the camera is attached (0 79). Image area 25 3 Attach the lens.
... of CPU lenses equipped with manual override). To remove the lens, press and hold the lens release button (q) while turning the lens clockwise (w). A Image Area The DX format image area is automatically selected when a DX lens is off when removing or exchanging lenses. Being careful not to press the lens-release button... the mounting index on the camera body, position the lens in the camera's bayonet mount (q). A Detaching the Lens Be sure the camera is attached (0 79). Image area 25 3 Attach the lens.
User Manual
Page 67
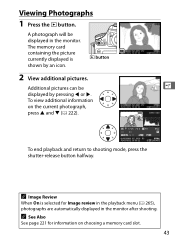
Additional pictures can be displayed in the monitor after shooting. s 1/12 NIKON D800 1/ 125 F5. 6 100 85mm 0, 0 100ND800 DSC_0001. JPG 10/01/2012 10: 06: 22 NORMAL 7360x4912 To end playback and return to shooting mode, press ... button halfway. A photograph will be displayed by an icon. To view additional information on choosing a memory card slot. 43 A See Also See page 221 for Image review in the playback menu (0 265), photographs are automatically displayed in the monitor. The memory card containing the picture currently displayed is selected for information...
Additional pictures can be displayed in the monitor after shooting. s 1/12 NIKON D800 1/ 125 F5. 6 100 85mm 0, 0 100ND800 DSC_0001. JPG 10/01/2012 10: 06: 22 NORMAL 7360x4912 To end playback and return to shooting mode, press ... button halfway. A photograph will be displayed by an icon. To view additional information on choosing a memory card slot. 43 A See Also See page 221 for Image review in the playback menu (0 265), photographs are automatically displayed in the monitor. The memory card containing the picture currently displayed is selected for information...
User Manual
Page 68
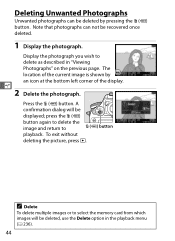
... be deleted, use the Delete option in "Viewing Photographs" on the previous page. A Delete To delete multiple images or to select the memory card from which images will be displayed; Press the O (Q) button. Note that photographs can be deleted by an icon at the ...button. Deleting Unwanted Photographs Unwanted photographs can not be recovered once deleted. 1 Display the photograph. press the O (Q) button again to delete the image and return to delete as described in the playback menu (0 236). 44 The location of the display. Display the photograph you wish to O...
... be deleted, use the Delete option in "Viewing Photographs" on the previous page. A Delete To delete multiple images or to select the memory card from which images will be displayed; Press the O (Q) button. Note that photographs can be deleted by an icon at the ...button. Deleting Unwanted Photographs Unwanted photographs can not be recovered once deleted. 1 Display the photograph. press the O (Q) button again to delete the image and return to delete as described in the playback menu (0 236). 44 The location of the display. Display the photograph you wish to O...
User Manual
Page 76
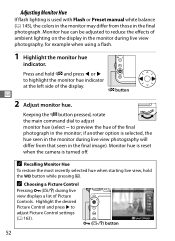
to preview the hue of ambient lighting on the display in the final image). Monitor hue is reset when the camera is turned off. Press and hold the U button while pressing a. if another option is selected, the hue seen ...
to preview the hue of ambient lighting on the display in the final image). Monitor hue is reset when the camera is turned off. Press and hold the U button while pressing a. if another option is selected, the hue seen ...
User Manual
Page 80
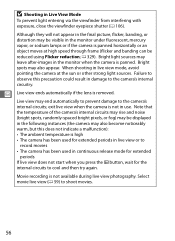
... circuitry. Note that the temperature of the camera's internal circuits may rise and noise (bright spots, randomly-spaced bright pixels, or fog) may leave after-images in use. D Shooting in continuous release mode for extended periods If live view does not start when you press the a button, wait for extended periods...
... circuitry. Note that the temperature of the camera's internal circuits may rise and noise (bright spots, randomly-spaced bright pixels, or fog) may leave after-images in use. D Shooting in continuous release mode for extended periods If live view does not start when you press the a button, wait for extended periods...
User Manual
Page 86
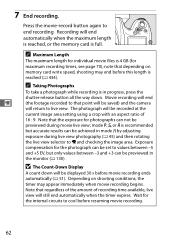
...will end y (the footage recorded to cool before this length is full. Press the movie-record button again to 1 and checking the image area. note that the exposure for the internal circuits to that regardless of the amount of 16 : 9. Depending on memory card write speed...point will end automatically when the maximum length is reached, or the memory card is reached (0 434). Recording will be recorded at the current image area setting using a crop with an aspect ratio of recording time available, live view; 7 End recording. A Taking Photographs To take a ...
...will end y (the footage recorded to cool before this length is full. Press the movie-record button again to 1 and checking the image area. note that the exposure for the internal circuits to that regardless of the amount of 16 : 9. Depending on memory card write speed...point will end automatically when the maximum length is reached, or the memory card is reached (0 434). Recording will be recorded at the current image area setting using a crop with an aspect ratio of recording time available, live view; 7 End recording. A Taking Photographs To take a ...
User Manual
Page 91
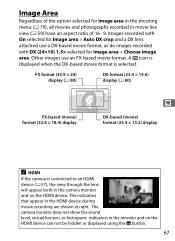
...monitor and on the HDMI device can not be hidden or displayed using the R button. 67 Other images use a DX-based movie format, as do images recorded with DX (24×16) 1.5× selected for Image area in the shooting menu (0 79), all movies and photographs recorded in the HDMI device during ... A HDMI If the camera is selected. The indicators that appear in movie live view (0 59) have an aspect ratio of the option selected for Image area > Choose image area. A a icon is displayed when the DX-based movie format is connected to an HDMI device (0 57), the view through the lens will ...
...monitor and on the HDMI device can not be hidden or displayed using the R button. 67 Other images use a DX-based movie format, as do images recorded with DX (24×16) 1.5× selected for Image area in the shooting menu (0 79), all movies and photographs recorded in the HDMI device during ... A HDMI If the camera is selected. The indicators that appear in movie live view (0 59) have an aspect ratio of the option selected for Image area > Choose image area. A a icon is displayed when the DX-based movie format is connected to an HDMI device (0 57), the view through the lens will ...
User Manual
Page 92
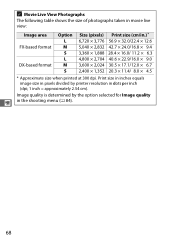
... Option Size (pixels) Print size (cm/in the shooting menu (0 84). 68 Print size in inches equals image size in pixels divided by the option selected for Image quality y in .) * L 6,720 × 3,776 56.9 × 32.0/22.4 × 12.6 FX-based format M 5,040 × 2,832 42.7 × 24.0/16.8 × 9.4 S 3,360 ×...
... Option Size (pixels) Print size (cm/in the shooting menu (0 84). 68 Print size in inches equals image size in pixels divided by the option selected for Image quality y in .) * L 6,720 × 3,776 56.9 × 32.0/22.4 × 12.6 FX-based format M 5,040 × 2,832 42.7 × 24.0/16.8 × 9.4 S 3,360 ×...

