
L20/19 User's Manual
Page 4
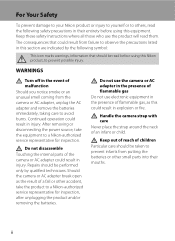
... result in injury. ii Repairs should be taken to prevent infants from putting the batteries or other accident, take the equipment to a Nikon-authorized service representative for inspection, after unplugging the product and/or removing the batteries. Handle the camera strap with care Never place the ... to observe the precautions listed in the event of a fall or other small parts into their entirety before using this Nikon product, to avoid burns. WARNINGS Turn off in this could result from the camera or AC adapter, unplug the AC adapter and remove the batteries immediately,...
... result in injury. ii Repairs should be taken to prevent infants from putting the batteries or other accident, take the equipment to a Nikon-authorized service representative for inspection, after unplugging the product and/or removing the batteries. Handle the camera strap with care Never place the ... to observe the precautions listed in the event of a fall or other small parts into their entirety before using this Nikon product, to avoid burns. WARNINGS Turn off in this could result from the camera or AC adapter, unplug the AC adapter and remove the batteries immediately,...
L20/19 User's Manual
Page 5
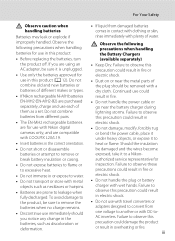
Do not combine old and new batteries or batteries of different makes or types. • If Nikon rechargeable Ni-MH batteries EN-MH2 (EN-MH2-B2) are purchased separately, charge and use with COOLPIX L20/L19. • Insert batteries in the correct orientation. • Do not short or disassemble batteries ...shock. • Dust on or near the battery charger during lightning storms. Failure to observe this product: • Before replacing the batteries, turn the product off. Failure to another or with wet hands. To avoid damage to the product, be sure to remove the batteries when no ...
Do not combine old and new batteries or batteries of different makes or types. • If Nikon rechargeable Ni-MH batteries EN-MH2 (EN-MH2-B2) are purchased separately, charge and use with COOLPIX L20/L19. • Insert batteries in the correct orientation. • Do not short or disassemble batteries ...shock. • Dust on or near the battery charger during lightning storms. Failure to observe this product: • Before replacing the batteries, turn the product off. Failure to another or with wet hands. To avoid damage to the product, be sure to remove the batteries when no ...
L20/19 User's Manual
Page 7
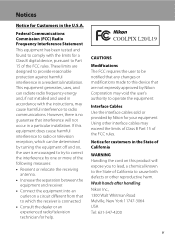
... installed and used in a residential installation. Notice for help. Wash hands after handling. Notices Notice for your equipment. Using other reproductive harm. Nikon Inc., 1300 Walt Whitman Road Melville, New York 11747-3064 USA Tel: 631-547-4200 v CAUTIONS Modifications The FCC requires the user to ...be determined by turning the equipment off and on, the user is no guarantee that are designed to comply with the instructions, may exceed the limits of Class ...
... installed and used in a residential installation. Notice for help. Wash hands after handling. Notices Notice for your equipment. Using other reproductive harm. Nikon Inc., 1300 Walt Whitman Road Melville, New York 11747-3064 USA Tel: 631-547-4200 v CAUTIONS Modifications The FCC requires the user to ...be determined by turning the equipment off and on, the user is no guarantee that are designed to comply with the instructions, may exceed the limits of Class ...
L20/19 User's Manual
Page 9
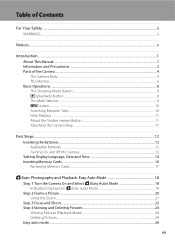
...Displays...11 About the Shutter-release Button...11 Attaching the Camera Strap ...11 First Steps ...12 Inserting the Batteries ...12 Applicable Batteries ...12 Turning On and Off the Camera...12 Setting Display Language, Date and Time 14 Inserting Memory Cards ...16 Removing Memory Cards...17 G Basic ...Photography and Playback: Easy Auto Mode 18 Step 1 Turn the Camera On and Select G (Easy Auto) Mode 18 Indicators Displayed in G (Easy auto) Mode 19 Step 2 Frame a Picture ...20 Using...
...Displays...11 About the Shutter-release Button...11 Attaching the Camera Strap ...11 First Steps ...12 Inserting the Batteries ...12 Applicable Batteries ...12 Turning On and Off the Camera...12 Setting Display Language, Date and Time 14 Inserting Memory Cards ...16 Removing Memory Cards...17 G Basic ...Photography and Playback: Easy Auto Mode 18 Step 1 Turn the Camera On and Select G (Easy Auto) Mode 18 Indicators Displayed in G (Easy auto) Mode 19 Step 2 Frame a Picture ...20 Using...

L20/19 User's Manual
Page 18
... 73 22 Continuous shooting mode 75 23 Self-timer indicator 30 *1 Differs according to the sections on each mode for details. 6 *2 K and K are displayed on L20, and z and y are displayed on L19. Shooting 4 5 23 1 2 3 22 10 7 21 8 20 19 +1.0 18 1/125 F3.1 999 6 9 10 11 ..., 33, 44, 53 a Number of the Camera Introduction The Monitor The following indicators may appear in the monitor during shooting and playback will turn off after a few seconds (A 89). The indicators and photo info displayed during shooting and playback (actual display varies with current camera settings). ...
... 73 22 Continuous shooting mode 75 23 Self-timer indicator 30 *1 Differs according to the sections on each mode for details. 6 *2 K and K are displayed on L20, and z and y are displayed on L19. Shooting 4 5 23 1 2 3 22 10 7 21 8 20 19 +1.0 18 1/125 F3.1 999 6 9 10 11 ..., 33, 44, 53 a Number of the Camera Introduction The Monitor The following indicators may appear in the monitor during shooting and playback will turn off after a few seconds (A 89). The indicators and photo info displayed during shooting and playback (actual display varies with current camera settings). ...
L20/19 User's Manual
Page 20
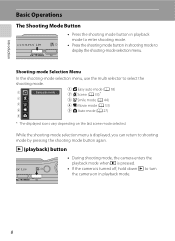
While the shooting-mode selection menu is turned off, hold down c to turn the camera on the last scene mode selected. c (playback) button • During shooting mode, the camera enters the playback mode when c is pressed. • If ...
While the shooting-mode selection menu is turned off, hold down c to turn the camera on the last scene mode selected. c (playback) button • During shooting mode, the camera enters the playback mode when c is pressed. • If ...
L20/19 User's Manual
Page 24
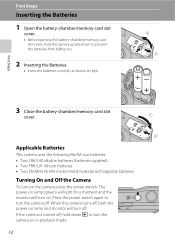
The power-on lamp (green) will light for a moment and the monitor will turn off , both the power-on lamp and monitor will turn on. Press the power switch again to turn the camera off , hold the camera upside down c to prevent the batteries from falling out. 2 Inserting the Batteries. &#...lithium batteries • Two EN-MH2 Ni-MH (nickel metal hydride) rechargeable batteries Turning On and Off the Camera To turn the camera on in playback mode. 12 If the camera is turned off . When the camera turns off . First Steps Inserting the Batteries 1 Open the battery-chamber/memory card slot...
The power-on lamp (green) will light for a moment and the monitor will turn off , both the power-on lamp and monitor will turn on. Press the power switch again to turn the camera off , hold the camera upside down c to prevent the batteries from falling out. 2 Inserting the Batteries. &#...lithium batteries • Two EN-MH2 Ni-MH (nickel metal hydride) rechargeable batteries Turning On and Off the Camera To turn the camera on in playback mode. 12 If the camera is turned off . When the camera turns off . First Steps Inserting the Batteries 1 Open the battery-chamber/memory card slot...
L20/19 User's Manual
Page 25
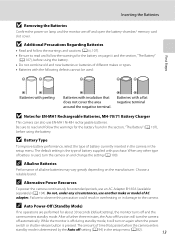
...Alkaline Batteries Performance of alkaline batteries may vary greatly depending on lamp and the monitor are performed for about 30 seconds (default setting), the monitor turns off and the camera enters standby mode. C Auto Power-Off (Standby Mode) If no operations are off setting (A 94) in the .... • Batteries with the following defects cannot be used , turn on and change the setting (A 100). After a further three minutes, the Auto off function will turn the camera off during standby mode, it will turn the camera on again when the power switch or shutter-release button...
...Alkaline Batteries Performance of alkaline batteries may vary greatly depending on lamp and the monitor are performed for about 30 seconds (default setting), the monitor turns off and the camera enters standby mode. C Auto Power-Off (Standby Mode) If no operations are off setting (A 94) in the .... • Batteries with the following defects cannot be used , turn on and change the setting (A 100). After a further three minutes, the Auto off function will turn the camera off during standby mode, it will turn the camera on again when the power switch or shutter-release button...
L20/19 User's Manual
Page 26
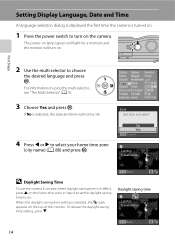
When the daylight saving time setting is selected, the date and time will turn on the camera. If No is selected, the W mark appears on the top of the monitor. The power-on lamp (green) will light for a moment ... the first time the camera is in effect, press H on the home time zone in an area where daylight saving time is turned on. 1 Press the power switch to turn on using the multi selector, see "The Multi Selector" (A 9). 3 Choose Yes and press k. For information on . Date Set time and date? First...
When the daylight saving time setting is selected, the date and time will turn on the camera. If No is selected, the W mark appears on the top of the monitor. The power-on lamp (green) will light for a moment ... the first time the camera is in effect, press H on the home time zone in an area where daylight saving time is turned on. 1 Press the power switch to turn on using the multi selector, see "The Multi Selector" (A 9). 3 Choose Yes and press k. For information on . Date Set time and date? First...

L20/19 User's Manual
Page 28
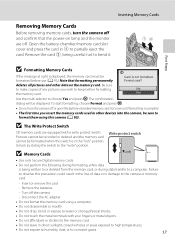
.... 1 Confirm the power-on removable Secure Digital (SD) memory cards (available separately) (A 104). If a memory card is correctly oriented. 16 Remove the memory card to turn off and open the battery-chamber/ memory card slot cover.
.... 1 Confirm the power-on removable Secure Digital (SD) memory cards (available separately) (A 104). If a memory card is correctly oriented. 16 Remove the memory card to turn off and open the battery-chamber/ memory card slot cover.
L20/19 User's Manual
Page 29
...in the "lock" position. Pictures cannot be recorded or deleted and the memory card cannot be formatted before formatting No the memory card. Turn off or open the battery-chamber/memory card slot cover until formatting is complete. • The first time you wish to the camera... not perform the following during data transfer to partially eject the card. To start formatting, choose Format and press k. • Do not turn the camera off and confirm that formatting permanently Card is displayed, the memory card must be formatted when this precaution could result in damage to...
...in the "lock" position. Pictures cannot be recorded or deleted and the memory card cannot be formatted before formatting No the memory card. Turn off or open the battery-chamber/memory card slot cover until formatting is complete. • The first time you wish to the camera... not perform the following during data transfer to partially eject the card. To start formatting, choose Format and press k. • Do not turn the camera off and confirm that formatting permanently Card is displayed, the memory card must be formatted when this precaution could result in damage to...
L20/19 User's Manual
Page 30
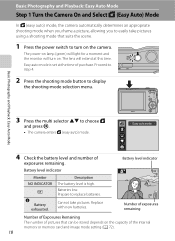
...level indicator Monitor NO INDICATOR B N Battery exhausted. Cannot take pictures using a shooting mode that can be stored depends on . The lens will turn on the camera. Easy auto mode 4 Check the battery level and number of pictures that suits the scene. 1 Press the power switch to... replace batteries. Basic Photography and Playback: Easy Auto Mode Step 1 Turn the Camera On and Select G (Easy Auto) Mode In G (easy auto) mode, the camera automatically determines an appropriate shooting mode when you frame...
...level indicator Monitor NO INDICATOR B N Battery exhausted. Cannot take pictures using a shooting mode that can be stored depends on . The lens will turn on the camera. Easy auto mode 4 Check the battery level and number of pictures that suits the scene. 1 Press the power switch to... replace batteries. Basic Photography and Playback: Easy Auto Mode Step 1 Turn the Camera On and Select G (Easy Auto) Mode In G (easy auto) mode, the camera automatically determines an appropriate shooting mode when you frame...

L20/19 User's Manual
Page 31
... shooting still pictures, shutter speed increases to reduce blurring. (This function is not displayed and pictures will be recorded to memory card. Step 1 Turn the Camera On and Select G (Easy Auto) Mode Indicators Displayed in G (Easy auto) Mode Shooting mode In easy auto mode, U, e,...increases shutter speed, the motion detection indicator turns green. 19 Basic Photography and Playback: Easy Auto Mode 7 Internal memory indicator Pictures will turn off ) (A 28). • The self-timer (A 30) and exposure compensation (A 32) are as follows: L20: K Normal (3648×2736) L19...
... shooting still pictures, shutter speed increases to reduce blurring. (This function is not displayed and pictures will be recorded to memory card. Step 1 Turn the Camera On and Select G (Easy Auto) Mode Indicators Displayed in G (Easy auto) Mode Shooting mode In easy auto mode, U, e,...increases shutter speed, the motion detection indicator turns green. 19 Basic Photography and Playback: Easy Auto Mode 7 Internal memory indicator Pictures will turn off ) (A 28). • The self-timer (A 30) and exposure compensation (A 32) are as follows: L20: K Normal (3648×2736) L19...

L20/19 User's Manual
Page 32
.... In this case, select another shooting mode. 20 • When digital zoom is above the lens. 2 Frame the picture. When taking pictures in "tall" orientation, turn the camera so that face will be in both hands, keeping your fingers and other faces will be framed by a single border. • When shooting...
.... In this case, select another shooting mode. 20 • When digital zoom is above the lens. 2 Frame the picture. When taking pictures in "tall" orientation, turn the camera so that face will be in both hands, keeping your fingers and other faces will be framed by a single border. • When shooting...

L20/19 User's Manual
Page 33
..., i.e. Maximum magnification of 4×. When zoom is being applied. Press f to indicate that interpolation is increased beyond V. Zoom indicator is initiated and the zoom indicator turns yellow to zoom out. The position of V moves to the right as interpolation to activate optical zoom. Step 2 Frame a Picture Zoom out Zoom in Basic...
..., i.e. Maximum magnification of 4×. When zoom is being applied. Press f to indicate that interpolation is increased beyond V. Zoom indicator is initiated and the zoom indicator turns yellow to zoom out. The position of V moves to the right as interpolation to activate optical zoom. Step 2 Frame a Picture Zoom out Zoom in Basic...
L20/19 User's Manual
Page 37
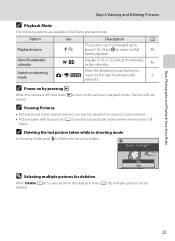
.... frame. No Yes D Selecting multiple pictures for deletion When Delete (A 81) is selected from the playback menu (A 78), multiple pictures can be enlarged up to turn on by pressing c When the camera is inserted. • Pictures taken with face priority (A 22) will not extend. C Deleting the last picture taken while in...
.... frame. No Yes D Selecting multiple pictures for deletion When Delete (A 81) is selected from the playback menu (A 78), multiple pictures can be enlarged up to turn on by pressing c When the camera is inserted. • Pictures taken with face priority (A 22) will not extend. C Deleting the last picture taken while in...
L20/19 User's Manual
Page 41
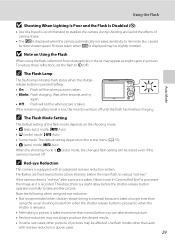
... picture. B Note on the scene menu (A 33). • A (auto) mode: U Auto When the shooting mode is A (auto) mode, the changed flash setting will turn off . Wait a few seconds and try again. • Off: Flash will fire when picture is taken. • Blinks: Flash charging. C Red-eye Reduction This camera... is equipped with red-eye reduction in above cases. 29 If the camera detects "red-eye" after a picture is taken, Nikon's own In-Camera Red Eye Fix processes the image as bright spots in the air may not always produce the desired results. • In some...
... picture. B Note on the scene menu (A 33). • A (auto) mode: U Auto When the shooting mode is A (auto) mode, the changed flash setting will turn off . Wait a few seconds and try again. • Off: Flash will fire when picture is taken. • Blinks: Flash charging. C Red-eye Reduction This camera... is equipped with red-eye reduction in above cases. 29 If the camera detects "red-eye" after a picture is taken, Nikon's own In-Camera Red Eye Fix processes the image as bright spots in the air may not always produce the desired results. • In some...

L20/19 User's Manual
Page 43
... take a picture at the current zoom position when F or the zoom indicator glows green. • The camera can be stored even if the camera is turned off. 31 C The Macro Mode Setting When the shooting mode is A (auto) mode, the macro mode setting will be used with easy auto mode (A 18...
... take a picture at the current zoom position when F or the zoom indicator glows green. • The camera can be stored even if the camera is turned off. 31 C The Macro Mode Setting When the shooting mode is A (auto) mode, the macro mode setting will be used with easy auto mode (A 18...

L20/19 User's Manual
Page 44
... will be cancelled. 3 The setting is applied. • The H icon is displayed in the monitor. 7 Auto Mode C Exposure Compensation Value When the shooting mode is turned off. Exposure compensation • Exposure compensation can be stored even if the camera is A (auto) mode (A 27), the exposure compensation setting will be set to...
... will be cancelled. 3 The setting is applied. • The H icon is displayed in the monitor. 7 Auto Mode C Exposure Compensation Value When the shooting mode is turned off. Exposure compensation • Exposure compensation can be stored even if the camera is A (auto) mode (A 27), the exposure compensation setting will be set to...
L20/19 User's Manual
Page 46
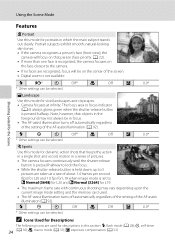
... m W n Off p Off o 0.0* * Other settings can be selected. c Landscape Use this mode for portraits in focus. • The AF-assist illumination turns off automatically regardless of the setting of the screen. • Digital zoom is pressed halfway. d Sports Use this section: m, flash mode (A 28); p, macro ...• If the camera recognizes a person's face (front view), the camera will be on the face closest to i Normal (3648) for L20 and R Normal (3264) for dynamic action shots that person (face priority: A 22). • If more than one face is recognized, the...
... m W n Off p Off o 0.0* * Other settings can be selected. c Landscape Use this mode for portraits in focus. • The AF-assist illumination turns off automatically regardless of the setting of the screen. • Digital zoom is pressed halfway. d Sports Use this section: m, flash mode (A 28); p, macro ...• If the camera recognizes a person's face (front view), the camera will be on the face closest to i Normal (3648) for L20 and R Normal (3264) for dynamic action shots that person (face priority: A 22). • If more than one face is recognized, the...


