
L18 / L16 User's Manual
Page 4
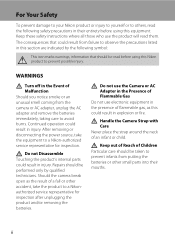
... using this section are indicated by qualified technicians. Do not Disassemble Touching the product's internal parts could result in injury. Handle the Camera Strap with Care Never place the strap around the neck of flammable gas, as the result of Flammable Gas Do not use the...the batteries or other accident, take the equipment to a Nikonauthorized service representative for inspection. For Your Safety To prevent damage to your Nikon product or injury to yourself or to others, read the following symbol: This icon marks warnings, information that could result from failure to...
... using this section are indicated by qualified technicians. Do not Disassemble Touching the product's internal parts could result in injury. Handle the Camera Strap with Care Never place the strap around the neck of flammable gas, as the result of Flammable Gas Do not use the...the batteries or other accident, take the equipment to a Nikonauthorized service representative for inspection. For Your Safety To prevent damage to your Nikon product or injury to yourself or to others, read the following symbol: This icon marks warnings, information that could result from failure to...
L18 / L16 User's Manual
Page 9
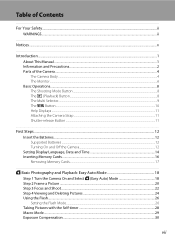
... About This Manual ...1 Information and Precautions...2 Parts of the Camera...4 The Camera Body ...4 The Monitor...6 Basic Operations...8 The Shooting Mode Button ...8 The c (Playback) Button...8 The Multi Selector...9 The d Button...10 Help Displays...11 Attaching the Camera Strap ...11 Shutter-release Button ...11 First Steps ...12 ...Date and Time 14 Inserting Memory Cards ...16 Removing Memory Cards...17 G Basic Photography and Playback: Easy Auto Mode 18 Step 1 Turn the Camera On and Select G (Easy Auto) Mode 18 Step 2 Frame a Picture ...20 Step 3 Focus and Shoot ...22 Step 4 Viewing and ...
... About This Manual ...1 Information and Precautions...2 Parts of the Camera...4 The Camera Body ...4 The Monitor...6 Basic Operations...8 The Shooting Mode Button ...8 The c (Playback) Button...8 The Multi Selector...9 The d Button...10 Help Displays...11 Attaching the Camera Strap ...11 Shutter-release Button ...11 First Steps ...12 ...Date and Time 14 Inserting Memory Cards ...16 Removing Memory Cards...17 G Basic Photography and Playback: Easy Auto Mode 18 Step 1 Turn the Camera On and Select G (Easy Auto) Mode 18 Step 2 Frame a Picture ...20 Step 3 Focus and Shoot ...22 Step 4 Viewing and ...

L18 / L16 User's Manual
Page 11
..., Computers and Printers 49 Connecting to a TV...49 Connecting to a Computer...50 Before Connecting the Camera...50 Transferring Pictures from the Camera to a Computer 51 Connecting to a Printer...54 Connecting the Camera and Printer...55 Printing Pictures One at a Time ...56 Printing Multiple Pictures ...57 Creating a DPOF... 62 Displaying the Shooting Menu...62 A Image Mode ...63 B White Balance...65 C Continuous ...67 F Color Options...68 Restrictions on Camera Settings ...69 Playback Options: The Playback Menu 70 Displaying the Playback Menu...70 b Slide Show...72 c Delete ...73 ix
..., Computers and Printers 49 Connecting to a TV...49 Connecting to a Computer...50 Before Connecting the Camera...50 Transferring Pictures from the Camera to a Computer 51 Connecting to a Printer...54 Connecting the Camera and Printer...55 Printing Pictures One at a Time ...56 Printing Multiple Pictures ...57 Creating a DPOF... 62 Displaying the Shooting Menu...62 A Image Mode ...63 B White Balance...65 C Continuous ...67 F Color Options...68 Restrictions on Camera Settings ...69 Playback Options: The Playback Menu 70 Displaying the Playback Menu...70 b Slide Show...72 c Delete ...73 ix
L18 / L16 User's Manual
Page 12
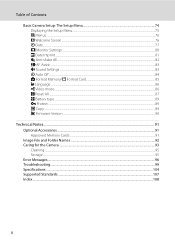
Table of Contents Basic Camera Setup: The Setup Menu 74 Displaying the Setup Menu...75 a Menus ...76 c Welcome Screen...76 d Date...77 e Monitor Settings ...80 f Date Imprint...81 U Anti-shake ... ...89 h Copy ...89 r Firmware Version ...90 Technical Notes...91 Optional Accessories ...91 Approved Memory Cards ...91 Image File and Folder Names...92 Caring for the Camera ...93 Cleaning ...95 Storage ...95 Error Messages...96 Troubleshooting...99 Specifications ...104 Supported Standards ...107 Index ...108 x
Table of Contents Basic Camera Setup: The Setup Menu 74 Displaying the Setup Menu...75 a Menus ...76 c Welcome Screen...76 d Date...77 e Monitor Settings ...80 f Date Imprint...81 U Anti-shake ... ...89 h Copy ...89 r Firmware Version ...90 Technical Notes...91 Optional Accessories ...91 Approved Memory Cards ...91 Image File and Folder Names...92 Caring for the Camera ...93 Cleaning ...95 Storage ...95 Error Messages...96 Troubleshooting...99 Specifications ...104 Supported Standards ...107 Index ...108 x

L18 / L16 User's Manual
Page 13
.... Read this camera can be stored in this manual, the product names "COOLPIX L18" and "COOLPIX L16" may sometimes be abbreviated as the "default setting." • The names of menu items displayed in the camera monitor, and the names of a Nikon COOLPIX L18/COOLPIX L16 digital camera. Symbols and ...Conventions To make it where all new pictures will be helpful when using the camera. Screen Samples In this manual, images are used to...
.... Read this camera can be stored in this manual, the product names "COOLPIX L18" and "COOLPIX L16" may sometimes be abbreviated as the "default setting." • The names of menu items displayed in the camera monitor, and the names of a Nikon COOLPIX L18/COOLPIX L16 digital camera. Symbols and ...Conventions To make it where all new pictures will be helpful when using the camera. Screen Samples In this manual, images are used to...
L18 / L16 User's Manual
Page 14
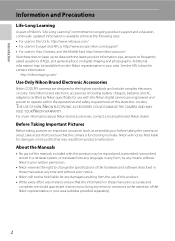
... may be held liable for contact information: http://nikonimaging.com/ Use Only Nikon Brand Electronic Accessories Nikon COOLPIX cameras are engineered and proven to operate within the operational and safety requirements of this product may result from the Nikon representative in your area. Only Nikon brand electronic accessories (including battery chargers, batteries and AC adapters) certified...
... may be held liable for contact information: http://nikonimaging.com/ Use Only Nikon Brand Electronic Accessories Nikon COOLPIX cameras are engineered and proven to operate within the operational and safety requirements of this product may result from the Nikon representative in your area. Only Nikon brand electronic accessories (including battery chargers, batteries and AC adapters) certified...
L18 / L16 User's Manual
Page 15
...issued by the government is prohibited. Unless the prior permission of the government was digitally copied or reproduced by means of a scanner, digital camera or other device may be punishable by law. • Items prohibited by law from being copied or reproduced Do not copy or reproduce ...or Reproduction Note that simply being in possession of material that deleting images or formatting data storage devices such as memory cards or builtin camera memory does not completely erase the original image data. Disposing of Data Storage Devices Please note that was obtained, the copying or ...
...issued by the government is prohibited. Unless the prior permission of the government was digitally copied or reproduced by means of a scanner, digital camera or other device may be punishable by law. • Items prohibited by law from being copied or reproduced Do not copy or reproduce ...or Reproduction Note that simply being in possession of material that deleting images or formatting data storage devices such as memory cards or builtin camera memory does not completely erase the original image data. Disposing of Data Storage Devices Please note that was obtained, the copying or ...
L18 / L16 User's Manual
Page 16
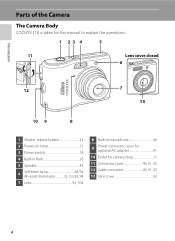
Introduction Parts of the Camera The Camera Body COOLPIX L18 is taken for this manual to explain the operations. 1 23 4 5 11 Lens cover closed 6 12 7 13 10 9 8 1 Shutter-release button 22 2 Power-on lamp 12 3 Power switch 18 4 Built-in flash 26 5 Speaker 48 6 Self-timer lamp 28, 94 AF-assist illuminator 23, 33, 83, 94 7 Lens 93, 104 8 Built-in microphone 46 9 Power connector cover for optional AC adapter 91 10 Eyelet for camera strap 11 11 Connector cover 49, 51, 55 12 Cable connector 49, 51, 55 13 Lens cover 93 4
Introduction Parts of the Camera The Camera Body COOLPIX L18 is taken for this manual to explain the operations. 1 23 4 5 11 Lens cover closed 6 12 7 13 10 9 8 1 Shutter-release button 22 2 Power-on lamp 12 3 Power switch 18 4 Built-in flash 26 5 Speaker 48 6 Self-timer lamp 28, 94 AF-assist illuminator 23, 33, 83, 94 7 Lens 93, 104 8 Built-in microphone 46 9 Power connector cover for optional AC adapter 91 10 Eyelet for camera strap 11 11 Connector cover 49, 51, 55 12 Cable connector 49, 51, 55 13 Lens cover 93 4
L18 / L16 User's Manual
Page 17
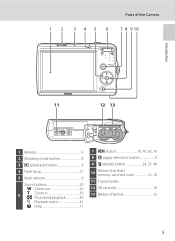
1 2 345 6 Parts of the Camera 7 8 9 10 Introduction 11 12 13 1 Monitor 6 2 Shooting mode button 8 3 c (playback) button 8 4 Flash lamp 27 5 Multi selector 9 Zoom buttons 20 f : Zoom out 20 6 g : Zoom in 20 h : Thumbnail playback 40 i : Playback zoom 41 j : Help 11 7 d button 10, 47, 62, 70 8 k (apply selection) button 9 9 l (delete) button 24, 25, 48 10 Battery-chamber/ memory card slot cover 12, 16 11 Tripod socket 12 SD card slot 16 13 Battery-chamber 12 5
1 2 345 6 Parts of the Camera 7 8 9 10 Introduction 11 12 13 1 Monitor 6 2 Shooting mode button 8 3 c (playback) button 8 4 Flash lamp 27 5 Multi selector 9 Zoom buttons 20 f : Zoom out 20 6 g : Zoom in 20 h : Thumbnail playback 40 i : Playback zoom 41 j : Help 11 7 d button 10, 47, 62, 70 8 k (apply selection) button 9 9 l (delete) button 24, 25, 48 10 Battery-chamber/ memory card slot cover 12, 16 11 Tripod socket 12 SD card slot 16 13 Battery-chamber 12 5
L18 / L16 User's Manual
Page 18
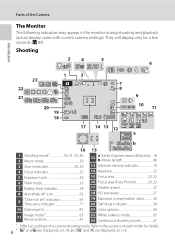
... options 68 11 Image mode2 63 Movie options 47 22 White balance mode 65 23 Continuous shooting mode 67 1 Differs according to the sections on L16. Refer to the current shooting mode. Shooting 24 5 6 1 3 23 7 22 8 21 20 19 18 10 +1.0 1/60 F2.8 999 9 10 11 17 16 1 Shooting mode1 ... AE icon 82 9 "Date not set" indicator 96 Time zone indicator 77 14 13 12 999 a 9999 59m59s b 15 9h59m59s 12 a Number of the Camera Introduction The Monitor The following indicators may appear in the monitor during shooting and playback (actual display varies with current...
... options 68 11 Image mode2 63 Movie options 47 22 White balance mode 65 23 Continuous shooting mode 67 1 Differs according to the sections on L16. Refer to the current shooting mode. Shooting 24 5 6 1 3 23 7 22 8 21 20 19 18 10 +1.0 1/60 F2.8 999 9 10 11 17 16 1 Shooting mode1 ... AE icon 82 9 "Date not set" indicator 96 Time zone indicator 77 14 13 12 999 a 9999 59m59s b 15 9h59m59s 12 a Number of the Camera Introduction The Monitor The following indicators may appear in the monitor during shooting and playback (actual display varies with current...
L18 / L16 User's Manual
Page 19
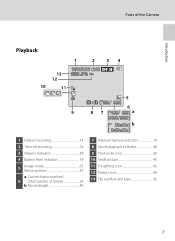
Introduction Parts of the Camera Playback 1 2 34 13 12 15/05/2008 12:00 9999.JPG 10 11 5 999 999 6 9 8 7 999 999 a 9999 9999 59m59s b 9h59m59s 1 Date of recording 14 2 Time of recording 14 3 Volume indicator 48 4 Battery level indicator 18 5 Image mode 63 Movie options 47 a Current frame number/ 6 total number of frames 24 b Movie length 48 7 Internal memory indicator 19 8 Movie playback indicator 48 9 Print-order icon 60 10 Small picture 45 11 D-Lighting icon 43 12 Protect icon 89 13 File number and type 92 7
Introduction Parts of the Camera Playback 1 2 34 13 12 15/05/2008 12:00 9999.JPG 10 11 5 999 999 6 9 8 7 999 999 a 9999 9999 59m59s b 9h59m59s 1 Date of recording 14 2 Time of recording 14 3 Volume indicator 48 4 Battery level indicator 18 5 Image mode 63 Movie options 47 a Current frame number/ 6 total number of frames 24 b Movie length 48 7 Internal memory indicator 19 8 Movie playback indicator 48 9 Print-order icon 60 10 Small picture 45 11 D-Lighting icon 43 12 Protect icon 89 13 File number and type 92 7
L18 / L16 User's Manual
Page 23
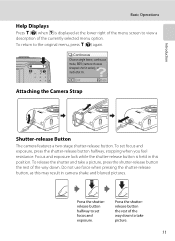
... feel resistance. Introduction Basic Operations Help Displays Press g (j) when M is held in this may result in series), or multi-shot 16. Exit Back Attaching the Camera Strap Shutter-release Button The camera features a two-stage shutter-release button. Continuous Choose single frame, continuous mode, BSS...
... feel resistance. Introduction Basic Operations Help Displays Press g (j) when M is held in this may result in series), or multi-shot 16. Exit Back Attaching the Camera Strap Shutter-release Button The camera features a two-stage shutter-release button. Continuous Choose single frame, continuous mode, BSS...
L18 / L16 User's Manual
Page 24
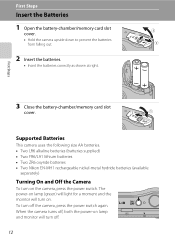
...Insert the batteries correctly as shown at right. 3 1 2 First Steps 3 Close the battery-chamber/memory card slot cover. 2 1 Supported Batteries This camera uses the following size AA batteries. • Two LR6 alkaline batteries (batteries supplied) • Two FR6/L91 lithium batteries • Two ZR6 oxyride batteries... • Two Nikon EN-MH1 rechargeable nickel-metal hydride batteries (available separately) Turning On and Off the Camera To turn on. The power-on lamp (green) will light for a moment and the ...
...Insert the batteries correctly as shown at right. 3 1 2 First Steps 3 Close the battery-chamber/memory card slot cover. 2 1 Supported Batteries This camera uses the following size AA batteries. • Two LR6 alkaline batteries (batteries supplied) • Two FR6/L91 lithium batteries • Two ZR6 oxyride batteries... • Two Nikon EN-MH1 rechargeable nickel-metal hydride batteries (available separately) Turning On and Off the Camera To turn on. The power-on lamp (green) will light for a moment and the ...
L18 / L16 User's Manual
Page 25
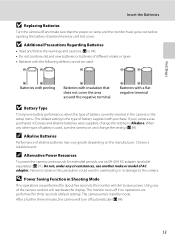
...any circumstances, use an EH-65A AC adapter (available separately) (A 91). Choose a reliable brand. D Power Saving Function in the setup menu. The camera enters standby mode. B Additional Precautions Regarding Batteries • Read and follow the warnings and cautions (A iii, 94). • Do not combine old ... periods, use another make sure that does not cover the area around the negative terminal. When any of the camera controls will turn the camera on and change the setting to observe this precaution could result in overheating or in Europe and alkaline batteries were ...
...any circumstances, use an EH-65A AC adapter (available separately) (A 91). Choose a reliable brand. D Power Saving Function in the setup menu. The camera enters standby mode. B Additional Precautions Regarding Batteries • Read and follow the warnings and cautions (A iii, 94). • Do not combine old ... periods, use another make sure that does not cover the area around the negative terminal. When any of the camera controls will turn the camera on and change the setting to observe this precaution could result in overheating or in Europe and alkaline batteries were ...
L18 / L16 User's Manual
Page 26
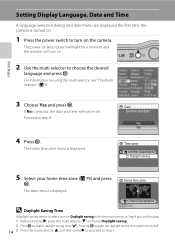
... the desired language and press k. First Steps Setting Display Language, Date and Time A language-selection dialog and date menu are displayed the first time the camera is selected, the date and time will turn on Daylight saving in the time zone menu in effect, turn on. 2 Use the multi selector to... turn on the camera. Date Set time and date? Home time zone D Daylight Saving Time London,Casablanca Back If daylight saving time is in Step 4 and set .
... the desired language and press k. First Steps Setting Display Language, Date and Time A language-selection dialog and date menu are displayed the first time the camera is selected, the date and time will turn on Daylight saving in the time zone menu in effect, turn on. 2 Use the multi selector to... turn on the camera. Date Set time and date? Home time zone D Daylight Saving Time London,Casablanca Back If daylight saving time is in Step 4 and set .
L18 / L16 User's Manual
Page 27
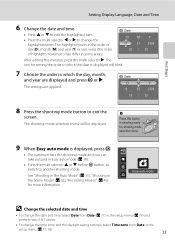
... change the highlighted item. Press this button in some areas). The row for setting the order in which the date is displayed, press k. • The camera enters the shooting mode and you can take pictures in Easy auto mode (A 18). • Press the multi selector H or I to edit the highlighted item...
... change the highlighted item. Press this button in some areas). The row for setting the order in which the date is displayed, press k. • The camera enters the shooting mode and you can take pictures in Easy auto mode (A 18). • Press the multi selector H or I to edit the highlighted item...
L18 / L16 User's Manual
Page 28
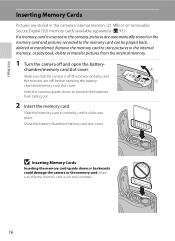
... memory (21 MB) or on the memory card and pictures recorded to prevent the batteries from the internal memory. 1 Turn the camera off ) before opening the batterychamber/memory card slot cover. Close the battery-chamber/memory card slot cover. 3 1 2 B Inserting Memory Cards Inserting the ...be played back, deleted or transferred. Make sure that the memory card is off (the power-on lamp and the monitor are stored in the camera, pictures are automatically stored on removable Secure Digital (SD) memory cards (available separately) (A 91). Remove the memory card to store pictures in ...
... memory (21 MB) or on the memory card and pictures recorded to prevent the batteries from the internal memory. 1 Turn the camera off ) before opening the batterychamber/memory card slot cover. Close the battery-chamber/memory card slot cover. 3 1 2 B Inserting Memory Cards Inserting the ...be played back, deleted or transferred. Make sure that the memory card is off (the power-on lamp and the monitor are stored in the camera, pictures are automatically stored on removable Secure Digital (SD) memory cards (available separately) (A 91). Remove the memory card to store pictures in ...
L18 / L16 User's Manual
Page 29
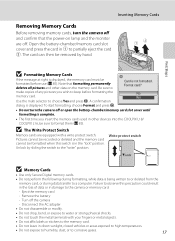
...the metal terminals with a write protect switch. No Yes • Do not turn the camera off and confirm that formatting permanently deletes all pictures and other devices into the COOLPIX L18/ COOLPIX L16, be formatted when this precaution could result in direct sunlight, closed vehicles or areas exposed ...If the message at right is not formatted. First Steps Inserting Memory Cards Removing Memory Cards Before removing memory cards, turn the camera off or open the battery-chamber/memory card slot cover until formatting is displayed. Open the battery-chamber/memory card slot cover ...
...the metal terminals with a write protect switch. No Yes • Do not turn the camera off and confirm that formatting permanently deletes all pictures and other devices into the COOLPIX L18/ COOLPIX L16, be formatted when this precaution could result in direct sunlight, closed vehicles or areas exposed ...If the message at right is not formatted. First Steps Inserting Memory Cards Removing Memory Cards Before removing memory cards, turn the camera off or open the battery-chamber/memory card slot cover until formatting is displayed. Open the battery-chamber/memory card slot cover ...
L18 / L16 User's Manual
Page 30
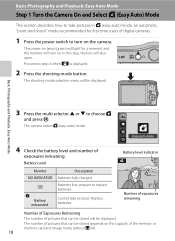
...setting (A 64). 18 In this step, the lens will light for first-time users of pictures that can be stored depends on the camera. Battery Level Battery level indicator Monitor NO INDICATOR B N Battery exhausted. prepare to choose G and press k. Basic Photography and Playback: ...Easy Auto Mode 3 Press the multi selector H or I to replace batteries. The number of digital cameras. 1 Press the power switch to turn on. Replace batteries. 7 Number of exposures remaining Number of Exposures Remaining The number of exposures remaining. ...
...setting (A 64). 18 In this step, the lens will light for first-time users of pictures that can be stored depends on the camera. Battery Level Battery level indicator Monitor NO INDICATOR B N Battery exhausted. prepare to choose G and press k. Basic Photography and Playback: ...Easy Auto Mode 3 Press the multi selector H or I to replace batteries. The number of digital cameras. 1 Press the power switch to turn on. Replace batteries. 7 Number of exposures remaining Number of Exposures Remaining The number of exposures remaining. ...
L18 / L16 User's Manual
Page 31
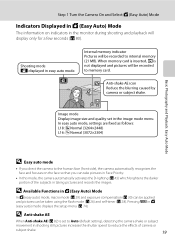
...Select G (Easy Auto) Mode Indicators Displayed in G (Easy Auto) Mode The information on the face so that you direct the camera to reduce the effects of the subjects in taking pictures and records the images. Internal memory indicator Pictures will be recorded to memory ... indicators in Face Priority. • In this mode, the camera automatically activates the D-lighting (A 43) which brightens the darker portion of camera or subject shake. 19 In easy auto mode, settings are fixed as follows: L18: y Normal (3264×2448) L16: d Normal (3072×2304) Basic Photography and Playback: ...
...Select G (Easy Auto) Mode Indicators Displayed in G (Easy Auto) Mode The information on the face so that you direct the camera to reduce the effects of the subjects in taking pictures and records the images. Internal memory indicator Pictures will be recorded to memory ... indicators in Face Priority. • In this mode, the camera automatically activates the D-lighting (A 43) which brightens the darker portion of camera or subject shake. 19 In easy auto mode, settings are fixed as follows: L18: y Normal (3264×2448) L16: d Normal (3072×2304) Basic Photography and Playback: ...


