
L12 User's Manual
Page 11
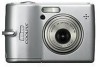
... Options: The Shooting Menu 76 Z Image Mode 77 d White Balance 79 q Continuous 81 A BSS ...82 d Color Options 83 Restrictions on Camera Settings 84 Playback Options: The Playback Menu 85 z Slide Show 87 A Delete ...88 D Protect 88 E Transfer Marking 89 L Copy...90 Basic... Camera Setup: The Setup Menu 91 R Menus...92 H Quick Startup 93 V Welcome Screen 93 W Date...94 Z Monitor Settings 97 f Date Imprint 98 b Vibration Reduction 100 u AF Assist 100 h Sound Settings ...
... Options: The Shooting Menu 76 Z Image Mode 77 d White Balance 79 q Continuous 81 A BSS ...82 d Color Options 83 Restrictions on Camera Settings 84 Playback Options: The Playback Menu 85 z Slide Show 87 A Delete ...88 D Protect 88 E Transfer Marking 89 L Copy...90 Basic... Camera Setup: The Setup Menu 91 R Menus...92 H Quick Startup 93 V Welcome Screen 93 W Date...94 Z Monitor Settings 97 f Date Imprint 98 b Vibration Reduction 100 u AF Assist 100 h Sound Settings ...
L12 User's Manual
Page 13
...of a Nikon COOLPIX L12 digital camera. This icon indicates that monitor icons can be more c information is available elsewhere in this camera can be read before using the camera. Notations • A Secure Digital (SD) memory card is referred to help you for your Nikon digital camera. This ...may differ from monitor display samples so that more clearly shown. Screen Samples In this manual, images are sometimes omitted from actual display. able memory cards. Illustrations and Screen Display Illustrations and text displays shown in the Quick Start Guide. ...
...of a Nikon COOLPIX L12 digital camera. This icon indicates that monitor icons can be more c information is available elsewhere in this camera can be read before using the camera. Notations • A Secure Digital (SD) memory card is referred to help you for your Nikon digital camera. This ...may differ from monitor display samples so that more clearly shown. Screen Samples In this manual, images are sometimes omitted from actual display. able memory cards. Illustrations and Screen Display Illustrations and text displays shown in the Quick Start Guide. ...
L12 User's Manual
Page 15
...business use by a company. The copying or reproduction of paper money, coins, or securities which are to be provided for the welcome screen (c 93). The copying or reproduction of stamps issued by the government and of certified documents stipulated by law is prohibited. • ...circulated in a foreign country is the user's responsibility. Disposing of Data Storage Devices Please note that has been digitally copied or reproduced by means of a scanner, digital camera or other device may be punishable by law. • Items prohibited by law from discarded storage devices using commercially...
...business use by a company. The copying or reproduction of paper money, coins, or securities which are to be provided for the welcome screen (c 93). The copying or reproduction of stamps issued by the government and of certified documents stipulated by law is prohibited. • ...circulated in a foreign country is the user's responsibility. Disposing of Data Storage Devices Please note that has been digitally copied or reproduced by means of a scanner, digital camera or other device may be punishable by law. • Items prohibited by law from discarded storage devices using commercially...
L12 User's Manual
Page 27
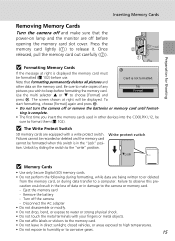
... 102). Format Use the multi selector G or H to the "write" position. Write protect switch j Memory Cards • Use only Secure Digital (SD) memory cards. • Do not perform the following during formatting, while data are being written to or deleted from the memory card, ... the COOLPIX L12, be displayed. Eject the memory card - Note that the power-on the memory card. Failure to a computer. Preparation for Shooting Inserting Memory Cards Removing Memory Cards Turn the camera off and make copies of data or in the "Lock" position. The screen shown at...
... 102). Format Use the multi selector G or H to the "write" position. Write protect switch j Memory Cards • Use only Secure Digital (SD) memory cards. • Do not perform the following during formatting, while data are being written to or deleted from the memory card, ... the COOLPIX L12, be displayed. Eject the memory card - Note that the power-on the memory card. Failure to a computer. Preparation for Shooting Inserting Memory Cards Removing Memory Cards Turn the camera off and make copies of data or in the "Lock" position. The screen shown at...

L12 User's Manual
Page 69
... recording Image mode Exit 3 Press G or H to choose [Voice recording] in the scene menu and press d. • The voice recording screen is displayed and playback starts. • Index markers show the index position added during recording. Date of recording Select sound file 001 15/05/2007... Voice Recordings 1 Press the multi selector G or H to choose the desired voice recording and press d. • The voice recording playback screen is displayed. • For information on using the multi selector, see "Multi Selector" (c 8). 2 Press i. • Currently saved voice recordings are listed...
... recording Image mode Exit 3 Press G or H to choose [Voice recording] in the scene menu and press d. • The voice recording screen is displayed and playback starts. • Index markers show the index position added during recording. Date of recording Select sound file 001 15/05/2007... Voice Recordings 1 Press the multi selector G or H to choose the desired voice recording and press d. • The voice recording playback screen is displayed. • For information on using the multi selector, see "Multi Selector" (c 8). 2 Press i. • Currently saved voice recordings are listed...

L12 User's Manual
Page 70
...recording. l Deleting Sound Files Press T during recording work only when playing back on the voice recording list screen to return to the Voice Recording Mode Press i on the camera. To delete the file, choose [Yes] and press d. Playback controls appear at the top of the ...playback. Playback resumes when d is released. S End playback and return to [Mass storage] (c 103) and copy the files directly from the camera. The following operations can be displayed. z Resume playback. s Skip to adjust playback volume. Voice Recording j Copying Voice Recordings to a computer ...
...recording. l Deleting Sound Files Press T during recording work only when playing back on the voice recording list screen to return to the Voice Recording Mode Press i on the camera. To delete the file, choose [Yes] and press d. Playback controls appear at the top of the ...playback. Playback resumes when d is released. S End playback and return to [Mass storage] (c 103) and copy the files directly from the camera. The following operations can be displayed. z Resume playback. s Skip to adjust playback volume. Voice Recording j Copying Voice Recordings to a computer ...
L12 User's Manual
Page 71
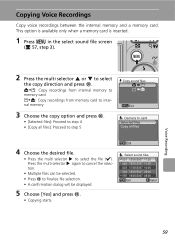
...memory 3 Choose the copy option and press d. • [Selected files]: Proceed to step 4 • [Copy all files]: Proceed to step 5 Copy sound files Exit Camera to card Selected files Copy all files 4 Choose the desired file. • Press the multi selector J to select the file (y). Copying Voice Recordings Copy voice... between the internal memory and a memory card. This option is available only when a memory card is inserted. 1 Press m in the select sound file screen (c 57, step 3). Exit Select sound files 001 15/05/2007 17:30 002 16/05/2007 11:00 003 17/05/2007 10:00 004...
...memory 3 Choose the copy option and press d. • [Selected files]: Proceed to step 4 • [Copy all files]: Proceed to step 5 Copy sound files Exit Camera to card Selected files Copy all files 4 Choose the desired file. • Press the multi selector J to select the file (y). Copying Voice Recordings Copy voice... between the internal memory and a memory card. This option is available only when a memory card is inserted. 1 Press m in the select sound file screen (c 57, step 3). Exit Select sound files 001 15/05/2007 17:30 002 16/05/2007 11:00 003 17/05/2007 10:00 004...
L12 User's Manual
Page 72
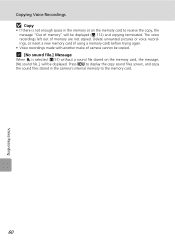
k [No sound file.] Message When q is not enough space in the camera's internal memory to receive the copy, the message "Out of memory" will be displayed. Press m to display the copy sound files screen, and copy the sound files stored in the memory or on the memory card, the message, [No sound file... there is selected (c 57) without a sound file stored on the memory card to the memory card. 60 Voice Recording The voice recordings left out of camera cannot be displayed (c 112) and copying terminated.
k [No sound file.] Message When q is not enough space in the camera's internal memory to receive the copy, the message "Out of memory" will be displayed. Press m to display the copy sound files screen, and copy the sound files stored in the memory or on the memory card, the message, [No sound file... there is selected (c 57) without a sound file stored on the memory card to the memory card. 60 Voice Recording The voice recordings left out of camera cannot be displayed (c 112) and copying terminated.

L12 User's Manual
Page 80
Then the print selection screen will be displayed in the camera monitor. Do not use force when connecting the USB cable. When disconnecting the USB cable, do not pull the connector at an angle. • Do not pinch the connector cover between the camera's USB connector and ... j Connecting the USB Cable • When connecting the USB cable, be displayed . USB PTP Mass storage 2 Turn the camera off. 3 Turn the printer on . • When connected correctly, the PictBridge start-up screen will be sure that the connectors are oriented correctly. Connecting to a Printer Connecting the...
Then the print selection screen will be displayed in the camera monitor. Do not use force when connecting the USB cable. When disconnecting the USB cable, do not pull the connector at an angle. • Do not pinch the connector cover between the camera's USB connector and ... j Connecting the USB Cable • When connecting the USB cable, be displayed . USB PTP Mass storage 2 Turn the camera off. 3 Turn the printer on . • When connected correctly, the PictBridge start-up screen will be sure that the connectors are oriented correctly. Connecting to a Printer Connecting the...

L12 User's Manual
Page 82
Printing 002/008 Cancel Current print/ total number of prints Printing Multiple Pictures After connecting the camera to the printer correctly (c 68), print pictures by following the procedure below. 1 When the print selection screen is complete. PictBridge Start print Copies Paper size Exit 7 Printing starts. • Monitor display returns to that shown in...
Printing 002/008 Cancel Current print/ total number of prints Printing Multiple Pictures After connecting the camera to the printer correctly (c 68), print pictures by following the procedure below. 1 When the print selection screen is complete. PictBridge Start print Copies Paper size Exit 7 Printing starts. • Monitor display returns to that shown in...
L12 User's Manual
Page 89
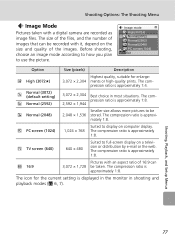
...Normal (3072) (default setting) d Normal (2592) 3,072 × 2,304 Best choice in shooting and playback modes (c 6, 7). h PC screen (1024) 1,024 × 768 Suited to use the picture. The compression ratio is approximately 1:8. The compression ratio is approximately 1:8. The compression ratio...592 × 1,944 e Normal (2048) Smaller size allows more pictures to full-screen display on the size and quality of the images. mately 1:8. B 16:9 Pictures with a digital camera are recorded as image files. Shooting Options: The Shooting Menu Z Image Mode Pictures ...
...Normal (3072) (default setting) d Normal (2592) 3,072 × 2,304 Best choice in shooting and playback modes (c 6, 7). h PC screen (1024) 1,024 × 768 Suited to use the picture. The compression ratio is approximately 1:8. The compression ratio is approximately 1:8. The compression ratio...592 × 1,944 e Normal (2048) Smaller size allows more pictures to full-screen display on the size and quality of the images. mately 1:8. B 16:9 Pictures with a digital camera are recorded as image files. Shooting Options: The Shooting Menu Z Image Mode Pictures ...

L12 User's Manual
Page 90
... memory card, even if the capacity for the memory card is the same. Image mode F High (3072A) E Normal (3072) d Normal (2592) e Normal (2048) h PC screen (1024) i TV screen (640) B 16:9 Internal memory (21 MB) 6 12 17 27 93 175 16 Memory card (256 MB) 70 140 195 305 1,045 1,965 185 Print...
... memory card, even if the capacity for the memory card is the same. Image mode F High (3072A) E Normal (3072) d Normal (2592) e Normal (2048) h PC screen (1024) i TV screen (640) B 16:9 Internal memory (21 MB) 6 12 17 27 93 175 16 Memory card (256 MB) 70 140 195 305 1,045 1,965 185 Print...

L12 User's Manual
Page 98
.... 1 Press the multi selector I or J to choose a picture. • Only one picture can be selected for the welcome screen (c 93), the screen shown at right is displayed. Protect Back ON/OFF Protect Back ON/OFF Protect Back ON/OFF Done Shooting, Playback, and Setup Menus...print set (c 73), deletion (c 88), protection from deletion (c 88), transfer (c 89), copying between internal memory and the memory card (c 90), or for [Welcome screen]. Proceed to step 3. • Press v (k) to switch to full-frame playback. • Press t (j) to switch back to thumbnail display. • For ...
.... 1 Press the multi selector I or J to choose a picture. • Only one picture can be selected for the welcome screen (c 93), the screen shown at right is displayed. Protect Back ON/OFF Protect Back ON/OFF Protect Back ON/OFF Done Shooting, Playback, and Setup Menus...print set (c 73), deletion (c 88), protection from deletion (c 88), transfer (c 89), copying between internal memory and the memory card (c 90), or for [Welcome screen]. Proceed to step 3. • Press v (k) to switch to full-frame playback. • Press t (j) to switch back to thumbnail display. • For ...

L12 User's Manual
Page 100
...( excluded) No Yes MENU Exit k Notes on Deletion • Once deleted, pictures cannot be deleted. If a memory card is inserted in the camera, pictures in the confirmation dialog to a computer before deletion. • Pictures marked with the D icon are recognized by the Q icon (c 42)...deletion. Delete Erase selected images Erase all pictures stored in the internal memory or on using this function. back mode and the erase selected images screen, and by the D icon (c 7) in 4- or 9-picture thumbnail playback mode. 88 C Erase all images Delete all images MENU Exit...
...( excluded) No Yes MENU Exit k Notes on Deletion • Once deleted, pictures cannot be deleted. If a memory card is inserted in the camera, pictures in the confirmation dialog to a computer before deletion. • Pictures marked with the D icon are recognized by the Q icon (c 42)...deletion. Delete Erase selected images Erase all pictures stored in the internal memory or on using this function. back mode and the erase selected images screen, and by the D icon (c 7) in 4- or 9-picture thumbnail playback mode. 88 C Erase all images Delete all images MENU Exit...

L12 User's Manual
Page 102
...images All images Shooting, Playback, and Setup Menus Exit j Notes on Copying Pictures • If there is JPEG, AVI, or WAV. • The camera may be displayed. If a new folder cannot be displayed. To copy all the pictures in ascending order starting form DSCN0033. • When pictures are copied... file format of images that can be displayed. era or that were created with the same file numbers. Press m to display the copy option screen, and copy the pictures stored in the internal memory or memory card. k File Names of cam- First, select from the largest number existing ...
...images All images Shooting, Playback, and Setup Menus Exit j Notes on Copying Pictures • If there is JPEG, AVI, or WAV. • The camera may be displayed. If a new folder cannot be displayed. To copy all the pictures in ascending order starting form DSCN0033. • When pictures are copied... file format of images that can be displayed. era or that were created with the same file numbers. Press m to display the copy option screen, and copy the pictures stored in the internal memory or memory card. k File Names of cam- First, select from the largest number existing ...

L12 User's Manual
Page 103
... or disable welcome screen and start-up sound. Welcome screen Select screen displayed when camera is turned on pictures. Date Set camera clock and choose home and destination time zones. AF assist Enable or disable AF assist illumination. Auto off Set time before camera enters standby mode to default values. Reset all Restore camera settings to save...
... or disable welcome screen and start-up sound. Welcome screen Select screen displayed when camera is turned on pictures. Date Set camera clock and choose home and destination time zones. AF assist Enable or disable AF assist illumination. Auto off Set time before camera enters standby mode to default values. Reset all Restore camera settings to save...

L12 User's Manual
Page 104
... use the multi selector (c 8). • To exit the setup menu, press m. Date -- Set up Shooting menu Menus Quick startup Welcome screen -- Exit Text Menus Exit Icon Menus Text Icons MENU Exit Menu names Shooting, Playback, and Setup Menus 92 Set up Shooting menu Menus Quick... menu. Shooting menu Set up Image mode White balance Continuous BSS Exit Displaying the menu screen Shooting menu Set up Image mode White balance Continuous BSS MENU Exit ? Date -- Basic Camera Setup: The Setup Menu Displaying the Setup Menu Choose [Set up] in the shooting menu...
... use the multi selector (c 8). • To exit the setup menu, press m. Date -- Set up Shooting menu Menus Quick startup Welcome screen -- Exit Text Menus Exit Icon Menus Text Icons MENU Exit Menu names Shooting, Playback, and Setup Menus 92 Set up Shooting menu Menus Quick... menu. Shooting menu Set up Image mode White balance Continuous BSS Exit Displaying the menu screen Shooting menu Set up Image mode White balance Continuous BSS MENU Exit ? Date -- Basic Camera Setup: The Setup Menu Displaying the Setup Menu Choose [Set up] in the shooting menu...
L12 User's Manual
Page 105
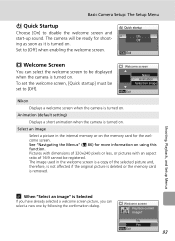
... original picture is deleted or the memory card is a copy of 16:9 cannot be registered. No Yes MENU Exit 93 Welcome screen Nikon Animation Select an image Exit Nikon Displays a welcome screen when the camera is turned on . Shooting, Playback, and Setup Menus k When "Select an image" is turned on . Quick startup On Off Exit...
... original picture is deleted or the memory card is a copy of 16:9 cannot be registered. No Yes MENU Exit 93 Welcome screen Nikon Animation Select an image Exit Nikon Displays a welcome screen when the camera is turned on . Shooting, Playback, and Setup Menus k When "Select an image" is turned on . Quick startup On Off Exit...

L12 User's Manual
Page 106
... and Setup Menus 94 Setting Travel Destination Time Zone 1 Press the multi selector G or H to choose [Time zone] and press d. • The [Time zone] screen is displayed. • For information on using the multi selector, see "Multi Selector" (c 8). 2 Press G or H to choose Y and press d. • The... time difference (c 96) is displayed. Time zone Exit Date Set camera clock to choose [DaylightSaving] and press d then press G. Date 15/05/2007 15:30 Date -- Basic Camera Setup: The Setup Menu W Date Set the camera clock and choose home and travel destination time zones. Date 15/05...
... and Setup Menus 94 Setting Travel Destination Time Zone 1 Press the multi selector G or H to choose [Time zone] and press d. • The [Time zone] screen is displayed. • For information on using the multi selector, see "Multi Selector" (c 8). 2 Press G or H to choose Y and press d. • The... time difference (c 96) is displayed. Time zone Exit Date Set camera clock to choose [DaylightSaving] and press d then press G. Date 15/05/2007 15:30 Date -- Basic Camera Setup: The Setup Menu W Date Set the camera clock and choose home and travel destination time zones. Date 15/05...

L12 User's Manual
Page 110
...• Imprinted dates form a permanent part of image data and cannot be deleted. • Dates imprinted at an image mode (c 77) setting of [TV screen(640)] may be printed if [Date] or [Info] is selected in the print set When using the format selected in the [Date] item (c 12, ...94). d Date counter c 99 Time stamp shows number of days between [Date imprint] and [Print set]. 98 Basic Camera Setup: The Setup Menu f Date Imprint Date and time of recording can be imprinted on pictures for more information on pictures. k Date imprint and Print...
...• Imprinted dates form a permanent part of image data and cannot be deleted. • Dates imprinted at an image mode (c 77) setting of [TV screen(640)] may be printed if [Date] or [Info] is selected in the print set When using the format selected in the [Date] item (c 12, ...94). d Date counter c 99 Time stamp shows number of days between [Date imprint] and [Print set]. 98 Basic Camera Setup: The Setup Menu f Date Imprint Date and time of recording can be imprinted on pictures for more information on pictures. k Date imprint and Print...


