
User Manual
Page 13
Before You Begin Parts of the Camera Mode dial (Q 6) Green (AF) lamp Red (!) lamp (Q 20) (Q 20) Viewfinder (Q 18) Monitor (Q 5, 18) Zoom (l/O) buttons (Q 18) Menu button (Q 77, 87) Multi selector (!/Y/&/V) (Q 7) u(delete) button (Q 22, 23) x(play) button (Q 22) Speaker Battery-chamber cover (Q 8) Battery-chamber Tripod socket (Q 25, 26) cover latch (Q 8) Interface connector cover (Q 51, 53) Interface connector cover USB connector (Q 53, 59) Audio/video (AV) out connector (Q 51) 3
Before You Begin Parts of the Camera Mode dial (Q 6) Green (AF) lamp Red (!) lamp (Q 20) (Q 20) Viewfinder (Q 18) Monitor (Q 5, 18) Zoom (l/O) buttons (Q 18) Menu button (Q 77, 87) Multi selector (!/Y/&/V) (Q 7) u(delete) button (Q 22, 23) x(play) button (Q 22) Speaker Battery-chamber cover (Q 8) Battery-chamber Tripod socket (Q 25, 26) cover latch (Q 8) Interface connector cover (Q 51, 53) Interface connector cover USB connector (Q 53, 59) Audio/video (AV) out connector (Q 51) 3
User Manual
Page 35
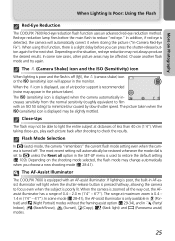
... by slow shutter speed. Choose another flash mode and try again. The AF-Assist Illuminator The COOLPIX 7600 is detected, the camera will automatically correct it when storing the picture ("In-Camera Red-Eye Fix"). Depending on the shooting mode selected, the flash mode may change automatically when ...you can press the shutter-release button again for the next shot. When the 2 icon is displayed, use of a tripod or support is displayed when the camera automatically in the picture taken). The 3 (sensitivity) icon is recommended (noise may be restored whenever the mode dial is ...
... by slow shutter speed. Choose another flash mode and try again. The AF-Assist Illuminator The COOLPIX 7600 is detected, the camera will automatically correct it when storing the picture ("In-Camera Red-Eye Fix"). Depending on the shooting mode selected, the flash mode may change automatically when ...you can press the shutter-release button again for the next shot. When the 2 icon is displayed, use of a tripod or support is displayed when the camera automatically in the picture taken). The 3 (sensitivity) icon is recommended (noise may be restored whenever the mode dial is ...

User Manual
Page 36
...shutter-release button is taken, press the shutter-release button. Countdown timer shows number of the camera will blink until picture is about to be used to allow you should either mount the camera on a tripod (recommended) or rest it on the front of seconds remaining until one second before the ...Display Self-timer menu. 3 Self-timer OFF ON OFF : Confirm Highlight ON (to prevent close-up or low-light shots from being blurred by the camera move- This can be released. tion, you to appear in your own pictures or to exit without changing mode, wait for a while). 4 10 ...
...shutter-release button is taken, press the shutter-release button. Countdown timer shows number of the camera will blink until picture is about to be used to allow you should either mount the camera on a tripod (recommended) or rest it on the front of seconds remaining until one second before the ...Display Self-timer menu. 3 Self-timer OFF ON OFF : Confirm Highlight ON (to prevent close-up or low-light shots from being blurred by the camera move- This can be released. tion, you to appear in your own pictures or to exit without changing mode, wait for a while). 4 10 ...

User Manual
Page 44
to prevent blurring, mount the camera on a tripod or rest it provides a natural balance between the main subject and the background. More on a flat, stable surface. For more information on framing assist options, ...
to prevent blurring, mount the camera on a tripod or rest it provides a natural balance between the main subject and the background. More on a flat, stable surface. For more information on framing assist options, ...

User Manual
Page 46
In this section, the precautions that you can take to avoid blur are indicated by stars: œ hold camera in both hands and brace elbows against your body. œœ use a tripod or rest the camera on Photography e Scene Mode The following scenes are available: BPARTY/INDOOR Use for shots that include details of...
In this section, the precautions that you can take to avoid blur are indicated by stars: œ hold camera in both hands and brace elbows against your body. œœ use a tripod or rest the camera on Photography e Scene Mode The following scenes are available: BPARTY/INDOOR Use for shots that include details of...
User Manual
Page 51
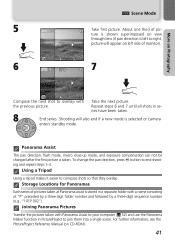
...The pan direction, flash mode, macro close-up mode, and exposure compensation can not be changed after the first picture is selected or camera enters standby mode. Storage Locations for Panoramas Each series of pictures taken at Panorama assist is left to right, picture will also end ... by a three-digit sequence number (e.g., "101P 002"). ries have been taken. 8 End series. Repeat steps 6 and 7 until all shots in a separate folder with Take the next picture. To change the pan direction, press ^ button to join them into a single scene. Using a Tripod Using a tripod makes it easier ...
...The pan direction, flash mode, macro close-up mode, and exposure compensation can not be changed after the first picture is selected or camera enters standby mode. Storage Locations for Panoramas Each series of pictures taken at Panorama assist is left to right, picture will also end ... by a three-digit sequence number (e.g., "101P 002"). ries have been taken. 8 End series. Repeat steps 6 and 7 until all shots in a separate folder with Take the next picture. To change the pan direction, press ^ button to join them into a single scene. Using a Tripod Using a tripod makes it easier ...

User Manual
Page 126
... to delete. No Yes : Confirm WARNING ! ! Camera shake warning can be blurred. Camera turned off and replace card. 104 21 11 106, 10-11 Technical Notes 116 Write-protect switch is complete. position. using tripod, by holding camera in both hands with them. PLEASE WAIT FOR THE... CAMERA TO FINISH RECORDING < MEMORY CARD IS WRITE PROTECTED CARD IS NOT FORMATTED / Format No Recorded blurred....
... to delete. No Yes : Confirm WARNING ! ! Camera shake warning can be blurred. Camera turned off and replace card. 104 21 11 106, 10-11 Technical Notes 116 Write-protect switch is complete. position. using tripod, by holding camera in both hands with them. PLEASE WAIT FOR THE... CAMERA TO FINISH RECORDING < MEMORY CARD IS WRITE PROTECTED CARD IS NOT FORMATTED / Format No Recorded blurred....

User Manual
Page 131
...8226; Exposure compensation is not set to N (landscape assist), j (sports assist), or W (movie), or to focus. 20 20 • Camera shook during shot. Blurring caused by camera shake can be reduced by : Š Using the flash Š m (night portrait assist) mode is selected or E DUSK/ DAWN or...Best Shot Selector (BSS) 85 Š Using the self-timer with a tripod 26 Randomly-spaced bright pixels ("noise") appear in focus area when shutter-release button was pressed halfway. • Green (AF) lamp flickers: camera unable to e (scene) mode with any of focus • Subject ...
...8226; Exposure compensation is not set to N (landscape assist), j (sports assist), or W (movie), or to focus. 20 20 • Camera shook during shot. Blurring caused by camera shake can be reduced by : Š Using the flash Š m (night portrait assist) mode is selected or E DUSK/ DAWN or...Best Shot Selector (BSS) 85 Š Using the self-timer with a tripod 26 Randomly-spaced bright pixels ("noise") appear in focus area when shutter-release button was pressed halfway. • Green (AF) lamp flickers: camera unable to e (scene) mode with any of focus • Subject ...

User Manual
Page 136
... Shooting menu, 77-86 Shutter-release button, 2, 20 Shutter-release delay, see Zoom Z Zoom, 18-19 digital, 18-19, 71 indicator, 18 optical, 18-19 playback, 49 Zoom buttons, 3, 18, 48-49 126... pic., 69 Smear, 114 Sound settings, 103 Speaker, 3 Speedlight, see Flash Standby mode, 13, 105 Strap, camera, i, 2 SUNSET, 36 Support information, 1 T T button, see Zoom buttons Telephoto, see Zoom Television, 51 ..., 79 Thumbnail playback, 48 Time zone, 14-15, 99 Transfer marking pictures for, 9293, 109 Transfer marking, 92 Tripod, 3 U USB, 52-54, 59, 108 cable (UC-E6), 52, 53, 59 connector, 3 V VCR...
... Shooting menu, 77-86 Shutter-release button, 2, 20 Shutter-release delay, see Zoom Z Zoom, 18-19 digital, 18-19, 71 indicator, 18 optical, 18-19 playback, 49 Zoom buttons, 3, 18, 48-49 126... pic., 69 Smear, 114 Sound settings, 103 Speaker, 3 Speedlight, see Flash Standby mode, 13, 105 Strap, camera, i, 2 SUNSET, 36 Support information, 1 T T button, see Zoom buttons Telephoto, see Zoom Television, 51 ..., 79 Thumbnail playback, 48 Time zone, 14-15, 99 Transfer marking pictures for, 9293, 109 Transfer marking, 92 Tripod, 3 U USB, 52-54, 59, 108 cable (UC-E6), 52, 53, 59 connector, 3 V VCR...