User Manual
Page 5
... equipment. Observe due caution when removing memory cards from the subject. Particular care should be observed if photographing infants, when the flash should be no charge remains. • Immediately after use only the cables provided or sold by Nikon for an extended period, the batteries ...to remove the battery when no less than one meter (39˝) from the camera. CD-ROMs The CD-ROMs on an audio CD player could cause temporary visual impairment. Removing memory cards Memory cards may become hot during use immediately should be sure to cool. • Discontinue ...
... equipment. Observe due caution when removing memory cards from the subject. Particular care should be observed if photographing infants, when the flash should be no charge remains. • Immediately after use only the cables provided or sold by Nikon for an extended period, the batteries ...to remove the battery when no less than one meter (39˝) from the camera. CD-ROMs The CD-ROMs on an audio CD player could cause temporary visual impairment. Removing memory cards Memory cards may become hot during use immediately should be sure to cool. • Discontinue ...
User Manual
Page 8
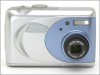
...Parts of the Camera and Their Functions 4 Where to Find It-Parts of the COOLPIX 2000 4 How to Use It-Camera Controls and Displays 6 First Steps: Getting Ready to Use Your Camera 9 Step 1-Attach the Camera Strap 9 Step 2-Insert Batteries 9 Step 3-Insert the Memory Card 10 Step 4-...Nikon View 5 30 Making the Connection: Connecting to Your Computer 32 Connecting to a Television or VCR: Television Playback 38 Beyond Point-and-Shoot: Adjusting Camera Settings 39 Focus-Mode Selection: The Button 40 Delaying Shutter Release: Self-Timer Mode 41 Framing Pictures: Optical and Digital...
...Parts of the Camera and Their Functions 4 Where to Find It-Parts of the COOLPIX 2000 4 How to Use It-Camera Controls and Displays 6 First Steps: Getting Ready to Use Your Camera 9 Step 1-Attach the Camera Strap 9 Step 2-Insert Batteries 9 Step 3-Insert the Memory Card 10 Step 4-...Nikon View 5 30 Making the Connection: Connecting to Your Computer 32 Connecting to a Television or VCR: Television Playback 38 Beyond Point-and-Shoot: Adjusting Camera Settings 39 Focus-Mode Selection: The Button 40 Delaying Shutter Release: Self-Timer Mode 41 Framing Pictures: Optical and Digital...

User Manual
Page 9
... Safeguarding Valuable Pictures: Protect 70 Ordering Prints: Print Set 71 Marking All Pictures for Transfer: Auto Transfer 73 The Setup Menu: Camera Setup 74 Adjusting Monitor Brightness: Brightness 75 Formatting Memory Cards: CF Card Format 75 Conserving Battery Power: Auto Off 76 Choosing a Video Standard: Video Mode 76 Choosing a USB Protocol: USB 77 Technical...
... Safeguarding Valuable Pictures: Protect 70 Ordering Prints: Print Set 71 Marking All Pictures for Transfer: Auto Transfer 73 The Setup Menu: Camera Setup 74 Adjusting Monitor Brightness: Brightness 75 Formatting Memory Cards: CF Card Format 75 Conserving Battery Power: Auto Off 76 Choosing a Video Standard: Video Mode 76 Choosing a USB Protocol: USB 77 Technical...
User Manual
Page 11
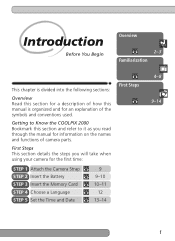
...manual for information on the names and functions of the symbols and conventions used. Getting to Know the COOLPIX 2000 Bookmark this manual is organized and for an explanation of camera parts. Introduction Before You Begin Overview 2-3 Familiarization This chapter is divided into the following sections: Overview ... a description of how this section and refer to it as you will take when using your camera for the first time: STEP 1 Attach the Camera Strap STEP 2 Insert the Battery STEP 3 Insert the Memory Card STEP 4 Choose a Language STEP 5 Set the Time and Date 9 9-10 10-11 12...
...manual for information on the names and functions of the symbols and conventions used. Getting to Know the COOLPIX 2000 Bookmark this manual is organized and for an explanation of camera parts. Introduction Before You Begin Overview 2-3 Familiarization This chapter is divided into the following sections: Overview ... a description of how this section and refer to it as you will take when using your camera for the first time: STEP 1 Attach the Camera Strap STEP 2 Insert the Battery STEP 3 Insert the Memory Card STEP 4 Choose a Language STEP 5 Set the Time and Date 9 9-10 10-11 12...
User Manual
Page 15
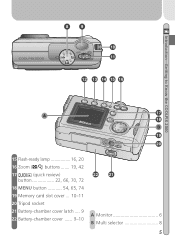
Introduction-Getting to Know the COOLPIX 2000 8 9 10 11 12 13 14 15 16 17 A 18 B 19 20 15 Flash-ready lamp 16, 20 16 Zoom ( / ) buttons ....... 19, 42 17 QUICK (quick review) button 22, 66, 70, 72 18 MENU button 54, 65, 74 19 Memory card slot cover ... 10-11 20 Tripod socket 21 Battery-chamber cover latch .... 9 22 Battery-chamber cover ...... 9-10 22 21 A Monitor 6 B Multi selector 8 5
Introduction-Getting to Know the COOLPIX 2000 8 9 10 11 12 13 14 15 16 17 A 18 B 19 20 15 Flash-ready lamp 16, 20 16 Zoom ( / ) buttons ....... 19, 42 17 QUICK (quick review) button 22, 66, 70, 72 18 MENU button 54, 65, 74 19 Memory card slot cover ... 10-11 20 Tripod socket 21 Battery-chamber cover latch .... 9 22 Battery-chamber cover ...... 9-10 22 21 A Monitor 6 B Multi selector 8 5
User Manual
Page 20
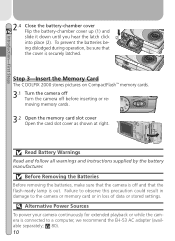
Step 3-Insert the Memory Card The COOLPIX 2000 stores pictures on CompactFlash™ memory cards. 3.1 Turn the camera off Turn the camera off and that the flash-ready lamp is off before inserting or removing memory cards. 3.2 Open the memory card slot cover Open the card slot cover as shown at right. Failure to observe this precaution could result in damage to a computer, we...
Step 3-Insert the Memory Card The COOLPIX 2000 stores pictures on CompactFlash™ memory cards. 3.1 Turn the camera off Turn the camera off and that the flash-ready lamp is off before inserting or removing memory cards. 3.2 Open the memory card slot cover Open the card slot cover as shown at right. Failure to observe this precaution could result in damage to a computer, we...

User Manual
Page 21
... memory card slot cover. The memory card supplied with the monitor toward you, slide the card in the contacts at shipment. Other memory cards, however, must be formatted before closing the cover may partially eject the card, causing errors when the camera is firmly seated in face up until it is turned on formatting memory cards, see "The Setup Menu: Formatting Memory Cards...
... memory card slot cover. The memory card supplied with the monitor toward you, slide the card in the contacts at shipment. Other memory cards, however, must be formatted before closing the cover may partially eject the card, causing errors when the camera is firmly seated in face up until it is turned on formatting memory cards, see "The Setup Menu: Formatting Memory Cards...
User Manual
Page 27
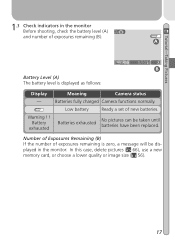
... a set of exposures remaining (B). Number of Exposures Remaining (B) If the number of exposures remaining is displayed as follows: 1632 FINE AUTO 8 B Display Meaning Camera status - Warning ! ! In this case, delete pictures ( 66), use a new memory card, or choose a lower quality or image size ( 56). 17 Tutorial-Taking Pictures 1.3 Check indicators in the monitor.
... a set of exposures remaining (B). Number of Exposures Remaining (B) If the number of exposures remaining is displayed as follows: 1632 FINE AUTO 8 B Display Meaning Camera status - Warning ! ! In this case, delete pictures ( 66), use a new memory card, or choose a lower quality or image size ( 56). 17 Tutorial-Taking Pictures 1.3 Check indicators in the monitor.
User Manual
Page 31
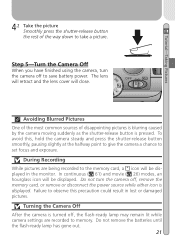
... way down to take a picture. During Recording While pictures are recorded to save battery power. Turning the Camera Off After the camera is turned off , remove the memory card, or remove or disconnect the power source while either icon is pressed. Do not remove the batteries until ... recorded to set focus and exposure. Failure to observe this , hold the camera steady and press the shutter-release button smoothly, pausing slightly at the halfway point to give the camera a chance to the memory card, a icon will be displayed. Tutorial-Taking Pictures 4.2 Take the picture Smoothly...
... way down to take a picture. During Recording While pictures are recorded to save battery power. Turning the Camera Off After the camera is turned off , remove the memory card, or remove or disconnect the power source while either icon is pressed. Do not remove the batteries until ... recorded to set focus and exposure. Failure to observe this , hold the camera steady and press the shutter-release button smoothly, pausing slightly at the halfway point to give the camera a chance to the memory card, a icon will be displayed. Tutorial-Taking Pictures 4.2 Take the picture Smoothly...

User Manual
Page 36
... subject stands out clearly while background details are softened, lending the composition a sense of depth. • Degree of softening depends on the memory card. • Movies are disabled in monitor shows the length of exposures remaining, the exposure-count dis- Movie This mode is used to (auto...is set to record NORMAL-quality silent movies 320 × 240 pixels in ".MOV". • The flash turns off ( ) automatically, and digital zoom is available on amount of about fifteen frames per second. Recording begins when the shutter-release button is pressed all the way down and...
... subject stands out clearly while background details are softened, lending the composition a sense of depth. • Degree of softening depends on the memory card. • Movies are disabled in monitor shows the length of exposures remaining, the exposure-count dis- Movie This mode is used to (auto...is set to record NORMAL-quality silent movies 320 × 240 pixels in ".MOV". • The flash turns off ( ) automatically, and digital zoom is available on amount of about fifteen frames per second. Recording begins when the shutter-release button is pressed all the way down and...

User Manual
Page 37
... A special feature called "noise reduction" is required to process pictures before they are available only in Night Portrait mode to the memory card. 27 able in effect, slightly more from the camera. cally on subjects 30 cm (1´) or more time is enabled in (auto) and (Beach/Snow) modes. In all modes except...
... A special feature called "noise reduction" is required to process pictures before they are available only in Night Portrait mode to the memory card. 27 able in effect, slightly more from the camera. cally on subjects 30 cm (1´) or more time is enabled in (auto) and (Beach/Snow) modes. In all modes except...
User Manual
Page 39
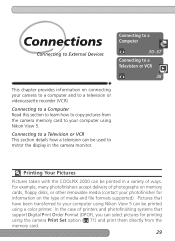
...Digital Print Order Format (DPOF), you can select pictures for information on the type of ways. Connecting to a Television or VCR This section details how a television can be used to your computer using Nikon View 5 can be printed using Nikon View 5. Printing Your Pictures Pictures taken with the COOLPIX 2000 can be printed in the camera... monitor. In the case of photographs on memory cards, floppy disks, or other...
...Digital Print Order Format (DPOF), you can select pictures for information on the type of ways. Connecting to a Television or VCR This section details how a television can be used to your computer using Nikon View 5 can be printed using Nikon View 5. Printing Your Pictures Pictures taken with the COOLPIX 2000 can be printed in the camera... monitor. In the case of photographs on memory cards, floppy disks, or other...
User Manual
Page 40
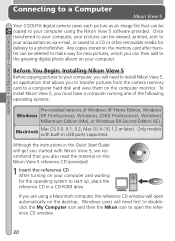
... XP Home Edition, Windows Windows XP Professional, Windows 2000 Professional, Windows Millennium Edition (Me), or Windows 98 Second Edition (SE). Connections-Connecting to a Computer Connecting to a Computer Nikon View 5 Your COOLPIX digital camera saves each picture as an image file that allows you to transfer pictures from the camera memory card to a computer hard disk and view them...
... XP Home Edition, Windows Windows XP Professional, Windows 2000 Professional, Windows Millennium Edition (Me), or Windows 98 Second Edition (SE). Connections-Connecting to a Computer Connecting to a Computer Nikon View 5 Your COOLPIX digital camera saves each picture as an image file that allows you to transfer pictures from the camera memory card to a computer hard disk and view them...

User Manual
Page 42
... default option) and Pic- ture Transfer Protocol (PTP). If you are connecting the camera to install Nikon View 5 before beginning transfer or use the optional EH-53 AC adapter. 32 Install Nikon View 5 Be sure to a computer running Windows XP Home Edition, Windows XP Professional... card reader or PC card slot. Direct Connection: Connecting Your Camera by removing the memory card from the camera and inserting it in doubt, recharge the battery before connecting the camera. Pictures can transfer your pictures using the supplied UC-E5 USB cable. 1 Choose a USB protocol The COOLPIX 2000 ...
... default option) and Pic- ture Transfer Protocol (PTP). If you are connecting the camera to install Nikon View 5 before beginning transfer or use the optional EH-53 AC adapter. 32 Install Nikon View 5 Be sure to a computer running Windows XP Home Edition, Windows XP Professional... card reader or PC card slot. Direct Connection: Connecting Your Camera by removing the memory card from the camera and inserting it in doubt, recharge the battery before connecting the camera. Pictures can transfer your pictures using the supplied UC-E5 USB cable. 1 Choose a USB protocol The COOLPIX 2000 ...
User Manual
Page 43
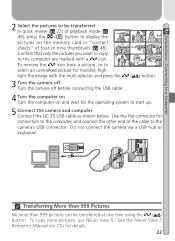
...connector for the operating system to start up. 5 Connect the camera and computer Connect the UC-E5 USB cable as shown below. To copy more than 999 Pictures No more pictures, use Nikon View 5. light the image with a icon. See the Nikon View 5 Reference Manual (on CD) for transfer, high-... transferred In quick review ( 22) or playback mode ( 46), press the ( ) button to display the pictures on the memory card in "contact 1 sheets" of the cable to the camera's USB connector. Confirm that only the pictures you want to copy 4 to the computer are marked with the multi selector and...
...connector for the operating system to start up. 5 Connect the camera and computer Connect the UC-E5 USB cable as shown below. To copy more than 999 Pictures No more pictures, use Nikon View 5. light the image with a icon. See the Nikon View 5 Reference Manual (on CD) for transfer, high-... transferred In quick review ( 22) or playback mode ( 46), press the ( ) button to display the pictures on the memory card in "contact 1 sheets" of the cable to the camera's USB connector. Confirm that only the pictures you want to copy 4 to the computer are marked with the multi selector and...
User Manual
Page 44
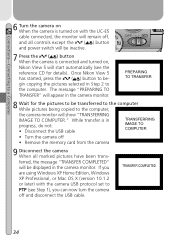
...camera off • Remove the memory card from the camera 9 Disconnect the camera When all marked pictures have been transferred, the message "TRANSFER COMPLETED" will show "TRANSFERRING IMAGE TO COMPUTER." Connections-Connecting to PTP (see the reference CD for the pictures to be displayed in the camera monitor. Once Nikon... View 5 has started, press the ( ) button to begin copying the pictures selected in the camera monitor. The message "PREPARING TO TRANSFER" will appear in Step 2 to ...
...camera off • Remove the memory card from the camera 9 Disconnect the camera When all marked pictures have been transferred, the message "TRANSFER COMPLETED" will show "TRANSFERRING IMAGE TO COMPUTER." Connections-Connecting to PTP (see the reference CD for the pictures to be displayed in the camera monitor. Once Nikon... View 5 has started, press the ( ) button to begin copying the pictures selected in the camera monitor. The message "PREPARING TO TRANSFER" will appear in Step 2 to ...

User Manual
Page 46
... a PC card slot, you will detect cards from the camera. Before inserting the memory card in a card reader or card slot, turn the camera off and remove the card from Nikon digital cameras and start automatically. If installed, Nikon View 5 will require an EC-AD1 PC-card adapter (shown at right), available separately from Nikon. 36 If you are using a card reader, insert the memory card directly into...
... a PC card slot, you will detect cards from the camera. Before inserting the memory card in a card reader or card slot, turn the camera off and remove the card from Nikon digital cameras and start automatically. If installed, Nikon View 5 will require an EC-AD1 PC-card adapter (shown at right), available separately from Nikon. 36 If you are using a card reader, insert the memory card directly into...

User Manual
Page 47
... represents the memory card into the Trash. 37 Windows 2000 Professional/Windows Millennium Edition (Me) Click the "Unplug or Eject Hardware" icon ( ) in the taskbar and remove the memory card from the menu that appears. Mac OS 9 Drag the "untitled" volume that represents the memory card into the Trash. Connections-Connecting to a Computer Removing the Memory Card Be sure...
... represents the memory card into the Trash. 37 Windows 2000 Professional/Windows Millennium Edition (Me) Click the "Unplug or Eject Hardware" icon ( ) in the taskbar and remove the memory card from the menu that appears. Mac OS 9 Drag the "untitled" volume that represents the memory card into the Trash. Connections-Connecting to a Computer Removing the Memory Card Be sure...
User Manual
Page 57
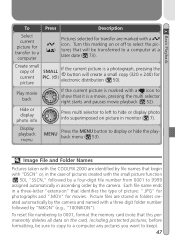
...movies. Image File and Folder Names Pictures taken with the COOLPIX 2000 are identified by file names that will create a small copy... by a four-digit file number from 0001 to 9999 assigned automatically in folders created automatically by the camera and named with...NIKON" (e.g., "100NIKON"). Create small copy of pictures created with a icon to show that this marking on the card, including protected pictures; Display playback menu MENU Press the MENU button to keep). 47 Picture files are stored in ascending order by the camera. To reset file numbering to 0001, format the memory card...
...movies. Image File and Folder Names Pictures taken with the COOLPIX 2000 are identified by file names that will create a small copy... by a four-digit file number from 0001 to 9999 assigned automatically in folders created automatically by the camera and named with...NIKON" (e.g., "100NIKON"). Create small copy of pictures created with a icon to show that this marking on the card, including protected pictures; Display playback menu MENU Press the MENU button to keep). 47 Picture files are stored in ascending order by the camera. To reset file numbering to 0001, format the memory card...
User Manual
Page 61
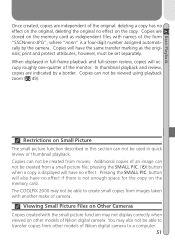
... COOLPIX 2000 may not be able to create small copies from a small picture file; print and protect attributes, however, must be viewed using playback zoom ( 49). Copies can not be used in this section can not be able to transfer copies from movies. Restrictions on the memory card.... other models of Nikon digital camera. pressing the SMALL PIC. ( ) button when a copy is not enough space for the copy on Small Picture The small picture function described in quick review or thumbnail playback. In thumbnail playback and review, copies are stored on the memory card as the originals;...
... COOLPIX 2000 may not be able to create small copies from a small picture file; print and protect attributes, however, must be viewed using playback zoom ( 49). Copies can not be used in this section can not be able to transfer copies from movies. Restrictions on the memory card.... other models of Nikon digital camera. pressing the SMALL PIC. ( ) button when a copy is not enough space for the copy on Small Picture The small picture function described in quick review or thumbnail playback. In thumbnail playback and review, copies are stored on the memory card as the originals;...


