
User Manual
Page 4
...; Be sure the product is unplugged. • Use only LR6 (AA) alkaline, NiCad, or NiMH batteries. • When inserting batteries, be exercised to prevent strangulation when wearing the camera strap around the neck of an infant or child. Should the product break open as the result of malfunction...the product will read the following safety precautions in the event of a fall or other accident, remove the batteries and AC adapter (if using your Nikon product to a Nikon-authorized service center for inspection. Do not use in the presence of flammable gas Do not use electronic equipment...
...; Be sure the product is unplugged. • Use only LR6 (AA) alkaline, NiCad, or NiMH batteries. • When inserting batteries, be exercised to prevent strangulation when wearing the camera strap around the neck of an infant or child. Should the product break open as the result of malfunction...the product will read the following safety precautions in the event of a fall or other accident, remove the batteries and AC adapter (if using your Nikon product to a Nikon-authorized service center for inspection. Do not use in the presence of flammable gas Do not use electronic equipment...
User Manual
Page 5
... than one meter (39˝) from the monitor touching the skin or entering the eyes or mouth. Before removing the battery, turn the camera off and allow the batteries to prevent liquid crystal from the subject. Keep out of reach of children Particular care should be taken to avoid injury ...due to broken glass and to cool. • Discontinue use only the cables provided or sold by Nikon for an extended period, the batteries ...
... than one meter (39˝) from the monitor touching the skin or entering the eyes or mouth. Before removing the battery, turn the camera off and allow the batteries to prevent liquid crystal from the subject. Keep out of reach of children Particular care should be taken to avoid injury ...due to broken glass and to cool. • Discontinue use only the cables provided or sold by Nikon for an extended period, the batteries ...
User Manual
Page 8
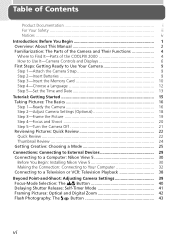
...Familiarization: The Parts of the Camera and Their Functions 4 Where to Find It-Parts of the COOLPIX 2000 4 How to Use It-Camera Controls and Displays 6 First Steps: Getting Ready to Use Your Camera 9 Step 1-Attach the Camera Strap 9 Step 2-Insert Batteries 9 Step 3-Insert the Memory...Nikon View 5 30 Making the Connection: Connecting to Your Computer 32 Connecting to a Television or VCR: Television Playback 38 Beyond Point-and-Shoot: Adjusting Camera Settings 39 Focus-Mode Selection: The Button 40 Delaying Shutter Release: Self-Timer Mode 41 Framing Pictures: Optical and Digital...
...Familiarization: The Parts of the Camera and Their Functions 4 Where to Find It-Parts of the COOLPIX 2000 4 How to Use It-Camera Controls and Displays 6 First Steps: Getting Ready to Use Your Camera 9 Step 1-Attach the Camera Strap 9 Step 2-Insert Batteries 9 Step 3-Insert the Memory...Nikon View 5 30 Making the Connection: Connecting to Your Computer 32 Connecting to a Television or VCR: Television Playback 38 Beyond Point-and-Shoot: Adjusting Camera Settings 39 Focus-Mode Selection: The Button 40 Delaying Shutter Release: Self-Timer Mode 41 Framing Pictures: Optical and Digital...

User Manual
Page 9
... Print Set 71 Marking All Pictures for Transfer: Auto Transfer 73 The Setup Menu: Camera Setup 74 Adjusting Monitor Brightness: Brightness 75 Formatting Memory Cards: CF Card Format 75 Conserving Battery Power: Auto Off 76 Choosing a Video Standard: Video Mode 76 Choosing a USB Protocol...: USB 77 Technical Notes: Camera Care, Options, and Resources 79 Optional Accessories 80 Caring for the Camera and Battery 81 Web Resources 83 Troubleshooting 83 ...
... Print Set 71 Marking All Pictures for Transfer: Auto Transfer 73 The Setup Menu: Camera Setup 74 Adjusting Monitor Brightness: Brightness 75 Formatting Memory Cards: CF Card Format 75 Conserving Battery Power: Auto Off 76 Choosing a Video Standard: Video Mode 76 Choosing a USB Protocol...: USB 77 Technical Notes: Camera Care, Options, and Resources 79 Optional Accessories 80 Caring for the Camera and Battery 81 Web Resources 83 Troubleshooting 83 ...
User Manual
Page 11
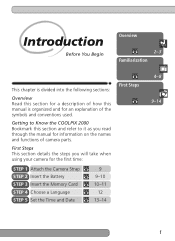
...for the first time: STEP 1 Attach the Camera Strap STEP 2 Insert the Battery STEP 3 Insert the Memory Card STEP 4 Choose a Language STEP 5 Set the Time and Date 9 9-10 10-11 12 13-14 First Steps 4-8 9-14 1 Getting to Know the COOLPIX 2000 Bookmark this manual is divided into the following ...sections: Overview Read this section for a description of how this section and refer to it as you will take when using your camera for information on the names and functions of the...
...for the first time: STEP 1 Attach the Camera Strap STEP 2 Insert the Battery STEP 3 Insert the Memory Card STEP 4 Choose a Language STEP 5 Set the Time and Date 9 9-10 10-11 12 13-14 First Steps 4-8 9-14 1 Getting to Know the COOLPIX 2000 Bookmark this manual is divided into the following ...sections: Overview Read this section for a description of how this section and refer to it as you will take when using your camera for information on the names and functions of the...
User Manual
Page 15
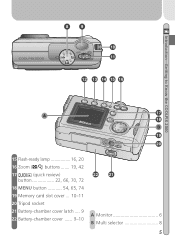
Introduction-Getting to Know the COOLPIX 2000 8 9 10 11 12 13 14 15 16 17 A 18 B 19 20 15 Flash-ready lamp 16, 20 16 Zoom ( / ) buttons ....... 19, 42 17 QUICK (quick review) button 22, 66, 70, 72 18 MENU button 54, 65, 74 19 Memory card slot cover ... 10-11 20 Tripod socket 21 Battery-chamber cover latch .... 9 22 Battery-chamber cover ...... 9-10 22 21 A Monitor 6 B Multi selector 8 5
Introduction-Getting to Know the COOLPIX 2000 8 9 10 11 12 13 14 15 16 17 A 18 B 19 20 15 Flash-ready lamp 16, 20 16 Zoom ( / ) buttons ....... 19, 42 17 QUICK (quick review) button 22, 66, 70, 72 18 MENU button 54, 65, 74 19 Memory card slot cover ... 10-11 20 Tripod socket 21 Battery-chamber cover latch .... 9 22 Battery-chamber cover ...... 9-10 22 21 A Monitor 6 B Multi selector 8 5
User Manual
Page 16
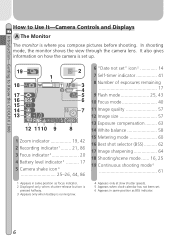
... 6 10 7 AUTO 9999 12 11 10 9 8 1 Zoom indicator 19, 42 2 Recording indicator 1 ........ 21, 86 3 Focus indicator 2 20 4 Battery level indicator 3 .......... 17 5 Camera shake icon 4 25-26, 44, 86 6 "Date not set" icon 5 14 7 Self-timer indicator 41 8 Number of exposures remaining 17 9 Flash mode... 2 Displayed only when shutter-release button is pressed halfway. 3 Appears only when battery is where you compose pictures before shooting. Introduction-Getting to Know the COOLPIX 2000 How to Use It-Camera Controls and Displays A The Monitor The monitor is running low. 4 Appears only ...
... 6 10 7 AUTO 9999 12 11 10 9 8 1 Zoom indicator 19, 42 2 Recording indicator 1 ........ 21, 86 3 Focus indicator 2 20 4 Battery level indicator 3 .......... 17 5 Camera shake icon 4 25-26, 44, 86 6 "Date not set" icon 5 14 7 Self-timer indicator 41 8 Number of exposures remaining 17 9 Flash mode... 2 Displayed only when shutter-release button is pressed halfway. 3 Appears only when battery is where you compose pictures before shooting. Introduction-Getting to Know the COOLPIX 2000 How to Use It-Camera Controls and Displays A The Monitor The monitor is running low. 4 Appears only ...
User Manual
Page 17
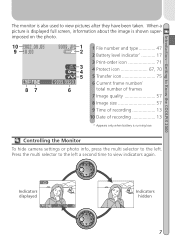
Controlling the Monitor To hide camera settings or photo info, press the multi selector to the left a second time to view indicators again. JPG 1 2 3 4 5 9999/9999 6 1 File number and type 47 2 Battery level indicator 17 3 Print-order icon 71 4 Protect icon 67, 70 5 Transfer icon 75 6 Current ...Time of recording 13 10 Date of recording 13 * Appears only when battery is also used to view pictures after they have been taken. Press the multi selector to the left . Introduction-Getting to Know the COOLPIX 2000 The monitor is running low. When a picture is displayed full screen,...
Controlling the Monitor To hide camera settings or photo info, press the multi selector to the left a second time to view indicators again. JPG 1 2 3 4 5 9999/9999 6 1 File number and type 47 2 Battery level indicator 17 3 Print-order icon 71 4 Protect icon 67, 70 5 Transfer icon 75 6 Current ...Time of recording 13 10 Date of recording 13 * Appears only when battery is also used to view pictures after they have been taken. Press the multi selector to the left . Introduction-Getting to Know the COOLPIX 2000 The monitor is running low. When a picture is displayed full screen,...
User Manual
Page 19
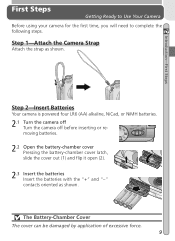
... will need to complete the following steps. Introduction-First Steps Step 2-Insert Batteries Your camera is powered four LR6 (AA) alkaline, NiCad, or NiMH batteries. 2.1 Turn the camera off Turn the camera off before inserting or removing batteries. 2.2 Open the battery-chamber cover Pressing the battery-chamber cover latch, slide the cover out (1) and flip it open (2). 2 1 2.3 Insert...
... will need to complete the following steps. Introduction-First Steps Step 2-Insert Batteries Your camera is powered four LR6 (AA) alkaline, NiCad, or NiMH batteries. 2.1 Turn the camera off Turn the camera off before inserting or removing batteries. 2.2 Open the battery-chamber cover Pressing the battery-chamber cover latch, slide the cover out (1) and flip it open (2). 2 1 2.3 Insert...
User Manual
Page 20
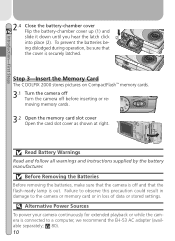
... for extended playback or while the camera is out. To prevent the batteries be- 1 ing dislodged during operation, be sure that the flash-ready lamp is connected to the camera or memory card or in loss of data or stored settings. Step 3-Insert the Memory Card The COOLPIX 2000 stores pictures on CompactFlash™ memory...
... for extended playback or while the camera is out. To prevent the batteries be- 1 ing dislodged during operation, be sure that the flash-ready lamp is connected to the camera or memory card or in loss of data or stored settings. Step 3-Insert the Memory Card The COOLPIX 2000 stores pictures on CompactFlash™ memory...

User Manual
Page 24
... stamp of back-up power after charging for an extended period with the main battery removed, the clock may need to be displayed in the top right corner of the monitor when the camera is installed. If the camera has been stored for about six hours. 14 If the time and date have... not been set, a flashing ("Date not set will have been set ") icon will be reset. The Clock Battery The camera's internal clock-calendar is powered by a separate...
... stamp of back-up power after charging for an extended period with the main battery removed, the clock may need to be displayed in the top right corner of the monitor when the camera is installed. If the camera has been stored for about six hours. 14 If the time and date have... not been set, a flashing ("Date not set will have been set ") icon will be reset. The Clock Battery The camera's internal clock-calendar is powered by a separate...
User Manual
Page 27
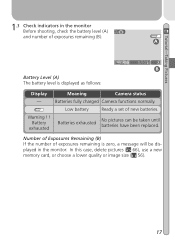
... No pictures can be displayed in the monitor Before shooting, check the battery level (A) and number of new batteries. Number of Exposures Remaining (B) If the number of exposures remaining is displayed as follows: 1632 FINE AUTO 8 B Display Meaning Camera status - In this case, delete pictures ( 66), use a new memory card, or choose a lower...
... No pictures can be displayed in the monitor Before shooting, check the battery level (A) and number of new batteries. Number of Exposures Remaining (B) If the number of exposures remaining is displayed as follows: 1632 FINE AUTO 8 B Display Meaning Camera status - In this case, delete pictures ( 66), use a new memory card, or choose a lower...
User Manual
Page 31
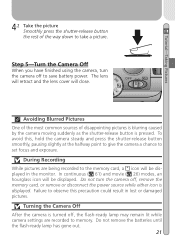
...lost or damaged pictures. During Recording While pictures are recorded to the memory card, a icon will be displayed. Turning the Camera Off After the camera is displayed. Do not remove the batteries until the flash-ready lamp has gone out. 21 In continuous ( 61) and movie ( 26) modes, an hourglass...result in the monitor. Step 5-Turn the Camera Off When you have finished using the camera, turn the camera off to take a picture. Avoiding Blurred Pictures One of the most common sources of the way down to save battery power. Do not turn the camera off , remove the memory card, or ...
...lost or damaged pictures. During Recording While pictures are recorded to the memory card, a icon will be displayed. Turning the Camera Off After the camera is displayed. Do not remove the batteries until the flash-ready lamp has gone out. 21 In continuous ( 61) and movie ( 26) modes, an hourglass...result in the monitor. Step 5-Turn the Camera Off When you have finished using the camera, turn the camera off to take a picture. Avoiding Blurred Pictures One of the most common sources of the way down to save battery power. Do not turn the camera off , remove the memory card, or ...

User Manual
Page 42
... the camera and inserting it in doubt, recharge the battery before connecting the camera. Before connecting the camera to a computer, select the USB option in USB connection, you can transfer your pictures using the supplied UC-E5 USB cable. 1 Choose a USB protocol The COOLPIX 2000 supports two... USB proto- If you BK Set OFF are connecting the camera to a computer running Windows XP Home Edition, Windows XP Professional, or Mac OS X (10.1.2 or later), choose PTP. ond Edition (SE), or Mac OS 9 (9.0, 9.1, or 9.2) and have installed Nikon View 5, ...
... the camera and inserting it in doubt, recharge the battery before connecting the camera. Before connecting the camera to a computer, select the USB option in USB connection, you can transfer your pictures using the supplied UC-E5 USB cable. 1 Choose a USB protocol The COOLPIX 2000 supports two... USB proto- If you BK Set OFF are connecting the camera to a computer running Windows XP Home Edition, Windows XP Professional, or Mac OS X (10.1.2 or later), choose PTP. ond Edition (SE), or Mac OS 9 (9.0, 9.1, or 9.2) and have installed Nikon View 5, ...
User Manual
Page 85
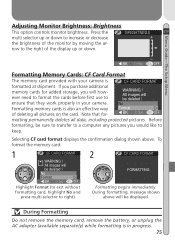
...they work properly in progress. 75 During formatting, message shown above . During Formatting Do not remove the memory card, remove the battery, or unplug the AC adapter (available separately) while formatting is also an effective way of the monitor by moving the ar- No...to increase or decrease BRIGHTNESS + the brightness of deleting all data, including protected pictures. Formatting memory cards is in your camera is formatted at shipment. Menu Guide-The Setup Menu Adjusting Monitor Brightness: Brightness This option controls monitor brightness. Press the multi...
...they work properly in progress. 75 During formatting, message shown above . During Formatting Do not remove the memory card, remove the battery, or unplug the AC adapter (available separately) while formatting is also an effective way of the monitor by moving the ar- No...to increase or decrease BRIGHTNESS + the brightness of deleting all data, including protected pictures. Formatting memory cards is in your camera is formatted at shipment. Menu Guide-The Setup Menu Adjusting Monitor Brightness: Brightness This option controls monitor brightness. Press the multi...
User Manual
Page 86
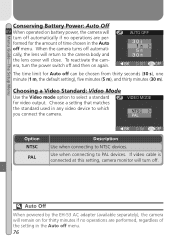
... mode option to select a standard for thirty minutes if no operations are performed, regardless of time chosen in any video device to the camera body and the lens cover will turn off and then on again. Use when connecting to NTSC devices. Menu Guide-The Setup Menu Conserving... Battery Power: Auto Off When operated on battery power, the camera will turn off automatically if no operations are performed for Auto off can be chosen from thirty seconds (30 s), one...
... mode option to select a standard for thirty minutes if no operations are performed, regardless of time chosen in any video device to the camera body and the lens cover will turn off and then on again. Use when connecting to NTSC devices. Menu Guide-The Setup Menu Conserving... Battery Power: Auto Off When operated on battery power, the camera will turn off automatically if no operations are performed for Auto off can be chosen from thirty seconds (30 s), one...
User Manual
Page 91
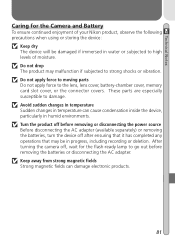
... are especially susceptible to the lens, lens cover, battery-chamber cover, memory card slot cover, or the connector covers. Do not apply force to moving parts Do not apply force to damage. After turning the camera off after ensuring that it has completed any operations ...or disconnecting the power source Before disconnecting the AC adapter (available separately) or removing the batteries, turn the device off , wait for the Camera and Battery To ensure continued enjoyment of your Nikon product, observe the following precautions when using or storing the device: Keep dry The device...
... are especially susceptible to the lens, lens cover, battery-chamber cover, memory card slot cover, or the connector covers. Do not apply force to moving parts Do not apply force to damage. After turning the camera off after ensuring that it has completed any operations ...or disconnecting the power source Before disconnecting the AC adapter (available separately) or removing the batteries, turn the device off , wait for the Camera and Battery To ensure continued enjoyment of your Nikon product, observe the following precautions when using or storing the device: Keep dry The device...
User Manual
Page 93
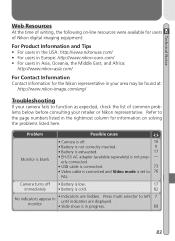
...of writing, the following on-line resources were available for users of common problems below before consulting your camera fails to function as expected, check the list of Nikon digital imaging equipment: For Product Information and Tips • For users in the USA: http://www.nikonusa... East, and Africa: http://www.nikon-asia.com/ For Contact Information Contact information for information on solving the problems listed here. Problem Possible cause Monitor is blank • Camera is off • Battery is low. 17 immediately • Battery is set to left until indicators are...
...of writing, the following on-line resources were available for users of common problems below before consulting your camera fails to function as expected, check the list of Nikon digital imaging equipment: For Product Information and Tips • For users in the USA: http://www.nikonusa... East, and Africa: http://www.nikon-asia.com/ For Contact Information Contact information for information on solving the problems listed here. Problem Possible cause Monitor is blank • Camera is off • Battery is low. 17 immediately • Battery is set to left until indicators are...
User Manual
Page 94
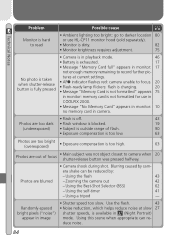
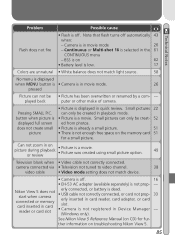
... brightness requires adjustment. 75 • Camera is in playback mode. 46 • Battery is exhausted. 17 • Message "Memory Card full" appears in image mode. Technical Notes Problem Monitor is hard to read Possible cause • Ambient lighting too bright: go to darker location 80 or use in COOLPIX 2000. • Message "No Memory...
... brightness requires adjustment. 75 • Camera is in playback mode. 46 • Battery is exhausted. 17 • Message "Memory Card full" appears in image mode. Technical Notes Problem Monitor is hard to read Possible cause • Ambient lighting too bright: go to darker location 80 or use in COOLPIX 2000. • Message "No Memory...
User Manual
Page 95
... not create small • Picture is already a small picture. 51 picture • There is selected in quick review. See Nikon View 5 Reference Manual (on 62 • Battery level is low. 17 Colors are unnatural • White balance does not match light source. 58 No menu is displayed when ...8226; USB cable not correctly connected, or card not prop- Technical Notes Problem Possible cause Flash does not fire • Flash is a movie. Camera is in on picture during playback or review • Picture is on CD) for a small picture. Can not zoom in movie mode 26 -...
... not create small • Picture is already a small picture. 51 picture • There is selected in quick review. See Nikon View 5 Reference Manual (on 62 • Battery level is low. 17 Colors are unnatural • White balance does not match light source. 58 No menu is displayed when ...8226; USB cable not correctly connected, or card not prop- Technical Notes Problem Possible cause Flash does not fire • Flash is a movie. Camera is in on picture during playback or review • Picture is on CD) for a small picture. Can not zoom in movie mode 26 -...


