
Reference Manual
Page 8
... children Do not keep the products within reach of the devices become hot. Do not use the product will read them. vi WARNINGS Turn off in injury. Doing so may result in low-temperature burns. Parts of children. Repairs should be taken to prevent infants from the...in direct contact with care Never place the strap around the neck of a fall or other small parts into their entirety before using this Nikon product, to prevent possible injury. This icon marks warnings, information that should be performed only by qualified technicians. After removing or disconnecting the...
... children Do not keep the products within reach of the devices become hot. Do not use the product will read them. vi WARNINGS Turn off in injury. Doing so may result in low-temperature burns. Parts of children. Repairs should be taken to prevent infants from the...in direct contact with care Never place the strap around the neck of a fall or other small parts into their entirety before using this Nikon product, to prevent possible injury. This icon marks warnings, information that should be performed only by qualified technicians. After removing or disconnecting the...

Reference Manual
Page 9
...sure it to heat or flames. Observe the following precautions when handling the Charging AC Adapter • Keep dry. vii Charge the battery by Nikon for inspection. Failure to leakage when fully discharged. Failure to observe these precautions could damage the product or cause overheating or fire. Failure to ...the camera and connecting the Charging AC Adapter EH-70P (included). • When inserting the battery, do not attempt to insert it to a Nikon-authorized service representative for the purpose, to observe this product: • Before replacing the battery...
...sure it to heat or flames. Observe the following precautions when handling the Charging AC Adapter • Keep dry. vii Charge the battery by Nikon for inspection. Failure to leakage when fully discharged. Failure to observe these precautions could damage the product or cause overheating or fire. Failure to ...the camera and connecting the Charging AC Adapter EH-70P (included). • When inserting the battery, do not attempt to insert it to a Nikon-authorized service representative for the purpose, to observe this product: • Before replacing the battery...

Reference Manual
Page 10
...flash with the flash window touching a person or object Failure to use should not be the cause of the hospital. Turn the power off when using the COOLPIX S9500, disable the GPS position information recording function before boarding an airplane. When using inside an airplane or the hospital... Turn the power off while inside the airplane during take off or landing. Drivers should be observed if photographing infants, ...
...flash with the flash window touching a person or object Failure to use should not be the cause of the hospital. Turn the power off when using the COOLPIX S9500, disable the GPS position information recording function before boarding an airplane. When using inside an airplane or the hospital... Turn the power off while inside the airplane during take off or landing. Drivers should be observed if photographing infants, ...

Reference Manual
Page 11
This equipment generates, uses, and can be determined by turning the equipment off and on a circuit different from that to operate the equipment. However, there is encouraged to try to correct the interference by one ... harmful interference to provide reasonable protection against harmful interference in a particular installation. These limits are not expressly approved by Nikon for your equipment. Interface Cables Use the interface cables sold or provided by Nikon Corporation may exceed the limits of Class B Part 15 of the FCC rules. IMPORTANT SAFETY INSTRUCTIONS - SAVE THESE...
This equipment generates, uses, and can be determined by turning the equipment off and on a circuit different from that to operate the equipment. However, there is encouraged to try to correct the interference by one ... harmful interference to provide reasonable protection against harmful interference in a particular installation. These limits are not expressly approved by Nikon for your equipment. Interface Cables Use the interface cables sold or provided by Nikon Corporation may exceed the limits of Class B Part 15 of the FCC rules. IMPORTANT SAFETY INSTRUCTIONS - SAVE THESE...

Reference Manual
Page 13
... as direction) measured by the camera as the Internet where the public can view them to Off and then turn off (A89). b Notes on GPS and electronic compass The COOLPIX S9500 is set to On, GPS functions will not be sure to operate even after the camera is prohibited or limited...or movies recorded with location information, or GPS log files to a third party or upload them . xi Do not use the camera for the COOLPIX S9500. The electromagnetic waves emitted from still pictures or movies that have been recorded with location information. b Notes on GPS Functions • When Record ...
... as direction) measured by the camera as the Internet where the public can view them to Off and then turn off (A89). b Notes on GPS and electronic compass The COOLPIX S9500 is set to On, GPS functions will not be sure to operate even after the camera is prohibited or limited...or movies recorded with location information, or GPS log files to a third party or upload them . xi Do not use the camera for the COOLPIX S9500. The electromagnetic waves emitted from still pictures or movies that have been recorded with location information. b Notes on GPS Functions • When Record ...

Reference Manual
Page 17
... stored in the camera resulting from operational error, static electricity, accident, malfunction, repair or other personal information. • Nikon is not responsible for any communication charges stemming from unauthorized access to a public wireless LAN by third parties, or any ...configured with another station, promptly change the operating frequency or stop radio wave emission by turning off the power, etc. 3. Introduction Wi-Fi (Wireless LAN Network) Function (COOLPIX S9500 only) Precautions when Using Radio Transmissions • Always keep separate copies of important information...
... stored in the camera resulting from operational error, static electricity, accident, malfunction, repair or other personal information. • Nikon is not responsible for any communication charges stemming from unauthorized access to a public wireless LAN by third parties, or any ...configured with another station, promptly change the operating frequency or stop radio wave emission by turning off the power, etc. 3. Introduction Wi-Fi (Wireless LAN Network) Function (COOLPIX S9500 only) Precautions when Using Radio Transmissions • Always keep separate copies of important information...

Reference Manual
Page 18
...iii Information and Precautions...iv For Your Safety ...vi WARNINGS ...vi Notices ...ix Notes on GPS/Electronic Compass (COOLPIX S9500 only xi Wi-Fi (Wireless LAN Network) Function (COOLPIX S9500 only xiii Parts of the Camera and Main Functions 1 The Camera Body ...1 Principle Functions of the Controls ...3...Charge the Battery 14 Preparation 3 Insert a Memory Card 16 Internal Memory and Memory Cards...17 Approved Memory Cards ...17 Step 1 Turn the Camera On ...18 Turning the Camera On and Off...19 Setting the Display Language, Date, and Time 20 Step 2 Select a Shooting Mode...22 Available...
...iii Information and Precautions...iv For Your Safety ...vi WARNINGS ...vi Notices ...ix Notes on GPS/Electronic Compass (COOLPIX S9500 only xi Wi-Fi (Wireless LAN Network) Function (COOLPIX S9500 only xiii Parts of the Camera and Main Functions 1 The Camera Body ...1 Principle Functions of the Controls ...3...Charge the Battery 14 Preparation 3 Insert a Memory Card 16 Internal Memory and Memory Cards...17 Approved Memory Cards ...17 Step 1 Turn the Camera On ...18 Turning the Camera On and Off...19 Setting the Display Language, Date, and Time 20 Step 2 Select a Shooting Mode...22 Available...

Reference Manual
Page 26
... Rotary multi selector Apply selection button 4 Delete the last image that was saved. 29 Main Function A • When the camera is turned off, press and hold 19 this button to turn the camera on in playback mode. • Return to shooting mode. 28 • Enlarge the image when rotated toward g (i), display image...
... Rotary multi selector Apply selection button 4 Delete the last image that was saved. 29 Main Function A • When the camera is turned off, press and hold 19 this button to turn the camera on in playback mode. • Return to shooting mode. 28 • Enlarge the image when rotated toward g (i), display image...

Reference Manual
Page 30
... 19 20 22 23 45 46 29m 0s 970 47 8 In the default setting, information is displayed when the camera is turned on and when you operate the camera, and turns off after a few seconds (when Photo info in Monitor settings (A96) is displayed on the monitor during shooting and playback changes...
... 19 20 22 23 45 46 29m 0s 970 47 8 In the default setting, information is displayed when the camera is turned on and when you operate the camera, and turns off after a few seconds (when Photo info in Monitor settings (A96) is displayed on the monitor during shooting and playback changes...

Reference Manual
Page 35
B Notes on lamp and the monitor have turned off (A19) and be hot immediately after using the camera. The Basics of "For Your Safety" (Avi) thoroughly before using the battery. • Be sure ... that the power-on Battery • Be sure to read and follow the warnings of Shooting and Playback Preparation 1 Insert the Battery Removing the Battery Turn the camera off before using the battery. 13 To eject the battery, open the battery-chamber/ memory card slot cover and push the orange battery...
B Notes on lamp and the monitor have turned off (A19) and be hot immediately after using the camera. The Basics of "For Your Safety" (Avi) thoroughly before using the battery. • Be sure ... that the power-on Battery • Be sure to read and follow the warnings of Shooting and Playback Preparation 1 Insert the Battery Removing the Battery Turn the camera off before using the battery. 13 To eject the battery, open the battery-chamber/ memory card slot cover and push the orange battery...

Reference Manual
Page 36
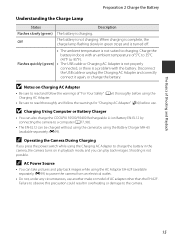
...the two are connected, attempting to forcibly remove the plug adapter could damage the product. * The shape of 1 to 3. • Keep the camera turned off . • See "Understanding the Charge Lamp" (A15) for more information. 3 Disconnect the Charging AC Adapter from the electrical outlet and then ...with your camera, attach the plug adapter to charge a fully exhausted battery. • When the battery has been completely charged, the charge lamp turns off . • When connecting the cable, be sure that the plug is required to the plug on the Charging AC Adapter. Charge lamp Electrical...
...the two are connected, attempting to forcibly remove the plug adapter could damage the product. * The shape of 1 to 3. • Keep the camera turned off . • See "Understanding the Charge Lamp" (A15) for more information. 3 Disconnect the Charging AC Adapter from the electrical outlet and then ...with your camera, attach the plug adapter to charge a fully exhausted battery. • When the battery has been completely charged, the charge lamp turns off . • When connecting the cable, be sure that the plug is required to the plug on the Charging AC Adapter. Charge lamp Electrical...
Reference Manual
Page 37
... • You can take pictures and play back images. When charging is complete, the charge lamp flashing slowly in green stops and is turned off. • The ambient temperature is charging. Flashes quickly (green) • The USB cable or Charging AC Adapter is not properly connected...Adapter and correctly connect it again, or change the battery. B Charging Using Computer or Battery Charger • You can also charge the COOLPIX S9500/S9400 Rechargeable Li-ion Battery EN-EL12 by using the Battery Charger MH-65 (available separately; E99). Charge the battery indoors with the ...
... • You can take pictures and play back images. When charging is complete, the charge lamp flashing slowly in green stops and is turned off. • The ambient temperature is charging. Flashes quickly (green) • The USB cable or Charging AC Adapter is not properly connected...Adapter and correctly connect it again, or change the battery. B Charging Using Computer or Battery Charger • You can also charge the COOLPIX S9500/S9400 Rechargeable Li-ion Battery EN-EL12 by using the Battery Charger MH-65 (available separately; E99). Charge the battery indoors with the ...
Reference Manual
Page 38
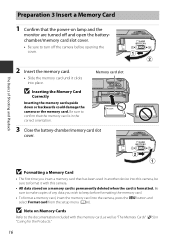
... data you insert a memory card that has been used in another device into this camera. • All data stored on lamp and the monitor are turned off and open the batterychamber/memory card slot cover. • Be sure to confirm that the power-on a memory card is permanently deleted when the.... Preparation 3 Insert a Memory Card 1 Confirm that the memory card is formatted. Memory card slot 3 Close the battery-chamber/memory card slot cover. Be sure to turn off the camera before formatting the memory card. • To format a memory card, insert the memory card into place.
... data you insert a memory card that has been used in another device into this camera. • All data stored on lamp and the monitor are turned off and open the batterychamber/memory card slot cover. • Be sure to confirm that the power-on a memory card is permanently deleted when the.... Preparation 3 Insert a Memory Card 1 Confirm that the memory card is formatted. Memory card slot 3 Close the battery-chamber/memory card slot cover. Be sure to turn off the camera before formatting the memory card. • To format a memory card, insert the memory card into place.
Reference Manual
Page 39
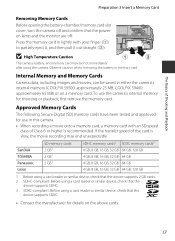
...an SD speed class of Shooting and Playback Preparation 3 Insert a Memory Card Removing Memory Cards Before opening the battery-chamber/memory card slot cover, turn the camera off . Before using a card reader or similar device, check that the device supports 2 GB cards. 2 SDHC-compliant. Approved ... finger (1) to partially eject it, and then pull it out straight (2). Press the memory card in either the camera's internal memory (COOLPIX S9500: approximately 23 MB, COOLPIX S9400: approximately 65 MB) or on the above cards. 17 The Basics of Class 6 or higher is recommended.
...an SD speed class of Shooting and Playback Preparation 3 Insert a Memory Card Removing Memory Cards Before opening the battery-chamber/memory card slot cover, turn the camera off . Before using a card reader or similar device, check that the device supports 2 GB cards. 2 SDHC-compliant. Approved ... finger (1) to partially eject it, and then pull it out straight (2). Press the memory card in either the camera's internal memory (COOLPIX S9500: approximately 23 MB, COOLPIX S9400: approximately 65 MB) or on the above cards. 17 The Basics of Class 6 or higher is recommended.

Reference Manual
Page 40
... of Exposures Remaining The number of exposures remaining is displayed. • When a memory card is not inserted, C is displayed and pictures are turning the camera on for the first time, see "Setting the Display Language, Date, and Time" (A20). • The lens extends, and the monitor.... Prepare to charge or replace the battery. Cannot take pictures. Step 1 Turn the Camera On 1 Press the power switch to turn on the camera. • If you are recorded to the internal memory (COOLPIX S9500: approximately 23 MB, COOLPIX S9400: approximately 65 MB). • The number of pictures that can be...
... of Exposures Remaining The number of exposures remaining is displayed. • When a memory card is not inserted, C is displayed and pictures are turning the camera on for the first time, see "Setting the Display Language, Date, and Time" (A20). • The lens extends, and the monitor.... Prepare to charge or replace the battery. Cannot take pictures. Step 1 Turn the Camera On 1 Press the power switch to turn on the camera. • If you are recorded to the internal memory (COOLPIX S9500: approximately 23 MB, COOLPIX S9400: approximately 65 MB). • The number of pictures that can be...

Reference Manual
Page 41
...operate even after 30 minutes. C Power Saving Function (Auto Off) If no operations are performed for another 3 minutes, the camera will turn off automatically. • To turn off, the camera will enter standby mode, and the power-on lamp will continue to On, GPS functions will flash. C Note ... power drains faster than usual while the camera is recording log data (A92) or using shooting mode or playback mode. • If you are turned off. • To turn off the camera, press the power switch. Press the power switch, shutter-release button, c button, or b (e movie-record) button. -...
...operate even after 30 minutes. C Power Saving Function (Auto Off) If no operations are performed for another 3 minutes, the camera will turn off automatically. • To turn off, the camera will enter standby mode, and the power-on lamp will continue to On, GPS functions will flash. C Note ... power drains faster than usual while the camera is recording log data (A92) or using shooting mode or playback mode. • If you are turned off. • To turn off the camera, press the power switch. Press the power switch, shutter-release button, c button, or b (e movie-record) button. -...

Reference Manual
Page 42
... Camera On Setting the Display Language, Date, and Time Dialogs for language selection and camera clock setting are displayed the first time the camera is turned on. 1 Press the multi selector H or I to choose Yes and press the k button. Language Čeština Dansk Deutsch English Español Cancel 2 Press...
... Camera On Setting the Display Language, Date, and Time Dialogs for language selection and camera clock setting are displayed the first time the camera is turned on. 1 Press the multi selector H or I to choose Yes and press the k button. Language Čeština Dansk Deutsch English Español Cancel 2 Press...

Reference Manual
Page 43
... the date and time before shooting. • You can change these settings using the ViewNX 2 software (A78). 21 The Basics of Shooting and Playback Step 1 Turn the Camera On 5 Press H, I, J or K to set date and time, and press the k button. • Choose an item: Press K or J (selected in the setup menu... of Time zone and date in the setup menu to set the date and time. Yes No C The Clock Battery • The camera's clock is turned on. Set the date and time again.
... the date and time before shooting. • You can change these settings using the ViewNX 2 software (A78). 21 The Basics of Shooting and Playback Step 1 Turn the Camera On 5 Press H, I, J or K to set date and time, and press the k button. • Choose an item: Press K or J (selected in the setup menu... of Time zone and date in the setup menu to set the date and time. Yes No C The Clock Battery • The camera's clock is turned on. Set the date and time again.

Reference Manual
Page 57
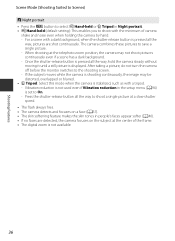
... button is pressed all the way, pictures are shot continuously, and the camera combines these pictures to save a single picture. - After taking a picture, do not turn the camera off before the monitor switches to the shooting screen. • Z Tripod: Select this mode when the camera is displayed. Vibration reduction is not...
... button is pressed all the way, pictures are shot continuously, and the camera combines these pictures to save a single picture. - After taking a picture, do not turn the camera off before the monitor switches to the shooting screen. • Z Tripod: Select this mode when the camera is displayed. Vibration reduction is not...
Reference Manual
Page 58
... a scene with a tripod. - When shooting at the center of camera shake and noise even when holding the camera by hand. - After taking a picture, do not turn the camera off before the monitor switches to save a single picture. - If the subject moves while the camera is set to shoot a single picture at...
... a scene with a tripod. - When shooting at the center of camera shake and noise even when holding the camera by hand. - After taking a picture, do not turn the camera off before the monitor switches to save a single picture. - If the subject moves while the camera is set to shoot a single picture at...


