
Reference Manual
Page 8
WARNINGS Turn off in the event of a fall or other small parts into their entirety before using this Nikon product, to prevent possible injury. Do not use the camera or Charging AC Adapter in the presence of flammable gas Using the camera in the ... as the result of malfunction Should you notice smoke or an unusual smell coming from putting the battery or other accident, take the equipment to a Nikon-authorized service representative for extended periods while the devices are on or in use the product will read them. Doing so may result in low...
WARNINGS Turn off in the event of a fall or other small parts into their entirety before using this Nikon product, to prevent possible injury. Do not use the camera or Charging AC Adapter in the presence of flammable gas Using the camera in the ... as the result of malfunction Should you notice smoke or an unusual smell coming from putting the battery or other accident, take the equipment to a Nikon-authorized service representative for extended periods while the devices are on or in use the product will read them. Doing so may result in low...

Reference Manual
Page 9
...rinse immediately with plenty of the plug should you are using the Charging AC Adapter/AC adapter, be sure it to a Nikon-authorized service representative for use with travel converters or adapters designed to another or with a dry cloth. Observe the following precautions ...Keep dry. Should the insulation be removed with DCto-AC inverters. Failure to observe this product: • Before replacing the battery, turn the product off. vii Observe the following precautions when handling the battery for inspection. Failure to observe this precaution could result in ...
...rinse immediately with plenty of the plug should you are using the Charging AC Adapter/AC adapter, be sure it to a Nikon-authorized service representative for use with travel converters or adapters designed to another or with a dry cloth. Observe the following precautions ...Keep dry. Should the insulation be removed with DCto-AC inverters. Failure to observe this product: • Before replacing the battery, turn the product off. vii Observe the following precautions when handling the battery for inspection. Failure to observe this precaution could result in ...

Reference Manual
Page 10
... if necessary. Cease use and follow their instructions. When using inside an airplane or the hospital Turn the power off while inside the airplane during take off or landing. Turn the power off when using the COOLPIX S9500, disable the GPS position information recording function before boarding an airplane. CD-ROMs The CD-ROMs...
... if necessary. Cease use and follow their instructions. When using inside an airplane or the hospital Turn the power off while inside the airplane during take off or landing. Turn the power off when using the COOLPIX S9500, disable the GPS position information recording function before boarding an airplane. CD-ROMs The CD-ROMs...

Reference Manual
Page 11
...provide reasonable protection against harmful interference in a particular installation. ix The power supply unit is intended to correct the interference by turning the equipment off and on a circuit different from that to which can radiate radio frequency energy and, if not installed ...SAFETY INSTRUCTIONS - Interface Cables Use the interface cables sold or provided by Nikon Corporation may void the user's authority to a supply not in the U.S.A. These limits are not expressly approved by Nikon for your equipment. Notices Introduction Notices for Customers in the U.S.A., use ...
...provide reasonable protection against harmful interference in a particular installation. ix The power supply unit is intended to correct the interference by turning the equipment off and on a circuit different from that to which can radiate radio frequency energy and, if not installed ...SAFETY INSTRUCTIONS - Interface Cables Use the interface cables sold or provided by Nikon Corporation may void the user's authority to a supply not in the U.S.A. These limits are not expressly approved by Nikon for your equipment. Notices Introduction Notices for Customers in the U.S.A., use ...

Reference Manual
Page 13
...functions will not be updated. • Use the location name information only as of April 2012. Do not use the camera for the COOLPIX S9500. Observe caution when you use this information for navigation of an airplane, car, and person or land survey applications. • When you...mountain climbing or trekking, be sure to read "Disposing of Data Storage Devices" (Av). b Notes on GPS and electronic compass The COOLPIX S9500 is turned off the camera. • An individual may affect the measuring instruments of an airplane or medical equipment. The location name information will ...
...functions will not be updated. • Use the location name information only as of April 2012. Do not use the camera for the COOLPIX S9500. Observe caution when you use this information for navigation of an airplane, car, and person or land survey applications. • When you...mountain climbing or trekking, be sure to read "Disposing of Data Storage Devices" (Av). b Notes on GPS and electronic compass The COOLPIX S9500 is turned off the camera. • An individual may affect the measuring instruments of an airplane or medical equipment. The location name information will ...

Reference Manual
Page 17
... Reset all user information registered and configured with the connection, stop radio wave emission by turning off the power, etc. 3. Introduction Wi-Fi (Wireless LAN Network) Function (COOLPIX S9500 only) Precautions when Using Radio Transmissions • Always keep separate copies of important information.... error, static electricity, accident, malfunction, repair or other damages resulting from alteration or loss of content that is not attributable to Nikon. • Before discarding this equipment, confirm that may occur during data transfer. • Using the Wi-Fi (wireless LAN)...
... Reset all user information registered and configured with the connection, stop radio wave emission by turning off the power, etc. 3. Introduction Wi-Fi (Wireless LAN Network) Function (COOLPIX S9500 only) Precautions when Using Radio Transmissions • Always keep separate copies of important information.... error, static electricity, accident, malfunction, repair or other damages resulting from alteration or loss of content that is not attributable to Nikon. • Before discarding this equipment, confirm that may occur during data transfer. • Using the Wi-Fi (wireless LAN)...

Reference Manual
Page 18
...iii Information and Precautions...iv For Your Safety ...vi WARNINGS ...vi Notices ...ix Notes on GPS/Electronic Compass (COOLPIX S9500 only xi Wi-Fi (Wireless LAN Network) Function (COOLPIX S9500 only xiii Parts of the Camera and Main Functions 1 The Camera Body ...1 Principle Functions of the Controls ...3...Charge the Battery 14 Preparation 3 Insert a Memory Card 16 Internal Memory and Memory Cards...17 Approved Memory Cards ...17 Step 1 Turn the Camera On ...18 Turning the Camera On and Off...19 Setting the Display Language, Date, and Time 20 Step 2 Select a Shooting Mode...22 Available...
...iii Information and Precautions...iv For Your Safety ...vi WARNINGS ...vi Notices ...ix Notes on GPS/Electronic Compass (COOLPIX S9500 only xi Wi-Fi (Wireless LAN Network) Function (COOLPIX S9500 only xiii Parts of the Camera and Main Functions 1 The Camera Body ...1 Principle Functions of the Controls ...3...Charge the Battery 14 Preparation 3 Insert a Memory Card 16 Internal Memory and Memory Cards...17 Approved Memory Cards ...17 Step 1 Turn the Camera On ...18 Turning the Camera On and Off...19 Setting the Display Language, Date, and Time 20 Step 2 Select a Shooting Mode...22 Available...

Reference Manual
Page 26
... Rotary multi selector Apply selection button 4 Delete the last image that was saved. 29 Main Function A • When the camera is turned off, press and hold 19 this button to turn the camera on in playback mode. • Return to shooting mode. 28 • Enlarge the image when rotated toward g (i), display image...
... Rotary multi selector Apply selection button 4 Delete the last image that was saved. 29 Main Function A • When the camera is turned off, press and hold 19 this button to turn the camera on in playback mode. • Return to shooting mode. 28 • Enlarge the image when rotated toward g (i), display image...

Reference Manual
Page 30
... is displayed on the monitor during shooting and playback changes depending on and when you operate the camera, and turns off after a few seconds (when Photo info in Monitor settings (A96) is turned on the camera's settings and state of use. In the default setting, information is displayed when the camera is...
... is displayed on the monitor during shooting and playback changes depending on and when you operate the camera, and turns off after a few seconds (when Photo info in Monitor settings (A96) is turned on the camera's settings and state of use. In the default setting, information is displayed when the camera is...

Reference Manual
Page 35
B Notes on lamp and the monitor have turned off before opening the battery-chamber/memory card slot cover. B High Temperature Caution The camera, battery, and memory card may be sure that the power-...) thoroughly before using the battery. • Be sure to read and follow the warnings of Shooting and Playback Preparation 1 Insert the Battery Removing the Battery Turn the camera off (A19) and be hot immediately after using the battery. 13
B Notes on lamp and the monitor have turned off before opening the battery-chamber/memory card slot cover. B High Temperature Caution The camera, battery, and memory card may be sure that the power-...) thoroughly before using the battery. • Be sure to read and follow the warnings of Shooting and Playback Preparation 1 Insert the Battery Removing the Battery Turn the camera off (A19) and be hot immediately after using the battery. 13

Reference Manual
Page 36
... the Battery 1 Prepare the included Charging AC Adapter EH-70P. Push the plug adapter firmly until it is required to 3. • Keep the camera turned off . • See "Understanding the Charge Lamp" (A15) for more information. 3 Disconnect the Charging AC Adapter from the electrical outlet and then disconnect...damage the product. * The shape of 1 to charge a fully exhausted battery. • When the battery has been completely charged, the charge lamp turns off . • When connecting the cable, be sure that the plug is inserted in the camera, and then connect the camera to the Charging ...
... the Battery 1 Prepare the included Charging AC Adapter EH-70P. Push the plug adapter firmly until it is required to 3. • Keep the camera turned off . • See "Understanding the Charge Lamp" (A15) for more information. 3 Disconnect the Charging AC Adapter from the electrical outlet and then disconnect...damage the product. * The shape of 1 to charge a fully exhausted battery. • When the battery has been completely charged, the charge lamp turns off . • When connecting the cable, be sure that the plug is inserted in the camera, and then connect the camera to the Charging ...
Reference Manual
Page 37
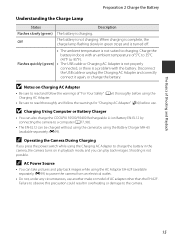
...play back images. When charging is complete, the charge lamp flashing slowly in overheating or damage to charge the battery in the camera, the camera turns on Charging AC Adapter • Be sure to read and follow the warnings for "Charging AC Adapter" (F4) before using the Charging AC ...than the EH-62F. Charge the battery indoors with the battery. B Charging Using Computer or Battery Charger • You can also charge the COOLPIX S9500/S9400 Rechargeable Li-ion Battery EN-EL12 by connecting the camera to 95°F). Failure to charging. Off The battery is not suited to observe...
...play back images. When charging is complete, the charge lamp flashing slowly in overheating or damage to charge the battery in the camera, the camera turns on Charging AC Adapter • Be sure to read and follow the warnings for "Charging AC Adapter" (F4) before using the Charging AC ...than the EH-62F. Charge the battery indoors with the battery. B Charging Using Computer or Battery Charger • You can also charge the COOLPIX S9500/S9400 Rechargeable Li-ion Battery EN-EL12 by connecting the camera to 95°F). Failure to charging. Off The battery is not suited to observe...
Reference Manual
Page 38
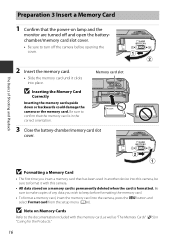
... that the memory card is formatted. Be sure to the documentation included with this camera. • All data stored on lamp and the monitor are turned off and open the batterychamber/memory card slot cover. • Be sure to keep before opening the cover. 2 Insert the memory card. • Slide the... battery-chamber/memory card slot cover. Be sure to make copies of Shooting and Playback B Formatting a Memory Card • The first time you wish to turn off the camera before formatting the memory card. • To format a memory card, insert the memory card into place.
... that the memory card is formatted. Be sure to the documentation included with this camera. • All data stored on lamp and the monitor are turned off and open the batterychamber/memory card slot cover. • Be sure to keep before opening the cover. 2 Insert the memory card. • Slide the... battery-chamber/memory card slot cover. Be sure to make copies of Shooting and Playback B Formatting a Memory Card • The first time you wish to turn off the camera before formatting the memory card. • To format a memory card, insert the memory card into place.
Reference Manual
Page 39
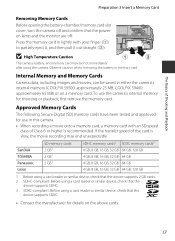
... Basics of Shooting and Playback Preparation 3 Insert a Memory Card Removing Memory Cards Before opening the battery-chamber/memory card slot cover, turn the camera off and confirm that the device supports SDXC. • Contact the manufacturer for shooting or playback, first remove the memory... (1) to partially eject it, and then pull it out straight (2). Press the memory card in either the camera's internal memory (COOLPIX S9500: approximately 23 MB, COOLPIX S9400: approximately 65 MB) or on the above cards. 17 B High Temperature Caution The camera, battery, and memory card may ...
... Basics of Shooting and Playback Preparation 3 Insert a Memory Card Removing Memory Cards Before opening the battery-chamber/memory card slot cover, turn the camera off and confirm that the device supports SDXC. • Contact the manufacturer for shooting or playback, first remove the memory... (1) to partially eject it, and then pull it out straight (2). Press the memory card in either the camera's internal memory (COOLPIX S9500: approximately 23 MB, COOLPIX S9400: approximately 65 MB) or on the above cards. 17 B High Temperature Caution The camera, battery, and memory card may ...

Reference Manual
Page 40
... of exposures remaining is displayed. • When a memory card is not inserted, C is displayed and pictures are recorded to turn on the camera. • If you are turning the camera on for the first time, see "Setting the Display Language, Date, and Time" (A20). • The lens...of exposures remaining shown in the illustration differs from the actual value. 18 Cannot take pictures. Step 1 Turn the Camera On 1 Press the power switch to the internal memory (COOLPIX S9500: approximately 23 MB, COOLPIX S9400: approximately 65 MB). • The number of pictures that can be stored depends on . ...
... of exposures remaining is displayed. • When a memory card is not inserted, C is displayed and pictures are recorded to turn on the camera. • If you are turning the camera on for the first time, see "Setting the Display Language, Date, and Time" (A20). • The lens...of exposures remaining shown in the illustration differs from the actual value. 18 Cannot take pictures. Step 1 Turn the Camera On 1 Press the power switch to the internal memory (COOLPIX S9500: approximately 23 MB, COOLPIX S9400: approximately 65 MB). • The number of pictures that can be stored depends on . ...

Reference Manual
Page 41
... the AC Adapter EH-62F (available separately), the camera enters standby mode after the camera is turned off . • To turn off , the camera will enter standby mode, and the power-on lamp will turn on the camera in playback mode, press and hold the c (playback) button. C Power Saving... Function (Auto Off) If no operations are performed for a while, the monitor will turn off automatically. • To turn on lamp are performed for another 3 minutes, the camera will flash. Both the monitor and the power-on the monitor again in GPS...
... the AC Adapter EH-62F (available separately), the camera enters standby mode after the camera is turned off . • To turn off , the camera will enter standby mode, and the power-on lamp will turn on the camera in playback mode, press and hold the c (playback) button. C Power Saving... Function (Auto Off) If no operations are performed for a while, the monitor will turn off automatically. • To turn on lamp are performed for another 3 minutes, the camera will flash. Both the monitor and the power-on the monitor again in GPS...

Reference Manual
Page 42
...241;ol Cancel 2 Press H or I to choose the desired language and press the k button. The Basics of Shooting and Playback Step 1 Turn the Camera On Setting the Display Language, Date, and Time Dialogs for language selection and camera clock setting are displayed the first time the camera... is turned on. 1 Press the multi selector H or I to choose Yes and press the k button. To disable the daylight saving time function, press I. 4 Press...
...241;ol Cancel 2 Press H or I to choose the desired language and press the k button. The Basics of Shooting and Playback Step 1 Turn the Camera On Setting the Display Language, Date, and Time Dialogs for language selection and camera clock setting are displayed the first time the camera... is turned on. 1 Press the multi selector H or I to choose Yes and press the k button. To disable the daylight saving time function, press I. 4 Press...

Reference Manual
Page 43
... the multi selector. • Confirm the settings: Select the minute field and press the k button or K. 6 Press H or I . The Basics of Shooting and Playback Step 1 Turn the Camera On 5 Press H, I, J or K to set the date and time. See step 2 of Time zone and date in z setup menu, when the daylight saving... Time" (A20) for several days. • If the camera's backup battery becomes exhausted, the date and time setting screen is displayed when the camera is turned on.
... the multi selector. • Confirm the settings: Select the minute field and press the k button or K. 6 Press H or I . The Basics of Shooting and Playback Step 1 Turn the Camera On 5 Press H, I, J or K to set the date and time. See step 2 of Time zone and date in z setup menu, when the daylight saving... Time" (A20) for several days. • If the camera's backup battery becomes exhausted, the date and time setting screen is displayed when the camera is turned on.

Reference Manual
Page 57
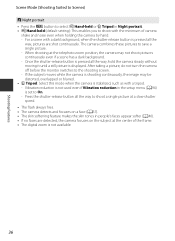
.... - Press the shutter-release button all the way, pictures are shot continuously, and the camera combines these pictures to infinity. After taking a picture, do not turn the camera off before the monitor switches to the shooting screen. • Z Tripod: Select this mode when the camera is set to shoot a single picture...
.... - Press the shutter-release button all the way, pictures are shot continuously, and the camera combines these pictures to infinity. After taking a picture, do not turn the camera off before the monitor switches to the shooting screen. • Z Tripod: Select this mode when the camera is set to shoot a single picture...
Reference Manual
Page 58
... d button to select Y Hand-held or Z Tripod in Night portrait. • Y Hand-held (default setting): This enables you to On. - After taking a picture, do not turn the camera off before the monitor switches to shoot a single picture at a slow shutter speed. • The flash always fires. • The camera detects and...
... d button to select Y Hand-held or Z Tripod in Night portrait. • Y Hand-held (default setting): This enables you to On. - After taking a picture, do not turn the camera off before the monitor switches to shoot a single picture at a slow shutter speed. • The flash always fires. • The camera detects and...


