
Reference Manual
Page 10
..., or discomfort. Prolonged viewing of the disruption, beforehand if inserted in a hospital. viii Turn the power off when using the COOLPIX S9500, disable the GPS position information recording function before boarding an airplane. Cease use and follow their instructions. CD-ROMs The CD-ROMs... included with the flash window touching a person or object Failure to observe this precaution could result in .) from the subject. Observe caution when using...
..., or discomfort. Prolonged viewing of the disruption, beforehand if inserted in a hospital. viii Turn the power off when using the COOLPIX S9500, disable the GPS position information recording function before boarding an airplane. Cease use and follow their instructions. CD-ROMs The CD-ROMs... included with the flash window touching a person or object Failure to observe this precaution could result in .) from the subject. Observe caution when using...
Reference Manual
Page 19
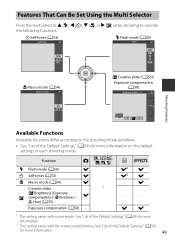
Introduction Table of Contents Features That Can Be Set Using the Multi Selector 49 Available Functions ...49 Using the Flash (Flash Modes) ...50 Using the Self-timer ...53 Using Macro Mode ...54 Adjusting Brightness (Exposure Compensation), Vividness, and Hue (Creative Slider) ...55 Adjusting ...Features That Can Be Set Using the d (Menu) Button (Movie Menu 86 Available Movie Menu...86 Playing Back Movies...87 Using GPS/Electronic Compass (COOLPIX S9500 only 88 Starting GPS Data Recording...88 Features That Can Be Set Using the d (Menu) Button (GPS Options Menu 91 Available GPS Options Menu...
Introduction Table of Contents Features That Can Be Set Using the Multi Selector 49 Available Functions ...49 Using the Flash (Flash Modes) ...50 Using the Self-timer ...53 Using Macro Mode ...54 Adjusting Brightness (Exposure Compensation), Vividness, and Hue (Creative Slider) ...55 Adjusting ...Features That Can Be Set Using the d (Menu) Button (Movie Menu 86 Available Movie Menu...86 Playing Back Movies...87 Using GPS/Electronic Compass (COOLPIX S9500 only 88 Starting GPS Data Recording...88 Features That Can Be Set Using the d (Menu) Button (GPS Options Menu 91 Available GPS Options Menu...

Reference Manual
Page 23
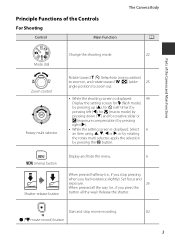
Parts of the Camera and Main Functions Parts of the Camera and Main Functions The Camera Body 1 2 34 5 6 4 Flash raised 7 Lens cover closed 89 10 1 Mode dial 22 2 Shutter-release button 3, 26 3 Power switch/power-on lamp 19 4 Microphone (stereo 74, 82 5 GPS antenna (COOLPIX S9500 only 88 6 Wi-Fi (wireless LAN) antenna (COOLPIX S9500 only 93 7 Flash 50 11 12 Zoom control 25 f : Wide 25 8 g : Tele 25 h: Thumbnail playback 70 i : Playback zoom 69 j : Help 33 9 Self-timer lamp 53 AF-assist illuminator 97 10 Lens 11 Speaker 74, 87, 97 12 Lens cover 1
Parts of the Camera and Main Functions Parts of the Camera and Main Functions The Camera Body 1 2 34 5 6 4 Flash raised 7 Lens cover closed 89 10 1 Mode dial 22 2 Shutter-release button 3, 26 3 Power switch/power-on lamp 19 4 Microphone (stereo 74, 82 5 GPS antenna (COOLPIX S9500 only 88 6 Wi-Fi (wireless LAN) antenna (COOLPIX S9500 only 93 7 Flash 50 11 12 Zoom control 25 f : Wide 25 8 g : Tele 25 h: Thumbnail playback 70 i : Playback zoom 69 j : Help 33 9 Self-timer lamp 53 AF-assist illuminator 97 10 Lens 11 Speaker 74, 87, 97 12 Lens cover 1

Reference Manual
Page 24
... 13 14 15 16 1 OLED monitor (monitor)1 8, 22 2 d (menu) button 6 3 Rotary multi selector (multi selector)2 3, 4 4 k (apply selection) button 3, 4 5 c (playback) button 4, 28 6 Charge lamp 14, E81 Flash lamp 50 7 l (delete) button 29, 87 8 b (e movie-record) button 28, 82 9 Tripod socket 10 Power connector cover (for an optional AC adapter E99 11 Battery...
... 13 14 15 16 1 OLED monitor (monitor)1 8, 22 2 d (menu) button 6 3 Rotary multi selector (multi selector)2 3, 4 4 k (apply selection) button 3, 4 5 c (playback) button 4, 28 6 Charge lamp 14, E81 Flash lamp 50 7 l (delete) button 29, 87 8 b (e movie-record) button 28, 82 9 Tripod socket 10 Power connector cover (for an optional AC adapter E99 11 Battery...
Reference Manual
Page 25
... zoom in, and rotate toward f (h) (wide- 25 angle position) to zoom out. • While the shooting screen is displayed: 49 Display the setting screen for m (flash mode) by pressing up (H), for n (self-timer) by pressing left (J), for p (macro mode) by pressing down (I) and for creative slider or o (exposure compensation) by pressing...
... zoom in, and rotate toward f (h) (wide- 25 angle position) to zoom out. • While the shooting screen is displayed: 49 Display the setting screen for m (flash mode) by pressing up (H), for n (self-timer) by pressing left (J), for p (macro mode) by pressing down (I) and for creative slider or o (exposure compensation) by pressing...
Reference Manual
Page 31
...AE/AF-L indicator 43 6 Quick effects 32 7 Flash mode 50 8 Battery level indicator 18 9 Vibration reduction icon 97 10 Wi-Fi communication indicator (COOLPIX S9500 only 93 Eye-Fi communication indicator 11 98, E85 12 GPS reception (COOLPIX S9500 only 90 13 Log display (COOLPIX S9500 only) ....92 14 Motion detection icon 97 15 .../Tripod 35, 36 43 Smile timer 63 Pet portrait auto release 42 44 Self-timer 53 45 Compass display (direction gauge) (COOLPIX S9500 only 92 46 Compass display (compass) (COOLPIX S9500 only 92 Location name information 47 (POI information...
...AE/AF-L indicator 43 6 Quick effects 32 7 Flash mode 50 8 Battery level indicator 18 9 Vibration reduction icon 97 10 Wi-Fi communication indicator (COOLPIX S9500 only 93 Eye-Fi communication indicator 11 98, E85 12 GPS reception (COOLPIX S9500 only 90 13 Log display (COOLPIX S9500 only) ....92 14 Motion detection icon 97 15 .../Tripod 35, 36 43 Smile timer 63 Pet portrait auto release 42 44 Self-timer 53 45 Compass display (direction gauge) (COOLPIX S9500 only 92 46 Compass display (compass) (COOLPIX S9500 only 92 Location name information 47 (POI information...

Reference Manual
Page 36
... is properly oriented. Charge lamp Electrical outlet The Basics of Shooting and Playback USB Cable UC-E6 (included) • When charging starts, the charge lamp flashes slowly in green. • About 3 hours and 50 minutes is required to 3. • Keep the camera turned off . • See "Understanding the Charge Lamp" (A15...
... is properly oriented. Charge lamp Electrical outlet The Basics of Shooting and Playback USB Cable UC-E6 (included) • When charging starts, the charge lamp flashes slowly in green. • About 3 hours and 50 minutes is required to 3. • Keep the camera turned off . • See "Understanding the Charge Lamp" (A15...
Reference Manual
Page 37
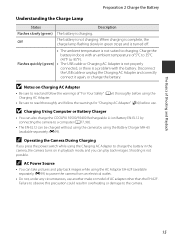
...The ambient temperature is complete, the charge lamp flashing slowly in playback mode, and you press the power switch while using the AC Adapter EH-62F (available separately; C AC Power Source • You can also charge the COOLPIX S9500/S9400 Rechargeable Li-ion Battery EN-EL12 by ... • Be sure to read thoroughly and follow the warnings of Shooting and Playback Preparation 2 Charge the Battery Understanding the Charge Lamp Status Description Flashes slowly (green) The battery is a problem with an ambient temperature of 5°C to 35°C (41°F to a computer (A77...
...The ambient temperature is complete, the charge lamp flashing slowly in playback mode, and you press the power switch while using the AC Adapter EH-62F (available separately; C AC Power Source • You can also charge the COOLPIX S9500/S9400 Rechargeable Li-ion Battery EN-EL12 by ... • Be sure to read thoroughly and follow the warnings of Shooting and Playback Preparation 2 Charge the Battery Understanding the Charge Lamp Status Description Flashes slowly (green) The battery is a problem with an ambient temperature of 5°C to 35°C (41°F to a computer (A77...

Reference Manual
Page 41
... 3 minutes, the camera will continue to On, GPS functions will turn off automatically. • To turn off when the monitor is turned on lamp will flash. Rotate the mode dial. • The time that elapses before the camera enters standby mode can be changed using a Wi-Fi connection (A93). 19 This...
... 3 minutes, the camera will continue to On, GPS functions will turn off automatically. • To turn off when the monitor is turned on lamp will flash. Rotate the mode dial. • The time that elapses before the camera enters standby mode can be changed using a Wi-Fi connection (A93). 19 This...

Reference Manual
Page 43
... and date in Printed Images • Set the date and time before shooting. • You can also be printed without setting the date and time, O flashes when the shooting screen is powered by rotating the multi selector. • Confirm the settings: Select the minute field and press the k button or K. 6 Press...
... and date in Printed Images • Set the date and time before shooting. • You can also be printed without setting the date and time, O flashes when the shooting screen is powered by rotating the multi selector. • Confirm the settings: Select the minute field and press the k button or K. 6 Press...
Reference Manual
Page 45
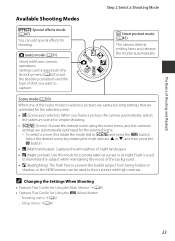
... press the k button. • X (Night landscape): Captures the atmosphere of night landscapes. • S (Night portrait): Use this mode for shooting. Flash is selected, pictures are captured using the scene menu, and the camera's settings are automatically optimized for the selected scene. - Setup menu ➝ A96 23... mode (A47) You can be used to illuminate the subject while maintaining the mood of the background. • W (Backlighting): The flash fires to prevent the backlit subject from being hidden in the shooting menu (A62) to suit the shooting conditions and the type of shot...
... press the k button. • X (Night landscape): Captures the atmosphere of night landscapes. • S (Night portrait): Use this mode for shooting. Flash is selected, pictures are captured using the scene menu, and the camera's settings are automatically optimized for the selected scene. - Setup menu ➝ A96 23... mode (A47) You can be used to illuminate the subject while maintaining the mood of the background. • W (Backlighting): The flash fires to prevent the backlit subject from being hidden in the shooting menu (A62) to suit the shooting conditions and the type of shot...

Reference Manual
Page 46
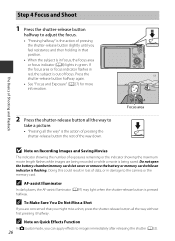
... camera. • Keep your fingers, hair, strap and other objects away from the lens, flash, AF-assist illuminator and microphone. • To shoot in the "tall" orientation, hold the camera so that the flash is above the lens. 2 Frame the picture. • Point the camera at the subject....In the following situations, use of camera shake: - When shooting in the telephoto zoom position • To take a picture with the flash mode (A50) set Vibration reduction in which flash is recommended to Off. 24 When shooting in a dark location, with the camera attached to a tripod, set to W (off)...
... camera. • Keep your fingers, hair, strap and other objects away from the lens, flash, AF-assist illuminator and microphone. • To shoot in the "tall" orientation, hold the camera so that the flash is above the lens. 2 Frame the picture. • Point the camera at the subject....In the following situations, use of camera shake: - When shooting in the telephoto zoom position • To take a picture with the flash mode (A50) set Vibration reduction in which flash is recommended to Off. 24 When shooting in a dark location, with the camera attached to a tripod, set to W (off)...
Reference Manual
Page 48
...first pressing it halfway. C AF-assist Illuminator In dark places, the AF-assist illuminator (A97) may light when the shutter-release button is flashing. Do not open the battery-chamber/memory card slot cover or remove the battery or memory card while an indicator is pressed halfway. C ...Note on Recording Images and Saving Movies The indicator showing the number of exposures remaining or the indicator showing the maximum movie length flashes while images are concerned that position. • When the subject is being recorded or while a movie is in focus, the focus area or...
...first pressing it halfway. C AF-assist Illuminator In dark places, the AF-assist illuminator (A97) may light when the shutter-release button is flashing. Do not open the battery-chamber/memory card slot cover or remove the battery or memory card while an indicator is pressed halfway. C ...Note on Recording Images and Saving Movies The indicator showing the number of exposures remaining or the indicator showing the maximum movie length flashes while images are concerned that position. • When the subject is being recorded or while a movie is in focus, the focus area or...

Reference Manual
Page 49
...). • In smart portrait mode, the camera focuses on that subject (Target finding AF) (A66). See "Using the Flash (Flash Modes)" (A50) for more information. • Lower the flash by gently pushing it focuses on the face around which a double border (focus area) is set using AF area mode (A62...) in the shooting menu. • The areas to focus on Subject" (A66) for more information. When not taking pictures, lower the flash. 27 The Basics of Shooting and Playback Step 4 Focus and Shoot Focus and Exposure When the shutter-release button is not displayed. See "Autofocus" ...
...). • In smart portrait mode, the camera focuses on that subject (Target finding AF) (A66). See "Using the Flash (Flash Modes)" (A50) for more information. • Lower the flash by gently pushing it focuses on the face around which a double border (focus area) is set using AF area mode (A62...) in the shooting menu. • The areas to focus on Subject" (A66) for more information. When not taking pictures, lower the flash. 27 The Basics of Shooting and Playback Step 4 Focus and Shoot Focus and Exposure When the shutter-release button is not displayed. See "Autofocus" ...
Reference Manual
Page 58
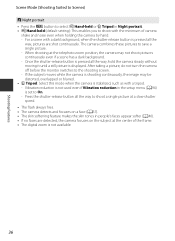
... Y Hand-held or Z Tripod in Night portrait. • Y Hand-held (default setting): This enables you to shoot a single picture at a slow shutter speed. • The flash always fires. • The camera detects and focuses on the subject at the center of camera shake and noise even when holding the camera by...
... Y Hand-held or Z Tripod in Night portrait. • Y Hand-held (default setting): This enables you to shoot a single picture at a slow shutter speed. • The flash always fires. • The camera detects and focuses on the subject at the center of camera shake and noise even when holding the camera by...
Reference Manual
Page 59
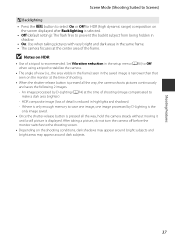
... d button to select On or Off for HDR (high dynamic range) composition on the screen displayed after Backlighting is selected. • Off (default setting): The flash fires to prevent the backlit subject from being hidden in shadow. • On: Use when taking a picture, do not turn the camera off before the...
... d button to select On or Off for HDR (high dynamic range) composition on the screen displayed after Backlighting is selected. • Off (default setting): The flash fires to prevent the backlit subject from being hidden in shadow. • On: Use when taking a picture, do not turn the camera off before the...

Reference Manual
Page 61
... the center area of the frame. The focus area or focus indicator (A8) always lights in green. You may hear the sound of the frame. Flash mode, self-timer or exposure compensation • The camera focuses on . y M k Close-up • The macro mode (A54) will be set to on, and the...
... the center area of the frame. The focus area or focus indicator (A8) always lights in green. You may hear the sound of the frame. Flash mode, self-timer or exposure compensation • The camera focuses on . y M k Close-up • The macro mode (A54) will be set to on, and the...

Reference Manual
Page 67
...8226; To finish automatic shooting of smile detection, perform any of the frame. 45 C When the Self-timer Lamp Flashes When the camera detects a face, the self-timer lamp flashes. B Notes on Smart Portrait Mode • The digital zoom is not available. • Under some shooting conditions, ... to switch to a shooting mode other than one face is detected, the face closest to Off. - The lamp quickly flashes immediately after the shutter is automatically released without pressing the shutterrelease button (smile timer). The skin softening function makes facial skin tones softer.
...8226; To finish automatic shooting of smile detection, perform any of the frame. 45 C When the Self-timer Lamp Flashes When the camera detects a face, the self-timer lamp flashes. B Notes on Smart Portrait Mode • The digital zoom is not available. • Under some shooting conditions, ... to switch to a shooting mode other than one face is detected, the face closest to Off. - The lamp quickly flashes immediately after the shutter is automatically released without pressing the shutterrelease button (smile timer). The skin softening function makes facial skin tones softer.

Reference Manual
Page 70
... a black and white image in which only the specified color remains. • Use the multi selector H or I to select the color to the overall image. Flash mode (A50) - Special Effects Mode (Applying Effects When Shooting) Option Soft Nostalgic sepia High-contrast monochrome High key Low key Selective color Description Soften the...
... a black and white image in which only the specified color remains. • Use the multi selector H or I to select the color to the overall image. Flash mode (A50) - Special Effects Mode (Applying Effects When Shooting) Option Soft Nostalgic sepia High-contrast monochrome High key Low key Selective color Description Soften the...
Reference Manual
Page 71
...See "List of the Default Settings" (A59) for more information. 2 The setting varies with scene mode. Function A x, y, X, S, W m Flash mode (A50) w n Self-timer (A53) w D Macro mode (A54) w Creative slider 1 (o Brightness (Exposure o compensation)/ GVividness / w F... Hue) (A55) Exposure compensation (A58) - n Self-timer (A53) Self-timer m Flash mode (A50) Auto Shooting Features D Macro mode (A54) Macro mode o Creative slider (A55)/ Exposure compensation (A58) Brightness (Exp. +/-) + 2.0 +...
...See "List of the Default Settings" (A59) for more information. 2 The setting varies with scene mode. Function A x, y, X, S, W m Flash mode (A50) w n Self-timer (A53) w D Macro mode (A54) w Creative slider 1 (o Brightness (Exposure o compensation)/ GVividness / w F... Hue) (A55) Exposure compensation (A58) - n Self-timer (A53) Self-timer m Flash mode (A50) Auto Shooting Features D Macro mode (A54) Macro mode o Creative slider (A55)/ Exposure compensation (A58) Brightness (Exp. +/-) + 2.0 +...


