
Reference Manual
Page 4
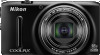
Introduction Introduction Read This First Thank you for purchasing the Nikon COOLPIX S9500 or COOLPIX S9400 digital camera. ii Before using the camera, please read the information in this manual. After reading, please keep this manual handy and refer to it to Aviii) and familiarize yourself with the information provided in "For Your Safety" (Avi to enhance your enjoyment of your new camera.
Introduction Introduction Read This First Thank you for purchasing the Nikon COOLPIX S9500 or COOLPIX S9400 digital camera. ii Before using the camera, please read the information in this manual. After reading, please keep this manual handy and refer to it to Aviii) and familiarize yourself with the information provided in "For Your Safety" (Avi to enhance your enjoyment of your new camera.
Reference Manual
Page 5
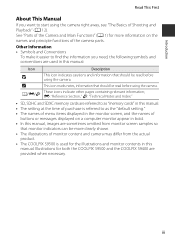
... names of buttons or messages displayed on the names and principle functions of Shooting and Playback" (A 12). Illustrations for both the COOLPIX S9500 and the COOLPIX S9400 are provided when necessary. See "Parts of the Camera and Main Functions" (A 1) for more clearly shown. • The ...sometimes omitted from monitor screen samples so that should be more information on a computer monitor appear in bold. • In this manual: Icon Description B This icon indicates cautions and information that should be read before using the camera. A/E/F These icons indicate other...
... names of buttons or messages displayed on the names and principle functions of Shooting and Playback" (A 12). Illustrations for both the COOLPIX S9500 and the COOLPIX S9400 are provided when necessary. See "Parts of the Camera and Main Functions" (A 1) for more clearly shown. • The ...sometimes omitted from monitor screen samples so that should be more information on a computer monitor appear in bold. • In this manual: Icon Description B This icon indicates cautions and information that should be read before using the camera. A/E/F These icons indicate other...
Reference Manual
Page 6
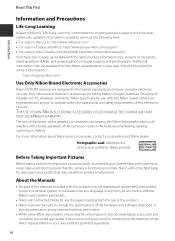
...; No part of the manuals included with this product may be held liable for contact information: http://imaging.nikon.com/ Use Only Nikon Brand Electronic Accessories Nikon COOLPIX cameras are engineered and proven to frequently asked questions (FAQs), and general advice on a trip), take a test shot to the attention of third-party rechargeable ...
...; No part of the manuals included with this product may be held liable for contact information: http://imaging.nikon.com/ Use Only Nikon Brand Electronic Accessories Nikon COOLPIX cameras are engineered and proven to frequently asked questions (FAQs), and general advice on a trip), take a test shot to the attention of third-party rechargeable ...

Reference Manual
Page 18
Introduction Table of Contents Introduction ...ii Read This First...ii About This Manual...iii Information and Precautions...iv For Your Safety ...vi WARNINGS ...vi Notices ...ix Notes on GPS/Electronic Compass (COOLPIX S9500 only xi Wi-Fi (Wireless LAN Network) Function (COOLPIX S9500 only xiii Parts of the Camera and Main Functions 1 The Camera...
Introduction Table of Contents Introduction ...ii Read This First...ii About This Manual...iii Information and Precautions...iv For Your Safety ...vi WARNINGS ...vi Notices ...ix Notes on GPS/Electronic Compass (COOLPIX S9500 only xi Wi-Fi (Wireless LAN Network) Function (COOLPIX S9500 only xiii Parts of the Camera and Main Functions 1 The Camera...

Reference Manual
Page 24
... 15 HDMI micro connector (Type D).........77 16 USB/Audio video connector 14, 77, 80 1 The OLED monitor is sometimes referred to as "monitor" in this manual. 2 The rotary multi selector is sometimes referred to as "multi selector" in this...
... 15 HDMI micro connector (Type D).........77 16 USB/Audio video connector 14, 77, 80 1 The OLED monitor is sometimes referred to as "monitor" in this manual. 2 The rotary multi selector is sometimes referred to as "multi selector" in this...
Reference Manual
Page 31
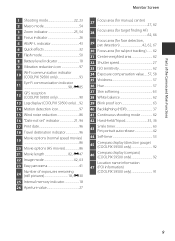
...8 Battery level indicator 18 9 Vibration reduction icon 97 10 Wi-Fi communication indicator (COOLPIX S9500 only 93 Eye-Fi communication indicator 11 98, E85 12 GPS reception (COOLPIX S9500 only 90 13 Log display (COOLPIX S9500 only) ....92 14 Motion detection icon 97 15 Wind noise reduction 86 16 ...23 Easy panorama 41 24 Number of exposures remaining (still pictures 18, E30 25 Internal memory indicator 18 26 Aperture value 27 Focus area (for manual, center) 27 27, 62 28 Focus area (for target finding AF 62, 66 29 Focus area (for face detection, pet detection 42,...
...8 Battery level indicator 18 9 Vibration reduction icon 97 10 Wi-Fi communication indicator (COOLPIX S9500 only 93 Eye-Fi communication indicator 11 98, E85 12 GPS reception (COOLPIX S9500 only 90 13 Log display (COOLPIX S9500 only) ....92 14 Motion detection icon 97 15 Wind noise reduction 86 16 ...23 Easy panorama 41 24 Number of exposures remaining (still pictures 18, E30 25 Internal memory indicator 18 26 Aperture value 27 Focus area (for manual, center) 27 27, 62 28 Focus area (for target finding AF 62, 66 29 Focus area (for face detection, pet detection 42,...
Reference Manual
Page 56
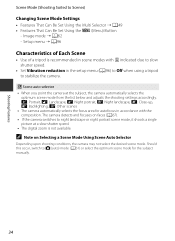
... is not available. e: Portrait, f: Landscape, h: Night portrait, g: Night landscape, i: Close-up, j: Backlighting, d: Other scenes • The camera automatically selects the focus area for the subject manually. 34 Shooting Features Scene Mode (Shooting Suited to night landscape or night portrait scene mode, it shoots a single picture at the subject, the camera automatically...
... is not available. e: Portrait, f: Landscape, h: Night portrait, g: Night landscape, i: Close-up, j: Backlighting, d: Other scenes • The camera automatically selects the focus area for the subject manually. 34 Shooting Features Scene Mode (Shooting Suited to night landscape or night portrait scene mode, it shoots a single picture at the subject, the camera automatically...
Reference Manual
Page 63
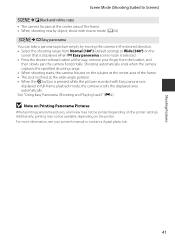
... camera focuses at the wide-angle position. • When the k button is selected. • Press the shutter-release button all the way, remove your printer's manual or contact a digital photo lab. 41
... camera focuses at the wide-angle position. • When the k button is selected. • Press the shutter-release button all the way, remove your printer's manual or contact a digital photo lab. 41

Reference Manual
Page 64
... pictures are facing, and brightness of a pet's face detected during shooting (A69) (except for pictures taken with continuous shooting). 42 When the shutter is released manually, about 1.9 frames per second while you hold the shutter-release button all the way (when image mode is set again. OFF: The camera does not...
... pictures are facing, and brightness of a pet's face detected during shooting (A69) (except for pictures taken with continuous shooting). 42 When the shutter is released manually, about 1.9 frames per second while you hold the shutter-release button all the way (when image mode is set again. OFF: The camera does not...

Reference Manual
Page 67
...; Up to smile. • When the camera detects a human face, a yellow double border (focus area) is detected, the face closest to Off. - C Releasing the Shutter Manually The shutter can be released by the double border is smiling, the Smile timer (A63) feature is activated and the shutter is automatically released. •...
...; Up to smile. • When the camera detects a human face, a yellow double border (focus area) is detected, the face closest to Off. - C Releasing the Shutter Manually The shutter can be released by the double border is smiling, the Smile timer (A63) feature is activated and the shutter is automatically released. •...

Reference Manual
Page 84
...-release button is r 4896×3672. The default setting E29 is pressed halfway. E31 Select the method that the camera uses to Face priority (A67), Manual, Center, Subject tracking or Target finding AF (A66) (default setting). The camera adjusts the exposure, which is On. You may hear the sound of shutter...
...-release button is r 4896×3672. The default setting E29 is pressed halfway. E31 Select the method that the camera uses to Face priority (A67), Manual, Center, Subject tracking or Target finding AF (A66) (default setting). The camera adjusts the exposure, which is On. You may hear the sound of shutter...

Reference Manual
Page 103
C Starting ViewNX 2 Manually • Windows: Double-click the ViewNX 2 shortcut on the memory card will be copied to the computer. 3 Terminate the connection. • If the camera is ... and then remove the card from the card reader or card slot. Using ViewNX 2 2 Transfer images to the computer. • Confirm that the name of Nikon Transfer 2 (1). • Click Start Transfer (2). 1 S9500 Playback Features 2 • At default settings, all the images on the desktop. • Mac OS: Click the ViewNX 2 icon...
C Starting ViewNX 2 Manually • Windows: Double-click the ViewNX 2 shortcut on the memory card will be copied to the computer. 3 Terminate the connection. • If the camera is ... and then remove the card from the card reader or card slot. Using ViewNX 2 2 Transfer images to the computer. • Confirm that the name of Nikon Transfer 2 (1). • Click Start Transfer (2). 1 S9500 Playback Features 2 • At default settings, all the images on the desktop. • Mac OS: Click the ViewNX 2 icon...
Reference Manual
Page 115
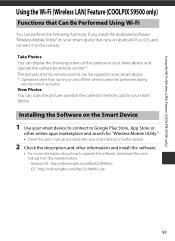
... Photos You can copy the pictures saved in the camera's memory card to your smart device for "Wireless Mobile Utility." • Check the user's manual provided with your smart device. Take Photos You can display the shooting screen of the camera on your smart device and operate the camera by...to the camera. iOS : http://nikonimglib.com/ManDL/WMAU-ios/ 93 Using the Wi-Fi (Wireless LAN) Feature (COOLPIX S9500 only) Using the Wi-Fi (Wireless LAN) Feature (COOLPIX S9500 only) Functions that Can Be Performed Using Wi-Fi You can perform the following functions if you install the dedicated...
... Photos You can copy the pictures saved in the camera's memory card to your smart device for "Wireless Mobile Utility." • Check the user's manual provided with your smart device. Take Photos You can display the shooting screen of the camera on your smart device and operate the camera by...to the camera. iOS : http://nikonimglib.com/ManDL/WMAU-ios/ 93 Using the Wi-Fi (Wireless LAN) Feature (COOLPIX S9500 only) Using the Wi-Fi (Wireless LAN) Feature (COOLPIX S9500 only) Functions that Can Be Performed Using Wi-Fi You can perform the following functions if you install the dedicated...
Reference Manual
Page 116
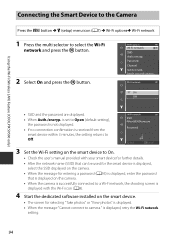
Wi-Fi network SSID: NikonS9500xxxxxxxx Password: Back Cancel 3 Set the Wi-Fi setting on the smart device to On. • Check the user's manual provided with your smart device for further details. • After the network name (SSID) that can be used for the smart device is displayed, ... and the password are displayed. • When Auth./encryp. Wi-Fi options Wi-Fi network SSID Auth./encryp. Using the Wi-Fi (Wireless LAN) Feature (COOLPIX S9500 only) Connecting the Smart Device to the Camera Press the d button M z (setup) menu icon (A7) M Wi-Fi optionsM Wi-Fi network 1 Press the ...
Wi-Fi network SSID: NikonS9500xxxxxxxx Password: Back Cancel 3 Set the Wi-Fi setting on the smart device to On. • Check the user's manual provided with your smart device for further details. • After the network name (SSID) that can be used for the smart device is displayed, ... and the password are displayed. • When Auth./encryp. Wi-Fi options Wi-Fi network SSID Auth./encryp. Using the Wi-Fi (Wireless LAN) Feature (COOLPIX S9500 only) Connecting the Smart Device to the Camera Press the d button M z (setup) menu icon (A7) M Wi-Fi optionsM Wi-Fi network 1 Press the ...

Reference Manual
Page 141
...devices. E21 Reference Section When disconnecting the cable, do not pull the plug at the TV to operate. • See your TV's instruction manual or other related documentation to check whether your television. C HDMI and HDMI-CEC "HDMI" is an abbreviation of HDMI-Consumer Electronics Control, ... D). Connecting the Camera to a TV (Viewing Images on a TV) 3 Tune the television to the video channel. • See the instruction manual provided with an HDMI cable. • Point the remote control at an angle. When purchasing an HDMI cable, be linked between full-frame playback and...
...devices. E21 Reference Section When disconnecting the cable, do not pull the plug at the TV to operate. • See your TV's instruction manual or other related documentation to check whether your television. C HDMI and HDMI-CEC "HDMI" is an abbreviation of HDMI-Consumer Electronics Control, ... D). Connecting the Camera to a TV (Viewing Images on a TV) 3 Tune the television to the video channel. • See the instruction manual provided with an HDMI cable. • Point the remote control at an angle. When purchasing an HDMI cable, be linked between full-frame playback and...
Reference Manual
Page 151
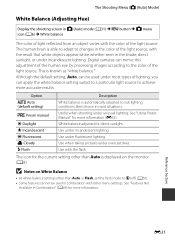
... images according to W (off) (A50). • Some features cannot be used under incandescent lighting. Option a Auto (default setting) b Preset manual c Daylight d Incandescent e Fluorescent f Cloudy g Flash Description White balance is known as "white balance." Best choice in the shade, direct sunlight..., or under most situations. See "Using Preset Manual" for direct sunlight. Use when taking pictures under fluorescent lighting. Although the default setting, Auto, can be used in Combination" (...
... images according to W (off) (A50). • Some features cannot be used under incandescent lighting. Option a Auto (default setting) b Preset manual c Daylight d Incandescent e Fluorescent f Cloudy g Flash Description White balance is known as "white balance." Best choice in the shade, direct sunlight..., or under most situations. See "Using Preset Manual" for direct sunlight. Use when taking pictures under fluorescent lighting. Although the default setting, Auto, can be used in Combination" (...

Reference Manual
Page 152
... under the lighting used during shooting. 1 Place a white or gray reference object under unusual lighting conditions (e.g., lamps with the flash, set White balance to b Preset manual, then press the k button. • The lens extends to Auto or Flash. The Shooting Menu (A (Auto) Mode) Using Preset... Manual Use when you want to make pictures taken under the lighting that will be used during shooting. 2 Display the shooting menu (A61), use the multi ...
... under the lighting used during shooting. 1 Place a white or gray reference object under unusual lighting conditions (e.g., lamps with the flash, set White balance to b Preset manual, then press the k button. • The lens extends to Auto or Flash. The Shooting Menu (A (Auto) Mode) Using Preset... Manual Use when you want to make pictures taken under the lighting that will be used during shooting. 2 Display the shooting menu (A61), use the multi ...

Reference Manual
Page 158
...shutter- Flash mode, macro mode, self-timer or exposure compensation To return to the camera. Reference Section E38 Option a Face priority x Manual Description The camera automatically detects and focuses on the monitor (multiple areas may light up to 9) that contain the subject closest to the ...focus area selection screen, press the k button again. Choose manually the focus position from 99 areas in A (Auto) mode (A31) M d button M A menu icon (A6) M AF area mode You can be ...
...shutter- Flash mode, macro mode, self-timer or exposure compensation To return to the camera. Reference Section E38 Option a Face priority x Manual Description The camera automatically detects and focuses on the monitor (multiple areas may light up to 9) that contain the subject closest to the ...focus area selection screen, press the k button again. Choose manually the focus position from 99 areas in A (Auto) mode (A31) M d button M A menu icon (A6) M AF area mode You can be ...

Reference Manual
Page 159
... center of the frame. Reference Section E39 You can also try using a feature that subject. s Subject tracking Subject tracking begins once you select a subject to Manual or Center and align the focus area with other menu settings. The focus area is in combination with the desired subject. See "Using Subject Tracking...
... center of the frame. Reference Section E39 You can also try using a feature that subject. s Subject tracking Subject tracking begins once you select a subject to Manual or Center and align the focus area with other menu settings. The focus area is in combination with the desired subject. See "Using Subject Tracking...

Reference Manual
Page 160
... shutter-release button is pressed halfway while the focus area is pressed halfway, the focus area display lights in red. AF area mode Face priority Manual Center Subject tracking Target finding AF 2 Frame the subject at the center of the frame. 1/250 F3.4 Reference Section E40 End 3 Press the shutter-release...
... shutter-release button is pressed halfway while the focus area is pressed halfway, the focus area display lights in red. AF area mode Face priority Manual Center Subject tracking Target finding AF 2 Frame the subject at the center of the frame. 1/250 F3.4 Reference Section E40 End 3 Press the shutter-release...


