
Reference Manual
Page 8
WARNINGS Turn off in the event of children. After removing or disconnecting the power source, take the product to a Nikon-authorized service representative for inspection. Do not use the product will read them. vi Keep out of reach of children Do not keep...within reach of malfunction Should you notice smoke or an unusual smell coming from putting the battery or other accident, take the equipment to a Nikon-authorized service representative for inspection, after unplugging the product and/or removing the battery. Doing so may result in low-temperature burns. Particular care...
WARNINGS Turn off in the event of children. After removing or disconnecting the power source, take the product to a Nikon-authorized service representative for inspection. Do not use the product will read them. vi Keep out of reach of children Do not keep...within reach of malfunction Should you notice smoke or an unusual smell coming from putting the battery or other accident, take the equipment to a Nikon-authorized service representative for inspection, after unplugging the product and/or removing the battery. Doing so may result in low-temperature burns. Particular care...
Reference Manual
Page 9
... or electric shock. • Dust on or near the Charging AC Adapter during lightning storms. Failure to observe this product: • Before replacing the battery, turn the product off. If you notice any change in the battery, such as necklaces or hairpins. • The battery is unplugged. • Use only a Rechargeable...
... or electric shock. • Dust on or near the Charging AC Adapter during lightning storms. Failure to observe this product: • Before replacing the battery, turn the product off. If you notice any change in the battery, such as necklaces or hairpins. • The battery is unplugged. • Use only a Rechargeable...
Reference Manual
Page 10
...still maturing, consult a pediatrician or ophthalmologist prior to maintain compliance with product regulations. Turn the power off when using in burns or fire. Cease use with the flash window... other display. Playing CD-ROMs on audio CD equipment. The electromagnetic waves emitted by Nikon for extended periods, whether on a television, monitor, or other moving parts with this... could result in a hospital, be taken to follow their instructions. Failure to OFF (COOLPIX S9300). For Your Safety Introduction • Do not handle the plug or Charging AC Adapter ...
...still maturing, consult a pediatrician or ophthalmologist prior to maintain compliance with product regulations. Turn the power off when using in burns or fire. Cease use with the flash window... other display. Playing CD-ROMs on audio CD equipment. The electromagnetic waves emitted by Nikon for extended periods, whether on a television, monitor, or other moving parts with this... could result in a hospital, be taken to follow their instructions. Failure to OFF (COOLPIX S9300). For Your Safety Introduction • Do not handle the plug or Charging AC Adapter ...
Reference Manual
Page 11
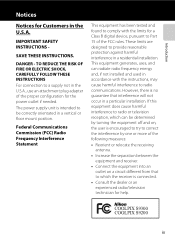
... be determined by turning the equipment off and on, the user is no guarantee that to which can radiate radio frequency energy and, if not installed and used in a particular installation. However, there is encouraged to try to correct the interference by one or more of the FCC rules. COOLPIX S9300 COOLPIX S9200 ix...
... be determined by turning the equipment off and on, the user is no guarantee that to which can radiate radio frequency energy and, if not installed and used in a particular installation. However, there is encouraged to try to correct the interference by one or more of the FCC rules. COOLPIX S9300 COOLPIX S9200 ix...

Reference Manual
Page 13
... pictures or movies that have been recorded with location information. The location name information will continue to operate even when the camera is turned off the camera. ● Using the camera overseas • Before taking the camera with location information, or GPS log files to...are driving a car. • Use information (such as direction) measured by the camera as a guideline only. Introduction Notes on GPS/electronic compass (COOLPIX S9300 only) ● Location name data of this camera Before using the GPS function, make sure to read "Disposing of Data Storage Devices" (Av)....
... pictures or movies that have been recorded with location information. The location name information will continue to operate even when the camera is turned off the camera. ● Using the camera overseas • Before taking the camera with location information, or GPS log files to...are driving a car. • Use information (such as direction) measured by the camera as a guideline only. Introduction Notes on GPS/electronic compass (COOLPIX S9300 only) ● Location name data of this camera Before using the GPS function, make sure to read "Disposing of Data Storage Devices" (Av)....
Reference Manual
Page 14
... Contents...ii About This Manual...iii Information and Precautions...iv For Your Safety...vi WARNINGS ...vi Notices ...ix Notes on GPS/electronic compass (COOLPIX S9300 only xi Parts of the Camera and Basic Operations 1 Parts of the Camera ...2 The Camera Body...2 Controls Used in Shooting Mode ...4...Charge the Battery 16 Preparation 3 Insert a Memory Card 18 Internal Memory and Memory Cards...19 Approved Memory Cards ...19 Step 1 Turn the Camera On ...20 Turning the Camera On and Off...21 Setting the Display Language, Date, and Time 22 Step 2 Select a Shooting Mode...24 Available Shooting...
... Contents...ii About This Manual...iii Information and Precautions...iv For Your Safety...vi WARNINGS ...vi Notices ...ix Notes on GPS/electronic compass (COOLPIX S9300 only xi Parts of the Camera and Basic Operations 1 Parts of the Camera ...2 The Camera Body...2 Controls Used in Shooting Mode ...4...Charge the Battery 16 Preparation 3 Insert a Memory Card 18 Internal Memory and Memory Cards...19 Approved Memory Cards ...19 Step 1 Turn the Camera On ...20 Turning the Camera On and Off...21 Setting the Display Language, Date, and Time 22 Step 2 Select a Shooting Mode...24 Available Shooting...
Reference Manual
Page 23
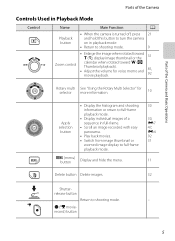
... Operations Parts of the Camera Controls Used in Playback Mode Control Name Main Function A Playback button • When the camera is turned off, press 21 and hold this button to turn the camera on in playback mode. • Return to shooting mode. 9 • Enlarge the image when rotated toward f (h Thumbnail playback). •...
... Operations Parts of the Camera Controls Used in Playback Mode Control Name Main Function A Playback button • When the camera is turned off, press 21 and hold this button to turn the camera on in playback mode. • Return to shooting mode. 9 • Enlarge the image when rotated toward f (h Thumbnail playback). •...
Reference Manual
Page 24
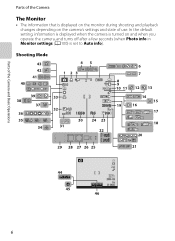
... The Monitor • The information that is displayed on the monitor during shooting and playback changes depending on and when you operate the camera, and turns off after a few seconds (when Photo info in Monitor settings (A100) is...
... The Monitor • The information that is displayed on the monitor during shooting and playback changes depending on and when you operate the camera, and turns off after a few seconds (when Photo info in Monitor settings (A100) is...
Reference Manual
Page 31
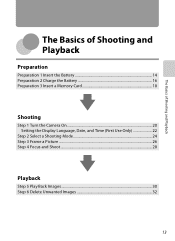
The Basics of Shooting and Playback The Basics of Shooting and Playback Preparation Preparation 1 Insert the Battery 14 Preparation 2 Charge the Battery 16 Preparation 3 Insert a Memory Card 18 Shooting Step 1 Turn the Camera On 20 Setting the Display Language, Date, and Time (First Use Only 22 Step 2 Select a Shooting Mode 24 Step 3 Frame a Picture ...26 Step 4 Focus and Shoot...28 Playback Step 5 Play Back Images ...30 Step 6 Delete Unwanted Images 32 13
The Basics of Shooting and Playback The Basics of Shooting and Playback Preparation Preparation 1 Insert the Battery 14 Preparation 2 Charge the Battery 16 Preparation 3 Insert a Memory Card 18 Shooting Step 1 Turn the Camera On 20 Setting the Display Language, Date, and Time (First Use Only 22 Step 2 Select a Shooting Mode 24 Step 3 Frame a Picture ...26 Step 4 Focus and Shoot...28 Playback Step 5 Play Back Images ...30 Step 6 Delete Unwanted Images 32 13
Reference Manual
Page 33
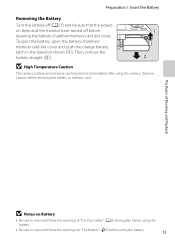
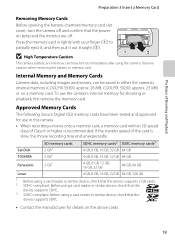
B High Temperature Caution The camera, battery, and memory card may be sure that the poweron lamp and the monitor have turned off (A21) and be hot immediately after using the battery. • Be sure to read and follow the warnings for "The Battery" (F3) before... opening the battery-chamber/memory card slot cover. Preparation 1 Insert the Battery Removing the Battery Turn the camera off before using the battery. 15 Then, remove the battery straight (2). The Basics of Shooting and Playback B Notes on Battery • Be ...
B High Temperature Caution The camera, battery, and memory card may be sure that the poweron lamp and the monitor have turned off (A21) and be hot immediately after using the battery. • Be sure to read and follow the warnings for "The Battery" (F3) before... opening the battery-chamber/memory card slot cover. Preparation 1 Insert the Battery Removing the Battery Turn the camera off before using the battery. 15 Then, remove the battery straight (2). The Basics of Shooting and Playback B Notes on Battery • Be ...
Reference Manual
Page 34
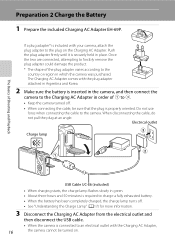
...The shape of 1 to charge a fully exhausted battery. • When the battery has been completely charged, the charge lamp turns off . • When connecting the cable, be turned on the Charging AC Adapter. Electrical outlet Charge lamp The Basics of Shooting and Playback 3 16 USB Cable UC-E6 (included...AC Adapter from the electrical outlet and then disconnect the USB cable. • When the camera is required to 3. • Keep the camera turned off . • See "Understanding the Charge Lamp" (A17) for more information. The Charging AC Adapter comes with the plug adapter attached ...
...The shape of 1 to charge a fully exhausted battery. • When the battery has been completely charged, the charge lamp turns off . • When connecting the cable, be turned on the Charging AC Adapter. Electrical outlet Charge lamp The Basics of Shooting and Playback 3 16 USB Cable UC-E6 (included...AC Adapter from the electrical outlet and then disconnect the USB cable. • When the camera is required to 3. • Keep the camera turned off . • See "Understanding the Charge Lamp" (A17) for more information. The Charging AC Adapter comes with the plug adapter attached ...
Reference Manual
Page 35
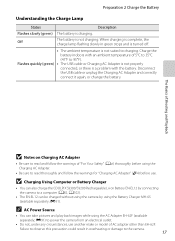
...the Charging AC Adapter and correctly connect it again, or change the battery. C AC Power Source • You can also charge the COOLPIX S9300/S9200 Rechargeable Li-ion Battery EN-EL12 by using the AC Adapter EH-62F (available separately; When charging is complete, the charge lamp ...any circumstances, use . The Basics of AC adapter other than EH-62F. Failure to observe this precaution could result in green stops and is turned off. • The ambient temperature is charging. B Charging Using Computer or Battery Charger • You can take pictures and play back images...
...the Charging AC Adapter and correctly connect it again, or change the battery. C AC Power Source • You can also charge the COOLPIX S9300/S9200 Rechargeable Li-ion Battery EN-EL12 by using the AC Adapter EH-62F (available separately; When charging is complete, the charge lamp ...any circumstances, use . The Basics of AC adapter other than EH-62F. Failure to observe this precaution could result in green stops and is turned off. • The ambient temperature is charging. B Charging Using Computer or Battery Charger • You can take pictures and play back images...
Reference Manual
Page 36
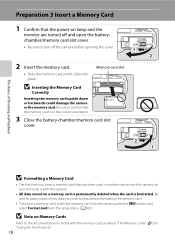
Preparation 3 Insert a Memory Card 1 Confirm that the power-on lamp and the monitor are turned off the camera before formatting the memory card. • To format a memory card, insert the memory card into the camera, press the d button and select ... B Formatting a Memory Card • The first time you wish to format it clicks into this camera. • All data stored on Memory Cards Refer to turn off and open the batterychamber/memory card slot cover. • Be sure to the documentation included with this camera, be sure to keep before opening...
Preparation 3 Insert a Memory Card 1 Confirm that the power-on lamp and the monitor are turned off the camera before formatting the memory card. • To format a memory card, insert the memory card into the camera, press the d button and select ... B Formatting a Memory Card • The first time you wish to format it clicks into this camera. • All data stored on Memory Cards Refer to turn off and open the batterychamber/memory card slot cover. • Be sure to the documentation included with this camera, be sure to keep before opening...
Reference Manual
Page 37
...eject it, and then pull it out straight (2). To use the camera's internal memory for use in either the camera's internal memory (COOLPIX S9300: approx. 26 MB; COOLPIX S9200: approx. 25 MB) or on the above cards. 19 The Basics of Shooting and Playback Preparation 3 Insert a Memory Card ...Removing Memory Cards Before opening the battery-chamber/memory card slot cover, turn the camera off . Approved Memory Cards The following Secure Digital (...
...eject it, and then pull it out straight (2). To use the camera's internal memory for use in either the camera's internal memory (COOLPIX S9300: approx. 26 MB; COOLPIX S9200: approx. 25 MB) or on the above cards. 19 The Basics of Shooting and Playback Preparation 3 Insert a Memory Card ...Removing Memory Cards Before opening the battery-chamber/memory card slot cover, turn the camera off . Approved Memory Cards The following Secure Digital (...
Reference Manual
Page 38
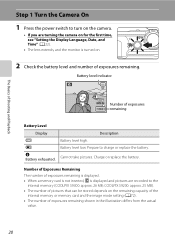
...Charge or replace the battery. Prepare to the internal memory (COOLPIX S9300: approx. 26 MB; Number of Exposures Remaining The number of exposures remaining is displayed. • When a memory card is not inserted, C is displayed and pictures are turning the camera on for the first time, see "Setting the... Language, Date, and Time" (A22). • The lens extends, and the monitor is turned on. 2 Check the battery level and number of exposures remaining. Step 1 Turn the Camera On 1 Press the power switch to turn on the camera. • If you are recorded to charge or replace the battery.
...Charge or replace the battery. Prepare to the internal memory (COOLPIX S9300: approx. 26 MB; Number of Exposures Remaining The number of exposures remaining is displayed. • When a memory card is not inserted, C is displayed and pictures are turning the camera on for the first time, see "Setting the... Language, Date, and Time" (A22). • The lens extends, and the monitor is turned on. 2 Check the battery level and number of exposures remaining. Step 1 Turn the Camera On 1 Press the power switch to turn on the camera. • If you are recorded to charge or replace the battery.
Reference Manual
Page 39
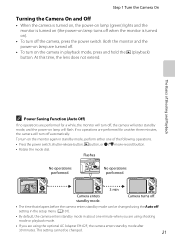
...Power Saving Function (Auto Off) If no operations are using the Auto off , the camera will enter standby mode, and the power-on lamp will turn off setting in the setup menu (A101). • By default, the camera enters standby mode in about one of the following operations. • ... cannot be changed . 21 No operations performed. 22001122//0055//1155 15:30 0004.JPG 29m 0s 3 min 4 11404 Camera enters standby mode. Camera turns off. • The time that elapses before the camera enters standby mode can be changed using the optional AC Adapter EH-62F, the camera enters...
...Power Saving Function (Auto Off) If no operations are using the Auto off , the camera will enter standby mode, and the power-on lamp will turn off setting in the setup menu (A101). • By default, the camera enters standby mode in about one of the following operations. • ... cannot be changed . 21 No operations performed. 22001122//0055//1155 15:30 0004.JPG 29m 0s 3 min 4 11404 Camera enters standby mode. Camera turns off. • The time that elapses before the camera enters standby mode can be changed using the optional AC Adapter EH-62F, the camera enters...
Reference Manual
Page 40
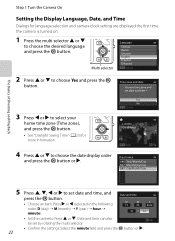
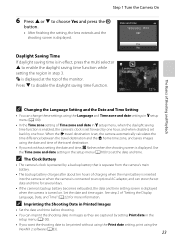
The Basics of Shooting and Playback Step 1 Turn the Camera On Setting the Display Language, Date, and Time Dialogs for more information. 4 Press H or I to choose the desired language and press the k button. ...), and press the k button. • See "Daylight Saving Time" (A23) for language selection and camera clock setting are displayed the first time the camera is turned on. 1 Press the multi selector H or I .
The Basics of Shooting and Playback Step 1 Turn the Camera On Setting the Display Language, Date, and Time Dialogs for more information. 4 Press H or I to choose the desired language and press the k button. ...), and press the k button. • See "Daylight Saving Time" (A23) for language selection and camera clock setting are displayed the first time the camera is turned on. 1 Press the multi selector H or I .
Reference Manual
Page 41
... settings using the ViewNX 2 software (A83). 23 See step 2 of charging when the main battery is inserted into the camera or when the camera is turned on. Step 1 Turn the Camera On 6 Press H or I to disable the daylight saving time function. London Casablanca Back The Basics of the monitor.
... settings using the ViewNX 2 software (A83). 23 See step 2 of charging when the main battery is inserted into the camera or when the camera is turned on. Step 1 Turn the Camera On 6 Press H or I to disable the daylight saving time function. London Casablanca Back The Basics of the monitor.
Reference Manual
Page 44
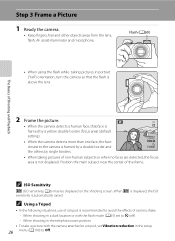
... the setup 26 menu (A100) to avoid the effects of camera shake: - The Basics of a tripod is automatically raised. When shooting in portrait ("tall") orientation, turn the camera so that face is framed by a yellow double border (focus area) (default setting). • When the camera detects more than one face, the...
... the setup 26 menu (A100) to avoid the effects of camera shake: - The Basics of a tripod is automatically raised. When shooting in portrait ("tall") orientation, turn the camera so that face is framed by a yellow double border (focus area) (default setting). • When the camera detects more than one face, the...
Reference Manual
Page 45
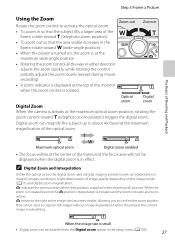
...control toward g (telephoto zoom position) triggers the digital zoom. V indicates the zoom position where interpolation is initiated and the zoom indicator also turns yellow. V moves to the right as interpolation to about 4× beyond the V position, interpolation is applied when shooting still pictures. When ...zoom in so that the subject fills a larger area of the frame, rotate toward f (wide-angle position). • When the power is turned on the image mode (A71) and digital zoom magnification. C Digital Zoom and Interpolation Unlike the optical zoom, the digital zoom uses a digital...
...control toward g (telephoto zoom position) triggers the digital zoom. V indicates the zoom position where interpolation is initiated and the zoom indicator also turns yellow. V moves to the right as interpolation to about 4× beyond the V position, interpolation is applied when shooting still pictures. When ...zoom in so that the subject fills a larger area of the frame, rotate toward f (wide-angle position). • When the power is turned on the image mode (A71) and digital zoom magnification. C Digital Zoom and Interpolation Unlike the optical zoom, the digital zoom uses a digital...


