
Reference Manual
Page 8
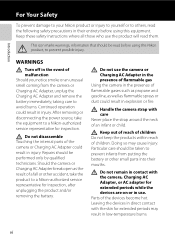
... care Never place the strap around the neck of a fall or other small parts into their entirety before using this Nikon product, to a Nikon-authorized service representative for extended periods may cause injury. vi Introduction For Your Safety To prevent damage to your...the Charging AC Adapter and remove the battery immediately, taking care to avoid burns. WARNINGS Turn off in low-temperature burns. After removing or disconnecting the power source, take the product to a Nikon-authorized service representative for extended periods while the devices are on or in injury. Handle ...
... care Never place the strap around the neck of a fall or other small parts into their entirety before using this Nikon product, to a Nikon-authorized service representative for extended periods may cause injury. vi Introduction For Your Safety To prevent damage to your...the Charging AC Adapter and remove the battery immediately, taking care to avoid burns. WARNINGS Turn off in low-temperature burns. After removing or disconnecting the power source, take the product to a Nikon-authorized service representative for extended periods while the devices are on or in injury. Handle ...
Reference Manual
Page 9
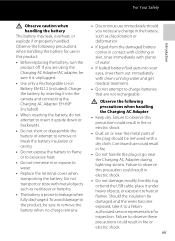
... Adapter. vii EH-69P (included). • When inserting the battery, do not attempt to insert it to observe this product: • Before replacing the battery, turn the product off. To avoid damage to the product, be sure it into your eyes, rinse them out immediately with a dry cloth. Failure to heat...
... Adapter. vii EH-69P (included). • When inserting the battery, do not attempt to insert it to observe this product: • Before replacing the battery, turn the product off. To avoid damage to the product, be sure it into your eyes, rinse them out immediately with a dry cloth. Failure to heat...
Reference Manual
Page 10
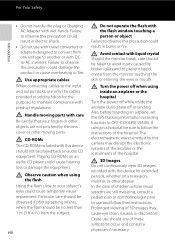
... designed to convert from one voltage to your fingers or other display. Failure to OFF (COOLPIX S9300). Playing CD-ROMs on audio CD equipment. Handle moving parts. Also, before boarding an ... be no less than 1 m (3 ft 4 in burns or fire. The electromagnetic waves emitted by Nikon for extended periods, whether on a television, monitor, or other objects are still maturing, consult a pediatrician...or object Failure to use with wet hands. If using inside an airplane or the hospital Turn the power off while inside the airplane during take off when using in electric shock. ...
... designed to convert from one voltage to your fingers or other display. Failure to OFF (COOLPIX S9300). Playing CD-ROMs on audio CD equipment. Handle moving parts. Also, before boarding an ... be no less than 1 m (3 ft 4 in burns or fire. The electromagnetic waves emitted by Nikon for extended periods, whether on a television, monitor, or other objects are still maturing, consult a pediatrician...or object Failure to use with wet hands. If using inside an airplane or the hospital Turn the power off while inside the airplane during take off when using in electric shock. ...
Reference Manual
Page 11
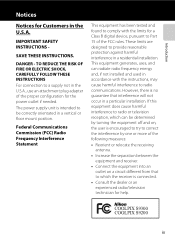
... there is no guarantee that to which the receiver is connected. • Consult the dealer or an experienced radio/television technician for help. COOLPIX S9300 COOLPIX S9200 ix If this equipment does cause harmful interference to radio or television reception, which can radiate radio frequency energy and, if not installed...a particular installation. TO REDUCE THE RISK OF FIRE OR ELECTRIC SHOCK, CAREFULLY FOLLOW THESE INSTRUCTIONS For connection to correct the interference by turning the equipment off and on a circuit different from that interference will not occur in the U.S.A.
... there is no guarantee that to which the receiver is connected. • Consult the dealer or an experienced radio/television technician for help. COOLPIX S9300 COOLPIX S9200 ix If this equipment does cause harmful interference to radio or television reception, which can radiate radio frequency energy and, if not installed...a particular installation. TO REDUCE THE RISK OF FIRE OR ELECTRIC SHOCK, CAREFULLY FOLLOW THESE INSTRUCTIONS For connection to correct the interference by turning the equipment off and on a circuit different from that interference will not occur in the U.S.A.

Reference Manual
Page 13
... airplane takeoffs and landings or inside a hospital, set the Record GPS data to Off and turn off . • The electromagnetic waves emitted from the government in China and on GPS/electronic compass (COOLPIX S9300 only) ● Location name data of this camera Before using Create log, GPS functions will...GPS options menu is On, and a log is recorded using the GPS function, make sure to read "USER LICENSE AGREEMENT FOR LOCATION NAME DATA (COOLPIX S9300 only)" (F7) and agree to Off. • The GPS may affect the measuring instruments of an airplane or medical equipment. For example, ...
... airplane takeoffs and landings or inside a hospital, set the Record GPS data to Off and turn off . • The electromagnetic waves emitted from the government in China and on GPS/electronic compass (COOLPIX S9300 only) ● Location name data of this camera Before using Create log, GPS functions will...GPS options menu is On, and a log is recorded using the GPS function, make sure to read "USER LICENSE AGREEMENT FOR LOCATION NAME DATA (COOLPIX S9300 only)" (F7) and agree to Off. • The GPS may affect the measuring instruments of an airplane or medical equipment. For example, ...
Reference Manual
Page 14
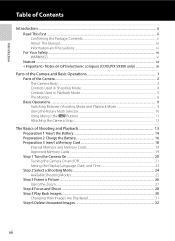
... Contents...ii About This Manual...iii Information and Precautions...iv For Your Safety...vi WARNINGS ...vi Notices ...ix Notes on GPS/electronic compass (COOLPIX S9300 only xi Parts of the Camera and Basic Operations 1 Parts of the Camera ...2 The Camera Body...2 Controls Used in Shooting Mode ...4...Charge the Battery 16 Preparation 3 Insert a Memory Card 18 Internal Memory and Memory Cards...19 Approved Memory Cards ...19 Step 1 Turn the Camera On ...20 Turning the Camera On and Off...21 Setting the Display Language, Date, and Time 22 Step 2 Select a Shooting Mode...24 Available Shooting...
... Contents...ii About This Manual...iii Information and Precautions...iv For Your Safety...vi WARNINGS ...vi Notices ...ix Notes on GPS/electronic compass (COOLPIX S9300 only xi Parts of the Camera and Basic Operations 1 Parts of the Camera ...2 The Camera Body...2 Controls Used in Shooting Mode ...4...Charge the Battery 16 Preparation 3 Insert a Memory Card 18 Internal Memory and Memory Cards...19 Approved Memory Cards ...19 Step 1 Turn the Camera On ...20 Turning the Camera On and Off...21 Setting the Display Language, Date, and Time 22 Step 2 Select a Shooting Mode...24 Available Shooting...
Reference Manual
Page 23
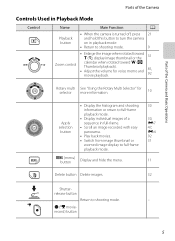
... individual images of the Camera Controls Used in Playback Mode Control Name Main Function A Playback button • When the camera is turned off, press 21 and hold this button to turn the camera on in full-frame. • Scroll an image recorded with easy panorama. • Play back movies. • Switch from...
... individual images of the Camera Controls Used in Playback Mode Control Name Main Function A Playback button • When the camera is turned off, press 21 and hold this button to turn the camera on in full-frame. • Scroll an image recorded with easy panorama. • Play back movies. • Switch from...
Reference Manual
Page 24
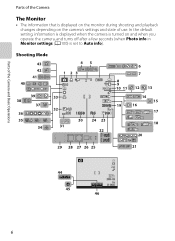
... 17 18 20 21 44 45 29m 0s 1140 46 6 In the default setting, information is displayed when the camera is turned on and when you operate the camera, and turns off after a few seconds (when Photo info in Monitor settings (A100) is displayed on the monitor during shooting and playback changes...
... 17 18 20 21 44 45 29m 0s 1140 46 6 In the default setting, information is displayed when the camera is turned on and when you operate the camera, and turns off after a few seconds (when Photo info in Monitor settings (A100) is displayed on the monitor during shooting and playback changes...
Reference Manual
Page 31
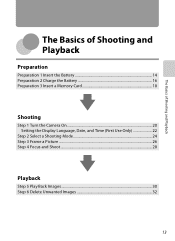
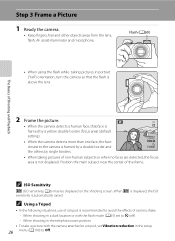
The Basics of Shooting and Playback The Basics of Shooting and Playback Preparation Preparation 1 Insert the Battery 14 Preparation 2 Charge the Battery 16 Preparation 3 Insert a Memory Card 18 Shooting Step 1 Turn the Camera On 20 Setting the Display Language, Date, and Time (First Use Only 22 Step 2 Select a Shooting Mode 24 Step 3 Frame a Picture ...26 Step 4 Focus and Shoot...28 Playback Step 5 Play Back Images ...30 Step 6 Delete Unwanted Images 32 13
The Basics of Shooting and Playback The Basics of Shooting and Playback Preparation Preparation 1 Insert the Battery 14 Preparation 2 Charge the Battery 16 Preparation 3 Insert a Memory Card 18 Shooting Step 1 Turn the Camera On 20 Setting the Display Language, Date, and Time (First Use Only 22 Step 2 Select a Shooting Mode 24 Step 3 Frame a Picture ...26 Step 4 Focus and Shoot...28 Playback Step 5 Play Back Images ...30 Step 6 Delete Unwanted Images 32 13
Reference Manual
Page 33
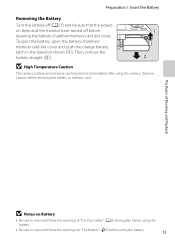
... latch in the direction shown (1). B High Temperature Caution The camera, battery, and memory card may be sure that the poweron lamp and the monitor have turned off before using the camera. Preparation 1 Insert the Battery Removing the Battery Turn the camera off (A21) and be hot immediately after using the battery. 15
... latch in the direction shown (1). B High Temperature Caution The camera, battery, and memory card may be sure that the poweron lamp and the monitor have turned off before using the camera. Preparation 1 Insert the Battery Removing the Battery Turn the camera off (A21) and be hot immediately after using the battery. 15
Reference Manual
Page 34
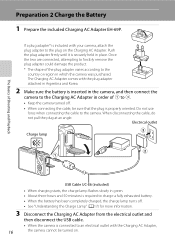
... camera, attach the plug adapter to charge a fully exhausted battery. • When the battery has been completely charged, the charge lamp turns off . • When connecting the cable, be turned on the Charging AC Adapter. Push the plug adapter firmly until it is securely held in green. • About three hours and... EH-69P. Electrical outlet Charge lamp The Basics of 1 to the camera. Do not use force when connecting the cable to 3. • Keep the camera turned off . • See "Understanding the Charge Lamp" (A17) for more information.
... camera, attach the plug adapter to charge a fully exhausted battery. • When the battery has been completely charged, the charge lamp turns off . • When connecting the cable, be turned on the Charging AC Adapter. Push the plug adapter firmly until it is securely held in green. • About three hours and... EH-69P. Electrical outlet Charge lamp The Basics of 1 to the camera. Do not use force when connecting the cable to 3. • Keep the camera turned off . • See "Understanding the Charge Lamp" (A17) for more information.
Reference Manual
Page 35
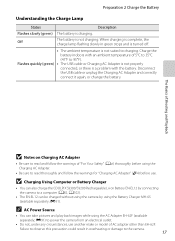
... warnings of AC adapter other than EH-62F. E91) to a computer (A82, A102). • The EN-EL12 can also charge the COOLPIX S9300/S9200 Rechargeable Li-ion Battery EN-EL12 by using the Battery Charger MH-65 (available separately; Charge the battery indoors with the battery. Preparation ...(Avi) thoroughly before using the AC Adapter EH-62F (available separately; Failure to observe this precaution could result in green stops and is turned off. • The ambient temperature is complete, the charge lamp flashing slowly in overheating or damage to charging. Off The battery is charging...
... warnings of AC adapter other than EH-62F. E91) to a computer (A82, A102). • The EN-EL12 can also charge the COOLPIX S9300/S9200 Rechargeable Li-ion Battery EN-EL12 by using the Battery Charger MH-65 (available separately; Charge the battery indoors with the battery. Preparation ...(Avi) thoroughly before using the AC Adapter EH-62F (available separately; Failure to observe this precaution could result in green stops and is turned off. • The ambient temperature is complete, the charge lamp flashing slowly in overheating or damage to charging. Off The battery is charging...
Reference Manual
Page 36
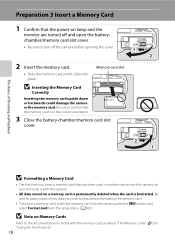
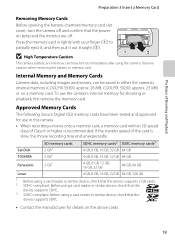
Be sure to make copies of Shooting and Playback B Formatting a Memory Card • The first time you wish to turn off and open the batterychamber/memory card slot cover. • Be sure to keep before opening the cover. 2 Insert the memory card. Preparation 3 Insert a Memory ... memory card, as well as "The Memory Cards" (F5) in another device into this camera. • All data stored on lamp and the monitor are turned off the camera before formatting the memory card. • To format a memory card, insert the memory card into place.
Be sure to make copies of Shooting and Playback B Formatting a Memory Card • The first time you wish to turn off and open the batterychamber/memory card slot cover. • Be sure to keep before opening the cover. 2 Insert the memory card. Preparation 3 Insert a Memory ... memory card, as well as "The Memory Cards" (F5) in another device into this camera. • All data stored on lamp and the monitor are turned off the camera before formatting the memory card. • To format a memory card, insert the memory card into place.
Reference Manual
Page 37
... 3 Insert a Memory Card Removing Memory Cards Before opening the battery-chamber/memory card slot cover, turn the camera off and confirm that the device supports SDHC. 3 SDXC-compliant. To use in either the camera's internal memory (COOLPIX S9300: approx. 26 MB; Internal Memory and Memory Cards Camera data, including images and movies, can...
... 3 Insert a Memory Card Removing Memory Cards Before opening the battery-chamber/memory card slot cover, turn the camera off and confirm that the device supports SDHC. 3 SDXC-compliant. To use in either the camera's internal memory (COOLPIX S9300: approx. 26 MB; Internal Memory and Memory Cards Camera data, including images and movies, can...
Reference Manual
Page 38
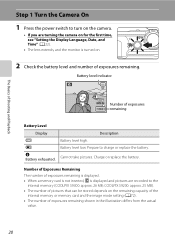
... exposures remaining is displayed. • When a memory card is not inserted, C is turned on. 2 Check the battery level and number of exposures remaining. Step 1 Turn the Camera On 1 Press the power switch to turn on the camera. • If you are turning the camera on for the first time, see "Setting the Display Language... of exposures remaining shown in the illustration differs from the actual value. 20 Description Battery level high. Battery level low. Prepare to the internal memory (COOLPIX S9300: approx. 26 MB;
... exposures remaining is displayed. • When a memory card is not inserted, C is turned on. 2 Check the battery level and number of exposures remaining. Step 1 Turn the Camera On 1 Press the power switch to turn on the camera. • If you are turning the camera on for the first time, see "Setting the Display Language... of exposures remaining shown in the illustration differs from the actual value. 20 Description Battery level high. Battery level low. Prepare to the internal memory (COOLPIX S9300: approx. 26 MB;
Reference Manual
Page 39
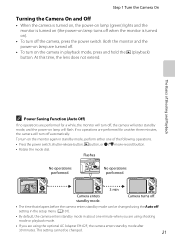
... Off) If no operations are using shooting mode or playback mode. • If you are performed for a while, the monitor will turn off automatically. At this time, the lens does not extend. To turn off the camera, press the power switch. This setting cannot be changed . 21 If no operations are... the c (playback) button. Step 1 Turn the Camera On Turning the Camera On and Off • When the camera is turned on, the power-on lamp (green) lights and the monitor is turned on (the power-on lamp turns off when the monitor is turned on). • To turn on the monitor again in standby mode...
... Off) If no operations are using shooting mode or playback mode. • If you are performed for a while, the monitor will turn off automatically. At this time, the lens does not extend. To turn off the camera, press the power switch. This setting cannot be changed . 21 If no operations are... the c (playback) button. Step 1 Turn the Camera On Turning the Camera On and Off • When the camera is turned on, the power-on lamp (green) lights and the monitor is turned on (the power-on lamp turns off when the monitor is turned on). • To turn on the monitor again in standby mode...
Reference Manual
Page 40
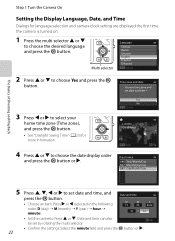
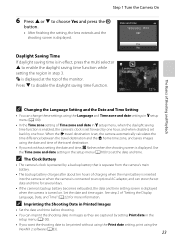
...), and press the k button. • See "Daylight Saving Time" (A23) for language selection and camera clock setting are displayed the first time the camera is turned on. 1 Press the multi selector H or I to choose the date display order and press the k button or K. D M Y 15 05 2012 15 10 ...; Set the contents: Press H or I , J or K to set date and time, and press the k button. The Basics of Shooting and Playback Step 1 Turn the Camera On Setting the Display Language, Date, and Time Dialogs for more information. 4 Press H or I to choose the desired language and press the k button...
...), and press the k button. • See "Daylight Saving Time" (A23) for language selection and camera clock setting are displayed the first time the camera is turned on. 1 Press the multi selector H or I to choose the date display order and press the k button or K. D M Y 15 05 2012 15 10 ...; Set the contents: Press H or I , J or K to set date and time, and press the k button. The Basics of Shooting and Playback Step 1 Turn the Camera On Setting the Display Language, Date, and Time Dialogs for more information. 4 Press H or I to choose the desired language and press the k button...
Reference Manual
Page 41
...step 3. Use the Time zone and date setting in z setup menu, when the daylight saving time function is enabled, the camera's clock is displayed. Step 1 Turn the Camera On 6 Press H or I to disable the daylight saving time function. W is displayed. Yes No Daylight Saving Time If daylight saving time is... turned on. Set the date and time again. London Casablanca Back The Basics of Time zone and date in the setup menu (A100) to set back ...
...step 3. Use the Time zone and date setting in z setup menu, when the daylight saving time function is enabled, the camera's clock is displayed. Step 1 Turn the Camera On 6 Press H or I to disable the daylight saving time function. W is displayed. Yes No Daylight Saving Time If daylight saving time is... turned on. Set the date and time again. London Casablanca Back The Basics of Time zone and date in the setup menu (A100) to set back ...
Reference Manual
Page 44
..., the ISO sensitivity is recommended to Off. C ISO Sensitivity E (ISO sensitivity, A6) may be displayed on the shooting screen. When shooting in portrait ("tall") orientation, turn the camera so that face is framed by a yellow double border (focus area) (default setting). • When the camera detects more than one face, the...
..., the ISO sensitivity is recommended to Off. C ISO Sensitivity E (ISO sensitivity, A6) may be displayed on the shooting screen. When shooting in portrait ("tall") orientation, turn the camera so that face is framed by a yellow double border (focus area) (default setting). • When the camera detects more than one face, the...
Reference Manual
Page 45
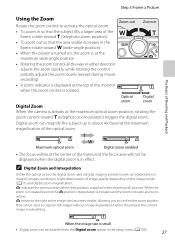
...angle position). • When the power is already at the current image mode setting. Optical Digital zoom zoom Digital Zoom When the camera is turned on the image mode (A71) and digital zoom magnification. The Basics of Shooting and Playback Maximum optical zoom Digital zoom enabled • The...of image quality depending on , the zoom is rotated. V indicates the zoom position where interpolation is initiated and the zoom indicator also turns yellow. When the zoom is increased beyond the maximum magnification of the monitor when the zoom control is at the top of the ...
...angle position). • When the power is already at the current image mode setting. Optical Digital zoom zoom Digital Zoom When the camera is turned on the image mode (A71) and digital zoom magnification. The Basics of Shooting and Playback Maximum optical zoom Digital zoom enabled • The...of image quality depending on , the zoom is rotated. V indicates the zoom position where interpolation is initiated and the zoom indicator also turns yellow. When the zoom is increased beyond the maximum magnification of the monitor when the zoom control is at the top of the ...


