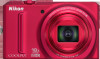
User Manual
Page 4
... Adapter, unplug the Charging AC Adapter and remove the battery immediately, taking care to a Nikonauthorized service representative for inspection, after unplugging the product and/or removing the battery. For Your Safety To prevent damage to your Nikon product or injury to yourself or to others, ...read the following safety precautions in their mouths. This icon marks warnings, information that should be performed only by qualified technicians. Should the camera or Charging AC Adapter break open as this...
... Adapter, unplug the Charging AC Adapter and remove the battery immediately, taking care to a Nikonauthorized service representative for inspection, after unplugging the product and/or removing the battery. For Your Safety To prevent damage to your Nikon product or injury to yourself or to others, ...read the following safety precautions in their mouths. This icon marks warnings, information that should be performed only by qualified technicians. Should the camera or Charging AC Adapter break open as this...

User Manual
Page 5
..., turn the product off. Failure to observe this precaution could result in fire or electric shock. • Dust on or near the Charging AC Adapter during lightning storms. Failure to heat or flames. Failure to observe this precaution could result in or expose to the product, ...8226; The battery is unplugged. • Use only a Rechargeable Li-ion Battery EN-EL12 (supplied). Observe the following precautions when handling the Charging AC Adapter • Keep dry. For Your Safety Observe caution when handling the battery The battery may leak, overheat, or explode if improperly handled....
..., turn the product off. Failure to observe this precaution could result in fire or electric shock. • Dust on or near the Charging AC Adapter during lightning storms. Failure to heat or flames. Failure to observe this precaution could result in or expose to the product, ...8226; The battery is unplugged. • Use only a Rechargeable Li-ion Battery EN-EL12 (supplied). Observe the following precautions when handling the Charging AC Adapter • Keep dry. For Your Safety Observe caution when handling the battery The battery may leak, overheat, or explode if improperly handled....
User Manual
Page 8
... appropriate collection point. Do not dispose of as household waste. • For more information, contact the retailer or the local authorities in charge of waste management. Wash hands after handling. This symbol indicates that the battery is to cause birth defects or other reproductive harm. The... for customers in the State of California WARNING Handling the cord on the battery indicates that this product is to be collected separately. Nikon Inc., 1300 Walt Whitman Road Melville, New York 11747-3064 USA Tel: 631-547-4200 Notice for customers in Europe CAUTIONS RISK ...
... appropriate collection point. Do not dispose of as household waste. • For more information, contact the retailer or the local authorities in charge of waste management. Wash hands after handling. This symbol indicates that the battery is to cause birth defects or other reproductive harm. The... for customers in the State of California WARNING Handling the cord on the battery indicates that this product is to be collected separately. Nikon Inc., 1300 Walt Whitman Road Melville, New York 11747-3064 USA Tel: 631-547-4200 Notice for customers in Europe CAUTIONS RISK ...
User Manual
Page 9
......12 Switching Between the Tabs on Menu Screens 13 Attaching the Camera Strap ...13 First Steps ...14 Inserting the Battery ...14 Removing the Battery ...15 Charging the Battery ...16 Turning On and Off the Camera...19 Setting Display Language, Date, and Time 20 Inserting Memory Cards ...22 Removing Memory Cards...22...
......12 Switching Between the Tabs on Menu Screens 13 Attaching the Camera Strap ...13 First Steps ...14 Inserting the Battery ...14 Removing the Battery ...15 Charging the Battery ...16 Turning On and Off the Camera...19 Setting Display Language, Date, and Time 20 Inserting Memory Cards ...22 Removing Memory Cards...22...
User Manual
Page 12
Table of Contents Connecting to a Computer...157 Before Connecting the Camera...157 Transferring Images from a Camera to a Computer 158 Charging While Connecting to a Computer 162 Connecting to a Printer...163 Connecting the Camera to a Printer...164 Printing Images One at a Time...165......180 AF Assist...181 Digital Zoom...182 Sound Settings...183 Auto Off ...184 Format Memory/Format Card ...185 Language...186 TV Settings ...186 Charge by Computer...187 Blink Warning ...188 Reset All ...190 Firmware Version ...193 Caring for the Camera...194 Maximizing Camera Life and Performance 194 ...
Table of Contents Connecting to a Computer...157 Before Connecting the Camera...157 Transferring Images from a Camera to a Computer 158 Charging While Connecting to a Computer 162 Connecting to a Printer...163 Connecting the Camera to a Printer...164 Printing Images One at a Time...165......180 AF Assist...181 Digital Zoom...182 Sound Settings...183 Auto Off ...184 Format Memory/Format Card ...185 Language...186 TV Settings ...186 Charge by Computer...187 Blink Warning ...188 Reset All ...190 Firmware Version ...193 Caring for the Camera...194 Maximizing Camera Life and Performance 194 ...
User Manual
Page 14
...product may result from the Nikon representative in your area (address provided separately). 2 Only Nikon brand electronic accessories (including battery charger, batteries, Charging AC Adapter, and AC adapters) certified by any means, without prior notice. • Nikon will not be held ...that the camera is functioning normally. Additional information may be held liable for contact information: http://imaging.nikon.com/ Use Only Nikon Brand Electronic Accessories Nikon COOLPIX cameras are engineered and proven to frequently asked questions (FAQs), and general advice on a trip), ...
...product may result from the Nikon representative in your area (address provided separately). 2 Only Nikon brand electronic accessories (including battery charger, batteries, Charging AC Adapter, and AC adapters) certified by any means, without prior notice. • Nikon will not be held ...that the camera is functioning normally. Additional information may be held liable for contact information: http://imaging.nikon.com/ Use Only Nikon Brand Electronic Accessories Nikon COOLPIX cameras are engineered and proven to frequently asked questions (FAQs), and general advice on a trip), ...
User Manual
Page 26
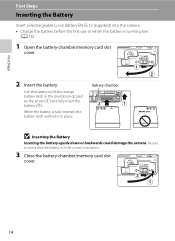
First Steps First Steps Inserting the Battery Insert a Rechargeable Li-ion Battery EN-EL12 (supplied) into the camera. • Charge the battery before the first use or when the battery is fully inserted, the battery latch will lock it in place. When the battery is ...
First Steps First Steps Inserting the Battery Insert a Rechargeable Li-ion Battery EN-EL12 (supplied) into the camera. • Charge the battery before the first use or when the battery is fully inserted, the battery latch will lock it in place. When the battery is ...

User Manual
Page 28
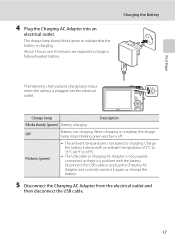
... the camera via the supplied USB Cable UC-E6, and then plugging the Charging AC Adapter into an electrical outlet. 1 Prepare the Charging AC Adapter EH-69P. If a plug adapter* is securely held in place. The Charging AC Adapter comes with the plug adapter attached in which the camera was purchased.... USB cable 16 First Steps Charging the Battery Charge the supplied Rechargeable Li-ion Battery EN-EL12 inserted into the camera, by connecting the supplied Charging AC Adapter EH-69P to insert connectors at an angle, and do not use force...
... the camera via the supplied USB Cable UC-E6, and then plugging the Charging AC Adapter into an electrical outlet. 1 Prepare the Charging AC Adapter EH-69P. If a plug adapter* is securely held in place. The Charging AC Adapter comes with the plug adapter attached in which the camera was purchased.... USB cable 16 First Steps Charging the Battery Charge the supplied Rechargeable Li-ion Battery EN-EL12 inserted into the camera, by connecting the supplied Charging AC Adapter EH-69P to insert connectors at an angle, and do not use force...
User Manual
Page 29
...it again, or change the battery. 5 Disconnect the Charging AC Adapter from the electrical outlet and then disconnect the USB cable. 17 Charge lamp Description Blinks slowly (green) Battery charging. Off Battery not charging. About 3 hours and 50 minutes are required to ...176;C (41°F to charging. Charging the Battery The following chart explains charge lamp status when the camera is complete, the charge lamp stops blinking green and turns off. The charge lamp slowly blinks green to charge a fully exhausted battery. When charging is plugged into an electrical outlet...
...it again, or change the battery. 5 Disconnect the Charging AC Adapter from the electrical outlet and then disconnect the USB cable. 17 Charge lamp Description Blinks slowly (green) Battery charging. Off Battery not charging. About 3 hours and 50 minutes are required to ...176;C (41°F to charging. Charging the Battery The following chart explains charge lamp status when the camera is complete, the charge lamp stops blinking green and turns off. The charge lamp slowly blinks green to charge a fully exhausted battery. When charging is plugged into an electrical outlet...

User Manual
Page 30
...using the Battery Charger MH-65 (available separately; Failure to observe this precaution could result in overheating or in damage to a computer also charges the Rechargeable Li-ion Battery ENEL12 (A 157, 187). • The EN-EL12 can be turned on. • Do not, under... Steps Charging the Battery B Notes on Charging AC Adapter • The Charging AC Adapter EH-69P is for charging the battery inserted into the camera. C AC Power Source • If the AC Adapter EH-62F (available separately; D Charging Using Computer or Battery Charger • Connecting the COOLPIX S9100 to the...
...using the Battery Charger MH-65 (available separately; Failure to observe this precaution could result in overheating or in damage to a computer also charges the Rechargeable Li-ion Battery ENEL12 (A 157, 187). • The EN-EL12 can be turned on. • Do not, under... Steps Charging the Battery B Notes on Charging AC Adapter • The Charging AC Adapter EH-69P is for charging the battery inserted into the camera. C AC Power Source • If the AC Adapter EH-62F (available separately; D Charging Using Computer or Battery Charger • Connecting the COOLPIX S9100 to the...
User Manual
Page 31
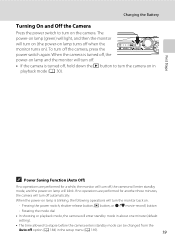
... menu (A 169). 19 First Steps C Power Saving Function (Auto Off) If no operations are performed for another three minutes, the camera will turn off automatically. Charging the Battery Turning On and Off the Camera Press the power switch to turn the camera on in playback mode (A 30). When the power-on...
... menu (A 169). 19 First Steps C Power Saving Function (Auto Off) If no operations are performed for another three minutes, the camera will turn off automatically. Charging the Battery Turning On and Off the Camera Press the power switch to turn the camera on in playback mode (A 30). When the power-on...
User Manual
Page 36
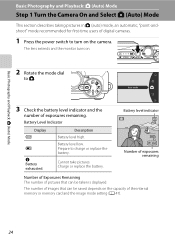
... Number of Exposures Remaining The number of digital cameras. 1 Press the power switch to turn on . 2 Rotate the mode dial to charge or replace the battery. Battery level low. Charge or replace the battery. The number of images that can be taken is displayed. The lens extends and the monitor turns on...
... Number of Exposures Remaining The number of digital cameras. 1 Press the power switch to turn on . 2 Rotate the mode dial to charge or replace the battery. Battery level low. Charge or replace the battery. The number of images that can be taken is displayed. The lens extends and the monitor turns on...
User Manual
Page 46
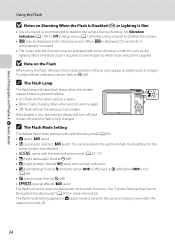
... (night portrait): fixed at W (off) (when HDR is turned off , until the flash is taken. When E is displayed, ISO sensitivity is taken. • Blinks: Flash charging. Wait a few seconds and try again. • Off: Flash will turn off, and remain off . 34 If the battery is low, the monitor display will... not fire when picture is fully charged. Set Vibration reduction (A 178) to Off in setup menu (A 169) when using the flash, reflections from dust particles in the air may appear as...
... (night portrait): fixed at W (off) (when HDR is turned off , until the flash is taken. When E is displayed, ISO sensitivity is taken. • Blinks: Flash charging. Wait a few seconds and try again. • Off: Flash will turn off, and remain off . 34 If the battery is low, the monitor display will... not fire when picture is fully charged. Set Vibration reduction (A 178) to Off in setup menu (A 169) when using the flash, reflections from dust particles in the air may appear as...
User Manual
Page 170
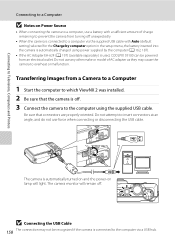
... (available separately) is off. 3 Connect the camera to the computer using the supplied USB cable. Do not use any other make or model of charge remaining to prevent the camera from a Camera to a Computer 1 Start the computer to which ViewNX 2 was installed. 2 Be sure that connectors are...Connecting to Televisions, Computers and Printers Connecting to a Computer B Notes on lamp will remain off. Be sure that the camera is used, COOLPIX S9100 can be recognized if the camera is automatically turned on and the power-on Power Source • When connecting the camera to a computer via...
... (available separately) is off. 3 Connect the camera to the computer using the supplied USB cable. Do not use any other make or model of charge remaining to prevent the camera from a Camera to a Computer 1 Start the computer to which ViewNX 2 was installed. 2 Be sure that connectors are...Connecting to Televisions, Computers and Printers Connecting to a Computer B Notes on lamp will remain off. Be sure that the camera is used, COOLPIX S9100 can be recognized if the camera is automatically turned on and the power-on Power Source • When connecting the camera to a computer via...
User Manual
Page 171
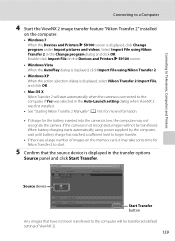
... automatically when the camera is connected to a Computer 4 Start the ViewNX 2 image transfer feature "Nikon Transfer 2" installed on the computer. • Windows 7 When the Devices and Printers K S9100 screen is displayed, click Change program under Import pictures and videos. When battery charging starts automatically using power supplied by the computer, wait until battery...
... automatically when the camera is connected to a Computer 4 Start the ViewNX 2 image transfer feature "Nikon Transfer 2" installed on the computer. • Windows 7 When the Devices and Printers K S9100 screen is displayed, click Change program under Import pictures and videos. When battery charging starts automatically using power supplied by the computer, wait until battery...
User Manual
Page 172
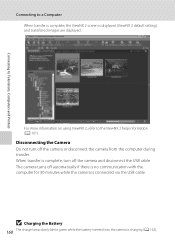
... is no communication with the computer for 30 minutes while the camera is complete, turn off the camera and disconnect the USB cable. B Charging the Battery 160 The charge lamp slowly blinks green while the battery inserted into the camera is displayed (ViewNX 2 default setting) and transferred images are displayed. Connecting to... Printers Connecting to the ViewNX 2 help information (A 161). For more information on using ViewNX 2, refer to a Computer When transfer is complete, the ViewNX 2 screen is charging (A 162).
... is no communication with the computer for 30 minutes while the camera is complete, turn off the camera and disconnect the USB cable. B Charging the Battery 160 The charge lamp slowly blinks green while the battery inserted into the camera is displayed (ViewNX 2 default setting) and transferred images are displayed. Connecting to... Printers Connecting to the ViewNX 2 help information (A 161). For more information on using ViewNX 2, refer to a Computer When transfer is complete, the ViewNX 2 screen is charging (A 162).
User Manual
Page 174
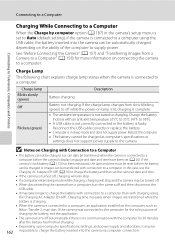
...; Depending upon computer specifications, settings, and power supply and allocation, it may be 162 impossible to charge the battery inserted into the camera can data be charged as Nikon Transfer 2, may start. Battery not charging. If the camera's clock battery (A 173) has been exhausted, the date and time must be reset before the camera...
...; Depending upon computer specifications, settings, and power supply and allocation, it may be 162 impossible to charge the battery inserted into the camera can data be charged as Nikon Transfer 2, may start. Battery not charging. If the camera's clock battery (A 173) has been exhausted, the date and time must be reset before the camera...
User Manual
Page 175
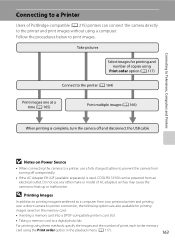
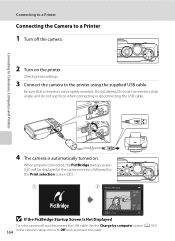
.... • If the AC Adapter EH-62F (available separately) is used, COOLPIX S9100 can connect the camera directly to the printer and print images without using the Print order option in the playback menu (A 117). 163 Do not use a fully charged battery to prevent the camera from turning off and disconnect the USB...
.... • If the AC Adapter EH-62F (available separately) is used, COOLPIX S9100 can connect the camera directly to the printer and print images without using the Print order option in the playback menu (A 117). 163 Do not use a fully charged battery to prevent the camera from turning off and disconnect the USB...
User Manual
Page 176
... be displayed in the camera monitor, followed by computer option (A 187) 164 in the camera's setup menu to Off and reconnect the cable. Set the Charge by the Print selection screen (2). 1 2 Print selection 15/05 2011 NO. 32 32 B If the PictBridge Startup Screen Is Not Displayed Turn the camera off...
... be displayed in the camera monitor, followed by computer option (A 187) 164 in the camera's setup menu to Off and reconnect the cable. Set the Charge by the Print selection screen (2). 1 2 Print selection 15/05 2011 NO. 32 32 B If the PictBridge Startup Screen Is Not Displayed Turn the camera off...
User Manual
Page 181
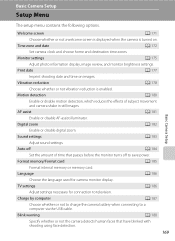
Print date A 177 Imprint shooting date and time on . Auto off to save power. Charge by computer A 187 Choose whether or not to charge the camera battery when connecting to television. Monitor settings A 175 Adjust photo information display, image review, and monitor brightness settings. AF assist A 181 Basic Camera ...
Print date A 177 Imprint shooting date and time on . Auto off to save power. Charge by computer A 187 Choose whether or not to charge the camera battery when connecting to television. Monitor settings A 175 Adjust photo information display, image review, and monitor brightness settings. AF assist A 181 Basic Camera ...


