
Reference Manual
Page 4
...Nikon COOLPIX S8200 digital camera. After reading, please keep this manual. Introduction Introduction Read This First Thank you purchased the camera. The shape of the plug adapter varies with the camera. COOLPIX S8200 Digital Camera Camera Strap Rechargeable Li-ion Battery EN-EL12 (with terminal cover) Charging AC Adapter EH-69P* USB Cable... UC-E6 Audio Video Cable EG-CP16 ViewNX 2 Installer CD Reference...
...Nikon COOLPIX S8200 digital camera. After reading, please keep this manual. Introduction Introduction Read This First Thank you purchased the camera. The shape of the plug adapter varies with the camera. COOLPIX S8200 Digital Camera Camera Strap Rechargeable Li-ion Battery EN-EL12 (with terminal cover) Charging AC Adapter EH-69P* USB Cable... UC-E6 Audio Video Cable EG-CP16 ViewNX 2 Installer CD Reference...

Reference Manual
Page 9
...; If liquid from the damaged battery comes in this precaution could result in electric shock. • Do not damage, modify, forcibly tug or bend the USB cable, place it under heavy objects, or expose it to remove the battery when no charge remains. • Discontinue use in contact with clothing or skin...
...; If liquid from the damaged battery comes in this precaution could result in electric shock. • Do not damage, modify, forcibly tug or bend the USB cable, place it under heavy objects, or expose it to remove the battery when no charge remains. • Discontinue use in contact with clothing or skin...
Reference Manual
Page 32
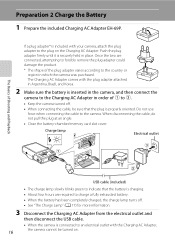
...for more information. 3 16 Disconnect the Charging AC Adapter from the electrical outlet and then disconnect the USB cable. • When the camera is connected to the plug on . When disconnecting the cable, do not pull the plug at an angle. • Close the battery-chamber/memory card slot ...cover. Charge lamp Electrical outlet The Basics of Shooting and Playback USB cable (included) • The charge lamp slowly blinks green to indicate that the plug is charging. • About four hours are required to...
...for more information. 3 16 Disconnect the Charging AC Adapter from the electrical outlet and then disconnect the USB cable. • When the camera is connected to the plug on . When disconnecting the cable, do not pull the plug at an angle. • Close the battery-chamber/memory card slot ...cover. Charge lamp Electrical outlet The Basics of Shooting and Playback USB cable (included) • The charge lamp slowly blinks green to indicate that the plug is charging. • About four hours are required to...

Reference Manual
Page 33
Disconnect the USB cable or unplug the Charging AC Adapter and correctly connect it again, or change the battery. Flickers (green) • The ambient temperature is charging. C Charging Using ... could result in "Charging AC Adapter" (F5) before use another make or model of 5 °C to 35 °C (41 °F to 95 °F). • The USB cable or Charging AC Adapter is not properly connected, or there is complete, the charge lamp stops blinking green and turns off. Off The battery is...
Disconnect the USB cable or unplug the Charging AC Adapter and correctly connect it again, or change the battery. Flickers (green) • The ambient temperature is charging. C Charging Using ... could result in "Charging AC Adapter" (F5) before use another make or model of 5 °C to 35 °C (41 °F to 95 °F). • The USB cable or Charging AC Adapter is not properly connected, or there is complete, the charge lamp stops blinking green and turns off. Off The battery is...

Reference Manual
Page 97
...If you transfer images to a computer, you can perform simple retouching and manage image data in addition to the printer's USB input jack with the included USB Cable UC-E6. • Before connecting to the same computer simultaneously may cause a camera malfunction or excessive power supply from ... the camera to open the connector Insert the plug straight. Connection method: Connect the camera to the computer's USB input jack with the included USB Cable UC-E6. 81 For information about the connection methods and subsequent operations, refer to the documentation included with the...
...If you transfer images to a computer, you can perform simple retouching and manage image data in addition to the printer's USB input jack with the included USB Cable UC-E6. • Before connecting to the same computer simultaneously may cause a camera malfunction or excessive power supply from ... the camera to open the connector Insert the plug straight. Connection method: Connect the camera to the computer's USB input jack with the included USB Cable UC-E6. 81 For information about the connection methods and subsequent operations, refer to the documentation included with the...

Reference Manual
Page 100
... is displayed, follow the steps below to select Nikon Transfer 2. 1 Under Import pictures and videos, click Change program. A program selection dialog will be displayed; B Connecting the USB Cable 84 The connection may take a while for Nikon Transfer 2 to start. If a message is displayed... prompting you to choose a program, select Nikon Transfer 2. • When using Windows 7 If the dialog shown ...
... is displayed, follow the steps below to select Nikon Transfer 2. 1 Under Import pictures and videos, click Change program. A program selection dialog will be displayed; B Connecting the USB Cable 84 The connection may take a while for Nikon Transfer 2 to start. If a message is displayed... prompting you to choose a program, select Nikon Transfer 2. • When using Windows 7 If the dialog shown ...

Reference Manual
Page 101
... the connection. • If the camera is connected to the computer, turn the camera off and disconnect the USB cable. • If a card reader or card slot is displayed in the "Source" panel in the Nikon Transfer 2 "Options" area (1). • Click Start Transfer (2). 1 2 • At default settings, all the images on using ViewNX...
... the connection. • If the camera is connected to the computer, turn the camera off and disconnect the USB cable. • If a card reader or card slot is displayed in the "Source" panel in the Nikon Transfer 2 "Options" area (1). • Click Start Transfer (2). 1 2 • At default settings, all the images on using ViewNX...

Reference Manual
Page 135
... camera from turning off unexpectedly. • If the AC Adapter EH-62F (available separately) is complete, turn the camera off and disconnect the USB cable Reference Section B Notes About Power Source • When connecting the camera to a printer, use any other make or model of PictBridge-compatible (... (E43) Connect to the printer (E24) Print images one at a time (E26) Print multiple images (E27) When printing is used, COOLPIX S8200 can connect the camera directly to the printer and print images without using the Print order option in the playback menu (E43). Connecting the Camera...
... camera from turning off unexpectedly. • If the AC Adapter EH-62F (available separately) is complete, turn the camera off and disconnect the USB cable Reference Section B Notes About Power Source • When connecting the camera to a printer, use any other make or model of PictBridge-compatible (... (E43) Connect to the printer (E24) Print images one at a time (E26) Print multiple images (E27) When printing is used, COOLPIX S8200 can connect the camera directly to the printer and print images without using the Print order option in the playback menu (E43). Connecting the Camera...

Reference Manual
Page 136
Connecting the Camera to a Printer (Direct Print) Connecting the Camera to a Printer 1 Turn off the camera. 2 Turn on the printer. • Check printer settings. 3 Connect the camera to insert plugs at an angle, and do not use force when connecting or disconnecting the USB cable. E24 Reference Section Do not attempt to the printer using the included USB cable. • Be sure that plugs are properly oriented.
Connecting the Camera to a Printer (Direct Print) Connecting the Camera to a Printer 1 Turn off the camera. 2 Turn on the printer. • Check printer settings. 3 Connect the camera to insert plugs at an angle, and do not use force when connecting or disconnecting the USB cable. E24 Reference Section Do not attempt to the printer using the included USB cable. • Be sure that plugs are properly oriented.

Reference Manual
Page 137
Connecting the Camera to a Printer (Direct Print) 4 The camera is automatically turned on. • When properly connected, the PictBridge startup screen (1) will be displayed in the camera monitor, followed by computer option (E75) in the camera's setup menu to Off and reconnect the cable. Set the Charge by the Print selection screen (2). 1 2 Print selection 15/11 2011 NO. 32 32 Reference Section B If the PictBridge Startup Screen Is Not Displayed Turn the camera off and disconnect the USB cable. E25
Connecting the Camera to a Printer (Direct Print) 4 The camera is automatically turned on. • When properly connected, the PictBridge startup screen (1) will be displayed in the camera monitor, followed by computer option (E75) in the camera's setup menu to Off and reconnect the cable. Set the Charge by the Print selection screen (2). 1 2 Print selection 15/11 2011 NO. 32 32 Reference Section B If the PictBridge Startup Screen Is Not Displayed Turn the camera off and disconnect the USB cable. E25

Reference Manual
Page 156
... Date and Info settings are enabled in step 1 of "a Print Order (Creating a DPOF Print Order)" (E43) and press the k button to a printer, via the included USB cable, for printing are printed on all images and cancel the print order. Print order • Select Date and press the k button to print the Done...
... Date and Info settings are enabled in step 1 of "a Print Order (Creating a DPOF Print Order)" (E43) and press the k button to a printer, via the included USB cable, for printing are printed on all images and cancel the print order. Print order • Select Date and press the k button to print the Done...

Reference Manual
Page 187
...using power supplied by the computer. The battery inserted into the camera is charged when the camera is connected to a computer via the USB cable (A 81). Set Charge by computer to Off and reconnect the camera to a computer. Charging time increases when images are transferred while... turned on the computer, such as Nikon Transfer 2, may start. Option Auto (default setting) Off Description When the camera is connected to a computer that is connected to a computer, an application installed on , turn the camera off and then disconnect the USB cable. • It may be transferred ...
...using power supplied by the computer. The battery inserted into the camera is charged when the camera is connected to a computer via the USB cable (A 81). Set Charge by computer to Off and reconnect the camera to a computer. Charging time increases when images are transferred while... turned on the computer, such as Nikon Transfer 2, may start. Option Auto (default setting) Off Description When the camera is connected to a computer that is connected to a computer, an application installed on , turn the camera off and then disconnect the USB cable. • It may be transferred ...

Reference Manual
Page 188
Reference Section E76 Charge lamp Blinks slowly (green) Off Flickers (green) Description Battery charging. Make sure the USB cable is connected correctly and replace the battery if necessary. • The computer is in sleep mode and is faulty. Charge the battery indoors ...with an ambient temperature of 5 °C to 35 °C (41 °F to 95 °F). • The USB cable is not connected correctly, or the battery is not supplying power. The Setup Menu C The Charge Lamp The following chart explains charge lamp status when...
Reference Section E76 Charge lamp Blinks slowly (green) Off Flickers (green) Description Battery charging. Make sure the USB cable is connected correctly and replace the battery if necessary. • The computer is in sleep mode and is faulty. Charge the battery indoors ...with an ambient temperature of 5 °C to 35 °C (41 °F to 95 °F). • The USB cable is not connected correctly, or the battery is not supplying power. The Setup Menu C The Charge Lamp The following chart explains charge lamp status when...

Reference Manual
Page 197
...ion Battery EN-EL121 Charging AC Adapter EH-69P1, 2 Battery Charger MH-65 AC Adapter EH-62F (connect as shown) AC adapter USB cable Audio/video cable Be sure that the power connector cord has been properly aligned in other countries, use a plug adapter (commercially available) as necessary. ...For more information about plug adapters, consult your travel agency. Reference Section E85 USB Cable UC-E61 Audio Video Cable EG-CP161 1 Included with the camera at the time of the grooves, the cover or cord may be damaged when the cover...
...ion Battery EN-EL121 Charging AC Adapter EH-69P1, 2 Battery Charger MH-65 AC Adapter EH-62F (connect as shown) AC adapter USB cable Audio/video cable Be sure that the power connector cord has been properly aligned in other countries, use a plug adapter (commercially available) as necessary. ...For more information about plug adapters, consult your travel agency. Reference Section E85 USB Cable UC-E61 Audio Video Cable EG-CP161 1 Included with the camera at the time of the grooves, the cover or cord may be damaged when the cover...

Reference Manual
Page 201
... . Remove the jammed paper, select Resume, and press the k button to create panorama. If error persists, contact retailer or Nikon-authorized 20 service representative. u Unable to resume - Shooting with printer. P Communications error Error occurred during communication with easy panorama ... Reference Section E89 Turn camera off , remove and reinsert battery, and turn camera on again. Turn camera off and reconnect USB cable. Pan the camera in printer. Could not shoot using easy panorama. E24 System error Q Error has occurred in printer. resume...
... . Remove the jammed paper, select Resume, and press the k button to create panorama. If error persists, contact retailer or Nikon-authorized 20 service representative. u Unable to resume - Shooting with printer. P Communications error Error occurred during communication with easy panorama ... Reference Section E89 Turn camera off , remove and reinsert battery, and turn camera on again. Turn camera off and reconnect USB cable. Pan the camera in printer. Could not shoot using easy panorama. E24 System error Q Error has occurred in printer. resume...

Reference Manual
Page 209
Reconnect the USB cable. • Inside of common problems below before consulting your retailer or Nikon-authorized service representative. Camera turns off without warning. • Battery is exhausted. • Camera has turned off automatically to save power. • The ... cold. • The camera turns off if the Charging AC Adapter is connected while the camera is on. • The camera turns off if the USB cable connecting it on . Power, Display, Settings Issues Problem Cause/Solution A The battery inserted in the camera cannot be charged. • Confirm all connections. &#...
Reconnect the USB cable. • Inside of common problems below before consulting your retailer or Nikon-authorized service representative. Camera turns off without warning. • Battery is exhausted. • Camera has turned off automatically to save power. • The ... cold. • The camera turns off if the Charging AC Adapter is connected while the camera is on. • The camera turns off if the USB cable connecting it on . Power, Display, Settings Issues Problem Cause/Solution A The battery inserted in the camera cannot be charged. • Confirm all connections. &#...

Reference Manual
Page 210
... F6 Date and time of recording are not correct. • If camera clock has not been set, "Date not set are connected via A/V cable or HDMI cable. • Adjust monitor brightness. • Monitor is turned on lamp blinks After the lamp blinks for saving power: press the power switch, shutter...movie-record) button, or rotate the mode dial. • When flash lamp blinks, wait until flash has charged. • Camera and computer are connected via USB cable. • Camera and TV are dated "00/00/0000 00:00" or "01/ 01/2011 00:00" respectively. Images and movies saved before resuming use...
... F6 Date and time of recording are not correct. • If camera clock has not been set, "Date not set are connected via A/V cable or HDMI cable. • Adjust monitor brightness. • Monitor is turned on lamp blinks After the lamp blinks for saving power: press the power switch, shutter...movie-record) button, or rotate the mode dial. • When flash lamp blinks, wait until flash has charged. • Camera and computer are connected via USB cable. • Camera and TV are dated "00/00/0000 00:00" or "01/ 01/2011 00:00" respectively. Images and movies saved before resuming use...

Reference Manual
Page 212
... 29 95, E69 21 Colored stripes appear in playback mode, press the c 9, 30 No image captured when the shutter-release button is pressed. Disconnect HDMI cable or USB cable. 81, 84, E21, E24 • When camera is in monitor when shooting.
... 29 95, E69 21 Colored stripes appear in playback mode, press the c 9, 30 No image captured when the shutter-release button is pressed. Disconnect HDMI cable or USB cable. 81, 84, E21, E24 • When camera is in monitor when shooting.

Reference Manual
Page 215
...8226; The COOLPIX S8200 is not able to play back images from the internal memory. - 80, E10 E11 80, E10 E11 95, E74 18 Nikon Transfer 2 does not start Nikon Transfer 2 automatically. Voice memos attached to help information contained in on image. For more information about Nikon Transfer 2, ...92 movies recorded with the COOLPIX S8200. Cannot record voice memos. • Voice memos cannot be attached to movies. • Voice memos can only be attached to start when camera is connected. • Camera is off. • Battery is exhausted. • USB cable is not correctly connected. ...
...8226; The COOLPIX S8200 is not able to play back images from the internal memory. - 80, E10 E11 80, E10 E11 95, E74 18 Nikon Transfer 2 does not start Nikon Transfer 2 automatically. Voice memos attached to help information contained in on image. For more information about Nikon Transfer 2, ...92 movies recorded with the COOLPIX S8200. Cannot record voice memos. • Voice memos cannot be attached to movies. • Voice memos can only be attached to start when camera is connected. • Camera is off. • Battery is exhausted. • USB cable is not correctly connected. ...

Reference Manual
Page 225
Sunset h 46 T Target finding AF 37, E39 Thumbnail display 31 Time difference 94, E63 Time zone 94, E61, E63 Time zone and date 22, 94, E61 Tripod socket 3, F17 TV 81, E21 TV settings 95, E74 U USB cable 81, 84, E24, E85 USB/audio/video output connector 81, 84, E23 V Vibration reduction 94, E67 Video mode E74 ViewNX 2 82, 83 Voice memo 80, E50 Volume 92, E50 W WAV E84 Welcome screen 94, E60 White balance 37, E30 Z Zoom control 4, 5, 27 Zoom in 27 Zoom out 27 Index F23 Technical Notes and Index
Sunset h 46 T Target finding AF 37, E39 Thumbnail display 31 Time difference 94, E63 Time zone 94, E61, E63 Time zone and date 22, 94, E61 Tripod socket 3, F17 TV 81, E21 TV settings 95, E74 U USB cable 81, 84, E24, E85 USB/audio/video output connector 81, 84, E23 V Vibration reduction 94, E67 Video mode E74 ViewNX 2 82, 83 Voice memo 80, E50 Volume 92, E50 W WAV E84 Welcome screen 94, E60 White balance 37, E30 Z Zoom control 4, 5, 27 Zoom in 27 Zoom out 27 Index F23 Technical Notes and Index


