Reference Manual
Page 11
... interference will not occur in the U.S.A. ix Introduction These limits are not expressly approved by Nikon Corporation may void the user's authority to correct the interference by Nikon for your equipment. The power supply unit is intended to be determined by turning the equipment...Customers in a particular installation. If this device that to provide reasonable protection against harmful interference in accordance with the limits for help. Interface Cables Use the interface cables sold or provided by one or more of the proper configuration for the power outlet ...
... interference will not occur in the U.S.A. ix Introduction These limits are not expressly approved by Nikon Corporation may void the user's authority to correct the interference by Nikon for your equipment. The power supply unit is intended to be determined by turning the equipment...Customers in a particular installation. If this device that to provide reasonable protection against harmful interference in accordance with the limits for help. Interface Cables Use the interface cables sold or provided by one or more of the proper configuration for the power outlet ...

Reference Manual
Page 18
Parts of the Camera and Basic Operations Parts of the Camera and Basic Operations Parts of the Camera The Camera Body 1 2 34 5 6 7 8 10 Flash raised 9 Lens cover closed Zoom control 4, 5, 27 f : wide 4, 27 1 g : tele 4, 27 h : thumbnail playback 5, 31 i : playback zoom 5, 31 j : help 39 2 Speaker 80, 92 3 Power switch/power-on lamp 20 4 Shutter-release button 4, 5, 28 5 Self-timer lamp 59 AF-assist illuminator 95 6 Mode dial 4, 5, 9, 24 7 Microphone (stereo 80, 88 8 Flash 56 9 Lens 10 Lens cover 2
Parts of the Camera and Basic Operations Parts of the Camera and Basic Operations Parts of the Camera The Camera Body 1 2 34 5 6 7 8 10 Flash raised 9 Lens cover closed Zoom control 4, 5, 27 f : wide 4, 27 1 g : tele 4, 27 h : thumbnail playback 5, 31 i : playback zoom 5, 31 j : help 39 2 Speaker 80, 92 3 Power switch/power-on lamp 20 4 Shutter-release button 4, 5, 28 5 Self-timer lamp 59 AF-assist illuminator 95 6 Mode dial 4, 5, 9, 24 7 Microphone (stereo 80, 88 8 Flash 56 9 Lens 10 Lens cover 2

Reference Manual
Page 55
...-up (A 47) l Museum (A 48) n Black and white copy (A 48) Scene menu Portrait Landscape Sports Night portrait Party/indoor Beach Snow Shooting Features C To View a Description (Help Display) of Each Scene Select the desired scene from the scene menu and rotate the zoom control (A 2) to g (j) to g (j) again. 39 x (Scene auto selector) (A 40...
...-up (A 47) l Museum (A 48) n Black and white copy (A 48) Scene menu Portrait Landscape Sports Night portrait Party/indoor Beach Snow Shooting Features C To View a Description (Help Display) of Each Scene Select the desired scene from the scene menu and rotate the zoom control (A 2) to g (j) to g (j) again. 39 x (Scene auto selector) (A 40...

Reference Manual
Page 99
...5 Exit the installer when the installation completion screen is displayed. • Windows: Click Yes. • Mac OS: Click OK. Nikon Movie Editor: For basic editing of transferred movies • Panorama Maker 5 (for creating a single panorama photo using a series of the...display the installation window. 3 Start the installer. • We recommend clicking Installation Guide in the installation window to check the installation help information and system requirements before installing ViewNX 2. • Click Typical Installation (Recommended) in panorama assist scene mode) • QuickTime ...
...5 Exit the installer when the installation completion screen is displayed. • Windows: Click Yes. • Mac OS: Click OK. Nikon Movie Editor: For basic editing of transferred movies • Panorama Maker 5 (for creating a single panorama photo using a series of the...display the installation window. 3 Start the installer. • We recommend clicking Installation Guide in the installation window to check the installation help information and system requirements before installing ViewNX 2. • Click Typical Installation (Recommended) in panorama assist scene mode) • QuickTime ...

Reference Manual
Page 101
... 2 2 Transfer images to the computer. • Confirm that the name of the connected camera or removable disk is displayed in the "Source" panel in the Nikon Transfer 2 "Options" area (1). • Click Start Transfer (2). 1 2 • At default settings, all the images on the desktop. • Mac OS: Click the ViewNX 2 icon in... the Dock. 85 Viewing Images Start ViewNX 2. • Images are displayed in ViewNX 2 when transfer is complete. • Consult online help for more information on using ViewNX 2.
... 2 2 Transfer images to the computer. • Confirm that the name of the connected camera or removable disk is displayed in the "Source" panel in the Nikon Transfer 2 "Options" area (1). • Click Start Transfer (2). 1 2 • At default settings, all the images on the desktop. • Mac OS: Click the ViewNX 2 icon in... the Dock. 85 Viewing Images Start ViewNX 2. • Images are displayed in ViewNX 2 when transfer is complete. • Consult online help for more information on using ViewNX 2.
Reference Manual
Page 110
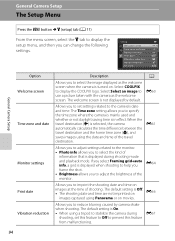
...the camera is On. • When using Panorama or on movies. If you select Framing grid+auto info, a grid is displayed when shooting to help you frame the shot. • Brightness allows you to select the image displayed as the welcome screen. Allows you can change the following settings. ...on . The Time zone setting allows you to stabilize the camera during shooting mode and playback mode. E64 Allows you to display the COOLPIX logo. Select COOLPIX to specify the time zone where the camera is mainly used and whether or not daylight saving time is not displayed by camera shake...
...the camera is On. • When using Panorama or on movies. If you select Framing grid+auto info, a grid is displayed when shooting to help you frame the shot. • Brightness allows you to select the image displayed as the welcome screen. Allows you can change the following settings. ...on . The Time zone setting allows you to stabilize the camera during shooting mode and playback mode. E64 Allows you to display the COOLPIX logo. Select COOLPIX to specify the time zone where the camera is mainly used and whether or not daylight saving time is not displayed by camera shake...

Reference Manual
Page 111
... and shutter speed to reduce blurring. Allows you to set to Auto (default setting), the AF-assist illuminator (A 2) lights when shooting in dark surroundings to help the camera focus. • The AF-assist illuminator has a range of about 2.2 m (7 ft 3 in.) at the maximum wide-angle position and about 1.4 m (4 ft 7 in.) at...
... and shutter speed to reduce blurring. Allows you to set to Auto (default setting), the AF-assist illuminator (A 2) lights when shooting in dark surroundings to help the camera focus. • The AF-assist illuminator has a range of about 2.2 m (7 ft 3 in.) at the maximum wide-angle position and about 1.4 m (4 ft 7 in.) at...

Reference Manual
Page 118
... cannot be deleted, nor can zoom or Image mode setting (A 71) be changed after the first picture is displayed to the on-screen instructions and help information contained in a single panorama. When the first picture is taken, R is taken. • Shooting ends if the auto off to a longer setting. They cannot...
... cannot be deleted, nor can zoom or Image mode setting (A 71) be changed after the first picture is displayed to the on-screen instructions and help information contained in a single panorama. When the first picture is taken, R is taken. • Shooting ends if the auto off to a longer setting. They cannot...

Reference Manual
Page 177
... operations are performed after a few seconds, the display will be the same as in Auto info is displayed. 29m 0s 840 Movie In addition to help frame pictures. The same information as Hide info. JPG 4/ 4 Auto info (default setting) The same information as in Show info is displayed. Hide info Reference...
... operations are performed after a few seconds, the display will be the same as in Auto info is displayed. 29m 0s 840 Movie In addition to help frame pictures. The same information as Hide info. JPG 4/ 4 Auto info (default setting) The same information as in Show info is displayed. Hide info Reference...

Reference Manual
Page 215
... to help information contained in the TV settings setup menu. • Memory card contains no images. Images not displayed on this camera. - 80, E50 Cannot use quick retouch, D-Lighting, skin softening, filter effects, small picture, or crop. For more information about Nikon Transfer 2, refer to play back 92 movies recorded with the COOLPIX S8200.
... to help information contained in the TV settings setup menu. • Memory card contains no images. Images not displayed on this camera. - 80, E50 Cannot use quick retouch, D-Lighting, skin softening, filter effects, small picture, or crop. For more information about Nikon Transfer 2, refer to play back 92 movies recorded with the COOLPIX S8200.

Reference Manual
Page 222
... k Apply selection button 5, 10 A Auto mode 24, 36 W Backlighting 42 C Continuous shooting mode 50, 52 l Delete button 4, 5, 32, E51 o Exposure compensation 68 X Flash mode 56 j Help 39 h Image thumbnail display 31 p Macro mode 64 j Night landscape 41 O Pet portrait 43 c Playback button 4, 5, 9, 30 c Playback menu 80, E43 i Playback zoom 31 C Scene...
... k Apply selection button 5, 10 A Auto mode 24, 36 W Backlighting 42 C Continuous shooting mode 50, 52 l Delete button 4, 5, 32, E51 o Exposure compensation 68 X Flash mode 56 j Help 39 h Image thumbnail display 31 p Macro mode 64 j Night landscape 41 O Pet portrait 43 c Playback button 4, 5, 9, 30 c Playback menu 80, E43 i Playback zoom 31 C Scene...

Reference Manual
Page 223
... Full-frame display 30 Full-time AF 38, 91, E42, E59 Index H HDMI E74 HDMI cable 81, E21 HDMI device control E74 HDMI mini connector 3 Help 39 High-speed continuous 52, E35 Histogram 8, 67 HS movie 91, E57 Hue 65 I Identifier E84 Image mode 71 Imprinting Date and Time 23, E66...
... Full-frame display 30 Full-time AF 38, 91, E42, E59 Index H HDMI E74 HDMI cable 81, E21 HDMI device control E74 HDMI mini connector 3 Help 39 High-speed continuous 52, E35 Histogram 8, 67 HS movie 91, E57 Hue 65 I Identifier E84 Image mode 71 Imprinting Date and Time 23, E66...


