
Reference Manual
Page 8
...care to avoid burns. Should the camera or Charging AC Adapter break open as this Nikon product, to prevent possible injury. Do not remain in explosion or fire. WARNINGS Turn off in their mouths. This icon marks warnings, information that should be performed only ...by qualified technicians. After removing or disconnecting the power source, take the product to a Nikon-authorized service representative for extended periods may...
...care to avoid burns. Should the camera or Charging AC Adapter break open as this Nikon product, to prevent possible injury. Do not remain in explosion or fire. WARNINGS Turn off in their mouths. This icon marks warnings, information that should be performed only ...by qualified technicians. After removing or disconnecting the power source, take the product to a Nikon-authorized service representative for extended periods may...

Reference Manual
Page 9
... are using a Battery Charger MH-65 (available separately). To avoid damage to the product, be sure to observe this product: • Before replacing the battery, turn the product off. To charge the battery with DCto-AC inverters. vii Failure to water. • Replace the terminal cover when transporting the battery. For...
... are using a Battery Charger MH-65 (available separately). To avoid damage to the product, be sure to observe this product: • Before replacing the battery, turn the product off. To charge the battery with DCto-AC inverters. vii Failure to water. • Replace the terminal cover when transporting the battery. For...

Reference Manual
Page 10
...and to prevent liquid crystal from the subject. Observe caution when using inside an airplane or the hospital Turn the power off while inside the airplane during take off when using the flash Using the flash close to your... the electronic systems of the airplane or the instruments of the hospital when using while in burns or fire. Turn the power off or landing. viii Handle moving parts with care Be careful that your subject's eyes could cause... or sold by the lens cover or other objects are not pinched by Nikon for the purpose, to maintain compliance with product regulations.
...and to prevent liquid crystal from the subject. Observe caution when using inside an airplane or the hospital Turn the power off while inside the airplane during take off when using the flash Using the flash close to your... the electronic systems of the airplane or the instruments of the hospital when using while in burns or fire. Turn the power off or landing. viii Handle moving parts with care Be careful that your subject's eyes could cause... or sold by the lens cover or other objects are not pinched by Nikon for the purpose, to maintain compliance with product regulations.
Reference Manual
Page 11
...installed and used in the U.S.A., use an attachment plug adapter of the FCC rules. These limits are not expressly approved by turning the equipment off and on a circuit different from that any changes or modifications made to this equipment does cause harmful interference ...connected. • Consult the dealer or an experienced radio/television technician for a Class B digital device, pursuant to correct the interference by Nikon for Customers in a vertical or floor mount position. DANGER - This equipment generates, uses, and can be correctly orientated in the U.S.A. ...
...installed and used in the U.S.A., use an attachment plug adapter of the FCC rules. These limits are not expressly approved by turning the equipment off and on a circuit different from that any changes or modifications made to this equipment does cause harmful interference ...connected. • Consult the dealer or an experienced radio/television technician for a Class B digital device, pursuant to correct the interference by Nikon for Customers in a vertical or floor mount position. DANGER - This equipment generates, uses, and can be correctly orientated in the U.S.A. ...

Reference Manual
Page 13
... Battery...14 Preparation 2 Charge the Battery 16 Preparation 3 Insert a Memory Card 18 Internal Memory and Memory Cards ...19 Approved Memory Cards ...19 Step 1 Turn the Camera On ...20 Turning the Camera On and Off...21 Setting the Display Language, Date, and Time 22 Step 2 Select a Shooting Mode...24 Available Shooting Modes...25...
... Battery...14 Preparation 2 Charge the Battery 16 Preparation 3 Insert a Memory Card 18 Internal Memory and Memory Cards ...19 Approved Memory Cards ...19 Step 1 Turn the Camera On ...20 Turning the Camera On and Off...21 Setting the Display Language, Date, and Time 22 Step 2 Select a Shooting Mode...24 Available Shooting Modes...25...

Reference Manual
Page 21
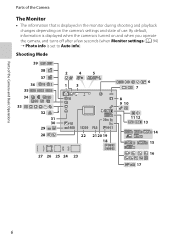
... Camera Controls Used in Playback Mode Control Name Main Function A Playback button • When the camera is off, press and hold 21, this button to turn the camera on and to 30 change to playback mode. • Returns to shooting. 9 Zoom control • When rotated to g (i): Magnifies the image. • When...
... Camera Controls Used in Playback Mode Control Name Main Function A Playback button • When the camera is off, press and hold 21, this button to turn the camera on and to 30 change to playback mode. • Returns to shooting. 9 Zoom control • When rotated to g (i): Magnifies the image. • When...
Reference Manual
Page 22
By default, information is displayed when the camera is turned on and when you operate the camera, and turns off after a few seconds (when Monitor settings (A 94) ➝ Photo info is displayed in the monitor during shooting and playback changes depending on the camera's ...
By default, information is displayed when the camera is turned on and when you operate the camera, and turns off after a few seconds (when Monitor settings (A 94) ➝ Photo info is displayed in the monitor during shooting and playback changes depending on the camera's ...

Reference Manual
Page 29
The Basics of Shooting and Playback The Basics of Shooting and Playback Preparation Preparation 1 Insert the Battery 14 Preparation 2 Charge the Battery 16 Preparation 3 Insert a Memory Card 18 Shooting Step 1 Turn the Camera On 20 Setting the Display Language, Date, and Time (First Use After Purchase) ....22 Step 2 Select a Shooting Mode 24 Step 3 Frame a Picture ...26 Step 4 Focus and Shoot...28 Playback Step 5 Play Back Images ...30 Step 6 Delete Unwanted Images 32 13
The Basics of Shooting and Playback The Basics of Shooting and Playback Preparation Preparation 1 Insert the Battery 14 Preparation 2 Charge the Battery 16 Preparation 3 Insert a Memory Card 18 Shooting Step 1 Turn the Camera On 20 Setting the Display Language, Date, and Time (First Use After Purchase) ....22 Step 2 Select a Shooting Mode 24 Step 3 Frame a Picture ...26 Step 4 Focus and Shoot...28 Playback Step 5 Play Back Images ...30 Step 6 Delete Unwanted Images 32 13
Reference Manual
Page 30
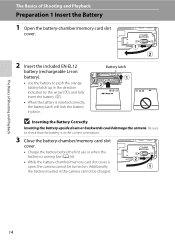
.../memory card slot cover is inserted correctly, the battery latch will lock the battery in place. Additionally, the battery inserted in the camera cannot be turned on.
.../memory card slot cover is inserted correctly, the battery latch will lock the battery in place. Additionally, the battery inserted in the camera cannot be turned on.

Reference Manual
Page 31
.... Observe caution when removing the battery or memory card. The battery can then be removed by the arrow (1). Preparation 1 Insert the Battery Removing the Battery Turn the camera off and be sure that the power-on page vii and in the direction indicated by hand (2). To eject the battery, open the... of Shooting and Playback B Notes About the Battery Be sure to read and follow the warnings for the battery on lamp and the monitor have turned off before use. 15
.... Observe caution when removing the battery or memory card. The battery can then be removed by the arrow (1). Preparation 1 Insert the Battery Removing the Battery Turn the camera off and be sure that the power-on page vii and in the direction indicated by hand (2). To eject the battery, open the... of Shooting and Playback B Notes About the Battery Be sure to read and follow the warnings for the battery on lamp and the monitor have turned off before use. 15
Reference Manual
Page 32
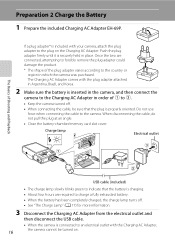
...two are required to charge a fully exhausted battery. • When the battery has been completely charged, the charge lamp turns off . • When connecting the cable, be turned on the Charging AC Adapter. If a plug adapter* is properly oriented. Do not use force when connecting the cable... included with your camera, attach the plug adapter to the camera. Charge lamp Electrical outlet The Basics of 1 to 3. • Keep the camera turned off . • See "The Charge Lamp" (A 17) for more information. 3 16 Disconnect the Charging AC Adapter from the electrical outlet and...
...two are required to charge a fully exhausted battery. • When the battery has been completely charged, the charge lamp turns off . • When connecting the cable, be turned on the Charging AC Adapter. If a plug adapter* is properly oriented. Do not use force when connecting the cable... included with your camera, attach the plug adapter to the camera. Charge lamp Electrical outlet The Basics of 1 to 3. • Keep the camera turned off . • See "The Charge Lamp" (A 17) for more information. 3 16 Disconnect the Charging AC Adapter from the electrical outlet and...

Reference Manual
Page 33
... 95 °F). • The USB cable or Charging AC Adapter is not properly connected, or there is complete, the charge lamp stops blinking green and turns off. E85) to power the camera from an electrical outlet. • Do not, under any circumstances, use . C Charging Using Computer or Battery Charger • You...
... 95 °F). • The USB cable or Charging AC Adapter is not properly connected, or there is complete, the charge lamp stops blinking green and turns off. E85) to power the camera from an electrical outlet. • Do not, under any circumstances, use . C Charging Using Computer or Battery Charger • You...

Reference Manual
Page 34
... this camera. • All data stored on lamp and the monitor are off and open the batterychamber/memory card slot cover. • Be sure to turn off the camera before formatting. • To format a memory card, insert the card into this camera, be sure to check that the memory card is...
... this camera. • All data stored on lamp and the monitor are off and open the batterychamber/memory card slot cover. • Be sure to turn off the camera before formatting. • To format a memory card, insert the card into this camera, be sure to check that the memory card is...
Reference Manual
Page 35
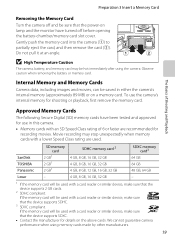
... device supports SDHC. 3 SDXC compliant. If the memory card will be used . Approved Memory Cards The following Secure Digital (SD) memory cards have turned off and be sure that the device supports SDXC. • Contact the manufacturer for details on a memory card. SanDisk TOSHIBA Panasonic SD memory card... a Memory Card The Basics of 6 or faster are used with an SD Speed Class rating of Shooting and Playback Removing the Memory Card Turn the camera off before opening the battery-chamber/memory card slot cover. If the memory card will be used with a card reader or similar...
... device supports SDHC. 3 SDXC compliant. If the memory card will be used . Approved Memory Cards The following Secure Digital (SD) memory cards have turned off and be sure that the device supports SDXC. • Contact the manufacturer for details on a memory card. SanDisk TOSHIBA Panasonic SD memory card... a Memory Card The Basics of 6 or faster are used with an SD Speed Class rating of Shooting and Playback Removing the Memory Card Turn the camera off before opening the battery-chamber/memory card slot cover. If the memory card will be used with a card reader or similar...

Reference Manual
Page 36
...saved in the internal memory (approx. 89 MB). • The number of exposures remaining depends on the amount of available memory in this manual are turning the camera on for example purposes only. 20 A 72). • The number of remaining exposures shown in the illustrations in the internal memory or... memory card, and also varies depending on the image quality and image size (determined by the image mode setting; Prepare to turn on the camera. • If you are for the first time, see "Setting the Display Language, Date, and Time" (A 22). • The lens ...
...saved in the internal memory (approx. 89 MB). • The number of exposures remaining depends on the amount of available memory in this manual are turning the camera on for example purposes only. 20 A 72). • The number of remaining exposures shown in the illustrations in the internal memory or... memory card, and also varies depending on the image quality and image size (determined by the image mode setting; Prepare to turn on the camera. • If you are for the first time, see "Setting the Display Language, Date, and Time" (A 22). • The lens ...

Reference Manual
Page 37
...standby mode in about one minute when you are using shooting mode or playback mode. • If you are performed for a while, the monitor will turn off, the camera will enter standby mode, and the power-on while the camera is in standby mode by performing any of Shooting and Playback...No operations performed 29m 0s 3 min 840 Camera enters standby mode. Step 1 Turn the Camera On Turning the Camera On and Off • The power-on lamp will light in green briefly then turn off, and then the monitor will turn on the camera and switch to playback mode, press and hold the c (playback...
...standby mode in about one minute when you are using shooting mode or playback mode. • If you are performed for a while, the monitor will turn off, the camera will enter standby mode, and the power-on while the camera is in standby mode by performing any of Shooting and Playback...No operations performed 29m 0s 3 min 840 Camera enters standby mode. Step 1 Turn the Camera On Turning the Camera On and Off • The power-on lamp will light in green briefly then turn off, and then the monitor will turn on the camera and switch to playback mode, press and hold the c (playback...

Reference Manual
Page 38
... the setting: Select the minute setting and press the k button or K. The Basics of Shooting and Playback Step 1 Turn the Camera On Setting the Display Language, Date, and Time When the camera is turned on for the first time after purchase, the language-selection screen and the date and time setting screen...
... the setting: Select the minute setting and press the k button or K. The Basics of Shooting and Playback Step 1 Turn the Camera On Setting the Display Language, Date, and Time When the camera is turned on for the first time after purchase, the language-selection screen and the date and time setting screen...

Reference Manual
Page 39
Step 1 Turn the Camera On Daylight Saving Time If daylight saving time is in effect, press the multi selector H to enable the daylight saving time function while ... travel destination and the home time zone (w) is connected to be printed without setting the date and time, O will blink when the shooting screen is turned on. Set the date and time again. See step 2 of shooting. • If you want the shooting date to an optional AC adapter, and can...
Step 1 Turn the Camera On Daylight Saving Time If daylight saving time is in effect, press the multi selector H to enable the daylight saving time function while ... travel destination and the home time zone (w) is connected to be printed without setting the date and time, O will blink when the shooting screen is turned on. Set the date and time again. See step 2 of shooting. • If you want the shooting date to an optional AC adapter, and can...

Reference Manual
Page 42
...-illuminator, microphone, and speaker. • When taking pictures in dark surroundings with the flash mode (A 57) set to W (off) - When shooting in portrait (tall) orientation, turn the camera so that the flash is above the lens. The Basics of . 29m 0s 840 C When Using a Tripod • We recommend using a tripod to...
...-illuminator, microphone, and speaker. • When taking pictures in dark surroundings with the flash mode (A 57) set to W (off) - When shooting in portrait (tall) orientation, turn the camera so that the flash is above the lens. The Basics of . 29m 0s 840 C When Using a Tripod • We recommend using a tripod to...

Reference Manual
Page 43
... beyond the maximum magnification of the optical zoom. The Basics of Shooting and Playback Maximum optical zoom Digital zoom enabled • When you turn the camera on, the zoom moves to the maximum wide-angle position. • Rotating the zoom control all the way in the setup...size • Digital zoom can magnify the subject up to about 2× beyond the V position, interpolation is initiated and the zoom indicator turns yellow to indicate that interpolation is being applied. The position of V moves to the right as interpolation to magnify images, resulting in to the...
... beyond the maximum magnification of the optical zoom. The Basics of Shooting and Playback Maximum optical zoom Digital zoom enabled • When you turn the camera on, the zoom moves to the maximum wide-angle position. • Rotating the zoom control all the way in the setup...size • Digital zoom can magnify the subject up to about 2× beyond the V position, interpolation is initiated and the zoom indicator turns yellow to indicate that interpolation is being applied. The position of V moves to the right as interpolation to magnify images, resulting in to the...


