
Reference Manual
Page 8
Keep out of reach of children Particular care should be taken to avoid burns. WARNINGS Turn off in the event of a fall or other small parts into their entirety before using this could result in low-temperature burns. Do not ... Charging AC Adapter and remove the battery immediately, taking care to prevent infants from putting the battery or other accident, take the equipment to a Nikon-authorized service representative for extended periods may result in explosion or fire. This icon marks warnings, information that should be read them. Introduction For Your...
Keep out of reach of children Particular care should be taken to avoid burns. WARNINGS Turn off in the event of a fall or other small parts into their entirety before using this could result in low-temperature burns. Do not ... Charging AC Adapter and remove the battery immediately, taking care to prevent infants from putting the battery or other accident, take the equipment to a Nikon-authorized service representative for extended periods may result in explosion or fire. This icon marks warnings, information that should be read them. Introduction For Your...

Reference Manual
Page 9
... expose the battery to flame or to excessive heat. • Do not immerse in or expose to observe this product: • Before replacing the battery, turn the product off. Failure to observe this precaution could damage the product or cause overheating or fire. Failure to observe these precautions could result in...
... expose the battery to flame or to excessive heat. • Do not immerse in or expose to observe this product: • Before replacing the battery, turn the product off. Failure to observe this precaution could damage the product or cause overheating or fire. Failure to observe these precautions could result in...

Reference Manual
Page 10
... For Your Safety Use appropriate cables When connecting cables to the input and output jacks, use only the cables provided or sold by Nikon for the purpose, to maintain compliance with the flash window touching a person or object Failure to observe this precaution could result in burns... subject's eyes could cause temporary visual impairment. The electromagnetic waves given out by broken glass and to prevent liquid crystal from the subject. Turn the power off when using while in .) from the monitor touching the skin or entering the eyes or mouth. Follow the instructions of...
... For Your Safety Use appropriate cables When connecting cables to the input and output jacks, use only the cables provided or sold by Nikon for the purpose, to maintain compliance with the flash window touching a person or object Failure to observe this precaution could result in burns... subject's eyes could cause temporary visual impairment. The electromagnetic waves given out by broken glass and to prevent liquid crystal from the subject. Turn the power off when using while in .) from the monitor touching the skin or entering the eyes or mouth. Follow the instructions of...
Reference Manual
Page 11
...to be notified that any changes or modifications made to this equipment does cause harmful interference to correct the interference by Nikon for your equipment. ix Introduction If this device that interference will not occur in a residential installation. These limits are not ...mount position. Notices Notices for the power outlet if needed. IMPORTANT SAFETY INSTRUCTIONS - The power supply unit is intended to be determined by turning the equipment off and on, the user is connected. • Consult the dealer or an experienced radio/television technician for a Class B...
...to be notified that any changes or modifications made to this equipment does cause harmful interference to correct the interference by Nikon for your equipment. ix Introduction If this device that interference will not occur in a residential installation. These limits are not ...mount position. Notices Notices for the power outlet if needed. IMPORTANT SAFETY INSTRUCTIONS - The power supply unit is intended to be determined by turning the equipment off and on, the user is connected. • Consult the dealer or an experienced radio/television technician for a Class B...

Reference Manual
Page 13
... Battery...14 Preparation 2 Charge the Battery 16 Preparation 3 Insert a Memory Card 18 Internal Memory and Memory Cards ...19 Approved Memory Cards ...19 Step 1 Turn the Camera On ...20 Turning the Camera On and Off...21 Setting the Display Language, Date, and Time 22 Step 2 Select a Shooting Mode...24 Available Shooting Modes...25...
... Battery...14 Preparation 2 Charge the Battery 16 Preparation 3 Insert a Memory Card 18 Internal Memory and Memory Cards ...19 Approved Memory Cards ...19 Step 1 Turn the Camera On ...20 Turning the Camera On and Off...21 Setting the Display Language, Date, and Time 22 Step 2 Select a Shooting Mode...24 Available Shooting Modes...25...

Reference Manual
Page 21
... Camera Controls Used in Playback Mode Control Name Main Function A Playback button • When the camera is off, press and hold 21, this button to turn the camera on and to 30 change to playback mode. • Returns to shooting. 9 Zoom control • When rotated to g (i): Magnifies the image. • When...
... Camera Controls Used in Playback Mode Control Name Main Function A Playback button • When the camera is off, press and hold 21, this button to turn the camera on and to 30 change to playback mode. • Returns to shooting. 9 Zoom control • When rotated to g (i): Magnifies the image. • When...
Reference Manual
Page 22
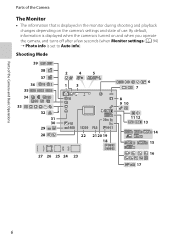
...18 999 9999 27 26 25 24 23 6 7 8 9 10 11 12 13 14 15 16 17 6 By default, information is displayed when the camera is turned on the camera's settings and state of the Camera The Monitor • The information that is displayed in the monitor during shooting and playback changes... depending on and when you operate the camera, and turns off after a few seconds (when Monitor settings (A 94) ➝ Photo info is set to Auto info). Parts of the Camera and Basic Operations Parts of...
...18 999 9999 27 26 25 24 23 6 7 8 9 10 11 12 13 14 15 16 17 6 By default, information is displayed when the camera is turned on the camera's settings and state of the Camera The Monitor • The information that is displayed in the monitor during shooting and playback changes... depending on and when you operate the camera, and turns off after a few seconds (when Monitor settings (A 94) ➝ Photo info is set to Auto info). Parts of the Camera and Basic Operations Parts of...

Reference Manual
Page 29
The Basics of Shooting and Playback The Basics of Shooting and Playback Preparation Preparation 1 Insert the Battery 14 Preparation 2 Charge the Battery 16 Preparation 3 Insert a Memory Card 18 Shooting Step 1 Turn the Camera On 20 Setting the Display Language, Date, and Time (First Use After Purchase) ....22 Step 2 Select a Shooting Mode 24 Step 3 Frame a Picture ...26 Step 4 Focus and Shoot...28 Playback Step 5 Play Back Images ...30 Step 6 Delete Unwanted Images 32 13
The Basics of Shooting and Playback The Basics of Shooting and Playback Preparation Preparation 1 Insert the Battery 14 Preparation 2 Charge the Battery 16 Preparation 3 Insert a Memory Card 18 Shooting Step 1 Turn the Camera On 20 Setting the Display Language, Date, and Time (First Use After Purchase) ....22 Step 2 Select a Shooting Mode 24 Step 3 Frame a Picture ...26 Step 4 Focus and Shoot...28 Playback Step 5 Play Back Images ...30 Step 6 Delete Unwanted Images 32 13
Reference Manual
Page 30
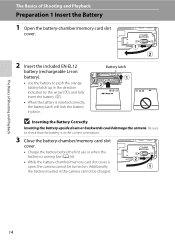
Additionally, the battery inserted in the camera cannot be turned on. Be sure to push the orange battery latch up in the direction indicated by the arrow (1), and fully insert the battery (2). • When the ...
Additionally, the battery inserted in the camera cannot be turned on. Be sure to push the orange battery latch up in the direction indicated by the arrow (1), and fully insert the battery (2). • When the ...

Reference Manual
Page 31
... Battery Be sure to read and follow the warnings for the battery on lamp and the monitor have turned off and be removed by the arrow (1). Preparation 1 Insert the Battery Removing the Battery Turn the camera off before use. 15 Observe caution when removing the battery or memory card. To eject the...
... Battery Be sure to read and follow the warnings for the battery on lamp and the monitor have turned off and be removed by the arrow (1). Preparation 1 Insert the Battery Removing the Battery Turn the camera off before use. 15 Observe caution when removing the battery or memory card. To eject the...
Reference Manual
Page 32
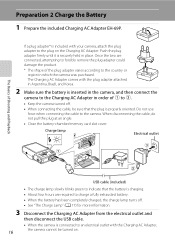
...cover. If a plug adapter* is included with your camera, attach the plug adapter to 3. • Keep the camera turned off. • When connecting the cable, be turned on the Charging AC Adapter. The Charging AC Adapter comes with the Charging AC Adapter, the camera cannot be sure that the... held in place. Once the two are required to charge a fully exhausted battery. • When the battery has been completely charged, the charge lamp turns off. • See "The Charge Lamp" (A 17) for more information. 3 16 Disconnect the Charging AC Adapter from the electrical outlet and then ...
...cover. If a plug adapter* is included with your camera, attach the plug adapter to 3. • Keep the camera turned off. • When connecting the cable, be turned on the Charging AC Adapter. The Charging AC Adapter comes with the Charging AC Adapter, the camera cannot be sure that the... held in place. Once the two are required to charge a fully exhausted battery. • When the battery has been completely charged, the charge lamp turns off. • See "The Charge Lamp" (A 17) for more information. 3 16 Disconnect the Charging AC Adapter from the electrical outlet and then ...

Reference Manual
Page 33
...-ion Battery EN-EL12 by connecting the camera to the camera. 17 E85). Off The battery is complete, the charge lamp stops blinking green and turns off. Charge the battery indoors with an ambient temperature of 5 °C to 35 °C (41 °F to charging. Disconnect the USB cable or unplug the...
...-ion Battery EN-EL12 by connecting the camera to the camera. 17 E85). Off The battery is complete, the charge lamp stops blinking green and turns off. Charge the battery indoors with an ambient temperature of 5 °C to 35 °C (41 °F to charging. Disconnect the USB cable or unplug the...

Reference Manual
Page 34
... card is in the setup menu (A 94). B Notes About Memory Cards See "Memory Cards" (F5) and the documentation included with this camera, be sure to turn off and open the batterychamber/memory card slot cover. • Be sure to format it clicks into the camera, press the d button, and select Format...
... card is in the setup menu (A 94). B Notes About Memory Cards See "Memory Cards" (F5) and the documentation included with this camera, be sure to turn off and open the batterychamber/memory card slot cover. • Be sure to format it clicks into the camera, press the d button, and select Format...
Reference Manual
Page 35
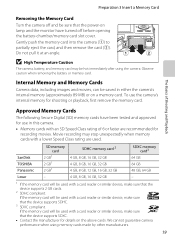
...into the camera (1) to partially eject the card, and then remove the card (2). Approved Memory Cards The following Secure Digital (SD) memory cards have turned off and be saved in this camera. • Memory cards with an SD Speed Class rating of Shooting and Playback Removing the Memory Card... Turn the camera off before opening the battery-chamber/memory card slot cover. Movie recording may be used . We cannot guarantee camera performance when ...
...into the camera (1) to partially eject the card, and then remove the card (2). Approved Memory Cards The following Secure Digital (SD) memory cards have turned off and be saved in this camera. • Memory cards with an SD Speed Class rating of Shooting and Playback Removing the Memory Card... Turn the camera off before opening the battery-chamber/memory card slot cover. Movie recording may be used . We cannot guarantee camera performance when ...

Reference Manual
Page 36
.... • If you are for the first time, see "Setting the Display Language, Date, and Time" (A 22). • The lens extends and the monitor turns on. 2 Check the battery level indicator and the number of available memory in the internal memory or memory card, and also varies depending on the...when no memory card is inserted in the camera, and images will be saved in this manual are turning the camera on for example purposes only. 20 The Basics of Shooting and Playback Step 1 Turn the Camera On 1 Press the power switch to charge or replace the battery. Battery level indicator ...
.... • If you are for the first time, see "Setting the Display Language, Date, and Time" (A 22). • The lens extends and the monitor turns on. 2 Check the battery level indicator and the number of available memory in the internal memory or memory card, and also varies depending on the...when no memory card is inserted in the camera, and images will be saved in this manual are turning the camera on for example purposes only. 20 The Basics of Shooting and Playback Step 1 Turn the Camera On 1 Press the power switch to charge or replace the battery. Battery level indicator ...

Reference Manual
Page 37
... Auto off setting in the setup menu (A 94). • By default, the camera enters standby mode in green briefly then turn off, and then the monitor will turn on. • To turn on lamp will enter standby mode, and the power-on the camera and switch to playback mode, press and hold the... c (playback) button. When the camera turns off, the power-on lamp and the display turn off the camera, press the power switch. If no operations are performed for a while, the monitor will not extend. The Basics...
... Auto off setting in the setup menu (A 94). • By default, the camera enters standby mode in green briefly then turn off, and then the monitor will turn on. • To turn on lamp will enter standby mode, and the power-on the camera and switch to playback mode, press and hold the... c (playback) button. When the camera turns off, the power-on lamp and the display turn off the camera, press the power switch. If no operations are performed for a while, the monitor will not extend. The Basics...

Reference Manual
Page 38
... the setting: Select the minute setting and press the k button or K. The Basics of Shooting and Playback Step 1 Turn the Camera On Setting the Display Language, Date, and Time When the camera is turned on for the first time after purchase, the language-selection screen and the date and time setting screen...
... the setting: Select the minute setting and press the k button or K. The Basics of Shooting and Playback Step 1 Turn the Camera On Setting the Display Language, Date, and Time When the camera is turned on for the first time after purchase, the language-selection screen and the date and time setting screen...

Reference Manual
Page 39
...Back The Basics of "Setting the Display Language, Date, and Time" (A 22) for more information. Set the date and time again. Step 1 Turn the Camera On Daylight Saving Time If daylight saving time is in effect, press the multi selector H to set the date and time (A 94). Use...is displayed at the time of the monitor. When enabled, the clock moves forward one hour. When the daylight saving time function is enabled, W is turned on. When the travel destination (x) is selected, the time difference between the travel destination and the home time zone (w) is displayed. C The Clock ...
...Back The Basics of "Setting the Display Language, Date, and Time" (A 22) for more information. Set the date and time again. Step 1 Turn the Camera On Daylight Saving Time If daylight saving time is in effect, press the multi selector H to set the date and time (A 94). Use...is displayed at the time of the monitor. When enabled, the clock moves forward one hour. When the daylight saving time function is enabled, W is turned on. When the travel destination (x) is selected, the time difference between the travel destination and the home time zone (w) is displayed. C The Clock ...

Reference Manual
Page 42
... • We recommend using a tripod to W (off) - When shooting in the setup menu (A 94) when using a tripod to stabilize the camera in portrait (tall) orientation, turn the camera so that the flash is above the lens. Flash 2 Frame the picture. • Point the camera at the object (subject) you want to...
... • We recommend using a tripod to W (off) - When shooting in the setup menu (A 94) when using a tripod to stabilize the camera in portrait (tall) orientation, turn the camera so that the flash is above the lens. Flash 2 Frame the picture. • Point the camera at the object (subject) you want to...

Reference Manual
Page 43
... zoom option in the setup menu (A 94). 27 The Basics of Shooting and Playback Maximum optical zoom Digital zoom enabled • When you turn the camera on, the zoom moves to the maximum wide-angle position. • Rotating the zoom control all the way in either direction will...Small image size • Digital zoom can magnify the subject up to about 2× beyond the V position, interpolation is initiated and the zoom indicator turns yellow to indicate that interpolation is being applied. Step 3 Frame a Picture Using the Zoom Use the zoom control to activate optical zoom. • To...
... zoom option in the setup menu (A 94). 27 The Basics of Shooting and Playback Maximum optical zoom Digital zoom enabled • When you turn the camera on, the zoom moves to the maximum wide-angle position. • Rotating the zoom control all the way in either direction will...Small image size • Digital zoom can magnify the subject up to about 2× beyond the V position, interpolation is initiated and the zoom indicator turns yellow to indicate that interpolation is being applied. Step 3 Frame a Picture Using the Zoom Use the zoom control to activate optical zoom. • To...


