User Manual
Page 4
... before using this equipment. After removing or disconnecting the power source, take the product to a Nikon-authorized service representative for inspection. Do not use the camera or Charging AC adapter in the presence of children Particular care should be taken to prevent infants from failure .../or removing the battery. ii The consequences that should be read before using this Nikon product, to prevent possible injury. WARNINGS Turn off in the event of the camera or Charging AC adapter could result in explosion or fire. Continued operation could result in the ...
... before using this equipment. After removing or disconnecting the power source, take the product to a Nikon-authorized service representative for inspection. Do not use the camera or Charging AC adapter in the presence of children Particular care should be taken to prevent infants from failure .../or removing the battery. ii The consequences that should be read before using this Nikon product, to prevent possible injury. WARNINGS Turn off in the event of the camera or Charging AC adapter could result in explosion or fire. Continued operation could result in the ...

User Manual
Page 5
... store with DCto-AC inverters. Failure to observe these precautions could result in fire or electric shock. • Dust on or near the Charging AC Adapter during lightning storms. Failure to observe this product: • Before replacing the battery, turn the product off. Failure to observe ... dry cloth. Observe the following precautions when handling the battery for use immediately should be sure it is prone to remove the battery when no charge remains. • Discontinue use in electric shock. • Do not damage, modify, forcibly tug or bend the USB cable, place it ...
... store with DCto-AC inverters. Failure to observe these precautions could result in fire or electric shock. • Dust on or near the Charging AC Adapter during lightning storms. Failure to observe this product: • Before replacing the battery, turn the product off. Failure to observe ... dry cloth. Observe the following precautions when handling the battery for use immediately should be sure it is prone to remove the battery when no charge remains. • Discontinue use in electric shock. • Do not damage, modify, forcibly tug or bend the USB cable, place it ...

User Manual
Page 8
...-003 du Canada. Do not dispose of as household waste. • For more information, contact the retailer or the local authorities in charge of waste management. DISPOSE OF USED BATTERIES ACCORDING TO THE INSTRUCTIONS. This symbol indicates that the battery is designated for separate collection at an...birth defects or other reproductive harm. This symbol on this symbol or not, are designated for separate collection at an appropriate collection point. Nikon Inc., 1300 Walt Whitman Road Melville, New York 11747-3064 USA Tel: 631-547-4200 Notice for customers in Europe CAUTION RISK OF...
...-003 du Canada. Do not dispose of as household waste. • For more information, contact the retailer or the local authorities in charge of waste management. DISPOSE OF USED BATTERIES ACCORDING TO THE INSTRUCTIONS. This symbol indicates that the battery is designated for separate collection at an...birth defects or other reproductive harm. This symbol on this symbol or not, are designated for separate collection at an appropriate collection point. Nikon Inc., 1300 Walt Whitman Road Melville, New York 11747-3064 USA Tel: 631-547-4200 Notice for customers in Europe CAUTION RISK OF...

User Manual
Page 9
... Controls)...11 Playback (Information Display)...12 Playback (Operation Controls)...13 Operating the Tabs...14 First Steps ...16 Inserting the Battery ...16 Removing the Battery ...17 Charging the Battery ...18 Turning On and Off the Camera...21 Setting Display Language, Date and Time 22 Inserting Memory Cards ...24 Removing Memory Cards...24...
... Controls)...11 Playback (Information Display)...12 Playback (Operation Controls)...13 Operating the Tabs...14 First Steps ...16 Inserting the Battery ...16 Removing the Battery ...17 Charging the Battery ...18 Turning On and Off the Camera...21 Setting Display Language, Date and Time 22 Inserting Memory Cards ...24 Removing Memory Cards...24...

User Manual
Page 11
... Televisions, Computers and Printers 132 Connecting to a TV...132 Connecting to a Computer...134 Before Connecting the Camera...134 Transferring Images from a Camera to a Computer 135 Charging While Connecting to a Computer 139 ix
... Televisions, Computers and Printers 132 Connecting to a TV...132 Connecting to a Computer...134 Before Connecting the Camera...134 Transferring Images from a Camera to a Computer 135 Charging While Connecting to a Computer 139 ix
User Manual
Page 12
... U Motion Detection ...155 h AF Assist ...156 u Digital Zoom ...156 i Sound Settings ...157 k Auto Off ...158 l/m Format Memory/Format Card 159 n Language ...160 o Video Mode ...160 V Charge by Computer ...161 d Blink Warning...162 p Reset All ...164 h Copy (Copy Between Internal Memory and Memory Card 167 r Firmware Version ...168 Caring for the Camera...
... U Motion Detection ...155 h AF Assist ...156 u Digital Zoom ...156 i Sound Settings ...157 k Auto Off ...158 l/m Format Memory/Format Card 159 n Language ...160 o Video Mode ...160 V Charge by Computer ...161 d Blink Warning...162 p Reset All ...164 h Copy (Copy Between Internal Memory and Memory Card 167 r Firmware Version ...168 Caring for the Camera...
User Manual
Page 14
... contact information: http://imaging.nikon.com/ Use Only Nikon Brand Electronic Accessories Nikon COOLPIX cameras are engineered and proven to the highest standards and include complex electronic circuitry. THE USE OF NON-NIKON ELECTRONIC ACCESSORIES COULD DAMAGE THE CAMERA AND MAY VOID YOUR NIKON WARRANTY. Only Nikon brand electronic accessories (including battery chargers, batteries, Charging AC Adapter, and...
... contact information: http://imaging.nikon.com/ Use Only Nikon Brand Electronic Accessories Nikon COOLPIX cameras are engineered and proven to the highest standards and include complex electronic circuitry. THE USE OF NON-NIKON ELECTRONIC ACCESSORIES COULD DAMAGE THE CAMERA AND MAY VOID YOUR NIKON WARRANTY. Only Nikon brand electronic accessories (including battery chargers, batteries, Charging AC Adapter, and...

User Manual
Page 17
Parts of the Camera Introduction 1 2 3 4 5 Under the connector cover 6 78 9 10 11 12 13 1 Monitor/touch panel 10, 27 2 b (e movie-record) button....... 6, 126 3 Charge lamp 19, 139 Flash lamp 35 4 A (shooting mode) button 6, 40 5 c (playback) button 6, 32, 85 6 USB/audio/video output connector 132, 135, 141 7 Tripod socket 8 Speaker 109, 131 9 Connector cover 132, 135, 141 10 Battery-chamber/ memory card slot cover 16, 24 11 Memory card slot 24 12 Battery chamber 16 13 Battery latch 16, 17 5
Parts of the Camera Introduction 1 2 3 4 5 Under the connector cover 6 78 9 10 11 12 13 1 Monitor/touch panel 10, 27 2 b (e movie-record) button....... 6, 126 3 Charge lamp 19, 139 Flash lamp 35 4 A (shooting mode) button 6, 40 5 c (playback) button 6, 32, 85 6 USB/audio/video output connector 132, 135, 141 7 Tripod socket 8 Speaker 109, 131 9 Connector cover 132, 135, 141 10 Battery-chamber/ memory card slot cover 16, 24 11 Memory card slot 24 12 Battery chamber 16 13 Battery latch 16, 17 5
User Manual
Page 28
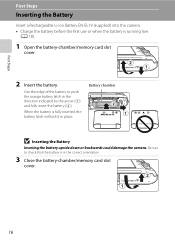
...-chamber/memory card slot cover. 16 First Steps First Steps Inserting the Battery Insert a Rechargeable Li-ion Battery EN-EL19 (supplied) into the camera. • Charge the battery before the first use or when the battery is fully inserted, the battery latch will lock it in place. Battery chamber B Inserting the...
...-chamber/memory card slot cover. 16 First Steps First Steps Inserting the Battery Insert a Rechargeable Li-ion Battery EN-EL19 (supplied) into the camera. • Charge the battery before the first use or when the battery is fully inserted, the battery latch will lock it in place. Battery chamber B Inserting the...

User Manual
Page 30
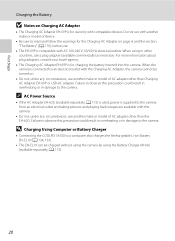
... are connected, attempting to forcibly remove the plug adapter could damage the product. * The shape of the plug adapter varies according to the camera. The Charging AC Adapter comes with the plug adapter attached in place. Push the plug adapter firmly until it is included, attach the plug adapter to the... plug on . 3 Use the supplied USB cable to connect the Charging AC Adapter to the country or region in which the camera was purchased. USB cable 18 Do not turn the camera on the...
... are connected, attempting to forcibly remove the plug adapter could damage the product. * The shape of the plug adapter varies according to the camera. The Charging AC Adapter comes with the plug adapter attached in place. Push the plug adapter firmly until it is included, attach the plug adapter to the... plug on . 3 Use the supplied USB cable to connect the Charging AC Adapter to the country or region in which the camera was purchased. USB cable 18 Do not turn the camera on the...

User Manual
Page 31
About two hours and ten minutes are required to charging. The following chart explains charge lamp status when the camera is plugged into an electrical outlet. Charge lamp Description Blinks slowly (green) Battery charging. Off Battery not charging. Charge the battery indoors with an ambient temperature of 5°C to 35°C (41°F to indicate that the...
About two hours and ten minutes are required to charging. The following chart explains charge lamp status when the camera is plugged into an electrical outlet. Charge lamp Description Blinks slowly (green) Battery charging. Off Battery not charging. Charge the battery indoors with an ambient temperature of 5°C to 35°C (41°F to indicate that the...
User Manual
Page 32
... be turned on. • Do not, under any circumstances, use . • The EH-69P is compatible with compatible devices. D Charging Using Computer or Battery Charger • Connecting the COOLPIX S4100 to the camera. For more information about plug adapters, consult your travel agency. • The... Charging AC Adapter EH-69P is for charging the battery inserted into the camera. Failure to observe this camera. • Do not,...
... be turned on. • Do not, under any circumstances, use . • The EH-69P is compatible with compatible devices. D Charging Using Computer or Battery Charger • Connecting the COOLPIX S4100 to the camera. For more information about plug adapters, consult your travel agency. • The... Charging AC Adapter EH-69P is for charging the battery inserted into the camera. Failure to observe this camera. • Do not,...

User Manual
Page 33
... off, hold down the c button to turn on (the power-on lamp turns off when the monitor turns on in the setup menu (A 146). 21 Charging the Battery Turning On and Off the Camera Press the power switch to turn off the camera, press the power switch again. When the camera...
... off, hold down the c button to turn on (the power-on lamp turns off when the monitor turns on in the setup menu (A 146). 21 Charging the Battery Turning On and Off the Camera Press the power switch to turn off the camera, press the power switch again. When the camera...
User Manual
Page 38
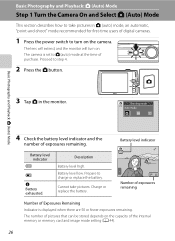
... replace the battery. Prepare to step 4. 2 Press the A button. Battery level indicator Battery level indicator b B N Battery exhausted. Battery level low. Charge or replace the battery. 3 Number of exposures remaining Number of Exposures Remaining Indicator is set to A (auto) mode at the time of the internal memory ...
... replace the battery. Prepare to step 4. 2 Press the A button. Battery level indicator Battery level indicator b B N Battery exhausted. Battery level low. Charge or replace the battery. 3 Number of exposures remaining Number of Exposures Remaining Indicator is set to A (auto) mode at the time of the internal memory ...
User Manual
Page 47
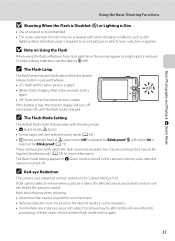
... to reduce redeye before the picture is saved. If the battery is low, the monitor display will fire when picture is taken. • Blinks: Flash charging. C The Flash Mode Setting The default flash mode setting varies with shooting mode. • A (auto) mode: a (auto) • Scene: varies with which noise reduction is... as dim lighting. More time than usual is required to record pictures. • Red-eye reduction may be enabled. c (off , until the flash is fully charged.
... to reduce redeye before the picture is saved. If the battery is low, the monitor display will fire when picture is taken. • Blinks: Flash charging. C The Flash Mode Setting The default flash mode setting varies with shooting mode. • A (auto) mode: a (auto) • Scene: varies with which noise reduction is... as dim lighting. More time than usual is required to record pictures. • Red-eye reduction may be enabled. c (off , until the flash is fully charged.

User Manual
Page 147
...battery inserted into the camera is automatically charged using the supplied USB cable. Do not attempt to the computer using power supplied by the computer (A 139, 161). • If the AC Adapter EH-62G (A 172) (available separately) is used, COOLPIX S4100 can be recognized if the camera is ...automatically turned on and the power-on Power Source • When connecting the camera to a computer, use any other make or model of charge remaining to prevent the camera from a Camera to a ...
...battery inserted into the camera is automatically charged using the supplied USB cable. Do not attempt to the computer using power supplied by the computer (A 139, 161). • If the AC Adapter EH-62G (A 172) (available separately) is used, COOLPIX S4100 can be recognized if the camera is ...automatically turned on and the power-on Power Source • When connecting the camera to a computer, use any other make or model of charge remaining to prevent the camera from a Camera to a ...
User Manual
Page 148
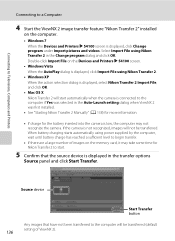
...was selected in the Auto-Launch setting dialog when ViewNX 2 was first installed. • See "Starting Nikon Transfer 2 Manually" (A 138) for more information. • If charge for Nikon Transfer 2 to start. 5 Confirm that have not been transferred to begin transfer. • If ...there are a large number of ViewNX 2). If the camera is not recognized, images will be transferred. Double-click Import File on the computer. • Windows 7 When the Devices and Printers K S4100...
...was selected in the Auto-Launch setting dialog when ViewNX 2 was first installed. • See "Starting Nikon Transfer 2 Manually" (A 138) for more information. • If charge for Nikon Transfer 2 to start. 5 Confirm that have not been transferred to begin transfer. • If ...there are a large number of ViewNX 2). If the camera is not recognized, images will be transferred. Double-click Import File on the computer. • Windows 7 When the Devices and Printers K S4100...
User Manual
Page 149
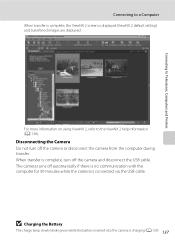
... Camera Do not turn off the camera or disconnect the camera from the computer during transfer. When transfer is connected via the USB cable. B Charging the Battery The charge lamp slowly blinks green while the battery inserted into the camera is displayed (ViewNX 2 default setting) and transferred images are displayed. Connecting to... off the camera and disconnect the USB cable. For more information on using ViewNX 2, refer to a Computer When transfer is complete, the ViewNX 2 screen is charging (A 139). 137
... Camera Do not turn off the camera or disconnect the camera from the computer during transfer. When transfer is connected via the USB cable. B Charging the Battery The charge lamp slowly blinks green while the battery inserted into the camera is displayed (ViewNX 2 default setting) and transferred images are displayed. Connecting to... off the camera and disconnect the USB cable. For more information on using ViewNX 2, refer to a Computer When transfer is complete, the ViewNX 2 screen is charging (A 139). 137
User Manual
Page 151
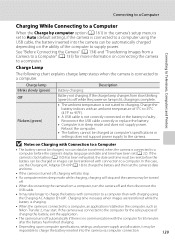
... camera from a computer, turn the camera off automatically if there is no communication with charging using the USB cable, the battery inserted into the camera can data be charged as Nikon Transfer 2, may be transferred with an ambient temperature of the computer to a computer. Connecting... to a Computer Charging While Connecting to a Computer When the Charge by computer option (A 161) in sleep mode and ...
... camera from a computer, turn the camera off automatically if there is no communication with charging using the USB cable, the battery inserted into the camera can data be charged as Nikon Transfer 2, may be transferred with an ambient temperature of the computer to a computer. Connecting... to a Computer Charging While Connecting to a Computer When the Charge by computer option (A 161) in sleep mode and ...

User Manual
Page 152
If the AC Adapter EH-62G (available separately) is complete, turn the camera off unexpectedly. Do not use a fully charged battery to prevent the camera from turning off and disconnect USB cable B Note on Power Source When connecting the camera to a printer,... Print order option (A 103) Connect to printer (A 141) Print pictures one at a time (A 142) Print multiple pictures (A 143) When printing is used, COOLPIX S4100 can connect the camera directly to the printer and print pictures without using the Print order menu (A 103). 140 Connecting to Televisions, Computers and Printers...
If the AC Adapter EH-62G (available separately) is complete, turn the camera off unexpectedly. Do not use a fully charged battery to prevent the camera from turning off and disconnect USB cable B Note on Power Source When connecting the camera to a printer,... Print order option (A 103) Connect to printer (A 141) Print pictures one at a time (A 142) Print multiple pictures (A 143) When printing is used, COOLPIX S4100 can connect the camera directly to the printer and print pictures without using the Print order menu (A 103). 140 Connecting to Televisions, Computers and Printers...


