
User Manual
Page 5
... flames. Should the insulation be sure to observe this precaution could result in electric shock. • Do not damage, modify, forcibly tug or bend the USB cable, place it under heavy objects, or expose it upside down or backwards. • Do not short or disassemble the battery or attempt to remove or...
... flames. Should the insulation be sure to observe this precaution could result in electric shock. • Do not damage, modify, forcibly tug or bend the USB cable, place it under heavy objects, or expose it upside down or backwards. • Do not short or disassemble the battery or attempt to remove or...

User Manual
Page 30
...it is included, attach the plug adapter to the plug on . 3 Use the supplied USB cable to connect the Charging AC Adapter to the country or region in Argentina and Korea. 2 Insert the battery (A 16). USB cable 18 Do not turn the camera on the Charging AC Adapter. The Charging AC Adapter ...comes with the plug adapter attached in which the camera was purchased. Do not attempt to the camera via the supplied USB Cable UC-E6, and then plugging the Charging AC Adapter into an electrical outlet. 1 Prepare the Charging AC Adapter EH-69P. First Steps Charging ...
...it is included, attach the plug adapter to the plug on . 3 Use the supplied USB cable to connect the Charging AC Adapter to the country or region in Argentina and Korea. 2 Insert the battery (A 16). USB cable 18 Do not turn the camera on the Charging AC Adapter. The Charging AC Adapter ...comes with the plug adapter attached in which the camera was purchased. Do not attempt to the camera via the supplied USB Cable UC-E6, and then plugging the Charging AC Adapter into an electrical outlet. 1 Prepare the Charging AC Adapter EH-69P. First Steps Charging ...

User Manual
Page 31
... Plug the Charging AC Adapter into the electrical outlet. The following chart explains charge lamp status when the camera is charging. Disconnect the USB cable or unplug the Charging AC Adapter and correctly connect it again, or change the battery. 5 Disconnect the Charging AC Adapter from the ...electrical outlet and then disconnect the USB cable. 19 About two hours and ten minutes are required to indicate that the battery is plugged into an electrical outlet. Charge lamp ...
... Plug the Charging AC Adapter into the electrical outlet. The following chart explains charge lamp status when the camera is charging. Disconnect the USB cable or unplug the Charging AC Adapter and correctly connect it again, or change the battery. 5 Disconnect the Charging AC Adapter from the ...electrical outlet and then disconnect the USB cable. 19 About two hours and ten minutes are required to indicate that the battery is plugged into an electrical outlet. Charge lamp ...

User Manual
Page 118
Tap n to a printer, via the supplied USB cable, for Multiple Pictures" (A 105). Changing the Date and time and Time zone settings using the Print date option (A 153) in the setup menu, pictures are ...
Tap n to a printer, via the supplied USB cable, for Multiple Pictures" (A 105). Changing the Date and time and Time zone settings using the Print date option (A 153) in the setup menu, pictures are ...
User Manual
Page 146
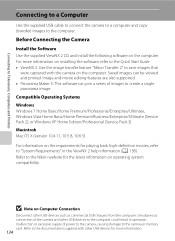
... X (version 10.4.11, 10.5.8, 10.6.5) For information on the requirements for the latest information on the computer. Refer to the Nikon website for playing back high-definition movies, refer to "System Requirements" in operation malfunction or excessive supply of images to the computer .... For more information. 134 Refer to the computer. Connecting to Televisions, Computers and Printers Connecting to a Computer Use the supplied USB cable to connect the camera to a computer and copy (transfer) images to the documentation supplied with the camera on the computer. Image...
... X (version 10.4.11, 10.5.8, 10.6.5) For information on the requirements for the latest information on the computer. Refer to the Nikon website for playing back high-definition movies, refer to "System Requirements" in operation malfunction or excessive supply of images to the computer .... For more information. 134 Refer to the computer. Connecting to Televisions, Computers and Printers Connecting to a Computer Use the supplied USB cable to connect the camera to a computer and copy (transfer) images to the documentation supplied with the camera on the computer. Image...

User Manual
Page 147
... supplied by the computer (A 139, 161). • If the AC Adapter EH-62G (A 172) (available separately) is used, COOLPIX S4100 can be recognized if the camera is connected to the computer via the supplied USB cable with Auto (default setting) selected for the Charge by computer option in the setup menu, the battery inserted...
... supplied by the computer (A 139, 161). • If the AC Adapter EH-62G (A 172) (available separately) is used, COOLPIX S4100 can be recognized if the camera is connected to the computer via the supplied USB cable with Auto (default setting) selected for the Charge by computer option in the setup menu, the battery inserted...
User Manual
Page 149
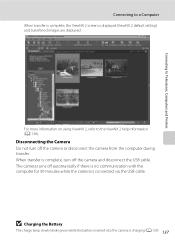
... there is no communication with the computer for 30 minutes while the camera is complete, turn off the camera and disconnect the USB cable. When transfer is connected via the USB cable. B Charging the Battery The charge lamp slowly blinks green while the battery inserted into the camera is displayed (ViewNX 2 default setting) and...
... there is no communication with the computer for 30 minutes while the camera is complete, turn off the camera and disconnect the USB cable. When transfer is connected via the USB cable. B Charging the Battery The charge lamp slowly blinks green while the battery inserted into the camera is displayed (ViewNX 2 default setting) and...
User Manual
Page 151
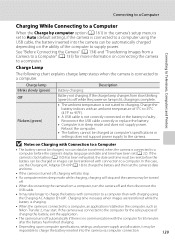
... explains charge lamp status when the camera is no communication with the computer for more information on connecting the camera to supply power. Reconnect the USB cable correctly or replace the battery. • Computer is connected to a computer, an application installed on lamp is lit, charging is complete. &#... battery can be charged or images can be transferred with connection to a computer. Reboot the computer. • The battery cannot be charged as Nikon Transfer 2, may start. In this case, use the Charging AC Adapter EH-69P (A 18) to charge the battery and then set to Auto...
... explains charge lamp status when the camera is no communication with the computer for more information on connecting the camera to supply power. Reconnect the USB cable correctly or replace the battery. • Computer is connected to a computer, an application installed on lamp is lit, charging is complete. &#... battery can be charged or images can be transferred with connection to a computer. Reboot the computer. • The battery cannot be charged as Nikon Transfer 2, may start. In this case, use the Charging AC Adapter EH-69P (A 18) to charge the battery and then set to Auto...

User Manual
Page 152
...the printer and print pictures without using a computer. Do not use a fully charged battery to prevent the camera from turning off and disconnect USB cable B Note on Power Source When connecting the camera to a printer, use any other make or model of AC adapter as they may ...order option (A 103) Connect to printer (A 141) Print pictures one at a time (A 142) Print multiple pictures (A 143) When printing is used, COOLPIX S4100 can connect the camera directly to print pictures. D Printing Pictures In addition to printing pictures transferred to a computer from an electrical outlet.
...the printer and print pictures without using a computer. Do not use a fully charged battery to prevent the camera from turning off and disconnect USB cable B Note on Power Source When connecting the camera to a printer, use any other make or model of AC adapter as they may ...order option (A 103) Connect to printer (A 141) Print pictures one at a time (A 142) Print multiple pictures (A 143) When printing is used, COOLPIX S4100 can connect the camera directly to print pictures. D Printing Pictures In addition to printing pictures transferred to a computer from an electrical outlet.

User Manual
Page 153
... Do not attempt to insert connectors at an angle, and do not use force when connecting or disconnecting the USB cable. 4 The camera is automatically turned on the printer. Be sure that connectors are properly oriented. Connecting to Televisions, Computers and Printers... Connecting the Camera to a Printer 1 Turn off and disconnect the USB cable. Set the Charge by the Print selection screen (2). 1 2 Print selection B If the PictBridge Startup Screen Is not Displayed Turn the camera off ...
... Do not attempt to insert connectors at an angle, and do not use force when connecting or disconnecting the USB cable. 4 The camera is automatically turned on the printer. Be sure that connectors are properly oriented. Connecting to Televisions, Computers and Printers... Connecting the Camera to a Printer 1 Turn off and disconnect the USB cable. Set the Charge by the Print selection screen (2). 1 2 Print selection B If the PictBridge Startup Screen Is not Displayed Turn the camera off ...

User Manual
Page 158
... illuminator. o Video mode A 160 Adjust settings necessary for items displayed in still pictures. e Monitor settings A 152 Set the options for connection to a computer via the USB cable. d Time zone and date A 149 Set camera clock and choose home and destination time zones. c Welcome screen A 148 Choose whether or not a welcome screen is...
... illuminator. o Video mode A 160 Adjust settings necessary for items displayed in still pictures. e Monitor settings A 152 Set the options for connection to a computer via the USB cable. d Time zone and date A 149 Set camera clock and choose home and destination time zones. c Welcome screen A 148 Choose whether or not a welcome screen is...

User Manual
Page 173
... to a printer, even if the printer complies with the PictBridge standard. • When Auto is connected to a computer via the USB cable (A 139). B Notes on , turn the camera off and disconnect the USB cable. Basic Camera Setup Setup Menu V Charge by Computer Tap the bottom tab (A 147) M Tap z (Setup menu) M V Charge by computer Choose...
... to a printer, even if the printer complies with the PictBridge standard. • When Auto is connected to a computer via the USB cable (A 139). B Notes on , turn the camera off and disconnect the USB cable. Basic Camera Setup Setup Menu V Charge by Computer Tap the bottom tab (A 147) M Tap z (Setup menu) M V Charge by computer Choose...
User Manual
Page 184
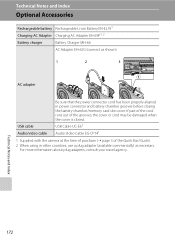
... the Quick Start Guide). 2 When using in other countries, use a plug adapter (available commercially) as shown) 1 2 3 AC adapter USB cable Audio/video cable Be sure that the power connector cord has been properly aligned in power connector and battery chamber grooves before closing the battery-chamber/memory... card slot cover. USB Cable UC-E61 Audio Video Cable EG-CP141 1 Supplied with the camera at the time of purchase (➝ page 3 of the grooves, the cover ...
... the Quick Start Guide). 2 When using in other countries, use a plug adapter (available commercially) as shown) 1 2 3 AC adapter USB cable Audio/video cable Be sure that the power connector cord has been properly aligned in power connector and battery chamber grooves before closing the battery-chamber/memory... card slot cover. USB Cable UC-E61 Audio Video Cable EG-CP141 1 Supplied with the camera at the time of purchase (➝ page 3 of the grooves, the cover ...
User Manual
Page 192
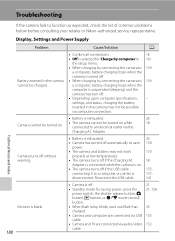
...blinks, wait until flash has charged. • Camera and computer are connected via USB cable. • Camera and TV are connected via the 18 Charging AC Adapter. Reconnect the USB cable. 141 Monitor is blank. 180 • Camera is 137, disconnected. settings,... and status, charging the battery inserted in 161 the setup menu. • When charging by connecting the camera to function as expected, check the list of common problems below before consulting your retailer or Nikon...
...blinks, wait until flash has charged. • Camera and computer are connected via USB cable. • Camera and TV are connected via the 18 Charging AC Adapter. Reconnect the USB cable. 141 Monitor is blank. 180 • Camera is 137, disconnected. settings,... and status, charging the battery inserted in 161 the setup menu. • When charging by connecting the camera to function as expected, check the list of common problems below before consulting your retailer or Nikon...
User Manual
Page 198
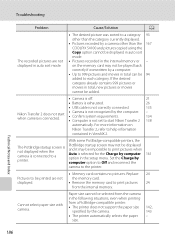
... movies cannot be added. • Camera is off. 21 • Battery is exhausted. 26 • USB cable is not correctly connected. 135 Nikon Transfer 2 does not start Nikon Transfer 2 - 134 138 automatically. size. With some PictBridge-compatible printers, the The PictBridge startup screen is not...played back correctly if overwritten by a camera other than the 167 COOLPIX S4100 and pictures copied using the Copy option cannot be selected from the internal memory. Technical Notes and Index 186 on Nikon Transfer 2, refer to print pictures 24 from the camera in ViewNX...
... movies cannot be added. • Camera is off. 21 • Battery is exhausted. 26 • USB cable is not correctly connected. 135 Nikon Transfer 2 does not start Nikon Transfer 2 - 134 138 automatically. size. With some PictBridge-compatible printers, the The PictBridge startup screen is not...played back correctly if overwritten by a camera other than the 167 COOLPIX S4100 and pictures copied using the Copy option cannot be selected from the internal memory. Technical Notes and Index 186 on Nikon Transfer 2, refer to print pictures 24 from the camera in ViewNX...
User Manual
Page 205
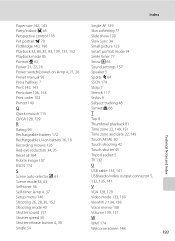
... zone 22, 149, 151 Time zone and date 22, 149 Touch AF/AE 50 Touch shooting 42 Touch shutter 45 Tripod socket 5 TV 132 U USB cable 135, 141 USB/audio/video output connector 5, 132, 135, 141 V VGA 128, 129 Video mode 133, 160 ViewNX 2 134, 138 Voice memo 108 Volume 109, 131 W WAV...
... zone 22, 149, 151 Time zone and date 22, 149 Touch AF/AE 50 Touch shooting 42 Touch shutter 45 Tripod socket 5 TV 132 U USB cable 135, 141 USB/audio/video output connector 5, 132, 135, 141 V VGA 128, 129 Video mode 133, 160 ViewNX 2 134, 138 Voice memo 108 Volume 109, 131 W WAV...


