User Manual
Page 9
... Switching Between Tabs in the Menu Screen 13 Using Camera Menus...14 Pressing the Shutter-Release Button Halfway/All the Way 15 x (Monitor) Button ...16 s (Display) Button ...17 First Steps ...18 Inserting the Battery...18 Removing the Battery...19 Charging the Battery ...20 Turning On and Off the Camera...23 Setting...
... Switching Between Tabs in the Menu Screen 13 Using Camera Menus...14 Pressing the Shutter-Release Button Halfway/All the Way 15 x (Monitor) Button ...16 s (Display) Button ...17 First Steps ...18 Inserting the Battery...18 Removing the Battery...19 Charging the Battery ...20 Turning On and Off the Camera...23 Setting...
User Manual
Page 10
Table of Contents Basic Photography and Playback: A (Auto) Mode 28 Step 1 Turn the Camera On and Select A (Auto) Mode 28 Indicators Displayed in A (Auto) Mode 29 Step 2 Frame a Picture...30 Using the Viewfinder ...30 Using the Zoom...31 Step 3 Focus and Shoot ...32 Step 4 Viewing and Deleting ...
Table of Contents Basic Photography and Playback: A (Auto) Mode 28 Step 1 Turn the Camera On and Select A (Auto) Mode 28 Indicators Displayed in A (Auto) Mode 29 Step 2 Frame a Picture...30 Using the Viewfinder ...30 Using the Zoom...31 Step 3 Focus and Shoot ...32 Step 4 Viewing and Deleting ...
User Manual
Page 11
... by Date (List by Date 132 Viewing Images in List by Date Mode 132 Operations in a Sequence...114 Viewing Multiple Pictures: Thumbnail Playback 115 Calendar Display...117 Taking a Closer Look: Playback Zoom 118 Playing Back Images by Date Mode ...133 Playback Options: Playback Menu 134 a Print Order: Setting the Pictures and......138 d Protect ...139 Selecting Pictures ...140 f Rotate Image...141 i Hide Image...141 E Voice Memo...142 h Copy: Copying Between Internal Memory and Memory Card 144 C Sequence Display Options...145 C Choose Key Picture ...145 ix
... by Date (List by Date 132 Viewing Images in List by Date Mode 132 Operations in a Sequence...114 Viewing Multiple Pictures: Thumbnail Playback 115 Calendar Display...117 Taking a Closer Look: Playback Zoom 118 Playing Back Images by Date Mode ...133 Playback Options: Playback Menu 134 a Print Order: Setting the Pictures and......138 d Protect ...139 Selecting Pictures ...140 f Rotate Image...141 i Hide Image...141 E Voice Memo...142 h Copy: Copying Between Internal Memory and Memory Card 144 C Sequence Display Options...145 C Choose Key Picture ...145 ix
User Manual
Page 15
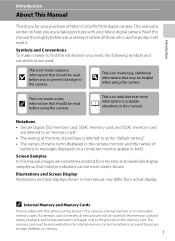
... memory card must be removed before use , to prevent damage to as the "default setting." • The names of menu items displayed in the camera monitor, and the names of Nikon COOLPIX P500 digital camera. This icon marks notes, C information that more clearly shown. This manual is available elsewhere in this manual thoroughly...
... memory card must be removed before use , to prevent damage to as the "default setting." • The names of menu items displayed in the camera monitor, and the names of Nikon COOLPIX P500 digital camera. This icon marks notes, C information that more clearly shown. This manual is available elsewhere in this manual thoroughly...

User Manual
Page 19
... 15 16 17 18 22 23 24 1 Side zoom control 31 2 Speaker 143, 168 3 x (monitor) button 16 4 Diopter adjustment control 30 5 Electronic viewfinder 16, 30 6 s (display) button 17 7 b (e movie-record) button 157 8 Movie mode switch 157 9 Command dial 11 10 USB/Audio video connector 171, 174, 180 11 HDMI Mini Connector...
... 15 16 17 18 22 23 24 1 Side zoom control 31 2 Speaker 143, 168 3 x (monitor) button 16 4 Diopter adjustment control 30 5 Electronic viewfinder 16, 30 6 s (display) button 17 7 b (e movie-record) button 157 8 Movie mode switch 157 9 Command dial 11 10 USB/Audio video connector 171, 174, 180 11 HDMI Mini Connector...

User Manual
Page 22
Introduction Parts of the Camera Monitor The following indicators may appear in the monitor during shooting and playback (actual display varies with current camera settings). See page 17 for how to switch the monitor display. Shooting 48 47 46 45 44 43 42 41 40 45 2 6 13 8 7 9 12 13 10 11 14 15 38, 39 37 35 1/250 F5.6 999 32 27 26 17 18 19 16 20 21 34 33 25 36 999 9999 1m00s 31 30 29 28 a b 22 23 24 49 50 1/250 F5.6 1342 8
Introduction Parts of the Camera Monitor The following indicators may appear in the monitor during shooting and playback (actual display varies with current camera settings). See page 17 for how to switch the monitor display. Shooting 48 47 46 45 44 43 42 41 40 45 2 6 13 8 7 9 12 13 10 11 14 15 38, 39 37 35 1/250 F5.6 999 32 27 26 17 18 19 16 20 21 34 33 25 36 999 9999 1m00s 31 30 29 28 a b 22 23 24 49 50 1/250 F5.6 1342 8

User Manual
Page 24
... 15 8 9 10 999/999 14 13 999/999 9999/9999 a 11 12 1m00s b 1 Date of recording 24 2 Time of recording 24 3 Protect icon 139 4 Sequence display 113, 145 5 Volume indicator 142, 168 Album icon in favorite pictures mode1 6 124 Category icon in auto sort mode1 129 7 Battery level indicator 28 8 Movie... 142 23 File number and type 215 1 The icon for the selected album or the selected category in auto sort mode in playback mode is displayed. 10 2 The icon displayed varies with the setting that was set at the time of shooting.
... 15 8 9 10 999/999 14 13 999/999 9999/9999 a 11 12 1m00s b 1 Date of recording 24 2 Time of recording 24 3 Protect icon 139 4 Sequence display 113, 145 5 Volume indicator 142, 168 Album icon in favorite pictures mode1 6 124 Category icon in auto sort mode1 129 7 Battery level indicator 28 8 Movie... 142 23 File number and type 215 1 The icon for the selected album or the selected category in auto sort mode in playback mode is displayed. 10 2 The icon displayed varies with the setting that was set at the time of shooting.

User Manual
Page 25
... to select items from a menu screen or to switch between 74 settings.) For Playback Mode Description Full-frame playback or thumbnail playback Choose a picture Calendar display Playback zoom Movie playback During movie pause or editing Choose a date Change the zoom ratio Advanced or rewound Advanced or rewound by one frame A 34...
... to select items from a menu screen or to switch between 74 settings.) For Playback Mode Description Full-frame playback or thumbnail playback Choose a picture Calendar display Playback zoom Movie playback During movie pause or editing Choose a date Change the zoom ratio Advanced or rewound Advanced or rewound by one frame A 34...
User Manual
Page 26
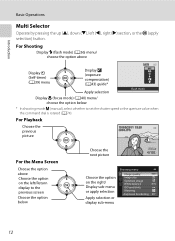
... previous picture 15/05/2011 15:30 0004.JPG For the Menu Screen Choose the option above Display n (Self-timer) (A39) menu Display o (exposure compensation) (A43) guide* Apply selection Flash mode Display D (focus mode) (A40) menu/ choose the option below Choose the next picture 4 132...right (K) section, or the k (apply selection) button. For Shooting Display m (flash mode) (A36) menu/ choose the option above Choose the option on the right/ Display sub-menu or apply selection Apply selection or display sub-menu Shooting menu Image quality Image size Optimize image White balance ...
... previous picture 15/05/2011 15:30 0004.JPG For the Menu Screen Choose the option above Display n (Self-timer) (A39) menu Display o (exposure compensation) (A43) guide* Apply selection Flash mode Display D (focus mode) (A40) menu/ choose the option below Choose the next picture 4 132...right (K) section, or the k (apply selection) button. For Shooting Display m (flash mode) (A36) menu/ choose the option above Choose the option on the right/ Display sub-menu or apply selection Apply selection or display sub-menu Shooting menu Image quality Image size Optimize image White balance ...

User Manual
Page 27
... for the menus available in the Menu Screen In the menu screen that is displayed when the d button is displayed. 13 Displayed when the G is displayed when there menu contains two are previous menu options or more pages Tab for displaying the setup menu Image quality Image size Optimize image White balance ISO sensitivity Metering...
... for the menus available in the Menu Screen In the menu screen that is displayed when the d button is displayed. 13 Displayed when the G is displayed when there menu contains two are previous menu options or more pages Tab for displaying the setup menu Image quality Image size Optimize image White balance ISO sensitivity Metering...
User Manual
Page 28
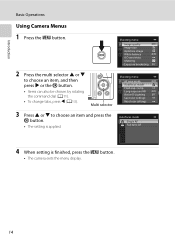
... selector 3 Press H or I to choose an item and press the k button. • The setting is finished, press the d button. • The camera exits the menu display. 14 comp. Long exposure NR Active D-Lighting Save user settings Reset user settings Autofocus mode Single AF Full-time AF 4 When setting is applied. Shooting...
... selector 3 Press H or I to choose an item and press the k button. • The setting is finished, press the d button. • The camera exits the menu display. 14 comp. Long exposure NR Active D-Lighting Save user settings Reset user settings Autofocus mode Single AF Full-time AF 4 When setting is applied. Shooting...

User Manual
Page 30
... 16 Monitor Viewfinder 1/250 F5.6 1342 1/250 F5.6 1342 B Diopter Adjustment of Viewfinder When the diopter for the viewfinder is out of focus and the display is clearly visible. • Take care not to switch between the monitor and viewfinder. For example, use the viewfinder in bright locations when it is...
... 16 Monitor Viewfinder 1/250 F5.6 1342 1/250 F5.6 1342 B Diopter Adjustment of Viewfinder When the diopter for the viewfinder is out of focus and the display is clearly visible. • Take care not to switch between the monitor and viewfinder. For example, use the viewfinder in bright locations when it is...

User Manual
Page 31
...the current file number/total number of the image (portions that shows the brightness distribution in a frame. Information hidden Display only the taken picture. 1 The brightest portions of exposures. The horizontal axis corresponds to pixel brightness, with dark ...:30 0004.JPG 100NIKON 0004.JPG P 1/250 F5.6 4 132 Display photo information Display the picture taken and the photo information. +1.0 ISO 200 4 132 Display shooting information (except for movies) Display highlight1, histogram2 and shooting information3. j is displayed when the shooting mode A, y, j, e, o, F or j is...
...the current file number/total number of the image (portions that shows the brightness distribution in a frame. Information hidden Display only the taken picture. 1 The brightest portions of exposures. The horizontal axis corresponds to pixel brightness, with dark ...:30 0004.JPG 100NIKON 0004.JPG P 1/250 F5.6 4 132 Display photo information Display the picture taken and the photo information. +1.0 ISO 200 4 132 Display shooting information (except for movies) Display highlight1, histogram2 and shooting information3. j is displayed when the shooting mode A, y, j, e, o, F or j is...
User Manual
Page 37
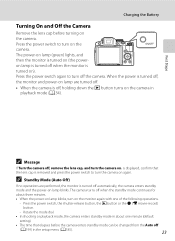
... the camera enters standby mode can be changed from the Auto off , holding down the c button turns on the camera in playback mode (A34). is displayed, confirm that elapses before turning on lamp blinks. Rotate the mode dial. • In shooting or playback mode, the camera enters standby mode in the...
... the camera enters standby mode can be changed from the Auto off , holding down the c button turns on the camera in playback mode (A34). is displayed, confirm that elapses before turning on lamp blinks. Rotate the mode dial. • In shooting or playback mode, the camera enters standby mode in the...
User Manual
Page 38
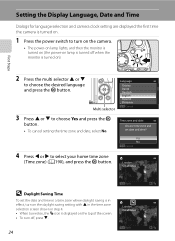
... in effect, turn on the daylight saving setting with H in the time zone selection screen shown in step 4. • When turned on, the W icon is displayed on the top of the screen. • To turn on the camera. • The power-on lamp lights, and then the monitor is turned off... multi selector H or I to select your home time zone (Time zone) (A190), and press the k button. Setting the Display Language, Date and Time Dialogs for language selection and camera clock setting are displayed the first time the camera is turned on. 1 Press the power switch to turn off when the monitor is...
... in effect, turn on the daylight saving setting with H in the time zone selection screen shown in step 4. • When turned on, the W icon is displayed on the top of the screen. • To turn on the camera. • The power-on lamp lights, and then the monitor is turned off... multi selector H or I to select your home time zone (Time zone) (A190), and press the k button. Setting the Display Language, Date and Time Dialogs for language selection and camera clock setting are displayed the first time the camera is turned on. 1 Press the power switch to turn off when the monitor is...
User Manual
Page 39
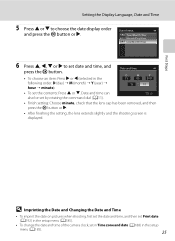
... lens cap has been removed, and then press the k button or K. • After finishing the setting, the lens extends slightly and the shooting screen is displayed. Date format Year/Month/Day Month/Day/Year Day/Month/Year 6 Press H, J, I or K to choose the date... display order and press the k button or K. First Steps Setting the Display Language, Date and Time 5 Press H or I to set in Time zone and date (A188) in the following order: D (day) ➝ M (month) ➝ Y (year) ➝...
... lens cap has been removed, and then press the k button or K. • After finishing the setting, the lens extends slightly and the shooting screen is displayed. Date format Year/Month/Day Month/Day/Year Day/Month/Year 6 Press H, J, I or K to choose the date... display order and press the k button or K. First Steps Setting the Display Language, Date and Time 5 Press H or I to set in Time zone and date (A188) in the following order: D (day) ➝ M (month) ➝ Y (year) ➝...
User Manual
Page 41
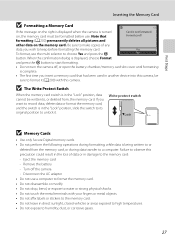
...; The first time you insert a memory card that Format card? formatting (A200) permanently deletes all pictures and other data on the right is displayed when the camera is turned Card is in the loss of any data you want to record data, delete data or format the memory card...its original position to choose Yes and press the k No button. Turn off , or open the battery-chamber/memory card slot cover until formatting is displayed, choose Format and press the k button to humidity, dust, or corrosive gases. 27 Write protect switch B Memory Cards • Use only Secure ...
...; The first time you insert a memory card that Format card? formatting (A200) permanently deletes all pictures and other data on the right is displayed when the camera is turned Card is in the loss of any data you want to record data, delete data or format the memory card...its original position to choose Yes and press the k No button. Turn off , or open the battery-chamber/memory card slot cover until formatting is displayed, choose Format and press the k button to humidity, dust, or corrosive gases. 27 Write protect switch B Memory Cards • Use only Secure ...
User Manual
Page 42
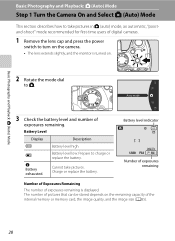
... of the internal memory or memory card, the image quality, and the image size (A85). 28 Prepare to charge or replace the battery. Battery Level Display b Description Battery level high. Cannot take pictures in A (auto) mode, an automatic, "pointand-shoot" mode recommended for first-time users of exposures remaining. Basic Photography... digital cameras. 1 Remove the lens cap and press the power switch to turn on the camera. • The lens extends slightly, and the monitor is displayed.
... of the internal memory or memory card, the image quality, and the image size (A85). 28 Prepare to charge or replace the battery. Battery Level Display b Description Battery level high. Cannot take pictures in A (auto) mode, an automatic, "pointand-shoot" mode recommended for first-time users of exposures remaining. Basic Photography... digital cameras. 1 Remove the lens cap and press the power switch to turn on the camera. • The lens extends slightly, and the monitor is displayed.

User Manual
Page 43
...camera during shooting. 29 record) button. - Shutter speed (A70) 1/250 F5.6 Aperture value (A70) Internal memory indicator Pictures are displayed. The default settings are recorded to the memory card. Vibration reduction icon Reduces the effects of the monitor. D Vibration Reduction • ...recording (A157, 164, 165). Basic Photography and Playback: A (Auto) Mode Step 1 Turn the Camera On and Select A (Auto) Mode Indicators Displayed in A (Auto) Mode Shooting mode A is backlit, be applied. • Press the d button to specify settings for image size. In ...
...camera during shooting. 29 record) button. - Shutter speed (A70) 1/250 F5.6 Aperture value (A70) Internal memory indicator Pictures are displayed. The default settings are recorded to the memory card. Vibration reduction icon Reduces the effects of the monitor. D Vibration Reduction • ...recording (A157, 164, 165). Basic Photography and Playback: A (Auto) Mode Step 1 Turn the Camera On and Select A (Auto) Mode Indicators Displayed in A (Auto) Mode Shooting mode A is backlit, be applied. • Press the d button to specify settings for image size. In ...
User Manual
Page 44
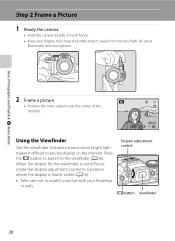
.... • Position the main subject near the center of focus, rotate the diopter adjustment control to a position where the display is clearly visible (A16). • Take care not to see the display on the monitor. When the diopter for the viewfinder is out of the monitor. 1/250 F5.6 32 Using the Viewfinder...
.... • Position the main subject near the center of focus, rotate the diopter adjustment control to a position where the display is clearly visible (A16). • Take care not to see the display on the monitor. When the diopter for the viewfinder is out of the monitor. 1/250 F5.6 32 Using the Viewfinder...


