User Manual
Page 10
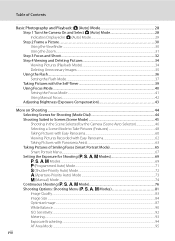
...) Mode 28 Indicators Displayed in A (Auto) Mode 29 Step 2 Frame a Picture...30 Using the Viewfinder ...30 Using the Zoom...31 Step 3 Focus and Shoot ...32 Step 4 Viewing and Deleting Pictures 34 Viewing Pictures (Playback Mode) ...34 Deleting Unnecessary Images...35 Using the Flash...36 Setting the ...Flash Mode...37 Taking Pictures with the Self-Timer 39 Using Focus Mode ...40 Setting the Focus Mode ...41 Using Manual Focus...42 Adjusting Brightness (Exposure Compensation 43 More on Shooting ...44 Selecting Scenes for Shooting (Mode Dial 44 ...
...) Mode 28 Indicators Displayed in A (Auto) Mode 29 Step 2 Frame a Picture...30 Using the Viewfinder ...30 Using the Zoom...31 Step 3 Focus and Shoot ...32 Step 4 Viewing and Deleting Pictures 34 Viewing Pictures (Playback Mode) ...34 Deleting Unnecessary Images...35 Using the Flash...36 Setting the ...Flash Mode...37 Taking Pictures with the Self-Timer 39 Using Focus Mode ...40 Setting the Focus Mode ...41 Using Manual Focus...42 Adjusting Brightness (Exposure Compensation 43 More on Shooting ...44 Selecting Scenes for Shooting (Mode Dial 44 ...
User Manual
Page 11
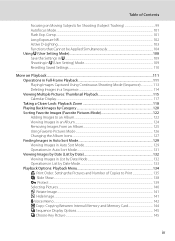
... the Settings in M...109 Shooting in List by Date Mode ...133 Playback Options: Playback Menu 134 a Print Order: Setting the Pictures and Number of Contents Focusing on Playback ...111 Operations in Full-Frame Playback 111 Playing Images Captured Using Continuous Shooting Mode (Sequence 113 Deleting Images in a Sequence...114 Viewing Multiple...
... the Settings in M...109 Shooting in List by Date Mode ...133 Playback Options: Playback Menu 134 a Print Order: Setting the Pictures and Number of Contents Focusing on Playback ...111 Operations in Full-Frame Playback 111 Playing Images Captured Using Continuous Shooting Mode (Sequence 113 Deleting Images in a Sequence...114 Viewing Multiple...
User Manual
Page 23
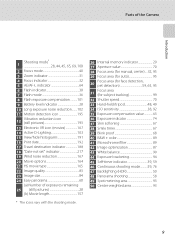
Parts of the Camera Introduction Shooting mode* 1 28, 44, 45, 65, 69, 108 2 Focus mode 40 3 Zoom indicator 31 4 Focus indicator 32 5 AE/AF-L indicator 64 6 Flash indicator 38 7 Flash mode 36 8 Flash exposure compensation ..........101 9 Battery level indicator 28 10 Long exposure noise ...vary with the shooting mode. 26 Internal memory indicator 29 27 Aperture value 70 28 Focus area (for manual, center)....32, 95 29 Focus area (for auto 95 Focus area (for face detection, 30 pet detection 59, 65, 95 Focus area 31 (for subject tracking 99 32 Shutter speed 70 33 Hand-held/tripod...
Parts of the Camera Introduction Shooting mode* 1 28, 44, 45, 65, 69, 108 2 Focus mode 40 3 Zoom indicator 31 4 Focus indicator 32 5 AE/AF-L indicator 64 6 Flash indicator 38 7 Flash mode 36 8 Flash exposure compensation ..........101 9 Battery level indicator 28 10 Long exposure noise ...vary with the shooting mode. 26 Internal memory indicator 29 27 Aperture value 70 28 Focus area (for manual, center)....32, 95 29 Focus area (for auto 95 Focus area (for face detection, 30 pet detection 59, 65, 95 Focus area 31 (for subject tracking 99 32 Shutter speed 70 33 Hand-held/tripod...
User Manual
Page 26
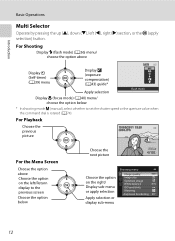
... 0004.JPG For the Menu Screen Choose the option above Display n (Self-timer) (A39) menu Display o (exposure compensation) (A43) guide* Apply selection Flash mode Display D (focus mode) (A40) menu/ choose the option below Choose the next picture 4 132 Choose the option on the left (J), right (K) section, or the k (apply selection) button...
... 0004.JPG For the Menu Screen Choose the option above Display n (Self-timer) (A39) menu Display o (exposure compensation) (A43) guide* Apply selection Flash mode Display D (focus mode) (A40) menu/ choose the option below Choose the next picture 4 132 Choose the option on the left (J), right (K) section, or the k (apply selection) button...

User Manual
Page 29
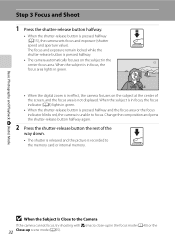
... exposure remain locked while the shutter-release button is pressed halfway. • While the shutter-release button is pressed halfway, focus and exposure (shutter speed and aperture value) are set focus and exposure, press the shutter-release button halfway, stopping when you feel resistance. Press halfway to lock the Press the rest... pressing the shutter-release button, as this position, release the shutter and take a picture by pressing the shutter-release button the rest of the way focus and exposure. To set .
... exposure remain locked while the shutter-release button is pressed halfway. • While the shutter-release button is pressed halfway, focus and exposure (shutter speed and aperture value) are set focus and exposure, press the shutter-release button halfway, stopping when you feel resistance. Press halfway to lock the Press the rest... pressing the shutter-release button, as this position, release the shutter and take a picture by pressing the shutter-release button the rest of the way focus and exposure. To set .

User Manual
Page 30
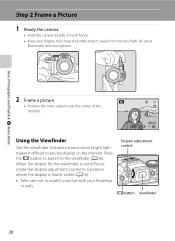
.... Diopter adjustment control 16 Monitor Viewfinder 1/250 F5.6 1342 1/250 F5.6 1342 B Diopter Adjustment of Viewfinder When the diopter for the viewfinder is out of focus and the display is clearly visible. • Take care not to switch between the monitor and viewfinder. While looking into the viewfinder, rotate the diopter...
.... Diopter adjustment control 16 Monitor Viewfinder 1/250 F5.6 1342 1/250 F5.6 1342 B Diopter Adjustment of Viewfinder When the diopter for the viewfinder is out of focus and the display is clearly visible. • Take care not to switch between the monitor and viewfinder. While looking into the viewfinder, rotate the diopter...

User Manual
Page 43
.... Rotate the mode dial. D Vibration Reduction • See Vibration reduction (A193) in A (Auto) Mode • The flash mode (A36) can be adjusted, self-timer (A39), focus mode (A40) and exposure compensation (A43) can be sure to raise the flash (A37). Basic Photography and Playback: A (Auto) Mode Step 1 Turn the Camera On...
.... Rotate the mode dial. D Vibration Reduction • See Vibration reduction (A193) in A (Auto) Mode • The flash mode (A36) can be adjusted, self-timer (A39), focus mode (A40) and exposure compensation (A43) can be sure to raise the flash (A37). Basic Photography and Playback: A (Auto) Mode Step 1 Turn the Camera On...
User Manual
Page 44
Diopter adjustment control x button Viewfinder 30 Basic Photography and Playback: A (Auto) Mode 2 Frame a picture. • Position the main subject near the center of focus, rotate the diopter adjustment control to a position where the display is clearly visible (A16). • Take care not to scratch your eye with your fingers, ...
Diopter adjustment control x button Viewfinder 30 Basic Photography and Playback: A (Auto) Mode 2 Frame a picture. • Position the main subject near the center of focus, rotate the diopter adjustment control to a position where the display is clearly visible (A16). • Take care not to scratch your eye with your fingers, ...

User Manual
Page 45
... zoom position, rotating and holding the zoom control at g triggers digital zoom. Maximum optical zoom Digital zoom enabled • The camera focuses at the center of the frame and the focus area is not displayed when digital zoom is possible at the maximum wide-angle position. • Rotating the zoom control all...
... zoom position, rotating and holding the zoom control at g triggers digital zoom. Maximum optical zoom Digital zoom enabled • The camera focuses at the center of the frame and the focus area is not displayed when digital zoom is possible at the maximum wide-angle position. • Rotating the zoom control all...
User Manual
Page 46
...and press the shutter-release button halfway again. 2 Press the shutter-release button the rest of the screen, and the focus area is pressed halfway (A15), the camera sets focus and exposure (shutter speed and aperture value). B When the Subject Is Close to the memory card or internal memory. The... • The shutter is released and the picture is unable to focus. When the subject is in focus, the focus indicator (A8) lights in green. • When the shutter-release button is pressed halfway and the focus area or the focus indicator blinks red, the camera is recorded to the Camera If the...
...and press the shutter-release button halfway again. 2 Press the shutter-release button the rest of the screen, and the focus area is pressed halfway (A15), the camera sets focus and exposure (shutter speed and aperture value). B When the Subject Is Close to the memory card or internal memory. The... • The shutter is released and the picture is unable to focus. When the subject is in focus, the focus indicator (A8) lights in green. • When the shutter-release button is pressed halfway and the focus area or the focus indicator blinks red, the camera is recorded to the Camera If the...
User Manual
Page 47
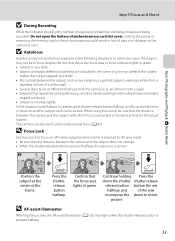
...are included in the scene (e.g. the sun behind the subject makes that the distance between the subject and surroundings (e.g. D Focus Lock Use focus lock to refocus several times, or focus on off-center subjects when Center is selected for the actual subject. a portrait subject, wearing a white shirt, is ... as expected in damage to shoot. D AF-assist illuminator When lighting is dim, the AF-assist illuminator (A196) may not be focused using focus lock, be sure that the distance between the camera and the subject with multiple rows of similarly shaped windows) • Subject is ...
...are included in the scene (e.g. the sun behind the subject makes that the distance between the subject and surroundings (e.g. D Focus Lock Use focus lock to refocus several times, or focus on off-center subjects when Center is selected for the actual subject. a portrait subject, wearing a white shirt, is ... as expected in damage to shoot. D AF-assist illuminator When lighting is dim, the AF-assist illuminator (A196) may not be focused using focus lock, be sure that the distance between the camera and the subject with multiple rows of similarly shaped windows) • Subject is ...

User Manual
Page 53
... the k button is not pressed within a few seconds, the selection will be canceled. 3 Frame the picture and press the shutter-release button halfway. • The focus and exposure are set. When using a tripod to choose 10s or 2s and press the k button. • 10s (ten seconds): suitable for group pictures •...
... the k button is not pressed within a few seconds, the selection will be canceled. 3 Frame the picture and press the shutter-release button halfway. • The focus and exposure are set. When using a tripod to choose 10s or 2s and press the k button. • 10s (ten seconds): suitable for group pictures •...

User Manual
Page 54
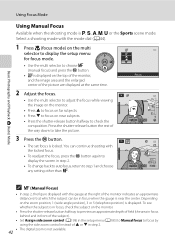
...vary between different scene modes (A46 to the maximum telephoto position. E Manual focus The focus can be used simultaneously with certain features. Basic Photography and Playback: A (Auto) Mode Using Focus Mode Choose a focus mode according to subject. In the zoom position where the F icon and zoom...Available in green. Use when the distance from the lens. www D (Macro close as close -up Use for any subject that Cannot be able to focus on subjects as about 1 cm (0.4 in.) from the maximum wide-angle position to lens is 50 cm (1 ft. 8 in.) or more, or ...
...vary between different scene modes (A46 to the maximum telephoto position. E Manual focus The focus can be used simultaneously with certain features. Basic Photography and Playback: A (Auto) Mode Using Focus Mode Choose a focus mode according to subject. In the zoom position where the F icon and zoom...Available in green. Use when the distance from the lens. www D (Macro close as close -up Use for any subject that Cannot be able to focus on subjects as about 1 cm (0.4 in.) from the maximum wide-angle position to lens is 50 cm (1 ft. 8 in.) or more, or ...

User Manual
Page 55
...AF is turned on automatically when macro mode is turned on the screen. 41 A sound will be cancelled. Setting the Focus Mode 1 Press p (focus mode) on the multi selector. • The focus mode menu is displayed. 2 Press H or I on the multi selector to infinity while using A (auto) mode or... the j, k, l, m and M modes, the focus area will not be displayed on (except Pet portrait scene mode). Using Focus Mode Focus 1/250 F5.6 32 Basic Photography and Playback: A (Auto) Mode C Macro Close-up When using shooting mode j, k, l, ...
...AF is turned on automatically when macro mode is turned on the screen. 41 A sound will be cancelled. Setting the Focus Mode 1 Press p (focus mode) on the multi selector. • The focus mode menu is displayed. 2 Press H or I on the multi selector to infinity while using A (auto) mode or... the j, k, l, m and M modes, the focus area will not be displayed on (except Pet portrait scene mode). Using Focus Mode Focus 1/250 F5.6 32 Basic Photography and Playback: A (Auto) Mode C Macro Close-up When using shooting mode j, k, l, ...
User Manual
Page 56
...angle position), 3 or 5 (telephoto position) is not available. 42 Select a shooting mode with the gauge at the right of the way down to focus by using the side zoom control instead of the picture are displayed at which the subject can be in step 2. • The digital zoom is... displayed. Basic Photography and Playback: A (Auto) Mode Using Focus Mode Using Manual Focus Available when the shooting mode is locked. Depending on the monitor. • Press the shutter-release button halfway to preview an approximate depth...
...angle position), 3 or 5 (telephoto position) is not available. 42 Select a shooting mode with the gauge at the right of the way down to focus by using the side zoom control instead of the picture are displayed at which the subject can be in step 2. • The digital zoom is... displayed. Basic Photography and Playback: A (Auto) Mode Using Focus Mode Using Manual Focus Available when the shooting mode is locked. Depending on the monitor. • Press the shutter-release button halfway to preview an approximate depth...

User Manual
Page 60
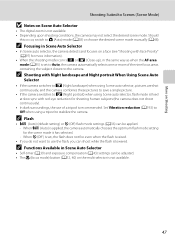
... and press the k button. • Scene auto selector is enabled. • When the flash is not raised, the message The flash is in focus, the focus area (active focus area) lights in the Scene Selected by the Camera (Scene Auto Selector) By simply framing a picture, the camera automatically selects the optimum scene mode... rest of the way down to take the picture. • The shooting mode icon changes. • Press the shutter-release button halfway to set the focus and exposure.
... and press the k button. • Scene auto selector is enabled. • When the flash is not raised, the message The flash is in focus, the focus area (active focus area) lights in the Scene Selected by the Camera (Scene Auto Selector) By simply framing a picture, the camera automatically selects the optimum scene mode... rest of the way down to take the picture. • The shooting mode icon changes. • Press the shutter-release button halfway to set the focus and exposure.
User Manual
Page 61
... more information). • When the shooting mode icon is d or i (Close-up), in Scene Auto Selector • In Scene auto selector, the camera detects and focuses on a face (see "Shooting with red-eye reduction for the scene mode it has selected. - C Flash • U (Auto) (default setting) or W (Off)...• If the camera switches to h (Night portrait) when using a tripod to stabilize the camera. Should this occur, switch to use of the nine focus areas containing the subject closest to the camera. When U (Auto) is set , the flash does not fire even when the flash is raised. •...
... more information). • When the shooting mode icon is d or i (Close-up), in Scene Auto Selector • In Scene auto selector, the camera detects and focuses on a face (see "Shooting with red-eye reduction for the scene mode it has selected. - C Flash • U (Auto) (default setting) or W (Off)...• If the camera switches to h (Night portrait) when using a tripod to stabilize the camera. Should this occur, switch to use of the nine focus areas containing the subject closest to the camera. When U (Auto) is set , the flash does not fire even when the flash is raised. •...
User Manual
Page 62
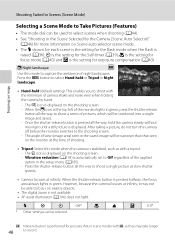
...(A193) is stabilized, such as with a tripod. - When the shutter-release button is displayed on the shooting screen. - The Y icon is pressed halfway, the focus area always lights in green. After taking a picture, do not turn the camera off before the monitor switches to the shooting screen. - X W n Off* ...to record. Once the shutter-release button is pressed all the way to shoot a single picture at slow shutter speeds. • Camera focuses at infinity, it until a still picture is raised (A36). More on Shooting Shooting Suited to Scenes (Scene Mode) Selecting a Scene ...
...(A193) is stabilized, such as with a tripod. - When the shutter-release button is displayed on the shooting screen. - The Y icon is pressed halfway, the focus area always lights in green. After taking a picture, do not turn the camera off before the monitor switches to the shooting screen. - X W n Off* ...to record. Once the shutter-release button is pressed all the way to shoot a single picture at slow shutter speeds. • Camera focuses at infinity, it until a still picture is raised (A36). More on Shooting Shooting Suited to Scenes (Scene Mode) Selecting a Scene ...
User Manual
Page 63
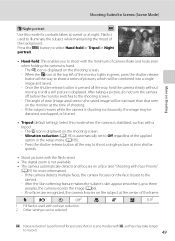
... of pictures, which will be combined into a single image and saved. - Vibration reduction (A193) is displayed. If the camera detects multiple faces, the camera focuses on the shooting screen. - X V1 n Off2 p A o 0.02 1 Fill flash is pressed all the way to illuminate the subject while maintaining the ...to Off regardless of the background. The angle of the frame. Q: Noise reduction is not available. • The camera automatically detects and focuses on the subject at the center of view (image area) seen in green, press the shutter-release button all the way, hold the...
... of pictures, which will be combined into a single image and saved. - Vibration reduction (A193) is displayed. If the camera detects multiple faces, the camera focuses on the shooting screen. - X V1 n Off2 p A o 0.02 1 Fill flash is pressed all the way to illuminate the subject while maintaining the ...to Off regardless of the background. The angle of the frame. Q: Noise reduction is not available. • The camera automatically detects and focuses on the subject at the center of view (image area) seen in green, press the shutter-release button all the way, hold the...
User Manual
Page 64
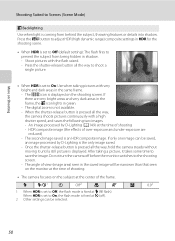
... way to shoot a single picture. • When HDR is set to On, the flash mode is fixed at the time of shooting. • The camera focuses on the shooting screen. Shoot pictures with very bright and dark areas in the saved image will be selected. The P icon is displayed on the...
... way to shoot a single picture. • When HDR is set to On, the flash mode is fixed at the time of shooting. • The camera focuses on the shooting screen. Shoot pictures with very bright and dark areas in the saved image will be selected. The P icon is displayed on the...


