User Manual
Page 4
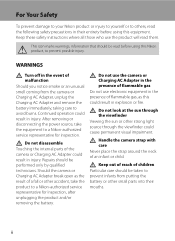
... marks warnings, information that should be taken to prevent infants from the camera or Charging AC Adapter, unplug the Charging AC Adapter and remove the battery immediately, taking care to a Nikon-authorized service representative for inspection. After removing or disconnecting the power source, take the...the product will read before using this could result in explosion or fire. Should the camera or Charging AC Adapter break open as this Nikon product, to a Nikon-authorized service representative for inspection, after unplugging the product and/or removing the battery.
... marks warnings, information that should be taken to prevent infants from the camera or Charging AC Adapter, unplug the Charging AC Adapter and remove the battery immediately, taking care to a Nikon-authorized service representative for inspection. After removing or disconnecting the power source, take the...the product will read before using this could result in explosion or fire. Should the camera or Charging AC Adapter break open as this Nikon product, to a Nikon-authorized service representative for inspection, after unplugging the product and/or removing the battery.

User Manual
Page 5
...when fully discharged. this precaution could result in fire or sure it under break the battery insulation or casing. Do not inspection. Charge the battery by inserting it to observe this precaution could the product, be precaution could result in fire. such as necklaces or ...hairpins. • Do not handle the plug or Charging • The battery is unplugged. Failure to a Nikon- If you notice any change in electric shock. heavy objects, or expose it upside down or backwards. authorized ...
...when fully discharged. this precaution could result in fire or sure it under break the battery insulation or casing. Do not inspection. Charge the battery by inserting it to observe this precaution could the product, be precaution could result in fire. such as necklaces or ...hairpins. • Do not handle the plug or Charging • The battery is unplugged. Failure to a Nikon- If you notice any change in electric shock. heavy objects, or expose it upside down or backwards. authorized ...

User Manual
Page 8
... management. Do not dispose of as household waste. • For more information, contact the retailer or the local authorities in charge of waste management. DISPOSE OF USED BATTERIES ACCORDING TO THE INSTRUCTIONS. Wash hands after handling. This symbol indicates that the battery ...harm. This symbol on this product is designated for Customers in European countries: • All batteries, whether marked with Canadian ICES-003. Nikon Inc., 1300 Walt Whitman Road, Melville, New York 11747-3064 USA Tel: 631-547-4200 Notice for separate collection at an appropriate collection ...
... management. Do not dispose of as household waste. • For more information, contact the retailer or the local authorities in charge of waste management. DISPOSE OF USED BATTERIES ACCORDING TO THE INSTRUCTIONS. Wash hands after handling. This symbol indicates that the battery ...harm. This symbol on this product is designated for Customers in European countries: • All batteries, whether marked with Canadian ICES-003. Nikon Inc., 1300 Walt Whitman Road, Melville, New York 11747-3064 USA Tel: 631-547-4200 Notice for separate collection at an appropriate collection ...
User Manual
Page 9
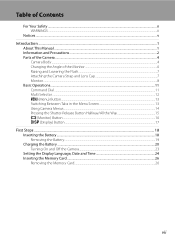
... Shutter-Release Button Halfway/All the Way 15 x (Monitor) Button ...16 s (Display) Button ...17 First Steps ...18 Inserting the Battery...18 Removing the Battery...19 Charging the Battery ...20 Turning On and Off the Camera...23 Setting the Display Language, Date and Time 24 Inserting the Memory Card ...26 Removing the...
... Shutter-Release Button Halfway/All the Way 15 x (Monitor) Button ...16 s (Display) Button ...17 First Steps ...18 Inserting the Battery...18 Removing the Battery...19 Charging the Battery ...20 Turning On and Off the Camera...23 Setting the Display Language, Date and Time 24 Inserting the Memory Card ...26 Removing the...

User Manual
Page 12
... Televisions, Computers and Printers 171 Connecting to a TV...171 Connecting to a Computer...173 Before Connecting the Camera ...173 Transferring Images from a Camera to a Computer 174 Charging While Connecting to a Computer 178 Connecting to a Printer...179 Connecting the Camera and Printer...180 Printing Pictures One at a Time...181 Printing Multiple Pictures ...182 x
... Televisions, Computers and Printers 171 Connecting to a TV...171 Connecting to a Computer...173 Before Connecting the Camera ...173 Transferring Images from a Camera to a Computer 174 Charging While Connecting to a Computer 178 Connecting to a Printer...179 Connecting the Camera and Printer...180 Printing Pictures One at a Time...181 Printing Multiple Pictures ...182 x
User Manual
Page 13
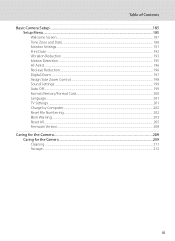
Table of Contents Basic Camera Setup ...185 Setup Menu...185 Welcome Screen ...187 Time Zone and Date...188 Monitor Settings...191 Print Date ...192 Vibration Reduction ...193 Motion Detection...195 AF Assist...196 Red-eye Reduction ...196 Digital Zoom...197 Assign Side Zoom Control ...198 Sound Settings...199 Auto Off ...199 Format Memory/Format Card...200 Language...201 TV Settings ...201 Charge by Computer...202 Reset File Numbering...202 Blink Warning ...203 Reset All ...205 Firmware Version...208 Caring for the Camera...209 Caring for the Camera ...209 Cleaning ...211 Storage ...212 xi
Table of Contents Basic Camera Setup ...185 Setup Menu...185 Welcome Screen ...187 Time Zone and Date...188 Monitor Settings...191 Print Date ...192 Vibration Reduction ...193 Motion Detection...195 AF Assist...196 Red-eye Reduction ...196 Digital Zoom...197 Assign Side Zoom Control ...198 Sound Settings...199 Auto Off ...199 Format Memory/Format Card...200 Language...201 TV Settings ...201 Charge by Computer...202 Reset File Numbering...202 Blink Warning ...203 Reset All ...205 Firmware Version...208 Caring for the Camera...209 Caring for the Camera ...209 Cleaning ...211 Storage ...212 xi
User Manual
Page 16
...digital imaging and photography. Additional information may be held liable for contact information: http://imaging.nikon.com/ Use Only Nikon Brand Electronic Accessories Nikon COOLPIX cameras are engineered and proven to operate within the operational and safety requirements of this product ...and education, continually updated information is functioning normally. Only Nikon brand electronic accessories (including battery chargers, batteries, Charging AC Adapter and AC adapters) certified by any means, without prior notice. • Nikon will not be available from the use of this ...
...digital imaging and photography. Additional information may be held liable for contact information: http://imaging.nikon.com/ Use Only Nikon Brand Electronic Accessories Nikon COOLPIX cameras are engineered and proven to operate within the operational and safety requirements of this product ...and education, continually updated information is functioning normally. Only Nikon brand electronic accessories (including battery chargers, batteries, Charging AC Adapter and AC adapters) certified by any means, without prior notice. • Nikon will not be available from the use of this ...
User Manual
Page 32
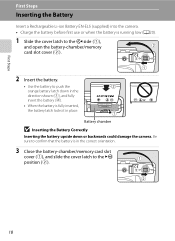
First Steps First Steps Inserting the Battery Insert a Rechargeable Li-ion Battery EN-EL5 (supplied) into the camera. • Charge the battery before first use or when the battery is running low (A20). 1 Slide the cover latch to the Y side (1), and open the battery-chamber/...
First Steps First Steps Inserting the Battery Insert a Rechargeable Li-ion Battery EN-EL5 (supplied) into the camera. • Charge the battery before first use or when the battery is running low (A20). 1 Slide the cover latch to the Y side (1), and open the battery-chamber/...

User Manual
Page 34
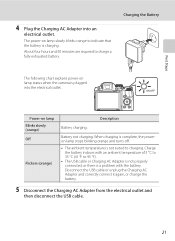
... could damage the product. * The shape of the plug adapter varies according to the plug on . 3 Use the supplied USB cable to connect the Charging AC Adapter to insert connectors at an angle, and do not use force when connecting or disconnecting the USB cable. Do not turn the camera... on the Charging AC Adapter. First Steps Charging the Battery Charge the supplied Rechargeable Li-ion Battery EN-EL5 inserted into the camera, by connecting the supplied Charging AC Adapter EH-69P to the camera via the supplied USB Cable UC-E6...
... could damage the product. * The shape of the plug adapter varies according to the plug on . 3 Use the supplied USB cable to connect the Charging AC Adapter to insert connectors at an angle, and do not use force when connecting or disconnecting the USB cable. Do not turn the camera... on the Charging AC Adapter. First Steps Charging the Battery Charge the supplied Rechargeable Li-ion Battery EN-EL5 inserted into the camera, by connecting the supplied Charging AC Adapter EH-69P to the camera via the supplied USB Cable UC-E6...
User Manual
Page 35
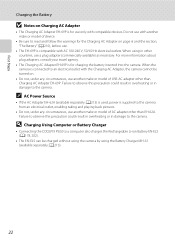
... stops blinking orange and turns off. • The ambient temperature is a problem with the battery. First Steps 4 Plug the Charging AC Adapter into the electrical outlet. Battery not charging. Charge the battery indoors with an ambient temperature of 5 °C to 35 °C (41 °F to 95 °F). &#...electrical outlet and then disconnect the USB cable. 21 The power-on lamp Blinks slowly (orange) Off Flickers (orange) Description Battery charging. About four hours and 50 minutes are required to indicate that the battery is plugged into an electrical outlet. Power-on lamp ...
... stops blinking orange and turns off. • The ambient temperature is a problem with the battery. First Steps 4 Plug the Charging AC Adapter into the electrical outlet. Battery not charging. Charge the battery indoors with an ambient temperature of 5 °C to 35 °C (41 °F to 95 °F). &#...electrical outlet and then disconnect the USB cable. 21 The power-on lamp Blinks slowly (orange) Off Flickers (orange) Description Battery charging. About four hours and 50 minutes are required to indicate that the battery is plugged into an electrical outlet. Power-on lamp ...
User Manual
Page 36
...to read and follow the warnings for the Charging AC Adapter on page iii and the section, "The Battery" (A210), before use. • The EH-69P is supplied to the camera. D Charging Using Computer or Battery Charger • Connecting the COOLPIX P500 to the camera. Failure to observe... this precaution could result in overheating or in damage to a computer also charges the Rechargeable Li-ion Battery EN-EL5 (A178, 202). •...
...to read and follow the warnings for the Charging AC Adapter on page iii and the section, "The Battery" (A210), before use. • The EH-69P is supplied to the camera. D Charging Using Computer or Battery Charger • Connecting the COOLPIX P500 to the camera. Failure to observe... this precaution could result in overheating or in damage to a computer also charges the Rechargeable Li-ion Battery EN-EL5 (A178, 202). •...
User Manual
Page 37
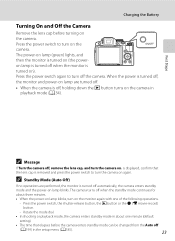
Charging the Battery Turning On and Off the Camera Remove the lens cap before the camera enters standby mode can be changed from the Auto off (...
Charging the Battery Turning On and Off the Camera Remove the lens cap before the camera enters standby mode can be changed from the Auto off (...
User Manual
Page 42
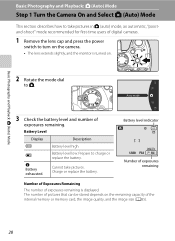
... Playback: A (Auto) Mode Basic Photography and Playback: A (Auto) Mode Step 1 Turn the Camera On and Select A (Auto) Mode This section describes how to take pictures. Charge or replace the battery. Battery level indicator 1/250 F5.6 32 Number of exposures remaining Number of Exposures Remaining The number of exposures remaining is turned... image size (A85). 28 Auto mode 3 Check the battery level and number of pictures that can be stored depends on . 2 Rotate the mode dial to charge or replace the battery. N Battery exhausted. The number of exposures remaining.
... Playback: A (Auto) Mode Basic Photography and Playback: A (Auto) Mode Step 1 Turn the Camera On and Select A (Auto) Mode This section describes how to take pictures. Charge or replace the battery. Battery level indicator 1/250 F5.6 32 Number of exposures remaining Number of Exposures Remaining The number of exposures remaining is turned... image size (A85). 28 Auto mode 3 Check the battery level and number of pictures that can be stored depends on . 2 Rotate the mode dial to charge or replace the battery. N Battery exhausted. The number of exposures remaining.
User Manual
Page 52
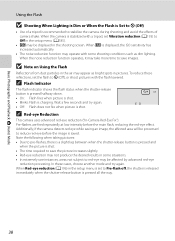
... Reduction This camera uses advanced red-eye reduction ("In-Camera Red-Eye Fix"). Pre-flashes are fired repeatedly at low intensity before the image is charging.
... Reduction This camera uses advanced red-eye reduction ("In-Camera Red-Eye Fix"). Pre-flashes are fired repeatedly at low intensity before the image is charging.
User Manual
Page 94
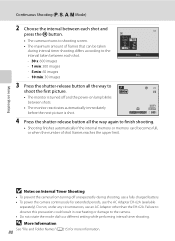
... next picture is turned off and the power-on Interval Timer Shooting • To prevent the camera from turning off unexpectedly during shooting, use a fully charged battery. • To power the camera continuously for more information. 80 Failure to observe this precaution could result in overheating or damage to the camera...
... next picture is turned off and the power-on Interval Timer Shooting • To prevent the camera from turning off unexpectedly during shooting, use a fully charged battery. • To power the camera continuously for more information. 80 Failure to observe this precaution could result in overheating or damage to the camera...

User Manual
Page 188
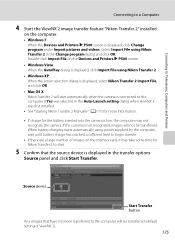
...amount of AC adapter other than EH-62A. B Connecting the USB Cable 174 The connection may not be recognized if the camera is used, COOLPIX P500 can be powered from an electrical outlet. Do not attempt to the camera. Transferring Images from turning off unexpectedly. • When the ...camera is automatically turned on and the power-on Power Source • When connecting the camera to a computer, use another make or model of charge remaining to prevent the camera from a Camera to a Computer 1 Start the computer to which ViewNX 2 was installed. 2 Be sure that connectors are ...
...amount of AC adapter other than EH-62A. B Connecting the USB Cable 174 The connection may not be recognized if the camera is used, COOLPIX P500 can be powered from an electrical outlet. Do not attempt to the camera. Transferring Images from turning off unexpectedly. • When the ...camera is automatically turned on and the power-on Power Source • When connecting the camera to a computer, use another make or model of charge remaining to prevent the camera from a Camera to a Computer 1 Start the computer to which ViewNX 2 was installed. 2 Be sure that connectors are ...
User Manual
Page 189
..., it may take some time for Nikon Transfer 2 to the computer if Yes was selected in the Auto-Launch setting dialog when ViewNX 2 was first installed. • See "Starting Nikon Transfer 2 Manually" (A177) for more information. • If charge for the battery inserted into the camera... is low, the computer may not recognize the camera. When battery charging starts automatically using power supplied by the computer, wait until...
..., it may take some time for Nikon Transfer 2 to the computer if Yes was selected in the Auto-Launch setting dialog when ViewNX 2 was first installed. • See "Starting Nikon Transfer 2 Manually" (A177) for more information. • If charge for the battery inserted into the camera... is low, the computer may not recognize the camera. When battery charging starts automatically using power supplied by the computer, wait until...

User Manual
Page 190
... the battery inserted into the camera is displayed (ViewNX 2 default setting) and transferred images are displayed. B Charging the Battery The power-on using ViewNX 2, refer to a Computer When transfer is complete, the ViewNX 2 screen is charging 176 (A178). The camera turns off automatically if there is no communication with the computer for...
... the battery inserted into the camera is displayed (ViewNX 2 default setting) and transferred images are displayed. B Charging the Battery The power-on using ViewNX 2, refer to a Computer When transfer is complete, the ViewNX 2 screen is charging 176 (A178). The camera turns off automatically if there is no communication with the computer for...
User Manual
Page 192
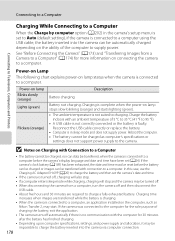
... °F to a computer. Reboot the computer. • The battery cannot be charged as Nikon Transfer 2, may be impossible to the camera. Charging time increases when images are required to charge a fully exhausted battery. Connecting to a Computer Charging While Connecting to a Computer When the Charge by computer option (A202) in sleep mode and does not supply power...
... °F to a computer. Reboot the computer. • The battery cannot be charged as Nikon Transfer 2, may be impossible to the camera. Charging time increases when images are required to charge a fully exhausted battery. Connecting to a Computer Charging While Connecting to a Computer When the Charge by computer option (A202) in sleep mode and does not supply power...
User Manual
Page 193
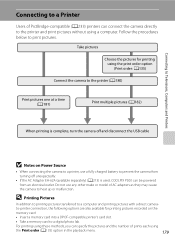
Do not use a fully charged battery to prevent the camera from turning off and disconnect the USB cable B Notes on the memory card: • Insert a memory card into a DPOF-compatible ...) Print multiple pictures (A182) When printing is complete, turn the camera off unexpectedly. • If the AC Adapter EH-62A (available separately) (A213) is used, COOLPIX P500 can be powered from an electrical outlet. to-printer connection, the following options are also available for printing using a computer.
Do not use a fully charged battery to prevent the camera from turning off and disconnect the USB cable B Notes on the memory card: • Insert a memory card into a DPOF-compatible ...) Print multiple pictures (A182) When printing is complete, turn the camera off unexpectedly. • If the AC Adapter EH-62A (available separately) (A213) is used, COOLPIX P500 can be powered from an electrical outlet. to-printer connection, the following options are also available for printing using a computer.


