
User Manual
Page 9
... Inserting the Battery...18 Removing the Battery...19 Charging the Battery ...20 Turning On and Off the Camera...23 Setting the Display Language, Date and Time 24 Inserting the Memory Card ...26 Removing the Memory Card...26 vii
... Inserting the Battery...18 Removing the Battery...19 Charging the Battery ...20 Turning On and Off the Camera...23 Setting the Display Language, Date and Time 24 Inserting the Memory Card ...26 Removing the Memory Card...26 vii
User Manual
Page 12
... from a Camera to a Computer 174 Charging While Connecting to a Computer 178 Connecting to a Printer...179 Connecting the Camera and Printer...180 Printing Pictures One at a Time...181 Printing Multiple Pictures ...182 x
... from a Camera to a Computer 174 Charging While Connecting to a Computer 178 Connecting to a Printer...179 Connecting the Camera and Printer...180 Printing Pictures One at a Time...181 Printing Multiple Pictures ...182 x

User Manual
Page 13
Table of Contents Basic Camera Setup ...185 Setup Menu...185 Welcome Screen ...187 Time Zone and Date...188 Monitor Settings...191 Print Date ...192 Vibration Reduction ...193 Motion Detection...195 AF Assist...196 Red-eye Reduction ...196 Digital Zoom...197 Assign Side Zoom Control ...198 Sound Settings...199 Auto Off ...199 Format Memory/Format Card...200 Language...201 TV Settings ...201 Charge by Computer...202 Reset File Numbering...202 Blink Warning ...203 Reset All ...205 Firmware Version...208 Caring for the Camera...209 Caring for the Camera ...209 Cleaning ...211 Storage ...212 xi
Table of Contents Basic Camera Setup ...185 Setup Menu...185 Welcome Screen ...187 Time Zone and Date...188 Monitor Settings...191 Print Date ...192 Vibration Reduction ...193 Motion Detection...195 AF Assist...196 Red-eye Reduction ...196 Digital Zoom...197 Assign Side Zoom Control ...198 Sound Settings...199 Auto Off ...199 Format Memory/Format Card...200 Language...201 TV Settings ...201 Charge by Computer...202 Reset File Numbering...202 Blink Warning ...203 Reset All ...205 Firmware Version...208 Caring for the Camera...209 Caring for the Camera ...209 Cleaning ...211 Storage ...212 xi
User Manual
Page 15
... camera. Screen Samples In this manual, images are referred to as "memory card." • The setting at the time of Nikon COOLPIX P500 digital camera. If a memory card is inserted, all those who use , to prevent damage to help you enjoy taking pictures with this manual thoroughly before ...
... camera. Screen Samples In this manual, images are referred to as "memory card." • The setting at the time of Nikon COOLPIX P500 digital camera. If a memory card is inserted, all those who use , to prevent damage to help you enjoy taking pictures with this manual thoroughly before ...
User Manual
Page 16
...described in these manuals at any time and without prior notice. • Nikon will not be available from the Nikon representative in your area (address provided separately). 2 For more information about Nikon brand accessories, contact a local authorized Nikon dealer. Before Taking Important Pictures ... information, tips, answers to ensure that may be held liable for contact information: http://imaging.nikon.com/ Use Only Nikon Brand Electronic Accessories Nikon COOLPIX cameras are engineered and proven to operate within the operational and safety requirements of this device as...
...described in these manuals at any time and without prior notice. • Nikon will not be available from the Nikon representative in your area (address provided separately). 2 For more information about Nikon brand accessories, contact a local authorized Nikon dealer. Before Taking Important Pictures ... information, tips, answers to ensure that may be held liable for contact information: http://imaging.nikon.com/ Use Only Nikon Brand Electronic Accessories Nikon COOLPIX cameras are engineered and proven to operate within the operational and safety requirements of this device as...

User Manual
Page 21
B Lens Cap • Remove the lens cap before you shoot a picture. • At times when you are not shooting pictures such as when the power is off, or while you are carrying the camera, attach the lens cap to ...
B Lens Cap • Remove the lens cap before you shoot a picture. • At times when you are not shooting pictures such as when the power is off, or while you are carrying the camera, attach the lens cap to ...

User Manual
Page 24
... 23 9999.JPG 22 6 7 18 17 16 19 15 8 9 10 999/999 14 13 999/999 9999/9999 a 11 12 1m00s b 1 Date of recording 24 2 Time of recording 24 3 Protect icon 139 4 Sequence display 113, 145 5 Volume indicator 142, 168 Album icon in favorite pictures mode1 6 124 Category icon in auto... the selected category in auto sort mode in playback mode is displayed. 10 2 The icon displayed varies with the setting that was set at the time of shooting.
... 23 9999.JPG 22 6 7 18 17 16 19 15 8 9 10 999/999 14 13 999/999 9999/9999 a 11 12 1m00s b 1 Date of recording 24 2 Time of recording 24 3 Protect icon 139 4 Sequence display 113, 145 5 Volume indicator 142, 168 Album icon in favorite pictures mode1 6 124 Category icon in auto... the selected category in auto sort mode in playback mode is displayed. 10 2 The icon displayed varies with the setting that was set at the time of shooting.

User Manual
Page 27
... quality Image size Optimize image White balance ISO sensitivity Metering Exposure bracketing Press the multi selector H or I to highlight the tab. Set up Welcome screen Time zone and date Monitor settings Print date Vibration reduction Motion detection AF assist The corresponding menu is pressed, choose the left end tab to switch...
... quality Image size Optimize image White balance ISO sensitivity Metering Exposure bracketing Press the multi selector H or I to highlight the tab. Set up Welcome screen Time zone and date Monitor settings Print date Vibration reduction Motion detection AF assist The corresponding menu is pressed, choose the left end tab to switch...
User Manual
Page 28
.... Shooting menu AF area mode Autofocus mode Flash exp. Long exposure NR Active D-Lighting Save user settings Reset user settings Autofocus mode Single AF Full-time AF 4 When setting is applied.
.... Shooting menu AF area mode Autofocus mode Flash exp. Long exposure NR Active D-Lighting Save user settings Reset user settings Autofocus mode Single AF Full-time AF 4 When setting is applied.
User Manual
Page 37
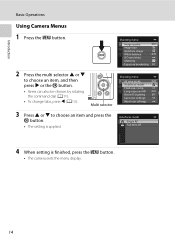
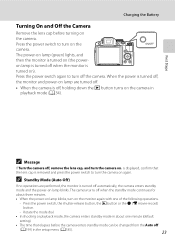
... the Auto off the camera. Press the power switch again to turn the camera on the monitor again with one minute (default setting). • The time that the lens cap is displayed, confirm that elapses before turning on ). First Steps C Message If Turn the camera off when the monitor is turned...
... the Auto off the camera. Press the power switch again to turn the camera on the monitor again with one minute (default setting). • The time that the lens cap is displayed, confirm that elapses before turning on ). First Steps C Message If Turn the camera off when the monitor is turned...
User Manual
Page 38
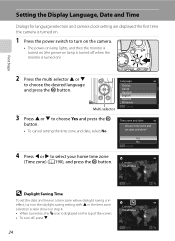
...the multi selector H or I to choose Yes and press the k button. • To cancel setting the time zone and date, select No. London Casablanca D Daylight Saving Time To set date and time? Multi selector Language Čeština Dansk Deutsch English Español Cancel 3 Press H or I to ...choose the desired language and press the k button. Setting the Display Language, Date and Time Dialogs for language selection and camera clock setting are displayed the first time the camera is turned on. 1 Press the power switch to turn off, press I. 24 Back London Casablanca ...
...the multi selector H or I to choose Yes and press the k button. • To cancel setting the time zone and date, select No. London Casablanca D Daylight Saving Time To set date and time? Multi selector Language Čeština Dansk Deutsch English Español Cancel 3 Press H or I to ...choose the desired language and press the k button. Setting the Display Language, Date and Time Dialogs for language selection and camera clock setting are displayed the first time the camera is turned on. 1 Press the power switch to turn off, press I. 24 Back London Casablanca ...

User Manual
Page 39
...) in the following order: D (day) ➝ M (month) ➝ Y (year) ➝ hour ➝ minute). Date and time can Edit also be set the contents: Press H or I. First Steps Setting the Display Language, Date and Time 5 Press H or I or K to choose the date display order and press the k button or K. Date format Year... press the k button. • To choose an item: Press K or J (selected in the setup menu (A185). 25 Date and time D M Y 15 05 2011 15 10 • To set by rotating the command dial (A11). • Finish setting: Choose minute, check that the lens cap...
...) in the following order: D (day) ➝ M (month) ➝ Y (year) ➝ hour ➝ minute). Date and time can Edit also be set the contents: Press H or I. First Steps Setting the Display Language, Date and Time 5 Press H or I or K to choose the date display order and press the k button or K. Date format Year... press the k button. • To choose an item: Press K or J (selected in the setup menu (A185). 25 Date and time D M Y 15 05 2011 15 10 • To set by rotating the command dial (A11). • Finish setting: Choose minute, check that the lens cap...
User Manual
Page 41
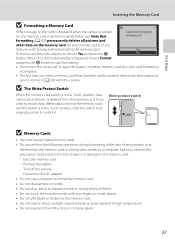
... memory card must be written to a computer. Turn off , or open the battery-chamber/memory card slot cover until formatting is complete. • The first time you want to record data, delete data or format the memory card, and the switch is in another device into this camera. When the confirmation...
... memory card must be written to a computer. Turn off , or open the battery-chamber/memory card slot cover until formatting is complete. • The first time you want to record data, delete data or format the memory card, and the switch is in another device into this camera. When the confirmation...
User Manual
Page 42
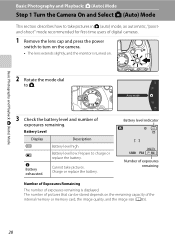
Cannot take pictures in A (auto) mode, an automatic, "pointand-shoot" mode recommended for first-time users of the internal memory or memory card, the image quality, and the image size (A85). 28 Battery level indicator 1/250 F5.6 32 Number of ...
Cannot take pictures in A (auto) mode, an automatic, "pointand-shoot" mode recommended for first-time users of the internal memory or memory card, the image quality, and the image size (A85). 28 Battery level indicator 1/250 F5.6 32 Number of ...

User Manual
Page 47
... and of similarly shaped windows) • Subject is moving rapidly In the situations noted above, try pressing the shutter-release button halfway to refocus several times, or focus on off-center subjects when Center is the same as expected in front of a white wall) • Several objects are at different distances...
... and of similarly shaped windows) • Subject is moving rapidly In the situations noted above, try pressing the shutter-release button halfway to refocus several times, or focus on off-center subjects when Center is the same as expected in front of a white wall) • Several objects are at different distances...

User Manual
Page 52
... reduction (A196) in the shooting screen. When the noise reduction function operates, it may take more time to Pre-flash off, the shutter is released immediately when the shutter-release button is shot. • The time required to save images. Note the following when taking pictures: • Due to pre-flashes, there...
... reduction (A196) in the shooting screen. When the noise reduction function operates, it may take more time to Pre-flash off, the shutter is released immediately when the shutter-release button is shot. • The time required to save images. Note the following when taking pictures: • Due to pre-flashes, there...

User Manual
Page 55
... is turned on automatically when macro mode is set to Full-time AF, the camera will continually focus until you set focus mode to choose the desired focus mode and press the k button. • The mode selected ...
... is turned on automatically when macro mode is set to Full-time AF, the camera will continually focus until you set focus mode to choose the desired focus mode and press the k button. • The mode selected ...

User Manual
Page 56
....6 1342 C E (Manual Focus) • In step 2, the figure displayed with the gauge at the right of the monitor indicates an approximate distance (m) at the same time. 2 Adjust the focus. • Use the multi selector to adjust the focus while viewing the image on the monitor. • Press H to check the composition...
....6 1342 C E (Manual Focus) • In step 2, the figure displayed with the gauge at the right of the monitor indicates an approximate distance (m) at the same time. 2 Adjust the focus. • Use the multi selector to adjust the focus while viewing the image on the monitor. • Press H to check the composition...
User Manual
Page 62
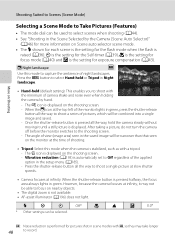
... selected. The Y icon is raised (A36). Vibration reduction (A193) is automatically set to shoot a single picture at slow shutter speeds. • Camera focuses at the time of camera shake and noise even when holding the camera by the Camera (Scene Auto Selector)" (A46) for more information on Scene auto selector scene...
... selected. The Y icon is raised (A36). Vibration reduction (A193) is automatically set to shoot a single picture at slow shutter speeds. • Camera focuses at the time of camera shake and noise even when holding the camera by the Camera (Scene Auto Selector)" (A46) for more information on Scene auto selector scene...
User Manual
Page 63
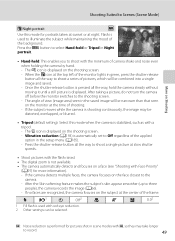
...-eye reduction. 2 Other settings can be selected. After the Skin softening feature makes the subject's skin appear smoother (up to shoot a single picture at the time of shooting. - The Y icon is not available. • The camera automatically detects and focuses on a face (see "Shooting with the minimum of camera shake and...
...-eye reduction. 2 Other settings can be selected. After the Skin softening feature makes the subject's skin appear smoother (up to shoot a single picture at the time of shooting. - The Y icon is not available. • The camera automatically detects and focuses on a face (see "Shooting with the minimum of camera shake and...


