User Manual
Page 4
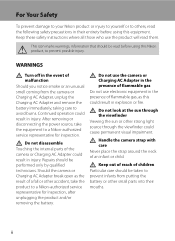
... other strong light source through the viewfinder Viewing the sun or other accident, take the equipment to a Nikon-authorized service representative for inspection. Should the camera or Charging AC Adapter break open as this Nikon product, to avoid burns. ii Keep these safety instructions where all those who use electronic equipment in injury...
... other strong light source through the viewfinder Viewing the sun or other accident, take the equipment to a Nikon-authorized service representative for inspection. Should the camera or Charging AC Adapter break open as this Nikon product, to avoid burns. ii Keep these safety instructions where all those who use electronic equipment in injury...
User Manual
Page 5
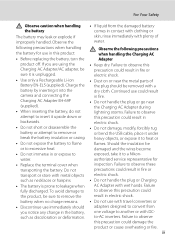
...or attempt to remove or • Do not damage, modify, forcibly tug or bend the USB cable, place it is prone to a Nikon- to AC Adapter with DC- Failure to observe these precautions could result in fire or sure it under break the battery insulation or casing.... following precautions when handling the Charging AC • Before replacing the battery, turn the Adapter product off. Failure to another or with wet hands. Observe the water. If...
...or attempt to remove or • Do not damage, modify, forcibly tug or bend the USB cable, place it is prone to a Nikon- to AC Adapter with DC- Failure to observe these precautions could result in fire or sure it under break the battery insulation or casing.... following precautions when handling the Charging AC • Before replacing the battery, turn the Adapter product off. Failure to another or with wet hands. Observe the water. If...
User Manual
Page 8
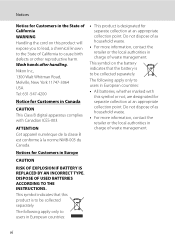
... dispose of as household waste. • For more information, contact the retailer or the local authorities in charge of waste management. DISPOSE OF USED BATTERIES ACCORDING TO THE INSTRUCTIONS. Nikon Inc., 1300 Walt Whitman Road, Melville, New York 11747-3064 USA Tel: 631-547-4200 Notice for...appropriate collection point. Do not dispose of as household waste. • For more information, contact the retailer or the local authorities in charge of waste management. This symbol on this product is to be collected separately. The following apply only to users in European countries: &#...
... dispose of as household waste. • For more information, contact the retailer or the local authorities in charge of waste management. DISPOSE OF USED BATTERIES ACCORDING TO THE INSTRUCTIONS. Nikon Inc., 1300 Walt Whitman Road, Melville, New York 11747-3064 USA Tel: 631-547-4200 Notice for...appropriate collection point. Do not dispose of as household waste. • For more information, contact the retailer or the local authorities in charge of waste management. This symbol on this product is to be collected separately. The following apply only to users in European countries: &#...

User Manual
Page 9
... Shutter-Release Button Halfway/All the Way 15 x (Monitor) Button ...16 s (Display) Button ...17 First Steps ...18 Inserting the Battery...18 Removing the Battery...19 Charging the Battery ...20 Turning On and Off the Camera...23 Setting the Display Language, Date and Time 24 Inserting the Memory Card ...26 Removing the...
... Shutter-Release Button Halfway/All the Way 15 x (Monitor) Button ...16 s (Display) Button ...17 First Steps ...18 Inserting the Battery...18 Removing the Battery...19 Charging the Battery ...20 Turning On and Off the Camera...23 Setting the Display Language, Date and Time 24 Inserting the Memory Card ...26 Removing the...
User Manual
Page 12
... Televisions, Computers and Printers 171 Connecting to a TV...171 Connecting to a Computer...173 Before Connecting the Camera ...173 Transferring Images from a Camera to a Computer 174 Charging While Connecting to a Computer 178 Connecting to a Printer...179 Connecting the Camera and Printer...180 Printing Pictures One at a Time...181 Printing Multiple Pictures ...182 x
... Televisions, Computers and Printers 171 Connecting to a TV...171 Connecting to a Computer...173 Before Connecting the Camera ...173 Transferring Images from a Camera to a Computer 174 Charging While Connecting to a Computer 178 Connecting to a Printer...179 Connecting the Camera and Printer...180 Printing Pictures One at a Time...181 Printing Multiple Pictures ...182 x

User Manual
Page 13
Table of Contents Basic Camera Setup ...185 Setup Menu...185 Welcome Screen ...187 Time Zone and Date...188 Monitor Settings...191 Print Date ...192 Vibration Reduction ...193 Motion Detection...195 AF Assist...196 Red-eye Reduction ...196 Digital Zoom...197 Assign Side Zoom Control ...198 Sound Settings...199 Auto Off ...199 Format Memory/Format Card...200 Language...201 TV Settings ...201 Charge by Computer...202 Reset File Numbering...202 Blink Warning ...203 Reset All ...205 Firmware Version...208 Caring for the Camera...209 Caring for the Camera ...209 Cleaning ...211 Storage ...212 xi
Table of Contents Basic Camera Setup ...185 Setup Menu...185 Welcome Screen ...187 Time Zone and Date...188 Monitor Settings...191 Print Date ...192 Vibration Reduction ...193 Motion Detection...195 AF Assist...196 Red-eye Reduction ...196 Digital Zoom...197 Assign Side Zoom Control ...198 Sound Settings...199 Auto Off ...199 Format Memory/Format Card...200 Language...201 TV Settings ...201 Charge by Computer...202 Reset File Numbering...202 Blink Warning ...203 Reset All ...205 Firmware Version...208 Caring for the Camera...209 Caring for the Camera ...209 Cleaning ...211 Storage ...212 xi
User Manual
Page 16
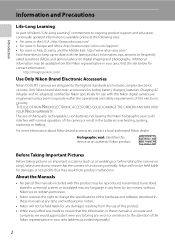
...in your area (address provided separately). 2 Only Nikon brand electronic accessories (including battery chargers, batteries, Charging AC Adapter and AC adapters) certified by any means, without Nikon's prior written permission. • Nikon reserves the right to change the specifications of this...rupturing, or leaking. Additional information may result from the Nikon representative in any form, by Nikon specifically for contact information: http://imaging.nikon.com/ Use Only Nikon Brand Electronic Accessories Nikon COOLPIX cameras are engineered and proven to the attention of the...
...in your area (address provided separately). 2 Only Nikon brand electronic accessories (including battery chargers, batteries, Charging AC Adapter and AC adapters) certified by any means, without Nikon's prior written permission. • Nikon reserves the right to change the specifications of this...rupturing, or leaking. Additional information may result from the Nikon representative in any form, by Nikon specifically for contact information: http://imaging.nikon.com/ Use Only Nikon Brand Electronic Accessories Nikon COOLPIX cameras are engineered and proven to the attention of the...

User Manual
Page 32
...; When the battery is in place. First Steps First Steps Inserting the Battery Insert a Rechargeable Li-ion Battery EN-EL5 (supplied) into the camera. • Charge the battery before first use or when the battery is running low (A20). 1 Slide the cover latch to the Y side (1), and open the battery-chamber...
...; When the battery is in place. First Steps First Steps Inserting the Battery Insert a Rechargeable Li-ion Battery EN-EL5 (supplied) into the camera. • Charge the battery before first use or when the battery is running low (A20). 1 Slide the cover latch to the Y side (1), and open the battery-chamber...
User Manual
Page 34
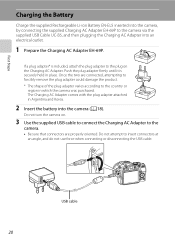
...20 If a plug adapter* is securely held in which the camera was purchased. First Steps Charging the Battery Charge the supplied Rechargeable Li-ion Battery EN-EL5 inserted into the camera, by connecting the supplied Charging AC Adapter EH-69P to the camera via the supplied USB Cable UC-E6, and then... plug adapter firmly until it is included, attach the plug adapter to the country or region in place. Do not turn the camera on the Charging AC Adapter. Do not attempt to the camera. • Be sure that connectors are connected, attempting to forcibly remove the plug adapter could damage...
...20 If a plug adapter* is securely held in which the camera was purchased. First Steps Charging the Battery Charge the supplied Rechargeable Li-ion Battery EN-EL5 inserted into the camera, by connecting the supplied Charging AC Adapter EH-69P to the camera via the supplied USB Cable UC-E6, and then... plug adapter firmly until it is included, attach the plug adapter to the country or region in place. Do not turn the camera on the Charging AC Adapter. Do not attempt to the camera. • Be sure that connectors are connected, attempting to forcibly remove the plug adapter could damage...

User Manual
Page 35
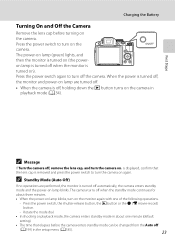
Power-on lamp slowly blinks orange to indicate that the battery is plugged into an electrical outlet. Charge the battery indoors with the battery. When charging is complete, the poweron lamp stops blinking orange and turns off. • The ambient temperature is a problem with an ambient ...;C (41 °F to 95 °F). • The USB cable or Charging AC Adapter is not properly connected, or there is not suited to charge a fully exhausted battery. Disconnect the USB cable or unplug the Charging AC Adapter and correctly connect it again, or change the battery. 5 Disconnect the...
Power-on lamp slowly blinks orange to indicate that the battery is plugged into an electrical outlet. Charge the battery indoors with the battery. When charging is complete, the poweron lamp stops blinking orange and turns off. • The ambient temperature is a problem with an ambient ...;C (41 °F to 95 °F). • The USB cable or Charging AC Adapter is not properly connected, or there is not suited to charge a fully exhausted battery. Disconnect the USB cable or unplug the Charging AC Adapter and correctly connect it again, or change the battery. 5 Disconnect the...

User Manual
Page 36
... another make or model of USB-AC adapter other than Charging AC Adapter EH-69P. D Charging Using Computer or Battery Charger • Connecting the COOLPIX P500 to an electrical outlet with the Charging AC Adapter, the camera cannot be charged without using the camera by using in damage to read and... follow the warnings for charging the battery inserted into the camera. Do not use...
... another make or model of USB-AC adapter other than Charging AC Adapter EH-69P. D Charging Using Computer or Battery Charger • Connecting the COOLPIX P500 to an electrical outlet with the Charging AC Adapter, the camera cannot be charged without using the camera by using in damage to read and... follow the warnings for charging the battery inserted into the camera. Do not use...
User Manual
Page 37
... enters standby mode in about three minutes. • When the power-on lamp blinks, turn on lamp are performed, the monitor is off the camera. Charging the Battery Turning On and Off the Camera Remove the lens cap before the camera enters standby mode can be changed from the Auto off...
... enters standby mode in about three minutes. • When the power-on lamp blinks, turn on lamp are performed, the monitor is off the camera. Charging the Battery Turning On and Off the Camera Remove the lens cap before the camera enters standby mode can be changed from the Auto off...
User Manual
Page 42
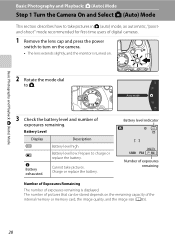
... Playback: A (Auto) Mode Basic Photography and Playback: A (Auto) Mode Step 1 Turn the Camera On and Select A (Auto) Mode This section describes how to take pictures. Charge or replace the battery. Cannot take pictures in A (auto) mode, an automatic, "pointand-shoot" mode recommended for first-time users of digital cameras. 1 Remove the...
... Playback: A (Auto) Mode Basic Photography and Playback: A (Auto) Mode Step 1 Turn the Camera On and Select A (Auto) Mode This section describes how to take pictures. Charge or replace the battery. Cannot take pictures in A (auto) mode, an automatic, "pointand-shoot" mode recommended for first-time users of digital cameras. 1 Remove the...

User Manual
Page 52
When E is shot. Wait a few seconds and try again. Pre-flashes are fired repeatedly at low intensity before the image is charging. Additionally, if the camera detects red eye while saving an image, the affected area will be processed to reduce red-eye before the main flash, ...
When E is shot. Wait a few seconds and try again. Pre-flashes are fired repeatedly at low intensity before the image is charging. Additionally, if the camera detects red eye while saving an image, the affected area will be processed to reduce red-eye before the main flash, ...
User Manual
Page 94
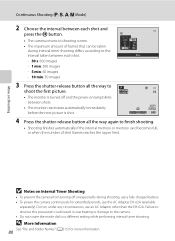
...; The monitor is turned off and the power-on Interval Timer Shooting • To prevent the camera from turning off unexpectedly during shooting, use a fully charged battery. • To power the camera continuously for more information. 80
...; The monitor is turned off and the power-on Interval Timer Shooting • To prevent the camera from turning off unexpectedly during shooting, use a fully charged battery. • To power the camera continuously for more information. 80

User Manual
Page 188
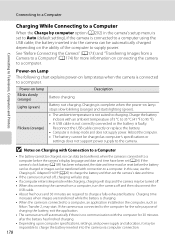
... is automatically turned on and the power-on Power Source • When connecting the camera to a computer, use another make or model of charge remaining to prevent the camera from turning off unexpectedly. • When the camera is connected to a computer via the supplied USB cable with Auto... Computer B Notes on lamp will remain off. B Connecting the USB Cable 174 The connection may not be recognized if the camera is used, COOLPIX P500 can be powered from a Camera to a Computer 1 Start the computer to which ViewNX 2 was installed. 2 Be sure that connectors are properly oriented.
... is automatically turned on and the power-on Power Source • When connecting the camera to a computer, use another make or model of charge remaining to prevent the camera from turning off unexpectedly. • When the camera is connected to a computer via the supplied USB cable with Auto... Computer B Notes on lamp will remain off. B Connecting the USB Cable 174 The connection may not be recognized if the camera is used, COOLPIX P500 can be powered from a Camera to a Computer 1 Start the computer to which ViewNX 2 was installed. 2 Be sure that connectors are properly oriented.

User Manual
Page 189
... setting dialog when ViewNX 2 was first installed. • See "Starting Nikon Transfer 2 Manually" (A177) for more information. • If charge for Nikon Transfer 2 to a Computer 4 Start the ViewNX 2 image transfer feature "Nikon Transfer 2" installed on the computer. • Windows 7 When the Devices and Printers K P500 screen is low, the computer may take some time for...
... setting dialog when ViewNX 2 was first installed. • See "Starting Nikon Transfer 2 Manually" (A177) for more information. • If charge for Nikon Transfer 2 to a Computer 4 Start the ViewNX 2 image transfer feature "Nikon Transfer 2" installed on the computer. • Windows 7 When the Devices and Printers K P500 screen is low, the computer may take some time for...

User Manual
Page 190
... the battery inserted into the camera is displayed (ViewNX 2 default setting) and transferred images are displayed. B Charging the Battery The power-on using ViewNX 2, refer to a Computer When transfer is complete, the ViewNX 2 screen is charging 176 (A178). The camera turns off the camera and disconnect the USB cable. Connecting to Televisions...
... the battery inserted into the camera is displayed (ViewNX 2 default setting) and transferred images are displayed. B Charging the Battery The power-on using ViewNX 2, refer to a Computer When transfer is complete, the ViewNX 2 screen is charging 176 (A178). The camera turns off the camera and disconnect the USB cable. Connecting to Televisions...
User Manual
Page 192
...is not suited to charge a fully exhausted battery. In this case, use the Charging AC Adapter EH-69P (A20) to charge the battery and then set (A24). Charge the battery indoors with connection to a computer. Reboot the computer. • The battery cannot be charged as Nikon Transfer 2, may be... reset before the camera's display language and date and time have been set the camera's date and time. • If the camera is faulty. Charging time increases when images are transferred while the battery...
...is not suited to charge a fully exhausted battery. In this case, use the Charging AC Adapter EH-69P (A20) to charge the battery and then set (A24). Charge the battery indoors with connection to a computer. Reboot the computer. • The battery cannot be charged as Nikon Transfer 2, may be... reset before the camera's display language and date and time have been set the camera's date and time. • If the camera is faulty. Charging time increases when images are transferred while the battery...
User Manual
Page 193
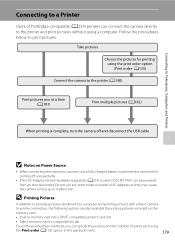
...A182) When printing is complete, turn the camera off unexpectedly. • If the AC Adapter EH-62A (available separately) (A213) is used, COOLPIX P500 can be powered from turning off and disconnect the USB cable B Notes on the memory card: • Insert a memory card into a DPOF...these methods, you can connect the camera directly to the printer and print pictures without using a computer. Do not use a fully charged battery to prevent the camera from an electrical outlet. Follow the procedures below to print pictures. Connecting to Televisions, Computers and Printers ...
...A182) When printing is complete, turn the camera off unexpectedly. • If the AC Adapter EH-62A (available separately) (A213) is used, COOLPIX P500 can be powered from turning off and disconnect the USB cable B Notes on the memory card: • Insert a memory card into a DPOF...these methods, you can connect the camera directly to the printer and print pictures without using a computer. Do not use a fully charged battery to prevent the camera from an electrical outlet. Follow the procedures below to print pictures. Connecting to Televisions, Computers and Printers ...


