
User Manual
Page 6
... Do not operate the flash with the flash window touching a person or object Failure to your fingers or other objects are not pinched by the lens cover or other moving parts. Follow the instructions of the hospital. For Your Safety Use appropriate cables When connecting cables to the input and output... jacks, use only the cables provided or sold by Nikon for the purpose, to prevent liquid crystal from the subject. Turn the power off when using while in a hospital. iv CD-ROMs The CD-...
... Do not operate the flash with the flash window touching a person or object Failure to your fingers or other objects are not pinched by the lens cover or other moving parts. Follow the instructions of the hospital. For Your Safety Use appropriate cables When connecting cables to the input and output... jacks, use only the cables provided or sold by Nikon for the purpose, to prevent liquid crystal from the subject. Turn the power off when using while in a hospital. iv CD-ROMs The CD-...

User Manual
Page 9
... ...1 Information and Precautions ...2 Parts of the Camera ...4 Camera Body ...4 Changing the Angle of the Monitor ...6 Raising and Lowering the Flash...7 Attaching the Camera Strap and Lens Cap 7 Monitor ...8 Basic Operations...11 Command Dial ...11 Multi Selector ...12 d (Menu) Button...13 Switching Between Tabs in the Menu Screen 13 Using Camera Menus...
... ...1 Information and Precautions ...2 Parts of the Camera ...4 Camera Body ...4 Changing the Angle of the Monitor ...6 Raising and Lowering the Flash...7 Attaching the Camera Strap and Lens Cap 7 Monitor ...8 Basic Operations...11 Command Dial ...11 Multi Selector ...12 d (Menu) Button...13 Switching Between Tabs in the Menu Screen 13 Using Camera Menus...

User Manual
Page 18
... control 31 f : Wide 31 10 g : Tele 31 h: Thumbnail playback 115 i : Playback zoom 118 j : Help 45 11 Self-timer lamp 39 AF-assist illuminator 196 12 Lens 211, 229 4
... control 31 f : Wide 31 10 g : Tele 31 h: Thumbnail playback 115 i : Playback zoom 118 j : Help 45 11 Self-timer lamp 39 AF-assist illuminator 196 12 Lens 211, 229 4

User Manual
Page 21
Attaching the Camera Strap and Lens Cap Attach the lens cap to the strap, and then attach the strap to protect the lens. 7 B Lens Cap • Remove the lens cap before you shoot a picture. • At times when you are not shooting pictures such as when the power is off, or while you are ...carrying the camera, attach the lens cap to the camera to the camera (at two places). Introduction Parts of the Camera Raising and Lowering the Flash Press the m (flash pop-up...
Attaching the Camera Strap and Lens Cap Attach the lens cap to the strap, and then attach the strap to protect the lens. 7 B Lens Cap • Remove the lens cap before you shoot a picture. • At times when you are not shooting pictures such as when the power is off, or while you are ...carrying the camera, attach the lens cap to the camera to the camera (at two places). Introduction Parts of the Camera Raising and Lowering the Flash Press the m (flash pop-up...
User Manual
Page 37
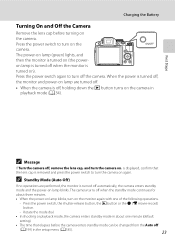
...to turn on the monitor again with one minute (default setting). • The time that the lens cap is turned on the camera. Charging the Battery Turning On and Off the Camera Remove the lens cap before the camera enters standby mode can be changed from the Auto off (A199) in ...camera is turned off when the standby mode continues for about one of the following operations. - Press the power switch to turn off , remove the lens cap, and turn on ). The camera turns off automatically, the camera enters standby mode and the power-on . Press the power switch again to ...
...to turn on the monitor again with one minute (default setting). • The time that the lens cap is turned on the camera. Charging the Battery Turning On and Off the Camera Remove the lens cap before the camera enters standby mode can be changed from the Auto off (A199) in ...camera is turned off when the standby mode continues for about one of the following operations. - Press the power switch to turn off , remove the lens cap, and turn on ). The camera turns off automatically, the camera enters standby mode and the power-on . Press the power switch again to ...

User Manual
Page 39
... camera clock, set by rotating the command dial (A11). • Finish setting: Choose minute, check that the lens cap has been removed, and then press the k button or K. • After finishing the setting, the lens extends slightly and the shooting screen is displayed. First Steps Setting the Display Language, Date and Time...
... camera clock, set by rotating the command dial (A11). • Finish setting: Choose minute, check that the lens cap has been removed, and then press the k button or K. • After finishing the setting, the lens extends slightly and the shooting screen is displayed. First Steps Setting the Display Language, Date and Time...
User Manual
Page 42
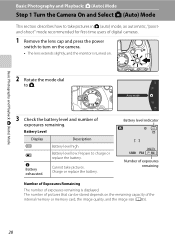
... of Exposures Remaining The number of exposures remaining is turned on the remaining capacity of digital cameras. 1 Remove the lens cap and press the power switch to turn on the camera. • The lens extends slightly, and the monitor is displayed. Basic Photography and Playback: A (Auto) Mode Basic Photography and Playback: A (Auto...
... of Exposures Remaining The number of exposures remaining is turned on the remaining capacity of digital cameras. 1 Remove the lens cap and press the power switch to turn on the camera. • The lens extends slightly, and the monitor is displayed. Basic Photography and Playback: A (Auto) Mode Basic Photography and Playback: A (Auto...

User Manual
Page 44
... the viewfinder is clearly visible (A16). • Take care not to scratch your eye with your fingers, hair, strap and other objects away from the lens, flash, AF-assist illuminator and microphone. Basic Photography and Playback: A (Auto) Mode 2 Frame a picture. • Position the main subject near the center of focus, rotate...
... the viewfinder is clearly visible (A16). • Take care not to scratch your eye with your fingers, hair, strap and other objects away from the lens, flash, AF-assist illuminator and microphone. Basic Photography and Playback: A (Auto) Mode 2 Frame a picture. • Position the main subject near the center of focus, rotate...

User Manual
Page 48
... Pictures Viewing Pictures (Playback Mode) Press the c (Playback) button. button frame playback mode. • Press the multi selector H or J to view the next image. The lens does not extend. C Options Available in full-frame playback mode according to scroll quickly through pictures. C Viewing Pictures • Press the x button to switch between...
... Pictures Viewing Pictures (Playback Mode) Press the c (Playback) button. button frame playback mode. • Press the multi selector H or J to view the next image. The lens does not extend. C Options Available in full-frame playback mode according to scroll quickly through pictures. C Viewing Pictures • Press the x button to switch between...

User Manual
Page 54
...The Focus Mode Setting • For shooting modes j, k, l and m, the changed focus mode setting will vary according to 59). Use when the distance from the lens. D Macro close as close -up ) w w B (Infinity) w w 2 ---- E Manual focus The focus can focus on nearby objects. E (Manual ...focus) - However, the camera may not be used simultaneously with certain features. Focus Modes Available in .) from the lens (A42). The closest shooting distance will be stored in .) or more information. 40 w ---- 1 Default setting for more when camera is...
...The Focus Mode Setting • For shooting modes j, k, l and m, the changed focus mode setting will vary according to 59). Use when the distance from the lens. D Macro close as close -up ) w w B (Infinity) w w 2 ---- E Manual focus The focus can focus on nearby objects. E (Manual ...focus) - However, the camera may not be used simultaneously with certain features. Focus Modes Available in .) from the lens (A42). The closest shooting distance will be stored in .) or more information. 40 w ---- 1 Default setting for more when camera is...

User Manual
Page 69
... subject at which the camera can focus varies depending on subjects as close as about 1 cm (0.4 in.) from the lens. More on subjects as close as about 10 cm (4 in.) from the lens. • AF area mode is set to Manual to enable the focus area to be chosen (A95). Press the...
... subject at which the camera can focus varies depending on subjects as close as about 1 cm (0.4 in.) from the lens. More on subjects as close as about 10 cm (4 in.) from the lens. • AF area mode is set to Manual to enable the focus area to be chosen (A95). Press the...

User Manual
Page 70
..., the camera can focus on the zoom position. X W n Off* p p o 0.0* * Other settings can focus on subjects as close as about 1 cm (0.4 in.) from the lens. • You can adjust hue within a slider display at which the camera can focus varies depending on subjects as close as about 10 cm (4 in....) from the lens. At the zoom position that Vibration reduction (A193) is set to Manual to enable the focus area to be selected. 56 Press the k button...
..., the camera can focus on the zoom position. X W n Off* p p o 0.0* * Other settings can focus on subjects as close as about 1 cm (0.4 in.) from the lens. • You can adjust hue within a slider display at which the camera can focus varies depending on subjects as close as about 10 cm (4 in....) from the lens. At the zoom position that Vibration reduction (A193) is set to Manual to enable the focus area to be selected. 56 Press the k button...

User Manual
Page 87
...expressed by small fnumbers) let more of the shutter speed differs depending on l (Aperture-Priority Auto) Shooting When the subject is zoomed in, the lens aperture can be possible to obtain the appropriate exposure with the set in green (maximum of f/3.4 to choose the aperture value (f/-number). • The... aperture value and try again. More on Shooting 2 Rotate the command dial to 5.7. D Aperture and Zoom The aperture value (f-number) indicates the lens brightness. the camera selects the shutter speed automatically. 1 Rotate the mode dial to the wide-angle position. 73
...expressed by small fnumbers) let more of the shutter speed differs depending on l (Aperture-Priority Auto) Shooting When the subject is zoomed in, the lens aperture can be possible to obtain the appropriate exposure with the set in green (maximum of f/3.4 to choose the aperture value (f/-number). • The... aperture value and try again. More on Shooting 2 Rotate the command dial to 5.7. D Aperture and Zoom The aperture value (f-number) indicates the lens brightness. the camera selects the shutter speed automatically. 1 Rotate the mode dial to the wide-angle position. 73

User Manual
Page 105
... used during shooting. 2 Display the shooting menu (A81), use the multi selector to set White balance to b Preset manual, then press the k button. • The lens extends to the zoom position for when the flash fires. Use the procedure below to measure the white balance value under the lighting used during...
... used during shooting. 2 Display the shooting menu (A81), use the multi selector to set White balance to b Preset manual, then press the k button. • The lens extends to the zoom position for when the flash fires. Use the procedure below to measure the white balance value under the lighting used during...

User Manual
Page 166
... Filter effects Soft Selective color Cross screen Fisheye Miniature effect Editing Pictures 152 Suitable for pictures shot in macro mode. In pictures taken with a fisheye lens. Editing Pictures p Filter Effects: Digital Filter Apply a variety of the image from the center to the Soft edge. The following effect options are available...
... Filter effects Soft Selective color Cross screen Fisheye Miniature effect Editing Pictures 152 Suitable for pictures shot in macro mode. In pictures taken with a fisheye lens. Editing Pictures p Filter Effects: Digital Filter Apply a variety of the image from the center to the Soft edge. The following effect options are available...

User Manual
Page 223
... loss of data or in water or subjected to prevent the liquid crystal from strong magnetic fields Do not use or store this Nikon product, observe the following precautions when using or storing the camera. Forcibly cutting power in these circumstances could result in the vicinity... of equipment that generates strong electromagnetic radiation or magnetic fields. B Handle the lens and all moving parts with the monitor, damage data stored on , or while images are easily damaged. Strong static charges or the ...
... loss of data or in water or subjected to prevent the liquid crystal from strong magnetic fields Do not use or store this Nikon product, observe the following precautions when using or storing the camera. Forcibly cutting power in these circumstances could result in the vicinity... of equipment that generates strong electromagnetic radiation or magnetic fields. B Handle the lens and all moving parts with the monitor, damage data stored on , or while images are easily damaged. Strong static charges or the ...

User Manual
Page 225
...dust or lint with a blower (typically a small device with a rubber bulb attached to one end that cannot be removed with a blower, wipe the lens with a soft cloth, using a cloth lightly dampened with your fingers. Monitor Remove dust or lint with a soft, dry cloth, being careful not to...the monitor with a blower. To remove fingerprints or other end). To remove fingerprints and other volatile chemicals. If this fails, clean the lens using a spiral motion that foreign matter inside the camera could cause damage not covered by the warranty. Body Use a blower to apply pressure.
...dust or lint with a blower (typically a small device with a rubber bulb attached to one end that cannot be removed with a blower, wipe the lens with a soft cloth, using a cloth lightly dampened with your fingers. Monitor Remove dust or lint with a soft, dry cloth, being careful not to...the monitor with a blower. To remove fingerprints or other end). To remove fingerprints and other volatile chemicals. If this fails, clean the lens using a spiral motion that foreign matter inside the camera could cause damage not covered by the warranty. Body Use a blower to apply pressure.

User Manual
Page 227
USB Cable UC-E61 Audio Video Cable EG-CP161 Lens cap LC-CP231 1 Supplied with the camera at the time of purchase (➝ page 3 of the groove, the cover or cord may be damaged when ... Battery charger Charging AC Adapter EH-69P1, 2 Battery Charger MH-612 AC Adapter EH-62A (connect as shown) 1 2 3 AC adapter USB cable Audio/video cable Lens cap Before closing the battery-chamber/memory card slot cover, fully insert the power connector cord into the slot in other countries, use a commercially available...
USB Cable UC-E61 Audio Video Cable EG-CP161 Lens cap LC-CP231 1 Supplied with the camera at the time of purchase (➝ page 3 of the groove, the cover or cord may be damaged when ... Battery charger Charging AC Adapter EH-69P1, 2 Battery Charger MH-612 AC Adapter EH-62A (connect as shown) 1 2 3 AC adapter USB cable Audio/video cable Lens cap Before closing the battery-chamber/memory card slot cover, fully insert the power connector cord into the slot in other countries, use a commercially available...
User Manual
Page 231
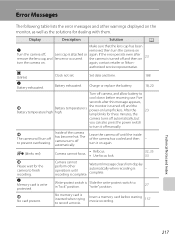
...the inside of the camera has become hot. If the error persists even after this message appears, P Battery temperature high Battery temperature is attached or lens error occurred. P The camera will turn it off manually. The camera turns off , and the power-on the monitor, as well as the ...solutions for dealing with them. again, contact retailer or Nikon- Leave the camera off to in "lock" position. Camera cannot focus. • Refocus. • Use focus lock. 32, 33 33 Camera cannot perform ...
...the inside of the camera has become hot. If the error persists even after this message appears, P Battery temperature high Battery temperature is attached or lens error occurred. P The camera will turn it off manually. The camera turns off , and the power-on the monitor, as well as the ...solutions for dealing with them. again, contact retailer or Nikon- Leave the camera off to in "lock" position. Camera cannot focus. • Refocus. • Use focus lock. 32, 33 33 Camera cannot perform ...
User Manual
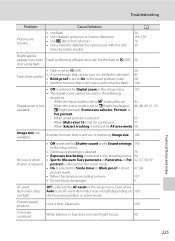
Page 239
... available. When smart portrait is selected for Smile timer or Blink proof in air. When Subject tracking is selected 65 - Pictures appear smeared. Clean lens. 209 Colors are blurred. • Use flash. • Use vibration reduction or motion detection. • Use D (Best Shot Selector). ... smart 67, 68 portrait mode. • When the camera is selected for continuous 77 - Troubleshooting Problem Cause/Solution A Pictures are unnatural. Lens is set now is restricting the flash. 104 • Off is recording a movie. 157 • Do not block the speaker. 5...
... available. When smart portrait is selected for Smile timer or Blink proof in air. When Subject tracking is selected 65 - Pictures appear smeared. Clean lens. 209 Colors are blurred. • Use flash. • Use vibration reduction or motion detection. • Use D (Best Shot Selector). ... smart 67, 68 portrait mode. • When the camera is selected for continuous 77 - Troubleshooting Problem Cause/Solution A Pictures are unnatural. Lens is set now is restricting the flash. 104 • Off is recording a movie. 157 • Do not block the speaker. 5...


