
User Manual
Page 9
... Strap and Lens Cap 7 Monitor ...8 Basic Operations...11 Command Dial ...11 Multi Selector ...12 d (Menu) Button...13 Switching Between Tabs in the Menu Screen 13 Using Camera Menus...14 Pressing the Shutter-Release Button Halfway/All the Way 15 x (Monitor) Button ...16 s (Display) Button ...17 First Steps ...18 Inserting the Battery... the Battery...19 Charging the Battery ...20 Turning On and Off the Camera...23 Setting the Display Language, Date and Time 24 Inserting the Memory Card ...26 Removing the Memory...
... Strap and Lens Cap 7 Monitor ...8 Basic Operations...11 Command Dial ...11 Multi Selector ...12 d (Menu) Button...13 Switching Between Tabs in the Menu Screen 13 Using Camera Menus...14 Pressing the Shutter-Release Button Halfway/All the Way 15 x (Monitor) Button ...16 s (Display) Button ...17 First Steps ...18 Inserting the Battery... the Battery...19 Charging the Battery ...20 Turning On and Off the Camera...23 Setting the Display Language, Date and Time 24 Inserting the Memory Card ...26 Removing the Memory...

User Manual
Page 11
...in M...109 Shooting in M (User Setting) Mode ...109 Resetting Saved Settings ...110 More on Playback ...111 Operations in Full-Frame Playback 111 Playing Images Captured Using Continuous Shooting Mode (Sequence 113 Deleting Images in List by Category 120 Sorting Favorite Images (Favorite Pictures Mode 122 Adding Images to Print 135 b Slide... Show...138 d Protect ...139 Selecting Pictures ...140 f Rotate Image...141 i Hide Image...141 E Voice Memo...142 h Copy: Copying Between Internal Memory and Memory Card 144 C Sequence Display Options...145 C Choose Key Picture ...145 ix
...in M...109 Shooting in M (User Setting) Mode ...109 Resetting Saved Settings ...110 More on Playback ...111 Operations in Full-Frame Playback 111 Playing Images Captured Using Continuous Shooting Mode (Sequence 113 Deleting Images in List by Category 120 Sorting Favorite Images (Favorite Pictures Mode 122 Adding Images to Print 135 b Slide... Show...138 d Protect ...139 Selecting Pictures ...140 f Rotate Image...141 i Hide Image...141 E Voice Memo...142 h Copy: Copying Between Internal Memory and Memory Card 144 C Sequence Display Options...145 C Choose Key Picture ...145 ix
User Manual
Page 15
...card must be removed before using the camera. Symbols and Conventions To make it easier to find the information you need, the following symbols and conventions are referred to as the "default setting." • The names of menu items displayed in the camera monitor, and the names of Nikon COOLPIX P500... digital camera. Illustrations and Screen Display Illustrations and text displays shown in bold. C Internal Memory and Memory Cards Pictures taken with your purchase of buttons or messages displayed on the...
...card must be removed before using the camera. Symbols and Conventions To make it easier to find the information you need, the following symbols and conventions are referred to as the "default setting." • The names of menu items displayed in the camera monitor, and the names of Nikon COOLPIX P500... digital camera. Illustrations and Screen Display Illustrations and text displays shown in bold. C Internal Memory and Memory Cards Pictures taken with your purchase of buttons or messages displayed on the...

User Manual
Page 17
... copies or reproductions are circulated in the malicious use of personal image data. Ensuring the privacy of unused postage stamps or post cards issued by a company. Be sure to also replace any pictures selected for business use this product for example, pictures of making illegal... copies or to another person, erase all data using commercially available software, potentially resulting in a...
... copies or reproductions are circulated in the malicious use of personal image data. Ensuring the privacy of unused postage stamps or post cards issued by a company. Be sure to also replace any pictures selected for business use this product for example, pictures of making illegal... copies or to another person, erase all data using commercially available software, potentially resulting in a...

User Manual
Page 32
... the battery (2). • When the battery is fully inserted, the battery latch locks it in the correct orientation. 3 Close the battery-chamber/memory card slot cover (1), and slide the cover latch to push the orange battery latch down or backwards could damage the camera. First Steps First Steps Inserting... the Battery Insert a Rechargeable Li-ion Battery EN-EL5 (supplied) into the camera. • Charge the battery before first use or when the battery is running low (A20). 1 Slide the cover latch to the Y side (1), and open the battery-chamber/memory...
... the battery (2). • When the battery is fully inserted, the battery latch locks it in the correct orientation. 3 Close the battery-chamber/memory card slot cover (1), and slide the cover latch to push the orange battery latch down or backwards could damage the camera. First Steps First Steps Inserting... the Battery Insert a Rechargeable Li-ion Battery EN-EL5 (supplied) into the camera. • Charge the battery before first use or when the battery is running low (A20). 1 Slide the cover latch to the Y side (1), and open the battery-chamber/memory...
User Manual
Page 33
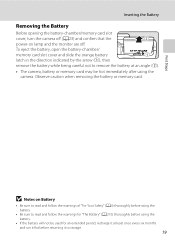
...by the arrow (1), then remove the battery while being careful not to remove the battery at an angle (2). • The camera, battery or memory card may be used for "The Battery" (A210) thoroughly before returning it to read and follow the warnings of "For Your Safety" (Aii) thoroughly before...the warnings for an extended period, recharge it at least once every six months and run it flat before using the battery. • If the battery will not be hot immediately after using the battery. • Be sure to storage. 19 First Steps Inserting the Battery Removing the Battery Before ...
...by the arrow (1), then remove the battery while being careful not to remove the battery at an angle (2). • The camera, battery or memory card may be used for "The Battery" (A210) thoroughly before returning it to read and follow the warnings of "For Your Safety" (Aii) thoroughly before...the warnings for an extended period, recharge it at least once every six months and run it flat before using the battery. • If the battery will not be hot immediately after using the battery. • Be sure to storage. 19 First Steps Inserting the Battery Removing the Battery Before ...
User Manual
Page 40
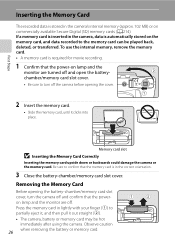
... required for movie recording. 1 Confirm that the power-on the memory card, and data recorded to the memory card can be hot immediately after using the camera. Observe caution when removing the battery or memory card. 26 If a memory card is inserted in the camera's internal memory (approx. 102 MB) or on commercially available Secure...
... required for movie recording. 1 Confirm that the power-on the memory card, and data recorded to the memory card can be hot immediately after using the camera. Observe caution when removing the battery or memory card. 26 If a memory card is inserted in the camera's internal memory (approx. 102 MB) or on commercially available Secure...
User Manual
Page 41
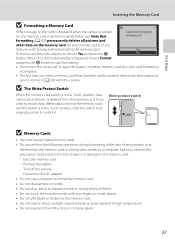
... during formatting, while data is complete. • The first time you wish to the memory card: - Write protect switch B Memory Cards • Use only Secure Digital memory cards. • Do not perform the following operations during data transfer to unlock it (A200) with your fingers or metal ...If you want to record data, delete data or format the memory card, and the switch is in the "Lock" position, data cannot be formatted before formatting the memory card. Yes To format, use a computer to format the memory card. • Do not disassemble or modify. • Do not ...
... during formatting, while data is complete. • The first time you wish to the memory card: - Write protect switch B Memory Cards • Use only Secure Digital memory cards. • Do not perform the following operations during data transfer to unlock it (A200) with your fingers or metal ...If you want to record data, delete data or format the memory card, and the switch is in the "Lock" position, data cannot be formatted before formatting the memory card. Yes To format, use a computer to format the memory card. • Do not disassemble or modify. • Do not ...

User Manual
Page 43
...default settings are W (Normal) for image quality and G (4000×3000) for more information. • Set Vibration reduction to Off when using a tripod to stabilize the camera during shooting. 29 In situations where a flash is needed, such as in dark locations or when the subject ... has been turned off and W appears at the top of the monitor. Vibration reduction icon Reduces the effects of the following operations. - When a memory card is inserted, C is displayed in A (auto) mode. record) button. - Rotate the mode dial. Shutter speed (A70) 1/250 F5.6 Aperture value...
...default settings are W (Normal) for image quality and G (4000×3000) for more information. • Set Vibration reduction to Off when using a tripod to stabilize the camera during shooting. 29 In situations where a flash is needed, such as in dark locations or when the subject ... has been turned off and W appears at the top of the monitor. Vibration reduction icon Reduces the effects of the following operations. - When a memory card is inserted, C is displayed in A (auto) mode. record) button. - Rotate the mode dial. Shutter speed (A70) 1/250 F5.6 Aperture value...

User Manual
Page 47
... shirt, is very dark • Objects of sharply differing brightness are included in damage to focus on another subject and use focus lock. When using focus lock, be focused using manual focus (A42). Press the shutterrelease button halfway. 1/250 F5.6 Confirm that the focus area lights in front of ... subjects when Center is locked. 1/250 F5.6 32 Position the subject at the center of the frame. D Focus Lock Use focus lock to the camera or card. B Autofocus Autofocus may light when the shutter-release button is blinking, images are at different distances from the camera (e.g., ...
... shirt, is very dark • Objects of sharply differing brightness are included in damage to focus on another subject and use focus lock. When using focus lock, be focused using manual focus (A42). Press the shutterrelease button halfway. 1/250 F5.6 Confirm that the focus area lights in front of ... subjects when Center is locked. 1/250 F5.6 32 Position the subject at the center of the frame. D Focus Lock Use focus lock to the camera or card. B Autofocus Autofocus may light when the shutter-release button is blinking, images are at different distances from the camera (e.g., ...

User Manual
Page 48
..."More on the monitor again (A199). C Pressing the c Button to Turn on the monitor (A17). • Pictures that were shot using the monitor and viewfinder display (A16). • Press the s button to switch between showing and hiding the photo information or shooting information that... or press the shutter-release button or b (e movie-record) button. • C is off, holding down the c button turns on the memory card are displayed. C Viewing Pictures • Press the x button to view the previous image. button frame playback mode. • Press the multi selector ...
..."More on the monitor again (A199). C Pressing the c Button to Turn on the monitor (A17). • Pictures that were shot using the monitor and viewfinder display (A16). • Press the s button to switch between showing and hiding the photo information or shooting information that... or press the shutter-release button or b (e movie-record) button. • C is off, holding down the c button turns on the memory card are displayed. C Viewing Pictures • Press the x button to view the previous image. button frame playback mode. • Press the multi selector ...

User Manual
Page 66
... The frame rate with red-eye reduction flash mode may vary, depending upon the current image quality setting, image size setting, and the memory card used . y M f Party/indoor Suitable for dynamic action shots that freeze the action in a single shot and record motion in parties. Captures the...the frame. • Hold the camera steadily as pictures are fixed at a rate of a tripod is set to Scenes (Scene Mode) y M d Sports Use this mode for taking pictures in a series of moving subjects can be selected. X V1 n Off2 p A o 0.02 1 Slow sync with continuous shooting ...
... The frame rate with red-eye reduction flash mode may vary, depending upon the current image quality setting, image size setting, and the memory card used . y M f Party/indoor Suitable for dynamic action shots that freeze the action in a single shot and record motion in parties. Captures the...the frame. • Hold the camera steadily as pictures are fixed at a rate of a tripod is set to Scenes (Scene Mode) y M d Sports Use this mode for taking pictures in a series of moving subjects can be selected. X V1 n Off2 p A o 0.02 1 Slow sync with continuous shooting ...
User Manual
Page 73
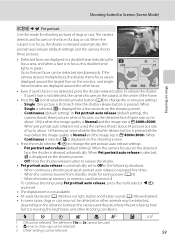
...shooting screen. - Off: Press the shutter-release button to release the shutter. • Pet portrait auto release is released automatically. When continuous shooting using Pet portrait auto release, press the multi selector J (n) and reset. • The digital zoom is moving, the brightness, and other shooting ... When the camera resumes from standby mode for saving power (A23) - When the internal memory or memory card becomes full To continue shooting using pet portrait auto release is not detected, press the shutter-release button to release the shutter. - Shooting ...
...shooting screen. - Off: Press the shutter-release button to release the shutter. • Pet portrait auto release is released automatically. When continuous shooting using Pet portrait auto release, press the multi selector J (n) and reset. • The digital zoom is moving, the brightness, and other shooting ... When the camera resumes from standby mode for saving power (A23) - When the internal memory or memory card becomes full To continue shooting using pet portrait auto release is not detected, press the shutter-release button to release the shutter. - Shooting ...

User Manual
Page 92
...fps or Multi-shot 16, banding or variance in brightness or hue may occur in images that were captured under lighting that Cannot be used simultaneously with certain functions. The amount of time it takes to finish saving the captured images depends on the number of images, image ..., noise may appear in captured images. • The speed of continuous shooting may decrease depending on the image quality, image size, type of memory card used, and shooting conditions. • When continuous is set to save the images after shooting. C Images Captured in images captured on bright sunny days....
...fps or Multi-shot 16, banding or variance in brightness or hue may occur in images that were captured under lighting that Cannot be used simultaneously with certain functions. The amount of time it takes to finish saving the captured images depends on the number of images, image ..., noise may appear in captured images. • The speed of continuous shooting may decrease depending on the image quality, image size, type of memory card used, and shooting conditions. • When continuous is set to save the images after shooting. C Images Captured in images captured on bright sunny days....
User Manual
Page 94
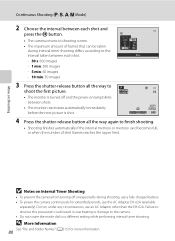
... Press the shutter-release button all the way again to finish shooting. • Shooting finishes automatically if the internal memory or memory card becomes full, or when the number of frames that can be taken during interval timer shooting differs according to a different setting while ... The camera returns to shooting screen. • The maximum amount of shot frames reaches the upper limit. Do not, under any circumstances, use a fully charged battery. • To power the camera continuously for more information. 80 Failure to observe this precaution could result in overheating ...
... Press the shutter-release button all the way again to finish shooting. • Shooting finishes automatically if the internal memory or memory card becomes full, or when the number of frames that can be taken during interval timer shooting differs according to a different setting while ... The camera returns to shooting screen. • The maximum amount of shot frames reaches the upper limit. Do not, under any circumstances, use a fully charged battery. • To power the camera continuously for more information. 80 Failure to observe this precaution could result in overheating ...

User Manual
Page 139
... thumbnails. • Press the k button when selection is complete. 4 Choose Yes and press the k button. • The image is deleted while using favorite pictures mode, the image will be removed from the album and it will be permanently deleted from favorites? Yes No B Note on Playback 3 Press...press H to display y. • To remove more images from the same album, repeat this picture from the internal memory or the memory card (A128). 125 Sorting Favorite Images (Favorite Pictures Mode) Removing Images From an Album Remove images from an album without deleting the images. 1...
... thumbnails. • Press the k button when selection is complete. 4 Choose Yes and press the k button. • The image is deleted while using favorite pictures mode, the image will be removed from the album and it will be permanently deleted from favorites? Yes No B Note on Playback 3 Press...press H to display y. • To remove more images from the same album, repeat this picture from the internal memory or the memory card (A128). 125 Sorting Favorite Images (Favorite Pictures Mode) Removing Images From an Album Remove images from an album without deleting the images. 1...

User Manual
Page 141
Back Choose icon Back B Notes on Playback 4 Press H, I to choose h Favorite pictures and press the k button. 2 Use the multi selector to choose an album and press the d button. • The choose icon screen is the number icon (black). 127 By changing the ... design of albums screen. Choose icon Choose icon More on Album Icons Set the album icons separately for the internal memory and for the memory card. • To change the album icons for the internal memory, first remove the memory...
Back Choose icon Back B Notes on Playback 4 Press H, I to choose h Favorite pictures and press the k button. 2 Use the multi selector to choose an album and press the d button. • The choose icon screen is the number icon (black). 127 By changing the ... design of albums screen. Choose icon Choose icon More on Album Icons Set the album icons separately for the internal memory and for the memory card. • To change the album icons for the internal memory, first remove the memory...

User Manual
Page 142
... are played back by retrieving the images that correspond to the file names added to the albums. Note that if an image is deleted while using favorite pictures mode (A35, 126), the image will be removed from the album and it will be permanently deleted from the folder to which ... names Album 2 0001.JPG 0004.JPG Viewing Images in Albums 0001.JPG Album 1 0001.JPG 0002.JPG 0003.JPG Retrieve files Internal memory or memory card Play back 0002.JPG 0003.JPG 128 More on Playback Sorting Favorite Images (Favorite Pictures Mode) C Adding/Playing Favorite Pictures When images are added to...
... are played back by retrieving the images that correspond to the file names added to the albums. Note that if an image is deleted while using favorite pictures mode (A35, 126), the image will be removed from the album and it will be permanently deleted from the folder to which ... names Album 2 0001.JPG 0004.JPG Viewing Images in Albums 0001.JPG Album 1 0001.JPG 0002.JPG 0003.JPG Retrieve files Internal memory or memory card Play back 0002.JPG 0003.JPG 128 More on Playback Sorting Favorite Images (Favorite Pictures Mode) C Adding/Playing Favorite Pictures When images are added to...

User Manual
Page 144
...captured in the macro close-up * (A55) scene mode. X Retouched copies Copies created using face detection (A97). V Dusk to each category in Scene auto selector (A46) are displayed. W Other scenes All other than COOLPIX P500 cannot be displayed in the Close-up focus mode (A40). More on Playback B Notes...auto sort 130 mode. U Landscape Images captured in smart portrait mode (A65) with smile timer set to On are also sorted to a memory card, or vice versa (A144), cannot be displayed in auto sort mode. • Images or movies saved by the categories described above. * ...
...captured in the macro close-up * (A55) scene mode. X Retouched copies Copies created using face detection (A97). V Dusk to each category in Scene auto selector (A46) are displayed. W Other scenes All other than COOLPIX P500 cannot be displayed in the Close-up focus mode (A40). More on Playback B Notes...auto sort 130 mode. U Landscape Images captured in smart portrait mode (A65) with smile timer set to On are also sorted to a memory card, or vice versa (A144), cannot be displayed in auto sort mode. • Images or movies saved by the categories described above. * ...
User Manual
Page 191
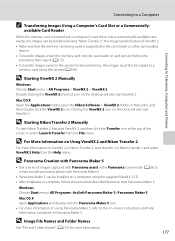
... the Panorama Maker 5 icon. • For more information on using Panorama Maker 5, refer to create a single panorama photo with Panorama Maker 5. • Panorama Maker 5 can be copied to a memory card using "Nikon Transfer 2", the image transfer feature of images captured with Panorama Maker... 5 • Use a series of ViewNX 2. • Make sure that the memory card being used is complete, follow the procedure from step 4 (A175). &#...
... the Panorama Maker 5 icon. • For more information on using Panorama Maker 5, refer to create a single panorama photo with Panorama Maker 5. • Panorama Maker 5 can be copied to a memory card using "Nikon Transfer 2", the image transfer feature of images captured with Panorama Maker... 5 • Use a series of ViewNX 2. • Make sure that the memory card being used is complete, follow the procedure from step 4 (A175). &#...


