P100 User's Manual
Page 4
...malfunction Should you notice smoke or an unusual smell coming from putting the battery or other accident, take the equipment to a Nikon-authorized service representative for inspection, after unplugging the product and/or removing the battery. Keep out of reach of an infant or child. Should the camera... or Charging AC Adapter break open as this Nikon product, to prevent possible injury. WARNINGS Turn off in explosion or fire....
...malfunction Should you notice smoke or an unusual smell coming from putting the battery or other accident, take the equipment to a Nikon-authorized service representative for inspection, after unplugging the product and/or removing the battery. Keep out of reach of an infant or child. Should the camera... or Charging AC Adapter break open as this Nikon product, to prevent possible injury. WARNINGS Turn off in explosion or fire....
P100 User's Manual
Page 5
water. Failure to a Nikon- If you notice any change in fire. • Do not handle the plug or go near...it into the camera and connecting the Charging AC Adapter EH-68P/EH-68P (AR) (supplied). • When inserting the battery, do not attempt to observe this precaution could result in electric shock. Failure to excessive heat. electric shock. • Use ...you are using the • Keep dry. heavy objects, or expose it to heat or • Do not expose the battery to remove or or bend the USB cable, place it upside down or backwards. • Dust on or near the ...
water. Failure to a Nikon- If you notice any change in fire. • Do not handle the plug or go near...it into the camera and connecting the Charging AC Adapter EH-68P/EH-68P (AR) (supplied). • When inserting the battery, do not attempt to observe this precaution could result in electric shock. Failure to excessive heat. electric shock. • Use ...you are using the • Keep dry. heavy objects, or expose it to heat or • Do not expose the battery to remove or or bend the USB cable, place it upside down or backwards. • Dust on or near the ...

P100 User's Manual
Page 8
... of as household waste. • For more information, contact the retailer or the local authorities in European countries: • All batteries, whether marked with Canadian ICES-003. The following apply only to be collected separately. Notices Notice for separate collection at an appropriate ...collection point. Notice for customers in Europe This symbol indicates that the battery is to users in European countries: • This product is to users in charge of waste management. ATTENTION Cet appareil ...
... of as household waste. • For more information, contact the retailer or the local authorities in European countries: • All batteries, whether marked with Canadian ICES-003. The following apply only to be collected separately. Notices Notice for separate collection at an appropriate ...collection point. Notice for customers in Europe This symbol indicates that the battery is to users in European countries: • This product is to users in charge of waste management. ATTENTION Cet appareil ...
P100 User's Manual
Page 9
... d Button...13 Switching Between Tabs...13 Help Displays ...14 The x (monitor) Button ...14 The s (display) Button ...15 First Steps ...16 Inserting the Battery ...16 Removing the Battery...17 Charging the Battery ...18 Turning On and Off the Camera...21 Setting Display Language, Date and Time 22 Inserting Memory Cards...24 Removing Memory Cards...
... d Button...13 Switching Between Tabs...13 Help Displays ...14 The x (monitor) Button ...14 The s (display) Button ...15 First Steps ...16 Inserting the Battery ...16 Removing the Battery...17 Charging the Battery ...18 Turning On and Off the Camera...21 Setting Display Language, Date and Time 22 Inserting Memory Cards...24 Removing Memory Cards...
P100 User's Manual
Page 14
...on a trip), take a test shot to ensure that may be held liable for contact information: http://imaging.nikon.com/ Use Only Nikon Brand Electronic Accessories Nikon COOLPIX cameras are engineered and proven to operate within the operational and safety requirements of this electronic circuitry. THE USE... electronic circuitry. Holographic seal: Identifies this product may be held liable for use of third-party rechargeable Li-ion batteries not bearing the Nikon holographic seal could interfere with normal operation of the camera or result in your area (address provided separately). 2...
...on a trip), take a test shot to ensure that may be held liable for contact information: http://imaging.nikon.com/ Use Only Nikon Brand Electronic Accessories Nikon COOLPIX cameras are engineered and proven to operate within the operational and safety requirements of this electronic circuitry. THE USE... electronic circuitry. Holographic seal: Identifies this product may be held liable for use of third-party rechargeable Li-ion batteries not bearing the Nikon holographic seal could interfere with normal operation of the camera or result in your area (address provided separately). 2...

P100 User's Manual
Page 17
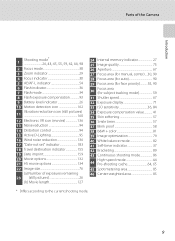
...) button 32 15 d button......13, 45, 74, 107, 132, 153 16 Multi selector 12 17 l (delete) button............32, 33, 117, 137 18 Tripod socket 19 Battery-chamber/ memory card slot cover 16, 24 20 Cover latch 16, 24 21 Memory card slot 24 22...
...) button 32 15 d button......13, 45, 74, 107, 132, 153 16 Multi selector 12 17 l (delete) button............32, 33, 117, 137 18 Tripod socket 19 Battery-chamber/ memory card slot cover 16, 24 20 Cover latch 16, 24 21 Memory card slot 24 22...
P100 User's Manual
Page 21
..., 66, 98 2 Focus mode 38 3 Zoom indicator 29 4 Focus indicator 30 5 AE/AF-L indicator 54 6 Flash indicator 36 7 Flash mode 34 8 Flash exposure compensation 93 9 Battery level indicator 26 10 Motion detection icon 162 Vibration reduction icon (still pictures) 11 160 12 Electronic VR icon (movies 136 13 Noise reduction 94...
..., 66, 98 2 Focus mode 38 3 Zoom indicator 29 4 Focus indicator 30 5 AE/AF-L indicator 54 6 Flash indicator 36 7 Flash mode 34 8 Flash exposure compensation 93 9 Battery level indicator 26 10 Motion detection icon 162 Vibration reduction icon (still pictures) 11 160 12 Electronic VR icon (movies 136 13 Noise reduction 94...
P100 User's Manual
Page 22
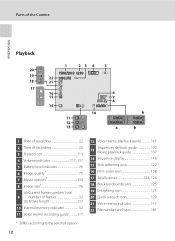
... 13 6 7 8 999/999 10 999/999 9999/9999 a 9 1m00s 1m00s b 1 Date of recording 22 2 Time of recording 22 3 Protect icon 113 4 Volume indicator 117, 137 5 Battery level indicator 26 6 Image quality 75 7 Movie options 133 8 Image size 76 (a) Current frame number/ total 9 number of frames 32 (b) Movie length 137 10 Internal...
... 13 6 7 8 999/999 10 999/999 9999/9999 a 9 1m00s 1m00s b 1 Date of recording 22 2 Time of recording 22 3 Protect icon 113 4 Volume indicator 117, 137 5 Battery level indicator 26 6 Image quality 75 7 Movie options 133 8 Image size 76 (a) Current frame number/ total 9 number of frames 32 (b) Movie length 137 10 Internal...
P100 User's Manual
Page 28
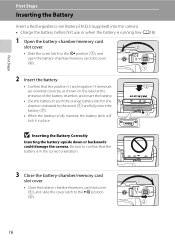
... label at the entrance of the battery chamber, and insert the battery. • Use the battery to push the orange battery latch in the direction indicated by the arrow (1) and fully insert the battery (2). • When the battery is in place. First Steps First Steps Inserting the Battery Insert a Rechargeable Li-ion Battery EN-EL5 (supplied) into the...
... label at the entrance of the battery chamber, and insert the battery. • Use the battery to push the orange battery latch in the direction indicated by the arrow (1) and fully insert the battery (2). • When the battery is in place. First Steps First Steps Inserting the Battery Insert a Rechargeable Li-ion Battery EN-EL5 (supplied) into the...
P100 User's Manual
Page 29
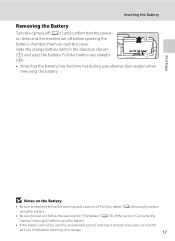
... to read and follow the warnings and cautions of "For Your Safety" (Aii) thoroughly before using the battery. • Be sure to storage. 17 Slide the orange battery latch in the direction shown (1) and eject the battery. PUSH TO EJECT • Note that the power- First Steps B Notes on lamp and the monitor...
... to read and follow the warnings and cautions of "For Your Safety" (Aii) thoroughly before using the battery. • Be sure to storage. 17 Slide the orange battery latch in the direction shown (1) and eject the battery. PUSH TO EJECT • Note that the power- First Steps B Notes on lamp and the monitor...
P100 User's Manual
Page 30
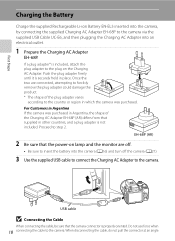
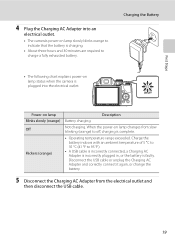
... properly oriented. For Customers in place. Do not use force when 18 connecting the cable to step 2. First Steps Charging the Battery Charge the supplied Rechargeable Li-ion Battery EN-EL5 inserted into the camera, by connecting the supplied Charging AC Adapter EH-68P to the camera via the supplied USB... Cable UC-E6, and then plugging the Charging AC Adapter into the camera (A16) and turn off . • Be sure to insert the battery into an electrical outlet. 1 Prepare the Charging AC Adapter EH-68P. Push the plug adapter firmly until it is included, attach the plug adapter to...
... properly oriented. For Customers in place. Do not use force when 18 connecting the cable to step 2. First Steps Charging the Battery Charge the supplied Rechargeable Li-ion Battery EN-EL5 inserted into the camera, by connecting the supplied Charging AC Adapter EH-68P to the camera via the supplied USB... Cable UC-E6, and then plugging the Charging AC Adapter into the camera (A16) and turn off . • Be sure to insert the battery into an electrical outlet. 1 Prepare the Charging AC Adapter EH-68P. Push the plug adapter firmly until it is included, attach the plug adapter to...
P100 User's Manual
Page 31
...176;C (41 °F to 95 °F). • A USB cable is incorrectly connected, a Charging AC Adapter is incorrectly plugged in, or the battery is complete. Off Not charging. Flickers (orange) • Operating temperature range exceeded. Disconnect the USB cable or unplug the Charging AC Adapter and correctly connect...when the camera is plugged into an electrical outlet. • The camera's power-on lamp slowly blinks orange to indicate that the battery is charging. • About three hours and 30 minutes are required to off, charging is faulty. When the power-on lamp ...
...176;C (41 °F to 95 °F). • A USB cable is incorrectly connected, a Charging AC Adapter is incorrectly plugged in, or the battery is complete. Off Not charging. Flickers (orange) • Operating temperature range exceeded. Disconnect the USB cable or unplug the Charging AC Adapter and correctly connect...when the camera is plugged into an electrical outlet. • The camera's power-on lamp slowly blinks orange to indicate that the battery is charging. • About three hours and 30 minutes are required to off, charging is faulty. When the power-on lamp ...
P100 User's Manual
Page 32
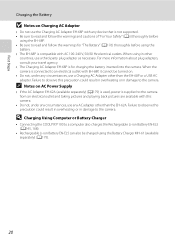
...countries, use a third-party plug adapter as necessary. D Charging Using Computer or Battery Charger • Connecting the COOLPIX P100 to a computer also charges the Rechargeable Li-ion Battery EN-EL5 (A145, 168). • Rechargeable Li-ion Battery EN-EL5 can also be turned on Charging AC Adapter • Do not ... EH-68P is connected to an electrical outlet with EH-68P, it cannot be charged using in damage to the camera. When using the Battery Charger MH-61 (available separately) (A179). 20 For more information about plug adapters, consult your travel agency. • The Charging AC ...
...countries, use a third-party plug adapter as necessary. D Charging Using Computer or Battery Charger • Connecting the COOLPIX P100 to a computer also charges the Rechargeable Li-ion Battery EN-EL5 (A145, 168). • Rechargeable Li-ion Battery EN-EL5 can also be turned on Charging AC Adapter • Do not ... EH-68P is connected to an electrical outlet with EH-68P, it cannot be charged using in damage to the camera. When using the Battery Charger MH-61 (available separately) (A179). 20 For more information about plug adapters, consult your travel agency. • The Charging AC ...
P100 User's Manual
Page 33
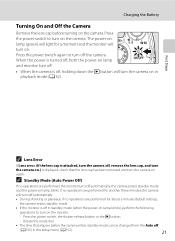
... are performed for another three minutes, the camera will turn off. • When the camera is off in the setup menu (A152). 21 Charging the Battery Turning On and Off the Camera Remove the lens cap before the camera enters standby mode can be changed from the Auto off the camera.
... are performed for another three minutes, the camera will turn off. • When the camera is off in the setup menu (A152). 21 Charging the Battery Turning On and Off the Camera Remove the lens cap before the camera enters standby mode can be changed from the Auto off the camera.

P100 User's Manual
Page 36
First Steps Inserting Memory Cards Image and movie files are off. Removing Memory Cards Before removing memory cards, turn off the camera before opening the battery-chamber/memory card slot cover. 2 Insert the memory card. • Slide the memory card in the internal memory, or play back, delete, or ...and the monitor are stored in the correct orientation. Pull the memory card out straight (2). 24 PUSH TO EJECT PUSH TO EJECT Open the battery-chamber/memory card slot cover and press the card in (1) gently to confirm that the memory card is automatically stored on the memory card ...
First Steps Inserting Memory Cards Image and movie files are off. Removing Memory Cards Before removing memory cards, turn off the camera before opening the battery-chamber/memory card slot cover. 2 Insert the memory card. • Slide the memory card in the internal memory, or play back, delete, or ...and the monitor are stored in the correct orientation. Pull the memory card out straight (2). 24 PUSH TO EJECT PUSH TO EJECT Open the battery-chamber/memory card slot cover and press the card in (1) gently to confirm that the memory card is automatically stored on the memory card ...
P100 User's Manual
Page 37
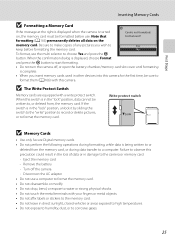
... position to record or delete pictures, or to the camera or memory card: - Eject the memory card - Turn off , or open the battery-chamber/memory card slot cover until formatting is displayed, choose Format and press the k button to format them (A166) with this camera for the... • Use only Secure Digital memory cards. • Do not perform the following operations during data transfer to corrosive gases. 25 Remove the battery - First Steps Inserting Memory Cards B Formatting a Memory Card If the message at the right is displayed when the camera is turned Card is...
... position to record or delete pictures, or to the camera or memory card: - Eject the memory card - Turn off , or open the battery-chamber/memory card slot cover until formatting is displayed, choose Format and press the k button to format them (A166) with this camera for the... • Use only Secure Digital memory cards. • Do not perform the following operations during data transfer to corrosive gases. 25 Remove the battery - First Steps Inserting Memory Cards B Formatting a Memory Card If the message at the right is displayed when the camera is turned Card is...

P100 User's Manual
Page 38
...Camera On and Select A (Auto) Mode This section describes how to take pictures in the monitor. Battery Level Monitor Description NO INDICATOR Battery fully charged. prepare to A. Battery level indicator 1/250 F5.6 17 Number of exposures remaining Number of Exposures Remaining The number of exposures remaining... first-time users of pictures that can be stored depends on . 2 Rotate the mode dial to charge or replace the battery. Auto mode 3 Check the battery level and number of exposures remaining in A (auto) mode, an automatic, "pointand-shoot" mode recommended for a moment ...
...Camera On and Select A (Auto) Mode This section describes how to take pictures in the monitor. Battery Level Monitor Description NO INDICATOR Battery fully charged. prepare to A. Battery level indicator 1/250 F5.6 17 Number of exposures remaining Number of Exposures Remaining The number of exposures remaining... first-time users of pictures that can be stored depends on . 2 Rotate the mode dial to charge or replace the battery. Auto mode 3 Check the battery level and number of exposures remaining in A (auto) mode, an automatic, "pointand-shoot" mode recommended for a moment ...

P100 User's Manual
Page 43
Do not open the battery-chamber/memory card slot cover while pictures are being recorded. Cutting power or removing the memory card in these circumstances could result in loss of ...
Do not open the battery-chamber/memory card slot cover while pictures are being recorded. Cutting power or removing the memory card in these circumstances could result in loss of ...

P100 User's Manual
Page 100
...taken between each shot and press the k button. • The maximum amount of frames that can be taken during recording, use a fully charged battery. • To power the camera continuously for more information. Failure to observe this precaution could result in overheating or in damage to the camera. ...off and the power-on lamp blinks between shots. • The monitor turns back on Interval Timer Shooting • To prevent the camera from Nikon). More on Shooting B Notes on automatically right before the next image is shot. 1/250 F5.6 17 5 Press the shutter-release button all ...
...taken between each shot and press the k button. • The maximum amount of frames that can be taken during recording, use a fully charged battery. • To power the camera continuously for more information. Failure to observe this precaution could result in overheating or in damage to the camera. ...off and the power-on lamp blinks between shots. • The monitor turns back on Interval Timer Shooting • To prevent the camera from Nikon). More on Shooting B Notes on automatically right before the next image is shot. 1/250 F5.6 17 5 Press the shutter-release button all ...

P100 User's Manual
Page 110
.... 4 The current focus area position is saved when AF area mode is set to shoot using the saved settings. More on Shooting B Clock battery If the internal clock battery (A156) is recommended. The following settings can be saved in mode dial M. Writing down 98 any important setting is exhausted, the settings saved...
.... 4 The current focus area position is saved when AF area mode is set to shoot using the saved settings. More on Shooting B Clock battery If the internal clock battery (A156) is recommended. The following settings can be saved in mode dial M. Writing down 98 any important setting is exhausted, the settings saved...


