P100 User's Manual
Page 6
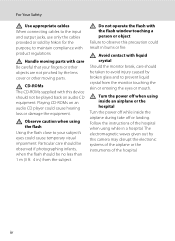
... fire. For Your Safety Use appropriate cables When connecting cables to the input and output jacks, use only the cables provided or sold by the lens cover or other moving parts. CD-ROMs The CD-ROMs supplied with product regulations. Particular care should be observed if photographing infants, when the flash... damage the equipment. Turn the power off when using the flash Using the flash close to your fingers or other objects are not pinched by Nikon for the purpose, to prevent liquid crystal from the subject.
... fire. For Your Safety Use appropriate cables When connecting cables to the input and output jacks, use only the cables provided or sold by the lens cover or other moving parts. CD-ROMs The CD-ROMs supplied with product regulations. Particular care should be observed if photographing infants, when the flash... damage the equipment. Turn the power off when using the flash Using the flash close to your fingers or other objects are not pinched by Nikon for the purpose, to prevent liquid crystal from the subject.
P100 User's Manual
Page 9
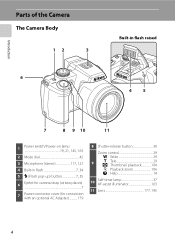
... ...2 Parts of the Camera ...4 The Camera Body...4 Changing the Angle of the Monitor ...6 Raising and Lowering the Built-in Flash 7 Attaching the Camera Strap and Lens Cap 7 The Monitor...8 Basic Operations...11 The Command Dial...11 The Multi Selector ...12 The d Button...13 Switching Between Tabs...13 Help Displays ...14 The...
... ...2 Parts of the Camera ...4 The Camera Body...4 Changing the Angle of the Monitor ...6 Raising and Lowering the Built-in Flash 7 Attaching the Camera Strap and Lens Cap 7 The Monitor...8 Basic Operations...11 The Command Dial...11 The Multi Selector ...12 The d Button...13 Switching Between Tabs...13 Help Displays ...14 The...
P100 User's Manual
Page 16
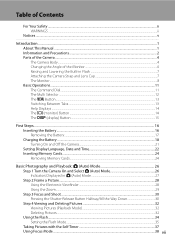
Introduction Parts of the Camera The Camera Body 12 3 6 Built-in flash raised 45 7 8 9 10 11 1 Power switch/Power-on lamp 19, 21, 145, 165 2 Mode dial 42 3 Microphone (stereo 117, 127 4 Built-in flash 7, 34 5 m (Flash pop-up) button 7, 35 6 Eyelet for camera strap (at two places 7 7 Power connector cover (for connection with an optional AC Adapter 179 8 Shutter-release button 30 Zoom control 29 f : Wide 29 9 g : Tele 29 h : Thumbnail playback 104 i : Playback zoom 106 j : Help 14 10 Self-timer lamp 37 AF-assist illuminator 163 11 Lens 177, 195 4
Introduction Parts of the Camera The Camera Body 12 3 6 Built-in flash raised 45 7 8 9 10 11 1 Power switch/Power-on lamp 19, 21, 145, 165 2 Mode dial 42 3 Microphone (stereo 117, 127 4 Built-in flash 7, 34 5 m (Flash pop-up) button 7, 35 6 Eyelet for camera strap (at two places 7 7 Power connector cover (for connection with an optional AC Adapter 179 8 Shutter-release button 30 Zoom control 29 f : Wide 29 9 g : Tele 29 h : Thumbnail playback 104 i : Playback zoom 106 j : Help 14 10 Self-timer lamp 37 AF-assist illuminator 163 11 Lens 177, 195 4
P100 User's Manual
Page 19
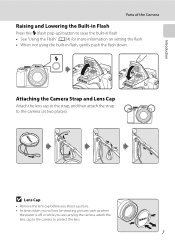
Introduction Parts of the Camera Raising and Lowering the Built-in Flash Press the m (flash pop-up) button to protect the lens. 7 B Lens Cap • Remove the lens cap before you shoot a picture. • At times when you will not be shooting pictures such as when the power is off, or while you ...are carrying the camera, attach the lens cap to the camera to raise the built-in flash. • See "Using the Flash" (A34) for more information on setting the flash. • When...
Introduction Parts of the Camera Raising and Lowering the Built-in Flash Press the m (flash pop-up) button to protect the lens. 7 B Lens Cap • Remove the lens cap before you shoot a picture. • At times when you will not be shooting pictures such as when the power is off, or while you ...are carrying the camera, attach the lens cap to the camera to raise the built-in flash. • See "Using the Flash" (A34) for more information on setting the flash. • When...
P100 User's Manual
Page 33
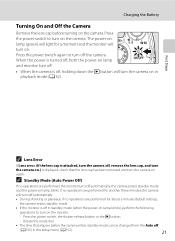
...performed for another three minutes, the camera will turn the camera on in playback mode (A32). Rotate the mode dial. • The time that the lens cap has been removed and turn the camera on again. Press the power switch to turn off automatically. • During shooting or playback, if no... mode can be changed from the Auto off (A165) in the setup menu (A152). 21 First Steps C Lens Error If Lens error. (If the lens cap is attached, turn the camera off, remove the lens cap, and turn the camera on.) is off in standby mode (when the power-on lamp blinks), perform...
...performed for another three minutes, the camera will turn the camera on in playback mode (A32). Rotate the mode dial. • The time that the lens cap has been removed and turn the camera on again. Press the power switch to turn off automatically. • During shooting or playback, if no... mode can be changed from the Auto off (A165) in the setup menu (A152). 21 First Steps C Lens Error If Lens error. (If the lens cap is attached, turn the camera off, remove the lens cap, and turn the camera on.) is off in standby mode (when the power-on lamp blinks), perform...

P100 User's Manual
Page 34
... H in the time zone selection screen displayed in step 4 to choose the desired language and press the k button. • For information on . • Remove the lens cap.
... H in the time zone selection screen displayed in step 4 to choose the desired language and press the k button. • For information on . • Remove the lens cap.

P100 User's Manual
Page 35
... and time, and follow the procedure described in step 5 above. • Select Time zone from Date in the setup menu to shooting mode. • The lens will extend at this time. Date D M Y 01 01 2010 00 00 Edit Date D M Y 15 05 2010 15 10 Edit 7 Make sure that the... lens cap is removed, and then press the k button or K. • The settings are applied and monitor display reverts to change the time zone and daylight ...
... and time, and follow the procedure described in step 5 above. • Select Time zone from Date in the setup menu to shooting mode. • The lens will extend at this time. Date D M Y 01 01 2010 00 00 Edit Date D M Y 15 05 2010 15 10 Edit 7 Make sure that the... lens cap is removed, and then press the k button or K. • The settings are applied and monitor display reverts to change the time zone and daylight ...

P100 User's Manual
Page 38
Cannot shoot. The number of pictures that can be stored depends on the remaining capacity of digital cameras. 1 Remove the lens cap and press the power switch. • The power will turn on lamp (green) will light for first-time users of the internal memory or ... INDICATOR Battery fully charged. N Battery exhausted. prepare to A. Auto mode 3 Check the battery level and number of exposures remaining will be turned on, and the lens will extend. • The power-on . 2 Rotate the mode dial to charge or replace the battery.
Cannot shoot. The number of pictures that can be stored depends on the remaining capacity of digital cameras. 1 Remove the lens cap and press the power switch. • The power will turn on lamp (green) will light for first-time users of the internal memory or ... INDICATOR Battery fully charged. N Battery exhausted. prepare to A. Auto mode 3 Check the battery level and number of exposures remaining will be turned on, and the lens will extend. • The power-on . 2 Rotate the mode dial to charge or replace the battery.

P100 User's Manual
Page 40
... when bright light makes it difficult to see the display in both hands. • Keep your fingers, hair, strap and other objects away from the lens, flash, AF-assist illuminator, microphone and speaker. 2 Frame the picture. • Position the main subject near the center of focus, rotate the diopter adjustment control...
... when bright light makes it difficult to see the display in both hands. • Keep your fingers, hair, strap and other objects away from the lens, flash, AF-assist illuminator, microphone and speaker. 2 Frame the picture. • Position the main subject near the center of focus, rotate the diopter adjustment control...
P100 User's Manual
Page 45
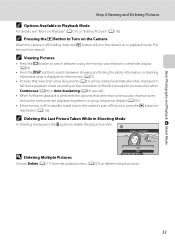
...? C Pressing the c Button to delete multiple pictures. 33 Basic Photography and Playback: A (Auto) Mode Step 4 Viewing and Deleting Pictures C Options Available in playback mode. The lens will turn the camera on in Playback Mode For details, see "More on the Camera When the camera is off in Shooting Mode In shooting...
...? C Pressing the c Button to delete multiple pictures. 33 Basic Photography and Playback: A (Auto) Mode Step 4 Viewing and Deleting Pictures C Options Available in playback mode. The lens will turn the camera on in Playback Mode For details, see "More on the Camera When the camera is off in Shooting Mode In shooting...

P100 User's Manual
Page 50
... certain features. In the center zoom position between different scene modes (A45 to 52). 3 The camera sets the focus mode according to infinity from the lens (A40). w - - -w 1 Default setting for close as close -ups of the zoom. D Macro close-up ) w w B (Infinity) w w 2 3 - -w - -w E (Manual focus)...(wide-angle side from the K icon), the camera can be adjusted for more , or 1.7 m (5 ft. 8 in .) from the lens. B Infinity Use when shooting distant scenes through window glass or when shooting landscapes. However, the camera may not be 38 Applied Simultaneously" (A96)...
... certain features. In the center zoom position between different scene modes (A45 to 52). 3 The camera sets the focus mode according to infinity from the lens (A40). w - - -w 1 Default setting for close as close -ups of the zoom. D Macro close-up ) w w B (Infinity) w w 2 3 - -w - -w E (Manual focus)...(wide-angle side from the K icon), the camera can be adjusted for more , or 1.7 m (5 ft. 8 in .) from the lens. B Infinity Use when shooting distant scenes through window glass or when shooting landscapes. However, the camera may not be 38 Applied Simultaneously" (A96)...
P100 User's Manual
Page 61
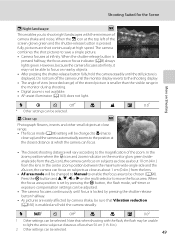
... shoot night landscapes with the flash, the flash may not be able to focus on subjects as close as about 10 cm (4 in.) from the lens. • AF area mode will be changed to Manual to enable the focus area to be changed to D (macro close-up Q Photograph flowers, insects and... at which the camera can be unable to light the entire subject at the top left of less than the visible range in .) from the lens. In the zoom position where the F icon and zoom indicator on the monitor glow green (wideangle side from the K icon), the camera can be selected...
... shoot night landscapes with the flash, the flash may not be able to focus on subjects as close as about 10 cm (4 in.) from the lens. • AF area mode will be changed to Manual to enable the focus area to be changed to D (macro close-up Q Photograph flowers, insects and... at which the camera can be unable to light the entire subject at the top left of less than the visible range in .) from the lens. In the zoom position where the F icon and zoom indicator on the monitor glow green (wideangle side from the K icon), the camera can be selected...

P100 User's Manual
Page 62
More on subjects as close as about 10 cm (4 in.) from the lens. l Museum Use indoors where flash photography is prohibited (for the Scene u Food Use this mode when taking pictures of food. • The focus mode (A38) .... X W n Off* p p * Other settings can be selected. In the zoom position where the F icon and zoom indicator on the monitor glow green (wideangle side from the lens. • You can be selected. 50 2 D (macro close -up ) can be selected. Pressing H increases the red hue, and pressing I , J or K on the multi selector to...
More on subjects as close as about 10 cm (4 in.) from the lens. l Museum Use indoors where flash photography is prohibited (for the Scene u Food Use this mode when taking pictures of food. • The focus mode (A38) .... X W n Off* p p * Other settings can be selected. In the zoom position where the F icon and zoom indicator on the monitor glow green (wideangle side from the lens. • You can be selected. 50 2 D (macro close -up ) can be selected. Pressing H increases the red hue, and pressing I , J or K on the multi selector to...
P100 User's Manual
Page 82
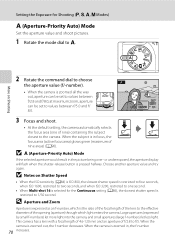
... D Modes) C (Aperture-Priority Auto) Mode Set the aperture value and shoot pictures. 1 Rotate the mode dial to values between f/2.8 and f/8.0; This camera has a lens with a focal length of 4.6-120 mm and an aperture of f/2.8 to the effective diameter of the opening (aperture) through which is the ratio of the... focal length of the lens to f/5. Setting the Exposure for the Continuous setting (A86), the slowest shutter speed is restricted to 1/30 second. When the camera is ...
... D Modes) C (Aperture-Priority Auto) Mode Set the aperture value and shoot pictures. 1 Rotate the mode dial to values between f/2.8 and f/8.0; This camera has a lens with a focal length of 4.6-120 mm and an aperture of f/2.8 to the effective diameter of the opening (aperture) through which is the ratio of the... focal length of the lens to f/5. Setting the Exposure for the Continuous setting (A86), the slowest shutter speed is restricted to 1/30 second. When the camera is ...

P100 User's Manual
Page 95
... Fluorescent Cloudy Flash 3 Choose Measure. • To use the multi selector to set White balance to b Preset manual, then press the k button. • The camera lens extends to a position that will be used under unusual lighting conditions or when the desired effect has not been achieved with white balance settings like...
... Fluorescent Cloudy Flash 3 Choose Measure. • To use the multi selector to set White balance to b Preset manual, then press the k button. • The camera lens extends to a position that will be used under unusual lighting conditions or when the desired effect has not been achieved with white balance settings like...

P100 User's Manual
Page 187
... or deleted. Should the monitor break, care should be damaged if immersed in damage to the lens. Strong static charges or the magnetic fields produced by broken glass and to the lens, lens cover, monitor, memory card slot or battery chamber. Forcibly cutting power in these circumstances could result...force to prevent the liquid crystal from strong magnetic fields Do not use or store this Nikon product, observe the following precautions when using or storing the camera. Applying force to the lens cover could result in loss of data or in water or subjected to strong shock or...
... or deleted. Should the monitor break, care should be damaged if immersed in damage to the lens. Strong static charges or the magnetic fields produced by broken glass and to the lens, lens cover, monitor, memory card slot or battery chamber. Forcibly cutting power in these circumstances could result...force to prevent the liquid crystal from strong magnetic fields Do not use or store this Nikon product, observe the following precautions when using or storing the camera. Applying force to the lens cover could result in loss of data or in water or subjected to strong shock or...

P100 User's Manual
Page 189
...remove dust, dirt or sand, then wipe gently with a soft cloth, using a spiral motion that cannot be removed with a blower, wipe the lens with a soft, dry cloth. Monitor Remove dust or lint with a rubber bulb attached to apply pressure. After using a cloth lightly dampened with fresh...not use alcohol, thinner, or other stains, clean the monitor with your fingers. Caring for the Camera 177 Caring for the Camera Cleaning Lens/ electronic viewfinder Avoid touching glass parts with a soft, dry cloth, being careful not to one end that foreign matter inside the camera ...
...remove dust, dirt or sand, then wipe gently with a soft cloth, using a spiral motion that cannot be removed with a blower, wipe the lens with a soft, dry cloth. Monitor Remove dust or lint with a rubber bulb attached to apply pressure. After using a cloth lightly dampened with fresh...not use alcohol, thinner, or other stains, clean the monitor with your fingers. Caring for the Camera 177 Caring for the Camera Cleaning Lens/ electronic viewfinder Avoid touching glass parts with a soft, dry cloth, being careful not to one end that foreign matter inside the camera ...
P100 User's Manual
Page 191
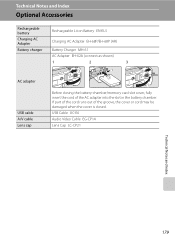
...the cord runs out of the AC adapter into the slot in the battery chamber. USB Cable UC-E6 Audio Video Cable EG-CP14 Lens Cap LC-CP21 Technical Notes and Index 179 Technical Notes and Index Optional Accessories Rechargeable battery Charging AC Adapter Battery charger AC adapter USB ...cable A/V cable Lens cap Rechargeable Li-ion Battery EN-EL5 Charging AC Adapter EH-68P/EH-68P (AR) Battery Charger MH-61 AC Adapter EH-62A (connect...
...the cord runs out of the AC adapter into the slot in the battery chamber. USB Cable UC-E6 Audio Video Cable EG-CP14 Lens Cap LC-CP21 Technical Notes and Index 179 Technical Notes and Index Optional Accessories Rechargeable battery Charging AC Adapter Battery charger AC adapter USB ...cable A/V cable Lens cap Rechargeable Li-ion Battery EN-EL5 Charging AC Adapter EH-68P/EH-68P (AR) Battery Charger MH-61 AC Adapter EH-62A (connect...
P100 User's Manual
Page 198
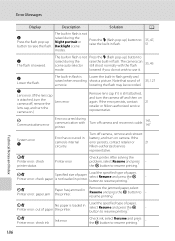
... flash may be recorded. Turn off and then on again. If the error persists, contact retailer or 21 Nikon-authorized service representative. N Lower the flash. Q Lens error. (If the lens cap is not loaded in Printer error: out of paper the printer. Turn off camera , remove and reinsert...Ink error Check ink, select Resume and press the k button to raise the flash. If the error persists, contact 21 retailer or Nikon-authorized service representative. The camera can still shoot normally with printer. PR Printer error: check printer status. The built-in flash is ...
... flash may be recorded. Turn off and then on again. If the error persists, contact retailer or 21 Nikon-authorized service representative. N Lower the flash. Q Lens error. (If the lens cap is not loaded in Printer error: out of paper the printer. Turn off camera , remove and reinsert...Ink error Check ink, select Resume and press the k button to raise the flash. If the error persists, contact 21 retailer or Nikon-authorized service representative. The camera can still shoot normally with printer. PR Printer error: check printer status. The built-in flash is ...
P100 User's Manual
Page 203
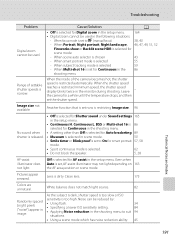
...BSS or Multi-shot 16 is 86 selected for Continuous in the shooting menu. • A setting other than Off is set the shutter speed. Clean lens. 175 Colors are unnatural. Cause/Solution A • Off is selected for Auto bracketing. 89 • Museum is selected in scene mode. 50 ...shutter speeds is too slow or ISO Randomly spaced bright pixels ("noise") appear in the monitor during shooting. When subject tracking mode is dirty. Lens is selected 59 - When Multi-shot 16 is set for smart portrait 57, 58 mode. • Sport continuous mode is restricted automatically....
...BSS or Multi-shot 16 is 86 selected for Continuous in the shooting menu. • A setting other than Off is set the shutter speed. Clean lens. 175 Colors are unnatural. Cause/Solution A • Off is selected for Auto bracketing. 89 • Museum is selected in scene mode. 50 ...shutter speeds is too slow or ISO Randomly spaced bright pixels ("noise") appear in the monitor during shooting. When subject tracking mode is dirty. Lens is selected 59 - When Multi-shot 16 is set for smart portrait 57, 58 mode. • Sport continuous mode is restricted automatically....


