

User Manual
Page 4
After reading, please keep this manual. COOLPIX L620 Digital Camera Camera Strap LR6/L40 (AA-size) alkaline batteries (×2)* USB Cable UC-E16 ViewNX 2 CD • User's Manual (this manual) • Warranty * The included batteries are missing, please contact the store where you for trial use only. NOTE: A memory card is not included with the... CD Introduction Introduction Read This First Thank you purchased the camera. Confirming the Package Contents In the event that any items are for purchasing the Nikon COOLPIX L620 digital camera.
After reading, please keep this manual. COOLPIX L620 Digital Camera Camera Strap LR6/L40 (AA-size) alkaline batteries (×2)* USB Cable UC-E16 ViewNX 2 CD • User's Manual (this manual) • Warranty * The included batteries are missing, please contact the store where you for trial use only. NOTE: A memory card is not included with the... CD Introduction Introduction Read This First Thank you purchased the camera. Confirming the Package Contents In the event that any items are for purchasing the Nikon COOLPIX L620 digital camera.

User Manual
Page 6
... F: "Technical Notes and Index." * Refer to the Reference Manual for pages indicated with E. • SD, SDHC, and SDXC memory cards are referred to as the "default setting." • The names of menu items displayed in this manual may differ from monitor display samples...camera. iv A/E/F These icons indicate other pages containing relevant information; Introduction Other Information • Symbols and Conventions To make it easier to as "memory cards" in this manual. • The setting at the time of buttons or messages displayed on a computer monitor appear in bold. • In...
... F: "Technical Notes and Index." * Refer to the Reference Manual for pages indicated with E. • SD, SDHC, and SDXC memory cards are referred to as the "default setting." • The names of menu items displayed in this manual may differ from monitor display samples...camera. iv A/E/F These icons indicate other pages containing relevant information; Introduction Other Information • Symbols and Conventions To make it easier to as "memory cards" in this manual. • The setting at the time of buttons or messages displayed on a computer monitor appear in bold. • In...
User Manual
Page 9
... deletion software, or format the device and then completely refill it with images containing no private information (for the Select an image option in camera memory does not completely erase the original image data. Deleted files can sometimes be taken to avoid injury or damage to also replace any pictures selected... such data is the user's responsibility. Ensuring the privacy of Data Storage Devices Please note that deleting images or formatting data storage devices such as memory cards or built-in the Welcome screen setting (A 69). vii
... deletion software, or format the device and then completely refill it with images containing no private information (for the Select an image option in camera memory does not completely erase the original image data. Deleted files can sometimes be taken to avoid injury or damage to also replace any pictures selected... such data is the user's responsibility. Ensuring the privacy of Data Storage Devices Please note that deleting images or formatting data storage devices such as memory cards or built-in the Welcome screen setting (A 69). vii

User Manual
Page 17
... 4 The Monitor 6 Shooting Mode 6 Playback Mode 8 The Basics of Shooting and Playback ... 10 Preparation 1 Insert the Batteries 10 Applicable Batteries 10 Preparation 2 Insert a Memory Card.......... 12 Internal Memory and Memory Cards......... 13 Preparation 3 Setting the Display Language, Date, and Time 14 Step 1 Turn the Camera On 18 Step 2 Select a Shooting Mode 20 Available Shooting Modes...
... 4 The Monitor 6 Shooting Mode 6 Playback Mode 8 The Basics of Shooting and Playback ... 10 Preparation 1 Insert the Batteries 10 Applicable Batteries 10 Preparation 2 Insert a Memory Card.......... 12 Internal Memory and Memory Cards......... 13 Preparation 3 Setting the Display Language, Date, and Time 14 Step 1 Turn the Camera On 18 Step 2 Select a Shooting Mode 20 Available Shooting Modes...

User Manual
Page 19
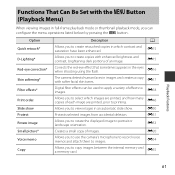
...Print Order (Creating a DPOF Print Order E46 Slide Show E50 Protect E51 Rotate Image E53 Voice Memo E54 Copy (Copy Between Internal Memory and Memory Card E55 Sequence Display Options E57 Choose Key Picture E57 The Movie Menu E58 Movie Options E58 Autofocus Mode E61 Wind Noise Reduction E61 ...Date and Time E67 Vibration Reduction E68 Motion Detection E69 AF Assist E70 Digital Zoom E70 Sound Settings E71 Auto Off E71 Format Memory/Format Card E72 Language E73 TV Settings E73 Blink Warning E74 Eye-Fi Upload E75 Reset All E76 Battery Type E77 Firmware Version E77 Error...
...Print Order (Creating a DPOF Print Order E46 Slide Show E50 Protect E51 Rotate Image E53 Voice Memo E54 Copy (Copy Between Internal Memory and Memory Card E55 Sequence Display Options E57 Choose Key Picture E57 The Movie Menu E58 Movie Options E58 Autofocus Mode E61 Wind Noise Reduction E61 ...Date and Time E67 Vibration Reduction E68 Motion Detection E69 AF Assist E70 Digital Zoom E70 Sound Settings E71 Auto Off E71 Format Memory/Format Card E72 Language E73 TV Settings E73 Blink Warning E74 Eye-Fi Upload E75 Reset All E76 Battery Type E77 Firmware Version E77 Error...
User Manual
Page 20
Introduction Technical Notes and Index F1 Caring for the Product F2 The Camera F2 Batteries F3 Memory Cards F5 Cleaning and Storage F6 Cleaning F6 Storage F7 Troubleshooting F8 Specifications F16 Approved Memory Cards F20 Index F23 xviii Refer to the Reference Manual for pages indicated with E.
Introduction Technical Notes and Index F1 Caring for the Product F2 The Camera F2 Batteries F3 Memory Cards F5 Cleaning and Storage F6 Cleaning F6 Storage F7 Troubleshooting F8 Specifications F16 Approved Memory Cards F20 Index F23 xviii Refer to the Reference Manual for pages indicated with E.

User Manual
Page 22
1 2 13 12 11 3 4 5 6 7 8 9 10 Parts of the Camera 1 K (flash pop-up) control 3, 41 2 Flash lamp 43 3 b (e movie-record) button 63 4 A (shooting mode) button 29, 30, 35, 37, 39 5 c (playback) button 26 6 Multi selector 4 7 k (apply selection) button 4 8 l (delete) button 27 9 d (menu) button 4, 50, 61, 66, 69 10 Battery-chamber/ memory card slot cover 10, 12 11 Tripod socket F18 12 Monitor 6 13 Speaker 61, 67 2
1 2 13 12 11 3 4 5 6 7 8 9 10 Parts of the Camera 1 K (flash pop-up) control 3, 41 2 Flash lamp 43 3 b (e movie-record) button 63 4 A (shooting mode) button 29, 30, 35, 37, 39 5 c (playback) button 26 6 Multi selector 4 7 k (apply selection) button 4 8 l (delete) button 27 9 d (menu) button 4, 50, 61, 66, 69 10 Battery-chamber/ memory card slot cover 10, 12 11 Tripod socket F18 12 Monitor 6 13 Speaker 61, 67 2

User Manual
Page 30
The Basics of Shooting and Playback Preparation 1 Insert the Batteries 1 Open the battery-chamber/memory card slot 3 cover. • Hold the camera upside down to prevent the batteries from 2 falling out. 1 2 Insert the batteries. • Confirm that the positive (+) and negative (-) ...-size) lithium batteries • Two EN-MH2 rechargeable Ni-MH (nickel metal hydride) batteries 10 1 2 The Basics of Shooting and Playback 3 Close the battery-chamber/memory card slot cover.
The Basics of Shooting and Playback Preparation 1 Insert the Batteries 1 Open the battery-chamber/memory card slot 3 cover. • Hold the camera upside down to prevent the batteries from 2 falling out. 1 2 Insert the batteries. • Confirm that the positive (+) and negative (-) ...-size) lithium batteries • Two EN-MH2 rechargeable Ni-MH (nickel metal hydride) batteries 10 1 2 The Basics of Shooting and Playback 3 Close the battery-chamber/memory card slot cover.

User Manual
Page 31
... with peeling Batteries with insulation that the power-on lamp and the monitor have turned off, and then open the battery-chamber/memory card slot cover. • The camera, batteries, and memory card may vary greatly depending on the manufacturer. Choose a reliable brand. 11 The Basics of Shooting and Playback B Removing the Batteries •...
... with peeling Batteries with insulation that the power-on lamp and the monitor have turned off, and then open the battery-chamber/memory card slot cover. • The camera, batteries, and memory card may vary greatly depending on the manufacturer. Choose a reliable brand. 11 The Basics of Shooting and Playback B Removing the Batteries •...
User Manual
Page 32
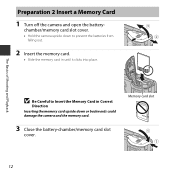
chamber/memory card slot cover. • Hold the camera upside down to prevent the batteries from falling out. 1 2 Insert the memory card. • Slide the memory card in until it clicks into place. 3 2 The Basics of Shooting and Playback B Be Careful to Insert the Memory Card in Correct Direction Inserting the memory card upside down or backwards could damage the camera and the memory card. 3 Close the battery-chamber/memory card slot cover. Memory card slot 1 2 12 Preparation 2 Insert a Memory Card 1 Turn off the camera and open the battery-
chamber/memory card slot cover. • Hold the camera upside down to prevent the batteries from falling out. 1 2 Insert the memory card. • Slide the memory card in until it clicks into place. 3 2 The Basics of Shooting and Playback B Be Careful to Insert the Memory Card in Correct Direction Inserting the memory card upside down or backwards could damage the camera and the memory card. 3 Close the battery-chamber/memory card slot cover. Memory card slot 1 2 12 Preparation 2 Insert a Memory Card 1 Turn off the camera and open the battery-

User Manual
Page 33
... data, including images and movies, can be hot immediately after using the camera. The Basics of Shooting and Playback B Formatting Memory Cards The first time you insert a memory card that the power-on a memory card. Removing Memory Cards Turn the camera off and make sure that has been used in another device into the camera, press the d button...
... data, including images and movies, can be hot immediately after using the camera. The Basics of Shooting and Playback B Formatting Memory Cards The first time you insert a memory card that the power-on a memory card. Removing Memory Cards Turn the camera off and make sure that has been used in another device into the camera, press the d button...

User Manual
Page 38
... and the number of images that can be taken is displayed. • C is displayed when no memory card is low. The battery level is inserted in the camera, and images are saved in the internal memory. 18 exhausted. Battery The camera cannot capture images. Replace the batteries. 25m 0s 780 Battery level indicator...
... and the number of images that can be taken is displayed. • C is displayed when no memory card is low. The battery level is inserted in the camera, and images are saved in the internal memory. 18 exhausted. Battery The camera cannot capture images. Replace the batteries. 25m 0s 780 Battery level indicator...
User Manual
Page 45
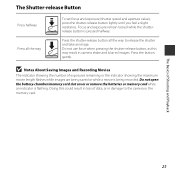
..., as this could result in loss of data, or in camera shake and blurred images. Do not open the battery-chamber/memory card slot cover or remove the batteries or memory card while an indicator is being recorded. Doing this may result in damage to release the shutter and take an image. The Basics... exposure remain locked while the shutterrelease button is pressed halfway. The Shutter-release Button Press halfway Press all the way to the camera or the memory card.
..., as this could result in loss of data, or in camera shake and blurred images. Do not open the battery-chamber/memory card slot cover or remove the batteries or memory card while an indicator is being recorded. Doing this may result in damage to release the shutter and take an image. The Basics... exposure remain locked while the shutterrelease button is pressed halfway. The Shutter-release Button Press halfway Press all the way to the camera or the memory card.
User Manual
Page 51
... switches to stabilize the camera during shooting. 31 One image is shooting continuously, the image may vary depending upon the current image mode setting, the memory card used, or shooting condition. • Focus, exposure, and hue are combined into a single image and saved. -
... switches to stabilize the camera during shooting. 31 One image is shooting continuously, the image may vary depending upon the current image mode setting, the memory card used, or shooting condition. • Focus, exposure, and hue are combined into a single image and saved. -
User Manual
Page 81
... which contrast and saturation have been enhanced. Protects selected images from accidental deletion. E53 E20 E54 Copy Allows you to copy images between the internal memory and a memory card. E55 Playback Features 61 E16 Skin softening* The camera detects human faces in images and creates a copy with enhanced brightness and contrast, brightening dark...
... which contrast and saturation have been enhanced. Protects selected images from accidental deletion. E53 E20 E54 Copy Allows you to copy images between the internal memory and a memory card. E55 Playback Features 61 E16 Skin softening* The camera detects human faces in images and creates a copy with enhanced brightness and contrast, brightening dark...

User Manual
Page 84
... a moving train or car, may appear skewed. - Subjects that move quickly from one side of the frame to the camera or the memory card. Banding may occur in the recorded movies. - B Notes About Saving Images and Recording Movies The indicator showing the number of exposures remaining ... of the image sensor interfere with a lower Speed Class rating are recommended when recording movies (F20). Movie recording may stop unexpectedly when memory cards with each other bright areas may leave residual images when the camera is moved. • Depending on the movie content, subject movement,...
... a moving train or car, may appear skewed. - Subjects that move quickly from one side of the frame to the camera or the memory card. Banding may occur in the recorded movies. - B Notes About Saving Images and Recording Movies The indicator showing the number of exposures remaining ... of the image sensor interfere with a lower Speed Class rating are recommended when recording movies (F20). Movie recording may stop unexpectedly when memory cards with each other bright areas may leave residual images when the camera is moved. • Depending on the movie content, subject movement,...

User Manual
Page 90
...to adjust TV-connection settings. Change this setting to match the type of batteries that passes before the monitor turns off Format memory/ Format card Language TV settings Blink warning Eye-Fi upload Reset all Battery type Firmware version Description Allows you to reset the camera's settings ... for sending images to set the amount of people using a commercially available Eye-Fi card. View the current camera firmware version. A E71 E71 Allows you to format the internal memory or the memory card. E73 E73 E74 E75 E76 E77 E77 General Camera Setup 70 Allows you to set...
...to adjust TV-connection settings. Change this setting to match the type of batteries that passes before the monitor turns off Format memory/ Format card Language TV settings Blink warning Eye-Fi upload Reset all Battery type Firmware version Description Allows you to reset the camera's settings ... for sending images to set the amount of people using a commercially available Eye-Fi card. View the current camera firmware version. A E71 E71 Allows you to format the internal memory or the memory card. E73 E73 E74 E75 E76 E77 E77 General Camera Setup 70 Allows you to set...

User Manual
Page 96
... Choose how images will be inserted directly in the camera. Turn the camera on. Connect the camera to the computer and insert the memory card. 76 Choose one of the following methods: • Direct USB connection: Turn the camera off and ensure that are saved in the camera...'s internal memory, remove the memory card from the camera before connecting it to the computer. • SD card slot: If your computer is inserted in the slot. • SD card reader: Connect a card reader (available separately from third-party suppliers) to the computer...
... Choose how images will be inserted directly in the camera. Turn the camera on. Connect the camera to the computer and insert the memory card. 76 Choose one of the following methods: • Direct USB connection: Turn the camera off and ensure that are saved in the camera...'s internal memory, remove the memory card from the camera before connecting it to the computer. • SD card slot: If your computer is inserted in the slot. • SD card reader: Connect a card reader (available separately from third-party suppliers) to the computer...

User Manual
Page 97
... a TV, Computer, or Printer If a message is displayed prompting you to choose a program, select Nikon Transfer 2. • When using Nikon Transfer 2 and click OK. 2 Double-click Import File. Wait until Nikon Transfer 2 starts. If the memory card contains a large number of Nikon Transfer 2 (1). • Click Start Transfer (2). 1 2 • At default settings, all the images on the...
... a TV, Computer, or Printer If a message is displayed prompting you to choose a program, select Nikon Transfer 2. • When using Nikon Transfer 2 and click OK. 2 Double-click Import File. Wait until Nikon Transfer 2 starts. If the memory card contains a large number of Nikon Transfer 2 (1). • Click Start Transfer (2). 1 2 • At default settings, all the images on the...

User Manual
Page 98
... and disconnect the USB cable. C Starting ViewNX 2 Manually • Windows: Double-click the ViewNX 2 shortcut icon on using a card reader or card slot, choose the appropriate option in the Dock. 78 If you are displayed in ViewNX 2 when transfer is connected to the memory card and then remove the card from the card reader or card slot.
... and disconnect the USB cable. C Starting ViewNX 2 Manually • Windows: Double-click the ViewNX 2 shortcut icon on using a card reader or card slot, choose the appropriate option in the Dock. 78 If you are displayed in ViewNX 2 when transfer is connected to the memory card and then remove the card from the card reader or card slot.

