User Manual
Page 10
... 20 Step 1 Turn the Camera On and Select G (Easy Auto) Mode 20 Indicators Displayed in G (Easy auto) Mode 21 Step 2 Frame a Picture ...22 Using the Zoom...23 Step 3 Focus and Shoot ...24 Step 4 Viewing and Deleting Images 26 Viewing Images (Playback Mode) ...26 Deleting Unwanted Images......27 Using the Flash...28 Selecting a Flash Mode ...28 Taking Pictures with the Self-timer 31 Adjusting the Brightness: Exposure Compensation 32 More on Shooting ...33 Selecting Shooting Mode ...33 Easy Auto Mode...34 ...
... 20 Step 1 Turn the Camera On and Select G (Easy Auto) Mode 20 Indicators Displayed in G (Easy auto) Mode 21 Step 2 Frame a Picture ...22 Using the Zoom...23 Step 3 Focus and Shoot ...24 Step 4 Viewing and Deleting Images 26 Viewing Images (Playback Mode) ...26 Deleting Unwanted Images......27 Using the Flash...28 Selecting a Flash Mode ...28 Taking Pictures with the Self-timer 31 Adjusting the Brightness: Exposure Compensation 32 More on Shooting ...33 Selecting Shooting Mode ...33 Easy Auto Mode...34 ...

User Manual
Page 11
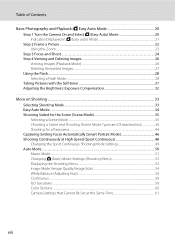
...: Copying Between Memory Card and Internal Memory 75 Editing Image...76 Image Editing Function ...76 Editing Images ...77 I D-Lighting: Enhancing Brightness and Contrast 77 g Small Picture: Decreasing Image Size 78 o Crop: Creating a Cropped Copy ...79 Movie Recording and Playback...80 Recording Movies ...80 Changing Movie Recording Settings ...83 Movie Options ...85...
...: Copying Between Memory Card and Internal Memory 75 Editing Image...76 Image Editing Function ...76 Editing Images ...77 I D-Lighting: Enhancing Brightness and Contrast 77 g Small Picture: Decreasing Image Size 78 o Crop: Creating a Cropped Copy ...79 Movie Recording and Playback...80 Recording Movies ...80 Changing Movie Recording Settings ...83 Movie Options ...85...

User Manual
Page 13
... computer monitor appear in bold. This icon marks notes, information C that more clearly shown. This icon indicates that should be read it where all new pictures will be helpful when using the camera. If a memory card is available elsewhere in this camera can be formatted or used : This icon marks cautions... keep it . This manual was written to as "memory card." • The setting at the time of purchase is referred to help you for purchasing a Nikon COOLPIX L310 digital camera. Read this manual may be stored on the memory card.
... computer monitor appear in bold. This icon marks notes, information C that more clearly shown. This icon indicates that should be read it where all new pictures will be helpful when using the camera. If a memory card is available elsewhere in this camera can be formatted or used : This icon marks cautions... keep it . This manual was written to as "memory card." • The setting at the time of purchase is referred to help you for purchasing a Nikon COOLPIX L310 digital camera. Read this manual may be stored on the memory card.
User Manual
Page 14
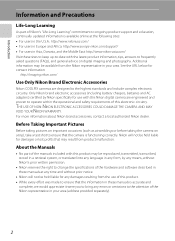
... support and education, continually updated information is functioning correctly. Nikon will not be held liable for any form, by Nikon specifically for contact information: http://imaging.nikon.com/ Use Only Nikon Brand Electronic Accessories Nikon COOLPIX cameras are engineered and proven to operate within the operational ... About the Manuals • No part of the manuals included with this Nikon digital camera are designed to ensure that the camera is available online at weddings or before taking pictures on important occasions (such as at the following sites: • For ...
... support and education, continually updated information is functioning correctly. Nikon will not be held liable for any form, by Nikon specifically for contact information: http://imaging.nikon.com/ Use Only Nikon Brand Electronic Accessories Nikon COOLPIX cameras are engineered and proven to operate within the operational ... About the Manuals • No part of the manuals included with this Nikon digital camera are designed to ensure that the camera is available online at weddings or before taking pictures on important occasions (such as at the following sites: • For ...

User Manual
Page 15
..., drawings, movies and photographs is governed by law is prohibited. Disposing of personal image data. Be sure to also replace any pictures selected for business use this product for example, pictures of certified documents stipulated by national and international copyright laws. Care should be punishable by law. • Items prohibited by the...
..., drawings, movies and photographs is governed by law is prohibited. Disposing of personal image data. Be sure to also replace any pictures selected for business use this product for example, pictures of certified documents stipulated by national and international copyright laws. Care should be punishable by law. • Items prohibited by the...

User Manual
Page 18
Introduction Parts of the Camera Attaching the Camera Strap and Lens Cap Attach the lens cap to the camera strap, and then attach the strap to protect the lens. B Lens Cap • Remove the lens cap before you take a picture. • At times when you will not be taking pictures such as when the power is off or while you are 6 carrying the camera, attach the lens cap to the camera to the camera. Attach them at two places.
Introduction Parts of the Camera Attaching the Camera Strap and Lens Cap Attach the lens cap to the camera strap, and then attach the strap to protect the lens. B Lens Cap • Remove the lens cap before you take a picture. • At times when you will not be taking pictures such as when the power is off or while you are 6 carrying the camera, attach the lens cap to the camera to the camera. Attach them at two places.

User Manual
Page 21
... frame number/ 7 total number of frames 26 b Movie length 88 8 Internal memory indicator 26 9 Movie playback indicator 88 10 Print order icon 68 11 Small picture 78 12 D-Lighting icon 77 13 Protect icon 72 14 File number and type 131 * The icon displayed varies with the setting that was set...
... frame number/ 7 total number of frames 26 b Movie length 88 8 Internal memory indicator 26 9 Movie playback indicator 88 10 Print order icon 68 11 Small picture 78 12 D-Lighting icon 77 13 Protect icon 72 14 File number and type 131 * The icon displayed varies with the setting that was set...
User Manual
Page 25
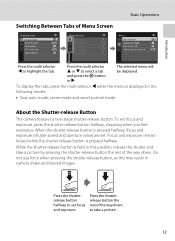
...pressed halfway. Do not use force when pressing the shutter-release button, as this position, release the shutter and take a picture by pressing the shutter-release button the rest of Menu Screen Shooting menu Image mode White balance Continuous ISO sensitivity Color options ... balance Continuous ISO sensitivity Color options Movie Movie options Autofocus mode Electronic VR Enhanced resolution Press the multi selector J to take a picture. 13 Focus and exposure remain locked while the shutter-release button is pressed halfway, focus and exposure (shutter speed and aperture value...
...pressed halfway. Do not use force when pressing the shutter-release button, as this position, release the shutter and take a picture by pressing the shutter-release button the rest of Menu Screen Shooting menu Image mode White balance Continuous ISO sensitivity Color options ... balance Continuous ISO sensitivity Color options Movie Movie options Autofocus mode Electronic VR Enhanced resolution Press the multi selector J to take a picture. 13 Focus and exposure remain locked while the shutter-release button is pressed halfway, focus and exposure (shutter speed and aperture value...
User Manual
Page 29
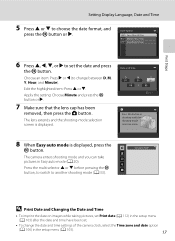
... k button or K. 7 Make sure that the lens cap has been removed, then press the A button. The camera enters shooting mode and you can take pictures in the setup menu (A 103). 17 Easy auto mode D Print Date and Changing the Date and Time • To imprint the date on images while... taking pictures, set Print date (A 112) in shooting mode for shooting-mode selection menu. 8 When Easy auto mode is displayed. Edit the highlighted item: Press H or I ...
... k button or K. 7 Make sure that the lens cap has been removed, then press the A button. The camera enters shooting mode and you can take pictures in the setup menu (A 103). 17 Easy auto mode D Print Date and Changing the Date and Time • To imprint the date on images while... taking pictures, set Print date (A 112) in shooting mode for shooting-mode selection menu. 8 When Easy auto mode is displayed. Edit the highlighted item: Press H or I ...

User Manual
Page 32
...and Select G (Easy Auto) Mode In G (easy auto) mode, the camera automatically determines an appropriate shooting mode when you frame a picture, allowing you to easily take pictures. The camera enters G (easy auto) mode. Proceed to raise the flash (A 7). Prepare to choose G Easy auto mode and press the...level indicator Display b Description Battery level high. Replace the batteries. 30 Number of exposures remaining Number of Exposures Remaining The number of pictures that can be taken is set at the time of the 20 internal memory or memory card and image mode setting (A 54)....
...and Select G (Easy Auto) Mode In G (easy auto) mode, the camera automatically determines an appropriate shooting mode when you frame a picture, allowing you to easily take pictures. The camera enters G (easy auto) mode. Proceed to raise the flash (A 7). Prepare to choose G Easy auto mode and press the...level indicator Display b Description Battery level high. Replace the batteries. 30 Number of exposures remaining Number of Exposures Remaining The number of pictures that can be taken is set at the time of the 20 internal memory or memory card and image mode setting (A 54)....

User Manual
Page 34
...to the camera is U. Position the main subject near the center of the frame. Basic Photography and Playback: G Easy Auto Mode 2 Frame the picture. When the camera detects more than one face, the face closest to 12 faces can be detected. In this case, select another shooting mode. 22...human face, that face will focus on Easy Auto Mode • The desired scene mode may not be framed by 30 single borders. Step 2 Frame a Picture 1 Ready the camera. Hold the camera steadily in effect, the shooting mode is framed by a double border and the others by a yellow double border (...
...to the camera is U. Position the main subject near the center of the frame. Basic Photography and Playback: G Easy Auto Mode 2 Frame the picture. When the camera detects more than one face, the face closest to 12 faces can be detected. In this case, select another shooting mode. 22...human face, that face will focus on Easy Auto Mode • The desired scene mode may not be framed by 30 single borders. Step 2 Frame a Picture 1 Ready the camera. Hold the camera steadily in effect, the shooting mode is framed by a double border and the others by a yellow double border (...

User Manual
Page 35
... is increased beyond V. Interpolation is applied when taking still images at the top of the frame. Basic Photography and Playback: G Easy Auto Mode Step 2 Frame a Picture Using the Zoom Use the zoom control to indicate that interpolation is being applied.
... is increased beyond V. Interpolation is applied when taking still images at the top of the frame. Basic Photography and Playback: G Easy Auto Mode Step 2 Frame a Picture Using the Zoom Use the zoom control to indicate that interpolation is being applied.

User Manual
Page 37
... may not be in focus despite the fact that is still not in focus, select auto mode and use focus lock (A 50) to take the picture by first focusing on Face Detection" (A 34) for more information. the sun is behind the subject and the subject is pressed all the way down...
... may not be in focus despite the fact that is still not in focus, select auto mode and use focus lock (A 50) to take the picture by first focusing on Face Detection" (A 34) for more information. the sun is behind the subject and the subject is pressed all the way down...

User Manual
Page 40
...) shadows and back-lit subjects. V Auto with slow shutter speed. U Auto Flash fires automatically when lighting is poor. X Fill flash Flash fires when a picture is taken. Y Slow sync Auto flash mode is combined with red-eye reduction Reduces "red-eye" in portraits (A 30). Selecting a Flash Mode When using ... determined scene mode. Basic Photography and Playback: G Easy Auto Mode Using the Flash In dark locations or when the subject is backlit, you can take pictures with flash by raising the flash. • The flash has a range of about 1.5 to 3.0 m (5 ft to 9 ft 10 in.) at the...
...) shadows and back-lit subjects. V Auto with slow shutter speed. U Auto Flash fires automatically when lighting is poor. X Fill flash Flash fires when a picture is taken. Y Slow sync Auto flash mode is combined with red-eye reduction Reduces "red-eye" in portraits (A 30). Selecting a Flash Mode When using ... determined scene mode. Basic Photography and Playback: G Easy Auto Mode Using the Flash In dark locations or when the subject is backlit, you can take pictures with flash by raising the flash. • The flash has a range of about 1.5 to 3.0 m (5 ft to 9 ft 10 in.) at the...
User Manual
Page 42
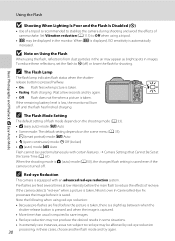
... used simultaneously with an advanced red-eye reduction system. If the camera detects "red-eye" when a picture is taken, Nikon's own In-Camera Red-Eye Fix processes the image before the picture is taken, there is a slight lag between when the shutter-release button is pressed and when the ... shake. C The Flash Lamp The flash lamp indicates flash status when the shutterrelease button is pressed halfway. • On: Flash fires when picture is recommended to Off when using the flash, reflections from dust particles in the air may be displayed in some situations. • In extremely...
... used simultaneously with an advanced red-eye reduction system. If the camera detects "red-eye" when a picture is taken, Nikon's own In-Camera Red-Eye Fix processes the image before the picture is taken, there is a slight lag between when the shutter-release button is pressed and when the ... shake. C The Flash Lamp The flash lamp indicates flash status when the shutterrelease button is pressed halfway. • On: Flash fires when picture is recommended to Off when using the flash, reflections from dust particles in the air may be displayed in some situations. • In extremely...

User Manual
Page 43
...down . The self-timer lamp flashes while the timer is cancelled. 3 Frame the picture and press the shutter-release button halfway. When the shutter is released, the self-timer is set .... When using the self-timer, pictures are set to select ON, and press the k button. When using a tripod. 1 Press n (self..., use of camera shake that occur when the shutter-release button is pressed. About one second before a picture is taken, press the shutter-release button again. 1/125 F3.1 9 31 Focus and exposure are taken ...
...down . The self-timer lamp flashes while the timer is cancelled. 3 Frame the picture and press the shutter-release button halfway. When the shutter is released, the self-timer is set .... When using the self-timer, pictures are set to select ON, and press the k button. When using a tripod. 1 Press n (self..., use of camera shake that occur when the shutter-release button is pressed. About one second before a picture is taken, press the shutter-release button again. 1/125 F3.1 9 31 Focus and exposure are taken ...

User Manual
Page 44
.... 1 Press o (exposure compensation) on the multi selector. Basic Photography and Playback: G Easy Auto Mode Adjusting the Brightness: Exposure Compensation By adjusting exposure compensation when taking pictures, overall image brightness can be adjusted to the "-" side. +0.3 0.0 Exposure compensation 3 Press the k button. To turn off .
.... 1 Press o (exposure compensation) on the multi selector. Basic Photography and Playback: G Easy Auto Mode Adjusting the Brightness: Exposure Compensation By adjusting exposure compensation when taking pictures, overall image brightness can be adjusted to the "-" side. +0.3 0.0 Exposure compensation 3 Press the k button. To turn off .

User Manual
Page 45
... Press H, I to select a shooting mode. b Scene A 35 Camera settings are automatically optimized for close-ups), etc., and take bursts of pictures continuously. 1 Press the A button in shooting mode. You can also select to shoot the face automatically. The shooting-mode selection menu is selected (...the second icon from the top), the scene type can be selected. G Easy auto mode A 20 By simply framing a picture, the camera automatically selects the optimum scene mode for simpler shooting. More on Shooting More on Shooting Selecting Shooting Mode The following shooting...
... Press H, I to select a shooting mode. b Scene A 35 Camera settings are automatically optimized for close-ups), etc., and take bursts of pictures continuously. 1 Press the A button in shooting mode. You can also select to shoot the face automatically. The shooting-mode selection menu is selected (...the second icon from the top), the scene type can be selected. G Easy auto mode A 20 By simply framing a picture, the camera automatically selects the optimum scene mode for simpler shooting. More on Shooting More on Shooting Selecting Shooting Mode The following shooting...

User Manual
Page 47
Scene Mode Types and Characteristics ➝ (A 36) Beach More on Shooting 3 Frame the subject and take a picture. The default setting is also applied to view a description of image quality (compression) and image size in Image mode (A 54). D Viewing the Description of Each ...
Scene Mode Types and Characteristics ➝ (A 36) Beach More on Shooting 3 Frame the subject and take a picture. The default setting is also applied to view a description of image quality (compression) and image size in Image mode (A 54). D Viewing the Description of Each ...

User Manual
Page 49
... night. • Raise the flash before shooting. • If the camera detects a face, it focuses on the face. More on Shooting Shooting Suited for taking pictures in parties. See "Face Detection" (A 24) for more information. • If more than one face is detected, the camera focuses on the subject in the.... Captures the effects of candlelight and other indoor background lighting. • The camera focuses on the subject in the center of the frame. • As pictures are detected, the camera focuses on the face closest to Off when using a tripod.
... night. • Raise the flash before shooting. • If the camera detects a face, it focuses on the face. More on Shooting Shooting Suited for taking pictures in parties. See "Face Detection" (A 24) for more information. • If more than one face is detected, the camera focuses on the subject in the.... Captures the effects of candlelight and other indoor background lighting. • The camera focuses on the subject in the center of the frame. • As pictures are detected, the camera focuses on the face closest to Off when using a tripod.


