User Manual
Page 10
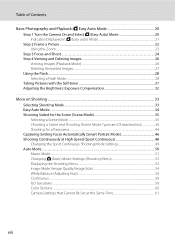
... 20 Step 1 Turn the Camera On and Select G (Easy Auto) Mode 20 Indicators Displayed in G (Easy auto) Mode 21 Step 2 Frame a Picture ...22 Using the Zoom...23 Step 3 Focus and Shoot ...24 Step 4 Viewing and Deleting Images 26 Viewing Images (Playback Mode) ...26 Deleting Unwanted Images......27 Using the Flash...28 Selecting a Flash Mode ...28 Taking Pictures with the Self-timer 31 Adjusting the Brightness: Exposure Compensation 32 More on Shooting ...33 Selecting Shooting Mode ...33 Easy Auto Mode...34 ...
... 20 Step 1 Turn the Camera On and Select G (Easy Auto) Mode 20 Indicators Displayed in G (Easy auto) Mode 21 Step 2 Frame a Picture ...22 Using the Zoom...23 Step 3 Focus and Shoot ...24 Step 4 Viewing and Deleting Images 26 Viewing Images (Playback Mode) ...26 Deleting Unwanted Images......27 Using the Flash...28 Selecting a Flash Mode ...28 Taking Pictures with the Self-timer 31 Adjusting the Brightness: Exposure Compensation 32 More on Shooting ...33 Selecting Shooting Mode ...33 Easy Auto Mode...34 ...

User Manual
Page 11
...: Copying Between Memory Card and Internal Memory 75 Editing Image...76 Image Editing Function ...76 Editing Images ...77 I D-Lighting: Enhancing Brightness and Contrast 77 g Small Picture: Decreasing Image Size 78 o Crop: Creating a Cropped Copy ...79 Movie Recording and Playback...80 Recording Movies ...80 Changing Movie Recording Settings ...83 Movie Options ...85...
...: Copying Between Memory Card and Internal Memory 75 Editing Image...76 Image Editing Function ...76 Editing Images ...77 I D-Lighting: Enhancing Brightness and Contrast 77 g Small Picture: Decreasing Image Size 78 o Crop: Creating a Cropped Copy ...79 Movie Recording and Playback...80 Recording Movies ...80 Changing Movie Recording Settings ...83 Movie Options ...85...

User Manual
Page 13
... thoroughly before use, and keep it where all new pictures will be read before use the product will apply only to the camera. This icon marks tips, additional D information that should be more A information is referred to find the information you for purchasing a Nikon COOLPIX L310 digital camera. Illustrations and Screen Display Illustrations and...
... thoroughly before use, and keep it where all new pictures will be read before use the product will apply only to the camera. This icon marks tips, additional D information that should be more A information is referred to find the information you for purchasing a Nikon COOLPIX L310 digital camera. Illustrations and Screen Display Illustrations and...
User Manual
Page 14
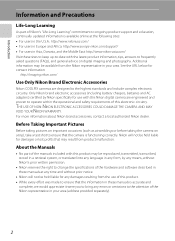
...nikon.com/ Use Only Nikon Brand Electronic Accessories Nikon COOLPIX cameras are engineered and proven to operate within the operational and safety requirements of this electronic circuitry. See the URL below for any damages resulting from the Nikon representative in your area (address provided separately). 2 Before Taking Important Pictures...Precautions Life-Long Learning As part of Nikon's "Life-Long Learning" commitment to ongoing product support and education, continually updated information is available online at weddings or before taking pictures on important occasions (such as at...
...nikon.com/ Use Only Nikon Brand Electronic Accessories Nikon COOLPIX cameras are engineered and proven to operate within the operational and safety requirements of this electronic circuitry. See the URL below for any damages resulting from the Nikon representative in your area (address provided separately). 2 Before Taking Important Pictures...Precautions Life-Long Learning As part of Nikon's "Life-Long Learning" commitment to ongoing product support and education, continually updated information is available online at weddings or before taking pictures on important occasions (such as at...

User Manual
Page 15
Before discarding a data storage device or transferring ownership to also replace any pictures selected for example, pictures of empty sky). Be sure to another person, erase all data using commercially available software, potentially resulting in the malicious use by a company. The copying ...
Before discarding a data storage device or transferring ownership to also replace any pictures selected for example, pictures of empty sky). Be sure to another person, erase all data using commercially available software, potentially resulting in the malicious use by a company. The copying ...

User Manual
Page 18
B Lens Cap • Remove the lens cap before you take a picture. • At times when you will not be taking pictures such as when the power is off or while you are 6 carrying the camera, attach the lens cap to the camera to the camera. Introduction Parts of the Camera Attaching the Camera Strap and Lens Cap Attach the lens cap to the camera strap, and then attach the strap to protect the lens. Attach them at two places.
B Lens Cap • Remove the lens cap before you take a picture. • At times when you will not be taking pictures such as when the power is off or while you are 6 carrying the camera, attach the lens cap to the camera to the camera. Introduction Parts of the Camera Attaching the Camera Strap and Lens Cap Attach the lens cap to the camera strap, and then attach the strap to protect the lens. Attach them at two places.

User Manual
Page 21
... frame number/ 7 total number of frames 26 b Movie length 88 8 Internal memory indicator 26 9 Movie playback indicator 88 10 Print order icon 68 11 Small picture 78 12 D-Lighting icon 77 13 Protect icon 72 14 File number and type 131 * The icon displayed varies with the setting that was set...
... frame number/ 7 total number of frames 26 b Movie length 88 8 Internal memory indicator 26 9 Movie playback indicator 88 10 Print order icon 68 11 Small picture 78 12 D-Lighting icon 77 13 Protect icon 72 14 File number and type 131 * The icon displayed varies with the setting that was set...
User Manual
Page 25
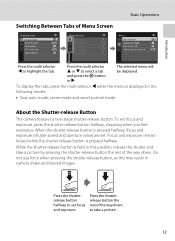
...are set. Do not use force when pressing the shutter-release button, as this may result in this position, release the shutter and take a picture. 13 The selected menu will be displayed. To display the tabs, press the multi selector J while the menu is pressed halfway. Press the ... VR Enhanced resolution Press the multi selector J to select a tab and press the k button or K. Press the shutterrelease button halfway to take a picture by pressing the shutter-release button the rest of the way down to set focus and exposure, press the shutter-release button halfway, stopping when...
...are set. Do not use force when pressing the shutter-release button, as this may result in this position, release the shutter and take a picture. 13 The selected menu will be displayed. To display the tabs, press the multi selector J while the menu is pressed halfway. Press the ... VR Enhanced resolution Press the multi selector J to select a tab and press the k button or K. Press the shutterrelease button halfway to take a picture by pressing the shutter-release button the rest of the way down to set focus and exposure, press the shutter-release button halfway, stopping when...
User Manual
Page 29
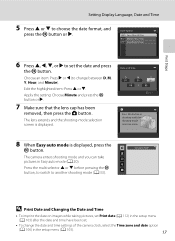
...K to another shooting mode (A 33). Easy auto mode D Print Date and Changing the Date and Time • To imprint the date on images while taking pictures, set Print date (A 112) in the setup menu (A 103) after the date and time have been set the date and press the k button. The lens... 17 Choose an item: Press K or J (to choose the date format, and press the k button or K. The camera enters shooting mode and you can take pictures in Easy auto mode (A 20). First Steps Setting Display Language, Date and Time 5 Press H or I to change the date and time settings of the camera...
...K to another shooting mode (A 33). Easy auto mode D Print Date and Changing the Date and Time • To imprint the date on images while taking pictures, set Print date (A 112) in the setup menu (A 103) after the date and time have been set the date and press the k button. The lens... 17 Choose an item: Press K or J (to choose the date format, and press the k button or K. The camera enters shooting mode and you can take pictures in Easy auto mode (A 20). First Steps Setting Display Language, Date and Time 5 Press H or I to change the date and time settings of the camera...

User Manual
Page 32
... k button. The camera enters G (easy auto) mode. Battery level indicator Battery level indicator Display b Description Battery level high. Cannot take pictures using a shooting mode that can be saved varies depending on . The lens extends and the monitor turns on the capacity of the 20 internal...54). Basic Photography and Playback: G Easy Auto Mode 3 Press the multi selector H or I to raise the flash (A 7). The number of pictures that can be taken is set at the time of exposures remaining. Battery level low. Easy auto mode 4 Check the battery level and number of...
... k button. The camera enters G (easy auto) mode. Battery level indicator Battery level indicator Display b Description Battery level high. Cannot take pictures using a shooting mode that can be saved varies depending on . The lens extends and the monitor turns on the capacity of the 20 internal...54). Basic Photography and Playback: G Easy Auto Mode 3 Press the multi selector H or I to raise the flash (A 7). The number of pictures that can be taken is set at the time of exposures remaining. Battery level low. Easy auto mode 4 Check the battery level and number of...

User Manual
Page 34
Step 2 Frame a Picture 1 Ready the camera. Up to the camera is framed by a double border and the others by a yellow double border (AF area). Shooting mode icon When ... be selected in the center of the focus area. B Notes on the subject in certain conditions. Basic Photography and Playback: G Easy Auto Mode 2 Frame the picture.
Step 2 Frame a Picture 1 Ready the camera. Up to the camera is framed by a double border and the others by a yellow double border (AF area). Shooting mode icon When ... be selected in the center of the focus area. B Notes on the subject in certain conditions. Basic Photography and Playback: G Easy Auto Mode 2 Frame the picture.

User Manual
Page 35
... turned on, the zoom is at the maximum wide-angle position. • A zoom indicator is operated. Basic Photography and Playback: G Easy Auto Mode Step 2 Frame a Picture Using the Zoom Use the zoom control to confirm the zoom positions at zoom positions beyond V. When the image size is zoomed in , increasing the...
... turned on, the zoom is at the maximum wide-angle position. • A zoom indicator is operated. Basic Photography and Playback: G Easy Auto Mode Step 2 Frame a Picture Using the Zoom Use the zoom control to confirm the zoom positions at zoom positions beyond V. When the image size is zoomed in , increasing the...

User Manual
Page 37
... as the desired subject. C Flash If the subject is moving rapidly In these situations, try pressing the shutter-release button halfway again to take the picture by first focusing on Face Detection" (A 34) for more information. B Autofocus Autofocus may fire when the shutter-release button is very dark • Objects of...
... as the desired subject. C Flash If the subject is moving rapidly In these situations, try pressing the shutter-release button halfway again to take the picture by first focusing on Face Detection" (A 34) for more information. B Autofocus Autofocus may fire when the shutter-release button is very dark • Objects of...

User Manual
Page 40
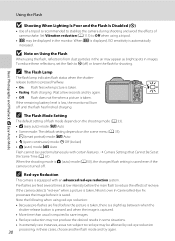
... dim light. 28 Basic Photography and Playback: G Easy Auto Mode Using the Flash In dark locations or when the subject is backlit, you can take pictures with flash by raising the flash. • The flash has a range of about 1.5 to 3.0 m (5 ft to 9 ft 10 in.) at the maximum telephoto zoom position... automatically sets a flash mode according to capture background at the top of the monitor. Use to 6.0 m (1 ft 8 in portraits (A 30). X Fill flash Flash fires when a picture is poor. Flash illuminates main subject;
... dim light. 28 Basic Photography and Playback: G Easy Auto Mode Using the Flash In dark locations or when the subject is backlit, you can take pictures with flash by raising the flash. • The flash has a range of about 1.5 to 3.0 m (5 ft to 9 ft 10 in.) at the maximum telephoto zoom position... automatically sets a flash mode according to capture background at the top of the monitor. Use to 6.0 m (1 ft 8 in portraits (A 30). X Fill flash Flash fires when a picture is poor. Flash illuminates main subject;
User Manual
Page 42
...-eye reduction 30 processing; C The Flash Lamp The flash lamp indicates flash status when the shutterrelease button is pressed halfway. • On: Flash fires when picture is low, the monitor will turn off . C The Flash Mode Setting The default setting of flash mode depends on the shooting mode (A 33). •...instances, areas not subject to red-eye may appear as bright spots in the monitor. If the camera detects "red-eye" when a picture is taken, Nikon's own In-Camera Red-Eye Fix processes the image before the main flash to reduce the effects of camera shake. To reduce these ...
...-eye reduction 30 processing; C The Flash Lamp The flash lamp indicates flash status when the shutterrelease button is pressed halfway. • On: Flash fires when picture is low, the monitor will turn off . C The Flash Mode Setting The default setting of flash mode depends on the shooting mode (A 33). •...instances, areas not subject to red-eye may appear as bright spots in the monitor. If the camera detects "red-eye" when a picture is taken, Nikon's own In-Camera Red-Eye Fix processes the image before the main flash to reduce the effects of camera shake. To reduce these ...

User Manual
Page 43
...-timer 10 4 Press the shutter-release button the rest of seconds remaining until the shutter is released is pressed. About one second before a picture is pressed. When the shutter is released, the self-timer is displayed. When using the self-timer, use of a tripod is released, the... lamp stops flashing and glows steadily. The self-timer lamp flashes while the timer is cancelled. 3 Frame the picture and press the shutter-release button halfway. Set Vibration reduction (A 113) in the monitor. If a setting is not applied by pressing the k button ...
...-timer 10 4 Press the shutter-release button the rest of seconds remaining until the shutter is released is pressed. About one second before a picture is pressed. When the shutter is released, the self-timer is displayed. When using the self-timer, use of a tripod is released, the... lamp stops flashing and glows steadily. The self-timer lamp flashes while the timer is cancelled. 3 Frame the picture and press the shutter-release button halfway. Set Vibration reduction (A 113) in the monitor. If a setting is not applied by pressing the k button ...

User Manual
Page 44
... "+" side. The exposure compensation guide is cancelled. Basic Photography and Playback: G Easy Auto Mode Adjusting the Brightness: Exposure Compensation By adjusting exposure compensation when taking pictures, overall image brightness can be adjusted to select a compensation value.
... "+" side. The exposure compensation guide is cancelled. Basic Photography and Playback: G Easy Auto Mode Adjusting the Brightness: Exposure Compensation By adjusting exposure compensation when taking pictures, overall image brightness can be adjusted to select a compensation value.

User Manual
Page 45
... a shooting mode. Easy auto mode 33 When a scene mode is displayed. 2 Press the multi selector H or I , J, or K to take pictures. d Sport continuous A 48 Allows rapid, continuous shooting while you press and hold the shutter-release button fully. You can change the flash mode, use ...macro mode (for simpler shooting. G Easy auto mode A 20 By simply framing a picture, the camera automatically selects the optimum scene mode for close-ups), etc., and take bursts of pictures continuously. 1 Press the A button in shooting mode. A Auto mode A 50 You can also select...
... a shooting mode. Easy auto mode 33 When a scene mode is displayed. 2 Press the multi selector H or I , J, or K to take pictures. d Sport continuous A 48 Allows rapid, continuous shooting while you press and hold the shutter-release button fully. You can change the flash mode, use ...macro mode (for simpler shooting. G Easy auto mode A 20 By simply framing a picture, the camera automatically selects the optimum scene mode for close-ups), etc., and take bursts of pictures continuously. 1 Press the A button in shooting mode. A Auto mode A 50 You can also select...

User Manual
Page 47
... a Scene Mode 1 Press the A button in Image mode (A 54). Scene Mode Types and Characteristics ➝ (A 36) Beach More on Shooting 3 Frame the subject and take a picture. Shooting Suited for the Scene (Scene Mode) Camera settings are available.
... a Scene Mode 1 Press the A button in Image mode (A 54). Scene Mode Types and Characteristics ➝ (A 36) Beach More on Shooting 3 Frame the subject and take a picture. Shooting Suited for the Scene (Scene Mode) Camera settings are available.

User Manual
Page 49
... (A 113) to the camera. • If no faces are detected, the camera focuses on the subject in the center of the frame. • As pictures are easily affected by camera shake, hold the camera steadily. m U* n Off* p Off o 0.0* * Default setting can be modified. Default setting can be...parties. f Party/indoor Suitable for more information. • If more than one face is not available. See "Face Detection" (A 24) for taking pictures in the center of the frame. • Digital zoom is detected, the camera focuses on the face closest to Off when using a tripod. m...
... (A 113) to the camera. • If no faces are detected, the camera focuses on the subject in the center of the frame. • As pictures are easily affected by camera shake, hold the camera steadily. m U* n Off* p Off o 0.0* * Default setting can be modified. Default setting can be...parties. f Party/indoor Suitable for more information. • If more than one face is not available. See "Face Detection" (A 24) for taking pictures in the center of the frame. • Digital zoom is detected, the camera focuses on the face closest to Off when using a tripod. m...


