User Manual
Page 10
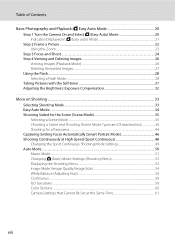
... 20 Step 1 Turn the Camera On and Select G (Easy Auto) Mode 20 Indicators Displayed in G (Easy auto) Mode 21 Step 2 Frame a Picture ...22 Using the Zoom...23 Step 3 Focus and Shoot ...24 Step 4 Viewing and Deleting Images 26 Viewing Images (Playback Mode) ...26 Deleting Unwanted Images......27 Using the Flash...28 Selecting a Flash Mode ...28 Taking Pictures with the Self-timer 31 Adjusting the Brightness: Exposure Compensation 32 More on Shooting ...33 Selecting Shooting Mode ...33 Easy Auto Mode...34 ...
... 20 Step 1 Turn the Camera On and Select G (Easy Auto) Mode 20 Indicators Displayed in G (Easy auto) Mode 21 Step 2 Frame a Picture ...22 Using the Zoom...23 Step 3 Focus and Shoot ...24 Step 4 Viewing and Deleting Images 26 Viewing Images (Playback Mode) ...26 Deleting Unwanted Images......27 Using the Flash...28 Selecting a Flash Mode ...28 Taking Pictures with the Self-timer 31 Adjusting the Brightness: Exposure Compensation 32 More on Shooting ...33 Selecting Shooting Mode ...33 Easy Auto Mode...34 ...

User Manual
Page 11
...: Copying Between Memory Card and Internal Memory 75 Editing Image...76 Image Editing Function ...76 Editing Images ...77 I D-Lighting: Enhancing Brightness and Contrast 77 g Small Picture: Decreasing Image Size 78 o Crop: Creating a Cropped Copy ...79 Movie Recording and Playback...80 Recording Movies ...80 Changing Movie Recording Settings ...83 Movie Options ...85...
...: Copying Between Memory Card and Internal Memory 75 Editing Image...76 Image Editing Function ...76 Editing Images ...77 I D-Lighting: Enhancing Brightness and Contrast 77 g Small Picture: Decreasing Image Size 78 o Crop: Creating a Cropped Copy ...79 Movie Recording and Playback...80 Recording Movies ...80 Changing Movie Recording Settings ...83 Movie Options ...85...

User Manual
Page 13
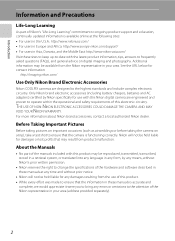
...in this manual, images are used: This icon marks cautions, B information that more clearly shown. C Memory Cards Pictures taken with your Nikon digital camera. This icon marks notes, information C that monitor indicators can be read before using the camera. Introduction ...pictures on the memory card. Notations • Secure Digital (SD) memory card, SDHC memory card, and SDXC memory card are referred to as "memory card." • The setting at the time of purchase is inserted, all those who use the product will apply only to help you for purchasing a Nikon COOLPIX L310...
...in this manual, images are used: This icon marks cautions, B information that more clearly shown. C Memory Cards Pictures taken with your Nikon digital camera. This icon marks notes, information C that monitor indicators can be read before using the camera. Introduction ...pictures on the memory card. Notations • Secure Digital (SD) memory card, SDHC memory card, and SDXC memory card are referred to as "memory card." • The setting at the time of purchase is inserted, all those who use the product will apply only to help you for purchasing a Nikon COOLPIX L310...
User Manual
Page 14
...-to ensure that may result from product malfunction. THE USE OF NON-NIKON ELECTRONIC ACCESSORIES COULD DAMAGE THE CAMERA AND MAY VOID YOUR NIKON WARRANTY. Before Taking Important Pictures Before taking pictures on important occasions (such as at weddings or before taking the camera ...camera is available online at any time and without prior notice. • Nikon will not be held liable for contact information: http://imaging.nikon.com/ Use Only Nikon Brand Electronic Accessories Nikon COOLPIX cameras are engineered and proven to operate within the operational and safety requirements of...
...-to ensure that may result from product malfunction. THE USE OF NON-NIKON ELECTRONIC ACCESSORIES COULD DAMAGE THE CAMERA AND MAY VOID YOUR NIKON WARRANTY. Before Taking Important Pictures Before taking pictures on important occasions (such as at weddings or before taking the camera ...camera is available online at any time and without prior notice. • Nikon will not be held liable for contact information: http://imaging.nikon.com/ Use Only Nikon Brand Electronic Accessories Nikon COOLPIX cameras are engineered and proven to operate within the operational and safety requirements of...

User Manual
Page 15
... using commercially available software, potentially resulting in the malicious use this product for the purpose of making illegal copies or to also replace any pictures selected for example, pictures of empty sky). Care should be punishable by law. • Items prohibited by national and international copyright laws. Introduction Information and Precautions Notice...
... using commercially available software, potentially resulting in the malicious use this product for the purpose of making illegal copies or to also replace any pictures selected for example, pictures of empty sky). Care should be punishable by law. • Items prohibited by national and international copyright laws. Introduction Information and Precautions Notice...

User Manual
Page 18
B Lens Cap • Remove the lens cap before you take a picture. • At times when you will not be taking pictures such as when the power is off or while you are 6 carrying the camera, attach the lens cap to the camera to the camera. Attach them at two places. Introduction Parts of the Camera Attaching the Camera Strap and Lens Cap Attach the lens cap to the camera strap, and then attach the strap to protect the lens.
B Lens Cap • Remove the lens cap before you take a picture. • At times when you will not be taking pictures such as when the power is off or while you are 6 carrying the camera, attach the lens cap to the camera to the camera. Attach them at two places. Introduction Parts of the Camera Attaching the Camera Strap and Lens Cap Attach the lens cap to the camera strap, and then attach the strap to protect the lens.

User Manual
Page 21
... frame number/ 7 total number of frames 26 b Movie length 88 8 Internal memory indicator 26 9 Movie playback indicator 88 10 Print order icon 68 11 Small picture 78 12 D-Lighting icon 77 13 Protect icon 72 14 File number and type 131 * The icon displayed varies with the setting that was set...
... frame number/ 7 total number of frames 26 b Movie length 88 8 Internal memory indicator 26 9 Movie playback indicator 88 10 Print order icon 68 11 Small picture 78 12 D-Lighting icon 77 13 Protect icon 72 14 File number and type 131 * The icon displayed varies with the setting that was set...
User Manual
Page 25
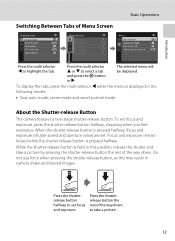
... menu will be displayed. Do not use force when pressing the shutter-release button, as this position, release the shutter and take a picture. 13 To set focus and exposure. When the shutter-release button is pressed halfway. Focus and exposure remain locked while the shutter-release... to select a tab and press the k button or K. Introduction Basic Operations Switching Between Tabs of the way down to take a picture by pressing the shutter-release button the rest of Menu Screen Shooting menu Image mode White balance Continuous ISO sensitivity Color options Shooting menu ...
... menu will be displayed. Do not use force when pressing the shutter-release button, as this position, release the shutter and take a picture. 13 To set focus and exposure. When the shutter-release button is pressed halfway. Focus and exposure remain locked while the shutter-release... to select a tab and press the k button or K. Introduction Basic Operations Switching Between Tabs of the way down to take a picture by pressing the shutter-release button the rest of Menu Screen Shooting menu Image mode White balance Continuous ISO sensitivity Color options Shooting menu ...
User Manual
Page 29
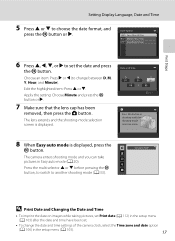
... D Print Date and Changing the Date and Time • To imprint the date on images while taking pictures, set . • To change between D, M, Y, Hour, and Minute). The camera enters shooting mode and you can take pictures in shooting mode for shooting-mode selection menu. 8 When Easy auto mode is displayed. The lens...
... D Print Date and Changing the Date and Time • To imprint the date on images while taking pictures, set . • To change between D, M, Y, Hour, and Minute). The camera enters shooting mode and you can take pictures in shooting mode for shooting-mode selection menu. 8 When Easy auto mode is displayed. The lens...

User Manual
Page 32
... the k button. Basic Photography and Playback: G Easy Auto Mode 3 Press the multi selector H or I to replace the batteries. Cannot take pictures using a shooting mode that suits the scene (A 34). 1 Remove the lens cap and press the power switch to turn on the camera. Basic... (Easy Auto) Mode In G (easy auto) mode, the camera automatically determines an appropriate shooting mode when you frame a picture, allowing you to easily take pictures. B N Battery exhausted. Replace the batteries. 30 Number of exposures remaining Number of Exposures Remaining The number of images that ...
... the k button. Basic Photography and Playback: G Easy Auto Mode 3 Press the multi selector H or I to replace the batteries. Cannot take pictures using a shooting mode that suits the scene (A 34). 1 Remove the lens cap and press the power switch to turn on the camera. Basic... (Easy Auto) Mode In G (easy auto) mode, the camera automatically determines an appropriate shooting mode when you frame a picture, allowing you to easily take pictures. B N Battery exhausted. Replace the batteries. 30 Number of exposures remaining Number of Exposures Remaining The number of images that ...

User Manual
Page 34
.... When shooting non-human subjects or when no faces are detected, the camera will be detected. Basic Photography and Playback: G Easy Auto Mode 2 Frame the picture. Step 2 Frame a Picture 1 Ready the camera.
.... When shooting non-human subjects or when no faces are detected, the camera will be detected. Basic Photography and Playback: G Easy Auto Mode 2 Frame the picture. Step 2 Frame a Picture 1 Ready the camera.

User Manual
Page 35
... of image quality. Digital zoom can be captured without interpolation using the current image mode setting. Basic Photography and Playback: G Easy Auto Mode Step 2 Frame a Picture Using the Zoom Use the zoom control to zoom in, increasing the size of the subject. Rotate the zoom control toward g triggers digital zoom.
... of image quality. Digital zoom can be captured without interpolation using the current image mode setting. Basic Photography and Playback: G Easy Auto Mode Step 2 Frame a Picture Using the Zoom Use the zoom control to zoom in, increasing the size of the subject. Rotate the zoom control toward g triggers digital zoom.

User Manual
Page 37
... not perform as the desired subject. If the subject is still not in focus, select auto mode and use focus lock (A 50) to take the picture by first focusing on Face Detection" (A 34) for more information. the subject is inside a cage) • Subjects with repeating patterns (window blinds, buildings with multiple...
... not perform as the desired subject. If the subject is still not in focus, select auto mode and use focus lock (A 50) to take the picture by first focusing on Face Detection" (A 34) for more information. the subject is inside a cage) • Subjects with repeating patterns (window blinds, buildings with multiple...

User Manual
Page 40
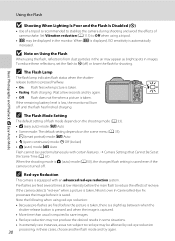
X Fill flash Flash fires when a picture is displayed at the top of about 0.5 to 6.0 m (1 ft 8 in portraits (A 30). When the flash is lowered, the flash setting changes to off and W is ... " (illuminate) shadows and back-lit subjects. Suited to "fill-in .) at the maximum telephoto zoom position. • If the flash is backlit, you can take pictures with flash by raising the flash. • The flash has a range of the monitor. Basic Photography and Playback: G Easy Auto Mode Using the Flash In...
X Fill flash Flash fires when a picture is displayed at the top of about 0.5 to 6.0 m (1 ft 8 in portraits (A 30). When the flash is lowered, the flash setting changes to off and W is ... " (illuminate) shadows and back-lit subjects. Suited to "fill-in .) at the maximum telephoto zoom position. • If the flash is backlit, you can take pictures with flash by raising the flash. • The flash has a range of the monitor. Basic Photography and Playback: G Easy Auto Mode Using the Flash In...
User Manual
Page 42
...flash setting is saved even if the camera is turned off. If the camera detects "red-eye" when a picture is taken, Nikon's own In-Camera Red-Eye Fix processes the image before the picture is taken, there is a slight lag between when the shutter-release button is pressed and when the image is... results in images. C The Flash Lamp The flash lamp indicates flash status when the shutterrelease button is pressed halfway. • On: Flash fires when picture is low, the monitor will turn off until the flash has finished charging. Pre-flashes are fired before it is saved. B Note on the scene...
...flash setting is saved even if the camera is turned off. If the camera detects "red-eye" when a picture is taken, Nikon's own In-Camera Red-Eye Fix processes the image before the picture is taken, there is a slight lag between when the shutter-release button is pressed and when the image is... results in images. C The Flash Lamp The flash lamp indicates flash status when the shutterrelease button is pressed halfway. • On: Flash fires when picture is low, the monitor will turn off until the flash has finished charging. Pre-flashes are fired before it is saved. B Note on the scene...

User Manual
Page 43
...flashes while the timer is counting down . When using a tripod. 1 Press n (self-timer) on the multi selector. When using the self-timer, pictures are set to select ON, and press the k button. Focus and exposure are taken 10 seconds after the shutter-release button is pressed. Set Vibration.... The self-timer menu is displayed. 2 Press the multi selector H or I to OFF. Basic Photography and Playback: G Easy Auto Mode Taking Pictures with the Self-timer The self-timer is useful for self-portraits or reducing the effects of seconds remaining until the shutter is released is...
...flashes while the timer is counting down . When using a tripod. 1 Press n (self-timer) on the multi selector. When using the self-timer, pictures are set to select ON, and press the k button. Focus and exposure are taken 10 seconds after the shutter-release button is pressed. Set Vibration.... The self-timer menu is displayed. 2 Press the multi selector H or I to OFF. Basic Photography and Playback: G Easy Auto Mode Taking Pictures with the Self-timer The self-timer is useful for self-portraits or reducing the effects of seconds remaining until the shutter is released is...

User Manual
Page 44
... darker, adjust the exposure compensation to shoot. Basic Photography and Playback: G Easy Auto Mode Adjusting the Brightness: Exposure Compensation By adjusting exposure compensation when taking pictures, overall image brightness can be adjusted to the "+" side.
... darker, adjust the exposure compensation to shoot. Basic Photography and Playback: G Easy Auto Mode Adjusting the Brightness: Exposure Compensation By adjusting exposure compensation when taking pictures, overall image brightness can be adjusted to the "+" side.

User Manual
Page 45
... shutter-release button fully. The shooting-mode selection menu is selected (the second icon from the top), the scene type can also select to take pictures. When a scene mode is displayed. 2 Press the multi selector H or I , J, or K to select a shooting mode. To return to shoot the face automatically... Mode The following shooting modes can change the flash mode, use macro mode (for close-ups), etc., and take bursts of pictures continuously. 1 Press the A button in shooting mode. The camera enters the selected shooting mode. G Easy auto mode A 20 By simply framing...
... shutter-release button fully. The shooting-mode selection menu is selected (the second icon from the top), the scene type can also select to take pictures. When a scene mode is displayed. 2 Press the multi selector H or I , J, or K to select a shooting mode. To return to shoot the face automatically... Mode The following shooting modes can change the flash mode, use macro mode (for close-ups), etc., and take bursts of pictures continuously. 1 Press the A button in shooting mode. The camera enters the selected shooting mode. G Easy auto mode A 20 By simply framing...

User Manual
Page 47
... the multi selector H or I , J, or K to select scene mode. Scene Mode Types and Characteristics ➝ (A 36) Beach More on Shooting 3 Frame the subject and take a picture. To return to the original screen, rotate the zoom control to change the combination of that use the flash, be sure to press the m (flash...
... the multi selector H or I , J, or K to select scene mode. Scene Mode Types and Characteristics ➝ (A 36) Beach More on Shooting 3 Frame the subject and take a picture. To return to the original screen, rotate the zoom control to change the combination of that use the flash, be sure to press the m (flash...

User Manual
Page 49
...such subjects as beaches or sunlit expanses of water. • The camera focuses on the subject in the center of the frame. • As pictures are detected, the camera focuses on the subject in the center of the frame. • Digital zoom is recommended. Captures the effects of candlelight... in portraits taken at fill flash with slow sync with red-eye reduction flash mode may be modified. More on Shooting Shooting Suited for taking pictures in parties. m V1 n Off2 p Off o 0.02 1 The flash mode setting is fixed at night. • Raise the flash before shooting. • If ...
...such subjects as beaches or sunlit expanses of water. • The camera focuses on the subject in the center of the frame. • As pictures are detected, the camera focuses on the subject in the center of the frame. • Digital zoom is recommended. Captures the effects of candlelight... in portraits taken at fill flash with slow sync with red-eye reduction flash mode may be modified. More on Shooting Shooting Suited for taking pictures in parties. m V1 n Off2 p Off o 0.02 1 The flash mode setting is fixed at night. • Raise the flash before shooting. • If ...


