
User Manual
Page 6
... Use appropriate cables When connecting cables to the input and output jacks, use only the cables provided or sold by the lens cover or other objects are not pinched by Nikon for the purpose, to maintain compliance with product regulations. The electromagnetic waves given out by broken glass and to prevent liquid...
... Use appropriate cables When connecting cables to the input and output jacks, use only the cables provided or sold by the lens cover or other objects are not pinched by Nikon for the purpose, to maintain compliance with product regulations. The electromagnetic waves given out by broken glass and to prevent liquid...
User Manual
Page 9
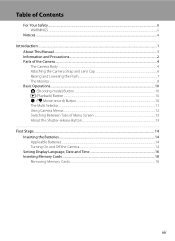
... Your Safety...ii WARNINGS...ii Notices ...v Introduction ...1 About This Manual ...1 Information and Precautions...2 Parts of the Camera...4 The Camera Body ...4 Attaching the Camera Strap and Lens Cap 6 Raising and Lowering the Flash...7 The Monitor...8 Basic Operations...10 A (Shooting mode) Button ...10 c (Playback) Button ...10 b (e Movie-record) Button ...10 The Multi Selector...
... Your Safety...ii WARNINGS...ii Notices ...v Introduction ...1 About This Manual ...1 Information and Precautions...2 Parts of the Camera...4 The Camera Body ...4 Attaching the Camera Strap and Lens Cap 6 Raising and Lowering the Flash...7 The Monitor...8 Basic Operations...10 A (Shooting mode) Button ...10 c (Playback) Button ...10 b (e Movie-record) Button ...10 The Multi Selector...

User Manual
Page 16
...-on lamp 20, 116 5 Speaker 88 6 Built-in microphone 80 7 Eyelet for camera strap 6 8 Flash 7, 28 9 DC input connector (for AC adapter available separately from Nikon) .... 15, 129 10 USB connector and audio/video output 91, 95, 98 11 Pin cover 91, 95, 98 12 m (flash pop-up) button 7, 28 13...
...-on lamp 20, 116 5 Speaker 88 6 Built-in microphone 80 7 Eyelet for camera strap 6 8 Flash 7, 28 9 DC input connector (for AC adapter available separately from Nikon) .... 15, 129 10 USB connector and audio/video output 91, 95, 98 11 Pin cover 91, 95, 98 12 m (flash pop-up) button 7, 28 13...

User Manual
Page 18
Introduction Parts of the Camera Attaching the Camera Strap and Lens Cap Attach the lens cap to the camera strap, and then attach the strap to protect the lens. Attach them at two places. B Lens Cap • Remove the lens cap before you take a picture. • At times when you will not be taking pictures such as when the power is off or while you are 6 carrying the camera, attach the lens cap to the camera to the camera.
Introduction Parts of the Camera Attaching the Camera Strap and Lens Cap Attach the lens cap to the camera strap, and then attach the strap to protect the lens. Attach them at two places. B Lens Cap • Remove the lens cap before you take a picture. • At times when you will not be taking pictures such as when the power is off or while you are 6 carrying the camera, attach the lens cap to the camera to the camera.
User Manual
Page 26
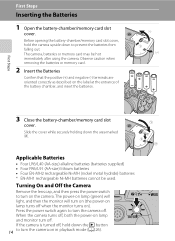
... lamp turns off . The power-on lamp (green) will light, and then the monitor will turn on ). Turning On and Off the Camera Remove the lens cap, and then press the power switch to prevent the batteries from falling out. First Steps Inserting the Batteries 1 Open the battery-chamber/memory card...
... lamp turns off . The power-on lamp (green) will light, and then the monitor will turn on ). Turning On and Off the Camera Remove the lens cap, and then press the power switch to prevent the batteries from falling out. First Steps Inserting the Batteries 1 Open the battery-chamber/memory card...
User Manual
Page 27
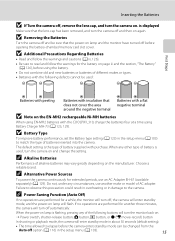
... the negative terminal Batteries with a flat negative terminal B Note on the EN-MH2 rechargeable Ni-MH batteries When using EN-MH2 batteries with the COOLPIX L310, charge the batteries four at a time using the battery. • Do not combine old and new batteries or batteries of alkaline batteries may ...• Read and follow the warnings for another make or model of the following defects cannot be sure that the lens cap has been removed, and turn the camera off , remove the lens cap, and turn off before using Battery Charger MH-73 (A 123, 129). Choose a reliable brand. If no...
... the negative terminal Batteries with a flat negative terminal B Note on the EN-MH2 rechargeable Ni-MH batteries When using EN-MH2 batteries with the COOLPIX L310, charge the batteries four at a time using the battery. • Do not combine old and new batteries or batteries of alkaline batteries may ...• Read and follow the warnings for another make or model of the following defects cannot be sure that the lens cap has been removed, and turn the camera off , remove the lens cap, and turn off before using Battery Charger MH-73 (A 123, 129). Choose a reliable brand. If no...
User Manual
Page 29
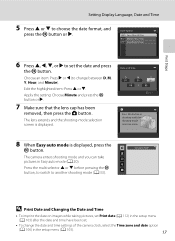
Apply the setting: Choose Minute and press the k button or K. 7 Make sure that the lens cap has been removed, then press the A button. The camera enters shooting mode and you can take pictures in shooting mode for shooting-mode selection ... zone and date option (A 106) in the setup menu (A 103) after the date and time have been set the date and press the k button. The lens extends and the shooting-mode selection screen is displayed, press the k button. First Steps Setting Display Language, Date and Time 5 Press H or I to another shooting...
Apply the setting: Choose Minute and press the k button or K. 7 Make sure that the lens cap has been removed, then press the A button. The camera enters shooting mode and you can take pictures in shooting mode for shooting-mode selection ... zone and date option (A 106) in the setup menu (A 103) after the date and time have been set the date and press the k button. The lens extends and the shooting-mode selection screen is displayed, press the k button. First Steps Setting Display Language, Date and Time 5 Press H or I to another shooting...

User Manual
Page 32
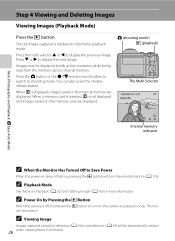
...In G (easy auto) mode, the camera automatically determines an appropriate shooting mode when you frame a picture, allowing you to easily take pictures. The lens extends and the monitor turns on the camera. Easy auto mode 4 Check the battery level and number of purchase. Easy auto mode is displayed. B .... The number of images that can be saved varies depending on the capacity of pictures that suits the scene (A 34). 1 Remove the lens cap and press the power switch to turn on . Proceed to replace the batteries. Cannot take pictures using a shooting mode that can be...
...In G (easy auto) mode, the camera automatically determines an appropriate shooting mode when you frame a picture, allowing you to easily take pictures. The lens extends and the monitor turns on the camera. Easy auto mode 4 Check the battery level and number of purchase. Easy auto mode is displayed. B .... The number of images that can be saved varies depending on the capacity of pictures that suits the scene (A 34). 1 Remove the lens cap and press the power switch to turn on . Proceed to replace the batteries. Cannot take pictures using a shooting mode that can be...

User Manual
Page 34
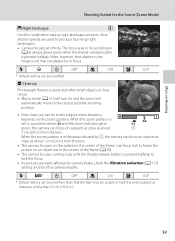
.... In this case, select another shooting mode. 22 • When digital zoom is in certain conditions. Keep fingers, hair and other objects away from the lens, flash, and microphone. Up to the camera is U. When shooting non-human subjects or when no faces are detected, the camera will be framed by...
.... In this case, select another shooting mode. 22 • When digital zoom is in certain conditions. Keep fingers, hair and other objects away from the lens, flash, and microphone. Up to the camera is U. When shooting non-human subjects or when no faces are detected, the camera will be framed by...
User Manual
Page 38
When C is displayed in the internal memory are displayed. The lens will be displayed briefly at low resolution while being read from the memory card or internal memory. Press the multi selector H or J to display the ...
When C is displayed in the internal memory are displayed. The lens will be displayed briefly at low resolution while being read from the memory card or internal memory. Press the multi selector H or J to display the ...
User Manual
Page 51
Slow shutter speeds are easily affected by 1, the camera can focus on objects as close as about 1 cm (0.4 in.) from the lens. m U* n Off* p On o 0.0* * Default setting can be modified. When the zoom position is in the area indicated by camera shake, check the Vibration reduction... foreground may be unable to light the entire subject at close range. • Macro mode (A 51) will turn on the subject in .) from the lens. • The camera focuses on and the zoom will automatically move to the closest possible shooting position. • How close as about 1 7 cm ...
Slow shutter speeds are easily affected by 1, the camera can focus on objects as close as about 1 cm (0.4 in.) from the lens. m U* n Off* p On o 0.0* * Default setting can be modified. When the zoom position is in the area indicated by camera shake, check the Vibration reduction... foreground may be unable to light the entire subject at close range. • Macro mode (A 51) will turn on the subject in .) from the lens. • The camera focuses on and the zoom will automatically move to the closest possible shooting position. • How close as about 1 7 cm ...

User Manual
Page 52
...a position where F and the zoom indicator glow green, the camera can focus on subjects as close as about 1 7 cm (2.8 in.) from the lens. • You can adjust the hue using a tripod. Set Vibration reduction 40 (A 113) to Off when using the slider displayed on the left side...(A 51) will turn on and the zoom will automatically move to the closest possible shooting position. • How close as about 1 cm (0.4 in.) from the lens. m W n Off* p Off* o 0.0* * Default setting can be modified. More on Shooting Shooting Suited for example, in museums and art galleries) or in...
...a position where F and the zoom indicator glow green, the camera can focus on subjects as close as about 1 7 cm (2.8 in.) from the lens. • You can adjust the hue using a tripod. Set Vibration reduction 40 (A 113) to Off when using the slider displayed on the left side...(A 51) will turn on and the zoom will automatically move to the closest possible shooting position. • How close as about 1 cm (0.4 in.) from the lens. m W n Off* p Off* o 0.0* * Default setting can be modified. More on Shooting Shooting Suited for example, in museums and art galleries) or in...

User Manual
Page 63
... position where F and the zoom indicator glow green. Macro mode How close you can focus on subjects as close as about 1 cm (0.4 in .) from the lens. 51 When the zoom position is used with some scene modes (A 39, 40, 41). 1 Press p (macro mode) on Shooting Auto Mode Macro Mode Macro mode... the procedure below. The macro mode icon (F) is set to the subject when shooting depends on objects as close as about 1 7 cm (2.8 in .) from the lens. When the zoom position is displayed.
... position where F and the zoom indicator glow green. Macro mode How close you can focus on subjects as close as about 1 cm (0.4 in .) from the lens. 51 When the zoom position is used with some scene modes (A 39, 40, 41). 1 Press p (macro mode) on Shooting Auto Mode Macro Mode Macro mode... the procedure below. The macro mode icon (F) is set to the subject when shooting depends on objects as close as about 1 7 cm (2.8 in .) from the lens. When the zoom position is displayed.

User Manual
Page 93
... recorded. • Smear (A 128) visible in the monitor when recording will be hot immediately after 30 seconds. The amount of zoom control operation, zoom, autofocus lens drive movement, and aperture operation when brightness changes may be some degradation in a hot area. • If the inside of the sun, and electric lights...
... recorded. • Smear (A 128) visible in the monitor when recording will be hot immediately after 30 seconds. The amount of zoom control operation, zoom, autofocus lens drive movement, and aperture operation when brightness changes may be some degradation in a hot area. • If the inside of the sun, and electric lights...
User Manual
Page 137
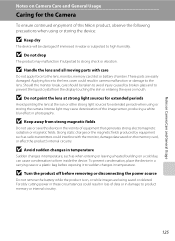
... or magnetic fields. B Do not drop The product may cause deterioration of the image sensor, producing a white blur effect in damage to the lens. B Avoid sudden changes in temperature Sudden changes in temperature, such as radio transmitters could result in loss of data or in photographs. B Do... not point the lens at strong light sources for extended periods Avoid pointing the lens at the sun or other strong light sources for the Camera To ensure continued enjoyment of this Nikon product, observe the following precautions when using or storing the ...
... or magnetic fields. B Do not drop The product may cause deterioration of the image sensor, producing a white blur effect in damage to the lens. B Avoid sudden changes in temperature Sudden changes in temperature, such as radio transmitters could result in loss of data or in photographs. B Do... not point the lens at strong light sources for extended periods Avoid pointing the lens at the sun or other strong light sources for the Camera To ensure continued enjoyment of this Nikon product, observe the following precautions when using or storing the ...

User Manual
Page 139
... a cloth lightly dampened with a blower. Do not use alcohol, thinner, or other stains that cannot be removed with a blower, wipe the lens with a soft cloth, using the camera at the center of air out the other stains, clean the monitor with a soft, dry cloth, being careful not ... touching glass parts with fresh water, then dry thoroughly. Remove dust or lint with a blower (typically a small device with a soft, dry cloth. To remove fingerprints Lens or other volatile chemicals.
... a cloth lightly dampened with a blower. Do not use alcohol, thinner, or other stains that cannot be removed with a blower, wipe the lens with a soft cloth, using the camera at the center of air out the other stains, clean the monitor with a soft, dry cloth, being careful not ... touching glass parts with fresh water, then dry thoroughly. Remove dust or lint with a blower (typically a small device with a soft, dry cloth. To remove fingerprints Lens or other volatile chemicals.

User Manual
Page 141
EN-MH1 rechargeable Ni-MH batteries cannot be used. 2 Supplied with the COOLPIX L310, charge the four EN-MH2 rechargeable Ni-MH batteries at a time using with this camera (➝Page 3 of the Quick Start Guide). Technical Notes Optional ...-B4 (set of four EN-MH2 batteries) AC adapter USB cable AC Adapter EH-67 USB Cable UC-E62 Audio/video cable Lens cap Audio Video Cable EG-CP14 Lens Cap LC-CP222 1 When using Battery Charger MH-73. Technical Notes 129 Also, do not mix batteries that have a different amount of...
EN-MH1 rechargeable Ni-MH batteries cannot be used. 2 Supplied with the COOLPIX L310, charge the four EN-MH2 rechargeable Ni-MH batteries at a time using with this camera (➝Page 3 of the Quick Start Guide). Technical Notes Optional ...-B4 (set of four EN-MH2 batteries) AC adapter USB cable AC Adapter EH-67 USB Cable UC-E62 Audio/video cable Lens cap Audio Video Cable EG-CP14 Lens Cap LC-CP222 1 When using Battery Charger MH-73. Technical Notes 129 Also, do not mix batteries that have a different amount of...

User Manual
Page 144
...lens cap, and turn the camera on again, contact retailer or Nikon-authorized service representative. Error Messages The following table lists the error messages and other operations until message clears from display automatically when saving is complete. 24, 25, 50 25 Write-protect switch is in COOLPIX L310....accessing memory card. • Use approved card. 130 • Check that connectors 18 are clean. • Confirm that the lens cap 15 attached, or a lens error has has been removed, then occurred. N Memory card is correctly inserted. Yes No Problem Solution A The...
...lens cap, and turn the camera on again, contact retailer or Nikon-authorized service representative. Error Messages The following table lists the error messages and other operations until message clears from display automatically when saving is complete. 24, 25, 50 25 Write-protect switch is in COOLPIX L310....accessing memory card. • Use approved card. 130 • Check that connectors 18 are clean. • Confirm that the lens cap 15 attached, or a lens error has has been removed, then occurred. N Memory card is correctly inserted. Yes No Problem Solution A The...

User Manual
Page 150
Digital zoom cannot be used with the flash is not heard even when set the flash mode to X (fill flash). Lens is released. Technical Notes 138 When using flash. 28 • Select a lower ISO sensitivity. 59 • Flash mode is set to W (Off). 7, 28...128 bright subject. mode to On. A feature that cannot be used with image mode 61 is reflecting off particles in images Flash is selected. Clean lens. 127 Hues are too dark (underexposed). Set flash 7, 28 captured with flash. Digital zoom cannot be used in setup menu. Images are unnatural....
Digital zoom cannot be used with the flash is not heard even when set the flash mode to X (fill flash). Lens is released. Technical Notes 138 When using flash. 28 • Select a lower ISO sensitivity. 59 • Flash mode is set to W (Off). 7, 28...128 bright subject. mode to On. A feature that cannot be used with image mode 61 is reflecting off particles in images Flash is selected. Clean lens. 127 Hues are too dark (underexposed). Set flash 7, 28 captured with flash. Digital zoom cannot be used in setup menu. Images are unnatural....
User Manual
Page 153
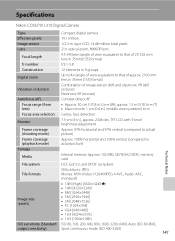
Specifications Nikon COOLPIX L310 Digital Camera Type Compact digital camera Effective pixels 14.1 million Image sensor 1/2.3-in .) to actual picture) Storage Technical Notes Media Internal memory (approx. 102 MB), ... 35mm[135] format) f/-number f/3.1-5.8 Construction 12 elements in 9 groups Digital zoom Up to 4× (angle of view equivalent to that of approx. 2100 mm lens in 35mm [135] format) Vibration reduction Combination of image-sensor shift and electronic VR (still pictures) Electronic VR (movies) Autofocus (AF) Contrast-detect AF Focus ...
Specifications Nikon COOLPIX L310 Digital Camera Type Compact digital camera Effective pixels 14.1 million Image sensor 1/2.3-in .) to actual picture) Storage Technical Notes Media Internal memory (approx. 102 MB), ... 35mm[135] format) f/-number f/3.1-5.8 Construction 12 elements in 9 groups Digital zoom Up to 4× (angle of view equivalent to that of approx. 2100 mm lens in 35mm [135] format) Vibration reduction Combination of image-sensor shift and electronic VR (still pictures) Electronic VR (movies) Autofocus (AF) Contrast-detect AF Focus ...


