
User Manual
Page 6
... waves given out by this precaution could cause temporary visual impairment. Handle moving parts with the flash window touching a person or object Failure to observe this camera may disrupt the electronic systems of... the airplane or the instruments of the hospital when using the flash Using the flash close to your fingers or other objects are not pinched by the lens cover or...input and output jacks, use only the cables provided or sold by Nikon for the purpose, to prevent liquid crystal from the subject. iv Particular care should be observed...
... waves given out by this precaution could cause temporary visual impairment. Handle moving parts with the flash window touching a person or object Failure to observe this camera may disrupt the electronic systems of... the airplane or the instruments of the hospital when using the flash Using the flash close to your fingers or other objects are not pinched by the lens cover or...input and output jacks, use only the cables provided or sold by Nikon for the purpose, to prevent liquid crystal from the subject. iv Particular care should be observed...
User Manual
Page 9
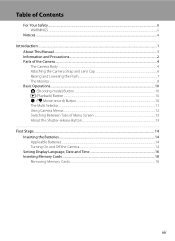
... ...v Introduction ...1 About This Manual ...1 Information and Precautions...2 Parts of the Camera...4 The Camera Body ...4 Attaching the Camera Strap and Lens Cap 6 Raising and Lowering the Flash...7 The Monitor...8 Basic Operations...10 A (Shooting mode) Button ...10 c (Playback) Button ...10 b (e Movie-record) Button ...10 The Multi Selector...11 Using Camera Menus...12 Switching...
... ...v Introduction ...1 About This Manual ...1 Information and Precautions...2 Parts of the Camera...4 The Camera Body ...4 Attaching the Camera Strap and Lens Cap 6 Raising and Lowering the Flash...7 The Monitor...8 Basic Operations...10 A (Shooting mode) Button ...10 c (Playback) Button ...10 b (e Movie-record) Button ...10 The Multi Selector...11 Using Camera Menus...12 Switching...
User Manual
Page 10
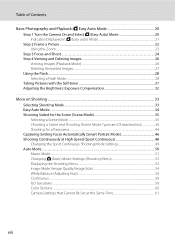
... Zoom...23 Step 3 Focus and Shoot ...24 Step 4 Viewing and Deleting Images 26 Viewing Images (Playback Mode) ...26 Deleting Unwanted Images...27 Using the Flash...28 Selecting a Flash Mode ...28 Taking Pictures with the Self-timer 31 Adjusting the Brightness: Exposure Compensation 32 More on Shooting ...33 Selecting Shooting Mode ...33 Easy...
... Zoom...23 Step 3 Focus and Shoot ...24 Step 4 Viewing and Deleting Images 26 Viewing Images (Playback Mode) ...26 Deleting Unwanted Images...27 Using the Flash...28 Selecting a Flash Mode ...28 Taking Pictures with the Self-timer 31 Adjusting the Brightness: Exposure Compensation 32 More on Shooting ...33 Selecting Shooting Mode ...33 Easy...

User Manual
Page 16
... 3 Self-timer lamp 31 4 Power switch/Power-on lamp 20, 116 5 Speaker 88 6 Built-in microphone 80 7 Eyelet for camera strap 6 8 Flash 7, 28 9 DC input connector (for AC adapter available separately from Nikon) .... 15, 129 10 USB connector and audio/video output 91, 95, 98 11 Pin cover 91, 95, 98 12...
... 3 Self-timer lamp 31 4 Power switch/Power-on lamp 20, 116 5 Speaker 88 6 Built-in microphone 80 7 Eyelet for camera strap 6 8 Flash 7, 28 9 DC input connector (for AC adapter available separately from Nikon) .... 15, 129 10 USB connector and audio/video output 91, 95, 98 11 Pin cover 91, 95, 98 12...

User Manual
Page 17
Introduction Parts of the Camera 1 23 4 5 6 7 8 11 10 9 12 13 14 1 Monitor 8 2 A (shooting mode) button 10 3 Flash lamp 28 4 b (e movie-record) button 10 5 c (playback) button 10, 26 6 Eyelet for camera strap 6 7 Multi selector 11 8 k (apply selection) button 11 9 Battery-chamber/ memory card slot cover 14, 18 10 l (delete) button 27, 88 11 d button 12, 53, 67, 83, 104 12 Tripod socket 142 13 Battery-chamber 14 14 Memory card slot 18 5
Introduction Parts of the Camera 1 23 4 5 6 7 8 11 10 9 12 13 14 1 Monitor 8 2 A (shooting mode) button 10 3 Flash lamp 28 4 b (e movie-record) button 10 5 c (playback) button 10, 26 6 Eyelet for camera strap 6 7 Multi selector 11 8 k (apply selection) button 11 9 Battery-chamber/ memory card slot cover 14, 18 10 l (delete) button 27, 88 11 d button 12, 53, 67, 83, 104 12 Tripod socket 142 13 Battery-chamber 14 14 Memory card slot 18 5

User Manual
Page 19
Introduction Parts of the Camera Raising and Lowering the Flash Press the m (flash pop-up) button to raise the flash. • See "Using the Flash" (A 28) for more information on setting the flash. • Push the flash down gently to lower the flash until it clicks into place when not in use. 7
Introduction Parts of the Camera Raising and Lowering the Flash Press the m (flash pop-up) button to raise the flash. • See "Using the Flash" (A 28) for more information on setting the flash. • Push the flash down gently to lower the flash until it clicks into place when not in use. 7

User Manual
Page 20
... 999 a 9999 20 1 Shooting mode*....20, 33, 46, 48, 50, 80 2 Macro mode 51 3 Zoom indicator 23, 51 4 AE/AF-L indicator 45 5 Focus indicator 24 6 Flash mode 28 7 Battery level indicator 20 8 Vibration reduction icon (still images 21, 113 9 Electronic VR (movies 86 10 Motion detection icon 21, 114 11 "Date...
... 999 a 9999 20 1 Shooting mode*....20, 33, 46, 48, 50, 80 2 Macro mode 51 3 Zoom indicator 23, 51 4 AE/AF-L indicator 45 5 Focus indicator 24 6 Flash mode 28 7 Battery level indicator 20 8 Vibration reduction icon (still images 21, 113 9 Electronic VR (movies 86 10 Motion detection icon 21, 114 11 "Date...

User Manual
Page 23
.../ go to the next screen (apply selection). Select the item below . Shooting menu Image mode White balance Continuous ISO sensitivity Color options 11 For Playback Flash mode Display the previous image. 15/05/2012 15:30 0004.JPG Display the next image. 44 For the Menu Screen Select the item above... the left (J), right (K), or by pressing the k button. Display p (macro mode) menu (A 51)/select the item below . Display o (exposure compensation) menu (A 32). For Shooting Display m (flash mode) menu (A 28)/select the item above .
.../ go to the next screen (apply selection). Select the item below . Shooting menu Image mode White balance Continuous ISO sensitivity Color options 11 For Playback Flash mode Display the previous image. 15/05/2012 15:30 0004.JPG Display the next image. 44 For the Menu Screen Select the item above... the left (J), right (K), or by pressing the k button. Display p (macro mode) menu (A 51)/select the item below . Display o (exposure compensation) menu (A 32). For Shooting Display m (flash mode) menu (A 28)/select the item above .
User Manual
Page 27
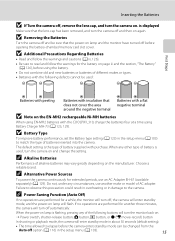
... 123) in the setup menu (A 103) to match the type of alkaline batteries may vary greatly depending on the manufacturer. The default setting is flashing, pressing any of the following defects cannot be used , turn the camera on and change the setting. Inserting the Batteries B If Turn the camera ... changed from the Auto off before using Battery Charger MH-73 (A 123, 129). Do not, under any other type of battery supplied with the COOLPIX L310, charge the batteries four at a time using the battery. • Do not combine old and new batteries or batteries of AC adapter. When ...
... 123) in the setup menu (A 103) to match the type of alkaline batteries may vary greatly depending on the manufacturer. The default setting is flashing, pressing any of the following defects cannot be used , turn the camera on and change the setting. Inserting the Batteries B If Turn the camera ... changed from the Auto off before using Battery Charger MH-73 (A 123, 129). Do not, under any other type of battery supplied with the COOLPIX L310, charge the batteries four at a time using the battery. • Do not combine old and new batteries or batteries of AC adapter. When ...

User Manual
Page 32
Press the m (flash pop-up) button to step 4. 2 Press the A button. Battery level indicator Battery level indicator Display b Description Battery level high. B N Battery exhausted. Cannot take pictures using a ... of images that suits the scene (A 34). 1 Remove the lens cap and press the power switch to turn on the camera. Proceed to raise the flash (A 7). Basic Photography and Playback: G Easy Auto Mode 3 Press the multi selector H or I to replace the batteries. Easy auto mode is displayed. The camera enters G (easy...
Press the m (flash pop-up) button to step 4. 2 Press the A button. Battery level indicator Battery level indicator Display b Description Battery level high. B N Battery exhausted. Cannot take pictures using a ... of images that suits the scene (A 34). 1 Remove the lens cap and press the power switch to turn on the camera. Proceed to raise the flash (A 7). Basic Photography and Playback: G Easy Auto Mode 3 Press the multi selector H or I to replace the batteries. Easy auto mode is displayed. The camera enters G (easy...

User Manual
Page 33
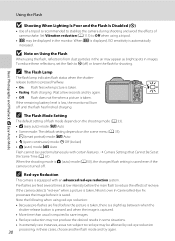
... Power switch, shutter-release button, A button, or b (e movie-record) button C Functions Available in Easy Auto Mode • When the camera is flashing) (A 116), press the following buttons to change the combination of the monitor. Vibration reduction icon Internal memory indicator Images will turn it (A 24, 34)....timer (A 31) and exposure compensation (A 32) are available. • The macro mode button (A 11, 51) on the Flash When the flash is lowered, the flash setting is fixed at off in standby mode to save power (the poweron lamp is pointed at the top of image quality (...
... Power switch, shutter-release button, A button, or b (e movie-record) button C Functions Available in Easy Auto Mode • When the camera is flashing) (A 116), press the following buttons to change the combination of the monitor. Vibration reduction icon Internal memory indicator Images will turn it (A 24, 34)....timer (A 31) and exposure compensation (A 32) are available. • The macro mode button (A 11, 51) on the Flash When the flash is lowered, the flash setting is fixed at off in standby mode to save power (the poweron lamp is pointed at the top of image quality (...

User Manual
Page 34
Step 2 Frame a Picture 1 Ready the camera. Keep fingers, hair and other objects away from the lens, flash, and microphone. Shooting mode icon When the camera determines a scene mode, the shooting mode icon changes (A 34). When shooting non-human subjects or when no ...
Step 2 Frame a Picture 1 Ready the camera. Keep fingers, hair and other objects away from the lens, flash, and microphone. Shooting mode icon When the camera determines a scene mode, the shooting mode icon changes (A 34). When shooting non-human subjects or when no ...
User Manual
Page 36
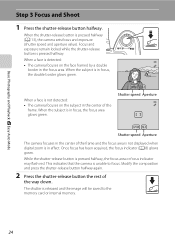
... the center of the frame and the focus area is not displayed when digital zoom is pressed halfway, the focus area or focus indicator may flash red. This indicates that the camera is not detected: • The camera focuses on the face framed by a double border in the center of the...
... the center of the frame and the focus area is not displayed when digital zoom is pressed halfway, the focus area or focus indicator may flash red. This indicates that the camera is not detected: • The camera focuses on the face framed by a double border in the center of the...

User Manual
Page 37
... focus area or the focus indicator glows green: • Subject is the same distance from the camera (e.g. C Flash If the subject is dimly lit, the flash (A 28) may result in loss of exposures remaining display will flash. the subject is inside a cage) • Subjects with repeating patterns (window blinds, buildings with multiple rows...
... focus area or the focus indicator glows green: • Subject is the same distance from the camera (e.g. C Flash If the subject is dimly lit, the flash (A 28) may result in loss of exposures remaining display will flash. the subject is inside a cage) • Subjects with repeating patterns (window blinds, buildings with multiple rows...
User Manual
Page 38
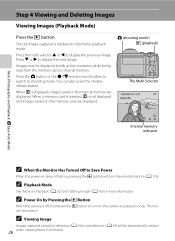
...-frame. Basic Photography and Playback: G Easy Auto Mode Step 4 Viewing and Deleting Images Viewing Images (Playback Mode) Press the c button. The last image captured is flashing, pressing the c button will not extend. Images may be automatically rotated 26 when viewing them in the internal memory are displayed. A (shooting mode) c (playback) The...
...-frame. Basic Photography and Playback: G Easy Auto Mode Step 4 Viewing and Deleting Images Viewing Images (Playback Mode) Press the c button. The last image captured is flashing, pressing the c button will not extend. Images may be automatically rotated 26 when viewing them in the internal memory are displayed. A (shooting mode) c (playback) The...

User Manual
Page 40
... portraits that include background scenery. U Auto Flash fires automatically when lighting is taken. X Fill flash Flash fires when a picture is poor. W Off Flash will not fire even when lighting is combined with flash by raising the flash. • The flash has a range of the monitor. Basic ...at the top of about 0.5 to "fill-in portraits (A 30). Use to 6.0 m (1 ft 8 in. Selecting a Flash Mode When using easy auto mode (A 20), the camera automatically sets a flash mode according to the determined scene mode. Suited to capture background at night or under dim light. 28...
... portraits that include background scenery. U Auto Flash fires automatically when lighting is taken. X Fill flash Flash fires when a picture is poor. W Off Flash will not fire even when lighting is combined with flash by raising the flash. • The flash has a range of the monitor. Basic ...at the top of about 0.5 to "fill-in portraits (A 30). Use to 6.0 m (1 ft 8 in. Selecting a Flash Mode When using easy auto mode (A 20), the camera automatically sets a flash mode according to the determined scene mode. Suited to capture background at night or under dim light. 28...

User Manual
Page 41
... is displayed. 3 Press the multi selector H or I to lower the flash until it clicks into place when not in use (A 7). 29 The flash pops up ) button. Flash mode 30 B Lowering the Flash Push the flash down gently to select a mode, and press the k button. Using the... Flash Basic Photography and Playback: G Easy Auto Mode 2 Press m (flash mode) on the multi selector. The flash mode menu is cancelled. 1 Press the m (flash pop-up...
... is displayed. 3 Press the multi selector H or I to lower the flash until it clicks into place when not in use (A 7). 29 The flash pops up ) button. Flash mode 30 B Lowering the Flash Push the flash down gently to select a mode, and press the k button. Using the... Flash Basic Photography and Playback: G Easy Auto Mode 2 Press m (flash mode) on the multi selector. The flash mode menu is cancelled. 1 Press the m (flash pop-up...
User Manual
Page 42
...) mode: U Auto • d (sport continuous) mode: W Off (locked) • A (auto) mode: U Auto Flash cannot be affected by red-eye reduction 30 processing; If the camera detects "red-eye" when a picture is taken, Nikon's own In-Camera Red-Eye Fix processes the image before it is low, the monitor will... turn off until the flash has finished charging. If the remaining battery level is saved. C The Flash Mode Setting The default setting of flash mode depends on the shooting...
...) mode: U Auto • d (sport continuous) mode: W Off (locked) • A (auto) mode: U Auto Flash cannot be affected by red-eye reduction 30 processing; If the camera detects "red-eye" when a picture is taken, Nikon's own In-Camera Red-Eye Fix processes the image before it is low, the monitor will... turn off until the flash has finished charging. If the remaining battery level is saved. C The Flash Mode Setting The default setting of flash mode depends on the shooting...

User Manual
Page 43
If a setting is not applied by pressing the k button within a few seconds, the selection is released, the lamp stops flashing and glows steadily. Focus and exposure are taken 10 seconds after the shutter-release button is displayed. 2 Press the multi selector H or I to Off when ... the effects of camera shake that occur when the shutter-release button is displayed. The self-timer icon (n 10) is pressed. The self-timer lamp flashes while the timer is recommended. When using the self-timer, pictures are set to OFF. Self-timer 10 4 Press the shutter-release button the rest...
If a setting is not applied by pressing the k button within a few seconds, the selection is released, the lamp stops flashing and glows steadily. Focus and exposure are taken 10 seconds after the shutter-release button is displayed. 2 Press the multi selector H or I to Off when ... the effects of camera shake that occur when the shutter-release button is displayed. The self-timer icon (n 10) is pressed. The self-timer lamp flashes while the timer is recommended. When using the self-timer, pictures are set to OFF. Self-timer 10 4 Press the shutter-release button the rest...

User Manual
Page 45
... F Smart portrait A 46 The camera detects a smiling face to select a scene. The camera enters the selected shooting mode. A Auto mode A 50 You can change the flash mode, use macro mode (for close-ups), etc., and take bursts of pictures continuously. 1 Press the A button in shooting mode. Press H, I to select a shooting mode...
... F Smart portrait A 46 The camera detects a smiling face to select a scene. The camera enters the selected shooting mode. A Auto mode A 50 You can change the flash mode, use macro mode (for close-ups), etc., and take bursts of pictures continuously. 1 Press the A button in shooting mode. Press H, I to select a shooting mode...

