L22 / L21 User's Manual
Page 5
...old and new batteries or batteries of different makes or types. • If Nikon rechargeable Ni-MH batteries EN-MH2 (EN-MH2-B2 or EN-MH2-B4) are purchased separately, charge and use ...with Nikon digital cameras only, and are using an AC adapter, be damaged and the wires become exposed...to excessive heat. • Do not immerse in or expose to water. • Do not transport or store with COOLPIX L22/L21. If you notice any change in the batteries, such as discoloration or deformation. • If liquid from different...
...old and new batteries or batteries of different makes or types. • If Nikon rechargeable Ni-MH batteries EN-MH2 (EN-MH2-B2 or EN-MH2-B4) are purchased separately, charge and use ...with Nikon digital cameras only, and are using an AC adapter, be damaged and the wires become exposed...to excessive heat. • Do not immerse in or expose to water. • Do not transport or store with COOLPIX L22/L21. If you notice any change in the batteries, such as discoloration or deformation. • If liquid from different...
L22 / L21 User's Manual
Page 13
...COOLPIX L22. Notations • In this manual, the product names "COOLPIX L22" and "COOLPIX L21" may sometimes be abbreviated as "L22" and "L21". • A Secure Digital (SD) memory card is referred to as a "memory card". • The setting at the time of a Nikon COOLPIX L22/COOLPIX ...L21 digital camera. Illustrations and Screen Display • Illustrations and text displays shown in bold. Illustrations and text displays for your Nikon digital camera. This icon marks tips, additional D information that...
...COOLPIX L22. Notations • In this manual, the product names "COOLPIX L22" and "COOLPIX L21" may sometimes be abbreviated as "L22" and "L21". • A Secure Digital (SD) memory card is referred to as a "memory card". • The setting at the time of a Nikon COOLPIX L22/COOLPIX ...L21 digital camera. Illustrations and Screen Display • Illustrations and text displays shown in bold. Illustrations and text displays for your Nikon digital camera. This icon marks tips, additional D information that...
L22 / L21 User's Manual
Page 16
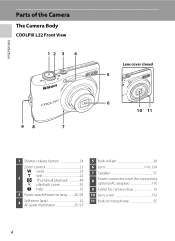
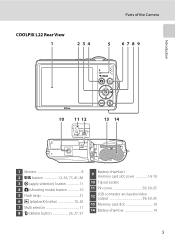
Introduction Parts of the Camera The Camera Body COOLPIX L22 Front View 12 3 4 98 7 Lens cover closed 5 6 10 11 1 Shutter-release button 24 Zoom control 23 f : wide 23 2 g : tele 23 h : Thumbnail playback 48 i : playback zoom 50 j : help 13 3 Power switch/Power-on lamp ....... 20, 99 4 Self-timer lamp 32 AF-assist illuminator 25, 97 5 Built-in flash 30 6 Lens 114, 124 7 Speaker 57 8 Power connector cover (for connecting optional AC adapter 110 9 Eyelet for camera strap 13 10 Lens cover 112 11 Built-in microphone 55 4
Introduction Parts of the Camera The Camera Body COOLPIX L22 Front View 12 3 4 98 7 Lens cover closed 5 6 10 11 1 Shutter-release button 24 Zoom control 23 f : wide 23 2 g : tele 23 h : Thumbnail playback 48 i : playback zoom 50 j : help 13 3 Power switch/Power-on lamp ....... 20, 99 4 Self-timer lamp 32 AF-assist illuminator 25, 97 5 Built-in flash 30 6 Lens 114, 124 7 Speaker 57 8 Power connector cover (for connecting optional AC adapter 110 9 Eyelet for camera strap 13 10 Lens cover 112 11 Built-in microphone 55 4
L22 / L21 User's Manual
Page 17
COOLPIX L22 Rear View 1 2 34 Parts of the Camera 5 67 89 Introduction 10 11 12 13 14 1 Monitor 8 2 d button 12, 56, 73, 81, 86 3 k (apply selection) button 11 4 A (shooting mode) button 10 5 Flash lamp 31 6 c (playback) button 10, 26 7 Multi selector 11 8 l (delete) button 26, 27, 57 9 Battery-chamber/ memory card slot cover 14, 18 10 Tripod socket 11 Pin cover 58, 60, 65 12 USB connector and audio/video output 58, 60, 65 13 Memory card slot 18 14 Battery-chamber 14 5
COOLPIX L22 Rear View 1 2 34 Parts of the Camera 5 67 89 Introduction 10 11 12 13 14 1 Monitor 8 2 d button 12, 56, 73, 81, 86 3 k (apply selection) button 11 4 A (shooting mode) button 10 5 Flash lamp 31 6 c (playback) button 10, 26 7 Multi selector 11 8 l (delete) button 26, 27, 57 9 Battery-chamber/ memory card slot cover 14, 18 10 Tripod socket 11 Pin cover 58, 60, 65 12 USB connector and audio/video output 58, 60, 65 13 Memory card slot 18 14 Battery-chamber 14 5
L22 / L21 User's Manual
Page 20
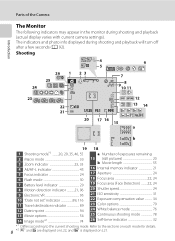
... 76 25 Continuous shooting mode 78 26 Self-timer indicator 32 *1 Differs according to the sections on each mode for details. 8 *2 S and L are displayed on L22, and z is displayed on L21. Refer to the current shooting mode. Shooting 4 6 5 26 1 2 3 25 10 24 7 9 10811 23 12 22 +1.0 21 1/125 F3.1 999 13...
... 76 25 Continuous shooting mode 78 26 Self-timer indicator 32 *1 Differs according to the sections on each mode for details. 8 *2 S and L are displayed on L22, and z is displayed on L21. Refer to the current shooting mode. Shooting 4 6 5 26 1 2 3 25 10 24 7 9 10811 23 12 22 +1.0 21 1/125 F3.1 999 13...
L22 / L21 User's Manual
Page 21
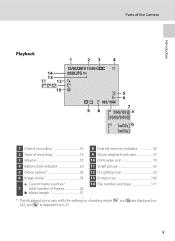
S and L are displayed on L22, and z is displayed on L21. 9 Parts of the Camera Introduction Playback 14 13 11 12 10 1 23 4 15/05/2010 12:00 9999.JPG 5 6 999 ...
S and L are displayed on L22, and z is displayed on L21. 9 Parts of the Camera Introduction Playback 14 13 11 12 10 1 23 4 15/05/2010 12:00 9999.JPG 5 6 999 ...

L22 / L21 User's Manual
Page 25
... this may result in this position. Introduction Basic Operations Help Displays Rotate the zoom control to g (j) when M/j is held in camera shake and blurred pictures. COOLPIX L22 COOLPIX L21 Continuous Choose single frame, continuous mode, BSS (camera chooses sharpest shot in series), or multi-shot 16. Press the shutterrelease button the rest of...
... this may result in this position. Introduction Basic Operations Help Displays Rotate the zoom control to g (j) when M/j is held in camera shake and blurred pictures. COOLPIX L22 COOLPIX L21 Continuous Choose single frame, continuous mode, BSS (camera chooses sharpest shot in series), or multi-shot 16. Press the shutterrelease button the rest of...
L22 / L21 User's Manual
Page 26
... off, both the power-on lamp and monitor will turn off. • If the camera is turned off, hold the camera upside down c to turn COOLPIX L22 COOLPIX L21 on . on lamp (green) lights for a moment, the monitor turns on the camera.
... off, both the power-on lamp and monitor will turn off. • If the camera is turned off, hold the camera upside down c to turn COOLPIX L22 COOLPIX L21 on . on lamp (green) lights for a moment, the monitor turns on the camera.
L22 / L21 User's Manual
Page 28
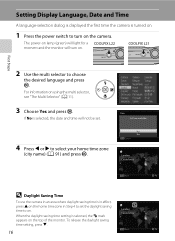
The power-on lamp (green) will light for a COOLPIX L22 moment and the monitor will not be set the daylight saving time to on. If No is in effect, press H on the home time zone ... Set time and date? 4 Press J or K to choose the desired language and press k. To release the daylight saving time setting, press I. 16 London Casablanca Back COOLPIX L21 First Steps 2 Use the multi selector to select your home time zone (city name) (A 91) and press k. Yes No Cancel London Casablanca Back D Daylight...
The power-on lamp (green) will light for a COOLPIX L22 moment and the monitor will not be set the daylight saving time to on. If No is in effect, press H on the home time zone ... Set time and date? 4 Press J or K to choose the desired language and press k. To release the daylight saving time setting, press I. 16 London Casablanca Back COOLPIX L21 First Steps 2 Use the multi selector to select your home time zone (city name) (A 91) and press k. Yes No Cancel London Casablanca Back D Daylight...

L22 / L21 User's Manual
Page 32
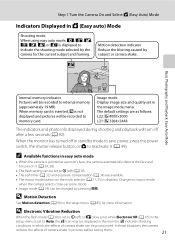
... internal memory or memory card and image mode setting (A 75). 20 The lens will turn on the camera. The power-on lamp (green) will light COOLPIX L22 for a moment and the monitor will extend at the time of purchase. Prepare to display the shooting-mode selection menu. Easy auto mode is high... Remaining The number of pictures that suits the scene (A 28). 1 Press the power switch to choose G and press k. • The camera enters G (easy auto) mode. COOLPIX L21 Basic Photography and Playback: Easy Auto Mode 3 Press the multi selector HI to turn on.
... internal memory or memory card and image mode setting (A 75). 20 The lens will turn on the camera. The power-on lamp (green) will light COOLPIX L22 for a moment and the monitor will extend at the time of purchase. Prepare to display the shooting-mode selection menu. Easy auto mode is high... Remaining The number of pictures that suits the scene (A 28). 1 Press the power switch to choose G and press k. • The camera enters G (easy auto) mode. COOLPIX L21 Basic Photography and Playback: Easy Auto Mode 3 Press the multi selector HI to turn on.
L22 / L21 User's Manual
Page 33
...: Easy Auto Mode 4 Internal memory indicator Pictures will be recorded to W (off) (A 30). • The self-timer (A 32) and exposure compensation (A 34) are as follows: L22: L 4000×3000 L21: y 3264×2448 The indicators and photo info displayed during shooting and playback will turn off ) or Y (slow sync) while Electronic...
...: Easy Auto Mode 4 Internal memory indicator Pictures will be recorded to W (off) (A 30). • The self-timer (A 32) and exposure compensation (A 34) are as follows: L22: L 4000×3000 L21: y 3264×2448 The indicators and photo info displayed during shooting and playback will turn off ) or Y (slow sync) while Electronic...
L22 / L21 User's Manual
Page 35
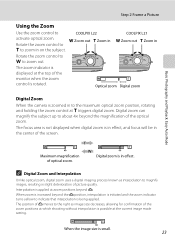
... zoom out. The position of V moves to the maximum optical zoom position, rotating and holding the zoom control at the top of the optical zoom. COOLPIX L21 f Zoom out g Zoom in Rotate the zoom control to f to indicate that interpolation is displayed at g triggers digital zoom. Basic Photography and Playback: Easy... 2 Frame a Picture Using the Zoom Use the zoom control to zoom in on the subject. f Zoom out g Zoom in Rotate the zoom control to g to COOLPIX L22 activate optical zoom. The zoom indicator is being applied.
... zoom out. The position of V moves to the maximum optical zoom position, rotating and holding the zoom control at the top of the optical zoom. COOLPIX L21 f Zoom out g Zoom in Rotate the zoom control to f to indicate that interpolation is displayed at g triggers digital zoom. Basic Photography and Playback: Easy... 2 Frame a Picture Using the Zoom Use the zoom control to zoom in on the subject. f Zoom out g Zoom in Rotate the zoom control to g to COOLPIX L22 activate optical zoom. The zoom indicator is being applied.

L22 / L21 User's Manual
Page 42
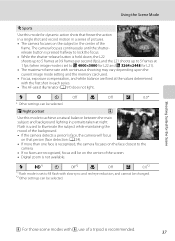
... portraits with slow shutter speed. Auto Mode Using the Flash The flash mode allows you to specify the settings according to shooting conditions. • For L22, the flash has a range of approx. 0.5-7.0 m (1 ft. 8 in.-23 ft.) when the camera is zoomed out all the way, and 0.5-2.5 m (1 ft. 8 in.-8 ft.) when the...
... portraits with slow shutter speed. Auto Mode Using the Flash The flash mode allows you to specify the settings according to shooting conditions. • For L22, the flash has a range of approx. 0.5-7.0 m (1 ft. 8 in.-23 ft.) when the camera is zoomed out all the way, and 0.5-2.5 m (1 ft. 8 in.-8 ft.) when the...

L22 / L21 User's Manual
Page 44
... k within a few seconds, the selection will be cancelled. 3 Frame the picture and press the shutter-release button halfway. The self-timer lamp will be set . COOLPIX L22 COOLPIX L21 32 The self-timer icon (n 10) is released, the self-timer will blink. The lamp stops blinking one second before a picture is taken, press...
... k within a few seconds, the selection will be cancelled. 3 Frame the picture and press the shutter-release button halfway. The self-timer lamp will be set . COOLPIX L22 COOLPIX L21 32 The self-timer icon (n 10) is released, the self-timer will blink. The lamp stops blinking one second before a picture is taken, press...
L22 / L21 User's Manual
Page 49
m V*1 n Off*2 p Off o 0.0*2 *1 Flash mode is set to I 4000×3000 for L22 and R 3264×2448 for L21). • The maximum frame rate with continuous shooting may vary depending upon the current image mode setting and the .... The camera focuses continuously until the shutterrelease button is pressed halfway to lock the focus. • While the shutter-release button is held down, the L22 shoots up to 5 frames at 0.9 frames per second (fps), and the L21 shoots up to 5 frames at night. m W n Off p Off o 0.0* * Other settings can be selected...
m V*1 n Off*2 p Off o 0.0*2 *1 Flash mode is set to I 4000×3000 for L22 and R 3264×2448 for L21). • The maximum frame rate with continuous shooting may vary depending upon the current image mode setting and the .... The camera focuses continuously until the shutterrelease button is pressed halfway to lock the focus. • While the shutter-release button is held down, the L22 shoots up to 5 frames at 0.9 frames per second (fps), and the L21 shoots up to 5 frames at night. m W n Off p Off o 0.0* * Other settings can be selected...
L22 / L21 User's Manual
Page 63
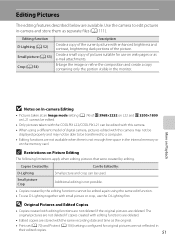
...8226; Print set (A 70) and Protect (A 106) settings configured for use on L21 cannot be edited. • Only pictures taken with the COOLPIX L22/COOLPIX L21 can be edited again using a different model of digital camera, pictures edited with enhanced brightness and contrast, brightening dark portions of the current ... pictures are not available when there is not possible. • Copies created by editing. Create a small copy of P 3968×2232 on L22 and P 3200×1800 on web pages or as separate files (A 111). Copies Created By: D-Lighting Can Be Edited By: Small picture ...
...8226; Print set (A 70) and Protect (A 106) settings configured for use on L21 cannot be edited. • Only pictures taken with the COOLPIX L22/COOLPIX L21 can be edited again using a different model of digital camera, pictures edited with enhanced brightness and contrast, brightening dark portions of the current ... pictures are not available when there is not possible. • Copies created by editing. Create a small copy of P 3968×2232 on L22 and P 3200×1800 on web pages or as separate files (A 111). Copies Created By: D-Lighting Can Be Edited By: Small picture ...
L22 / L21 User's Manual
Page 66
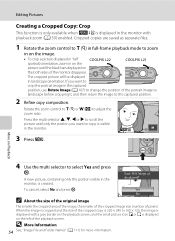
... the zoom control to g (i) in full-frame playback mode to zoom in on the image. • To crop a picture displayed in "tall" COOLPIX L22 (portrait) orientation, zoom in on the COOLPIX L21 picture until only the portion you want to adjust the zoom ratio. A new picture, containing only the portion visible in the...
... the zoom control to g (i) in full-frame playback mode to zoom in on the image. • To crop a picture displayed in "tall" COOLPIX L22 (portrait) orientation, zoom in on the COOLPIX L21 picture until only the portion you want to adjust the zoom ratio. A new picture, containing only the portion visible in the...

L22 / L21 User's Manual
Page 70
... the television to the TV using an optional audio video cable (AV cable) (A 110) to the camera. The 58 video mode setting is oriented correctly. COOLPIX L22 COOLPIX L21 Connecting to Televisions, Computers and Printers 2 Connect the camera to the video channel. B Connecting an AV Cable When connecting the AV cable, be sure...
... the television to the TV using an optional audio video cable (AV cable) (A 110) to the camera. The 58 video mode setting is oriented correctly. COOLPIX L22 COOLPIX L21 Connecting to Televisions, Computers and Printers 2 Connect the camera to the video channel. B Connecting an AV Cable When connecting the AV cable, be sure...
L22 / L21 User's Manual
Page 71
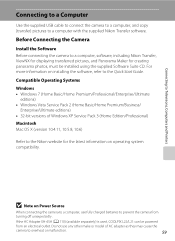
... electrical outlet. Before Connecting the Camera Install the Software Before connecting the camera to a computer with the supplied Nikon Transfer software. If the AC Adapter EH-65A (A 110) (available separately) is used, COOLPIX L22/L21 can be installed using the supplied Software Suite CD. Connecting to Televisions, Computers and Printers Connecting to a Computer...
... electrical outlet. Before Connecting the Camera Install the Software Before connecting the camera to a computer with the supplied Nikon Transfer software. If the AC Adapter EH-65A (A 110) (available separately) is used, COOLPIX L22/L21 can be installed using the supplied Software Suite CD. Connecting to Televisions, Computers and Printers Connecting to a Computer...
L22 / L21 User's Manual
Page 72
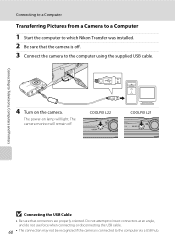
COOLPIX L22 COOLPIX L21 B Connecting the USB Cable • Be sure that the camera is connected to the computer using the supplied USB cable. 4 Turn on lamp will .... The camera monitor will light. Connecting to Televisions, Computers and Printers Connecting to a Computer Transferring Pictures from a Camera to a Computer 1 Start the computer to which Nikon Transfer was installed. 2 Be sure that connectors are properly oriented. Do not attempt to insert connectors at an angle, and do not use force when...
COOLPIX L22 COOLPIX L21 B Connecting the USB Cable • Be sure that the camera is connected to the computer using the supplied USB cable. 4 Turn on lamp will .... The camera monitor will light. Connecting to Televisions, Computers and Printers Connecting to a Computer Transferring Pictures from a Camera to a Computer 1 Start the computer to which Nikon Transfer was installed. 2 Be sure that connectors are properly oriented. Do not attempt to insert connectors at an angle, and do not use force when...


