User Manual
Page 1
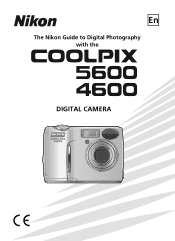
En The Nikon Guide to Digital Photography with the DIGITAL CAMERA
En The Nikon Guide to Digital Photography with the DIGITAL CAMERA

User Manual
Page 3
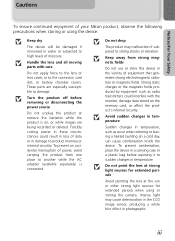
...in the presence of flammable gas Do not use in this product: • Before replacing the batteries, turn the camera off immediately in this section are using your Nikon product or injury to yourself or to others, read the following symbol: This icon marks warnings, information that could result...Observe proper precautions when handling batteries Batteries may leak or explode if improperly handled. Do not use the product will read before using the camera strap Never place the strap around the neck of an infant or child. Keep these safety instructions where all those who use other ...
...in the presence of flammable gas Do not use in this product: • Before replacing the batteries, turn the camera off immediately in this section are using your Nikon product or injury to yourself or to others, read the following symbol: This icon marks warnings, information that could result...Observe proper precautions when handling batteries Batteries may leak or explode if improperly handled. Do not use the product will read before using the camera strap Never place the strap around the neck of an infant or child. Keep these safety instructions where all those who use other ...

User Manual
Page 4
... software and manuals are prone to your subject's eyes could cause hearing loss or damage the equipment. Before removing the batteries, turn the camera off and allow the batteries to maintain compliance with liquid crystal Should the monitor break, care should you notice any changes in a cool ...use . Avoid contact with product regulations. Removing memory cards Memory cards may become hot during use only the cables provided or sold by Nikon for an extended period, the batteries may become hot. Observe due caution when removing memory cards from the subject. To avoid damage to ...
... software and manuals are prone to your subject's eyes could cause hearing loss or damage the equipment. Before removing the batteries, turn the camera off and allow the batteries to maintain compliance with liquid crystal Should the monitor break, care should you notice any changes in a cool ...use . Avoid contact with product regulations. Removing memory cards Memory cards may become hot during use only the cables provided or sold by Nikon for an extended period, the batteries may become hot. Observe due caution when removing memory cards from the subject. To avoid damage to ...
User Manual
Page 5
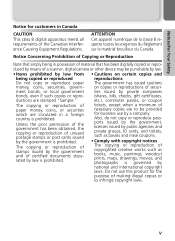
... effect in water or subjected to the connector, card slot, or battery chamber covers. Notices/For Your Safety Cautions To ensure continued enjoyment of your Nikon product, observe the following precautions when storing or using or storing the camera. These parts are being recorded or deleted.
... effect in water or subjected to the connector, card slot, or battery chamber covers. Notices/For Your Safety Cautions To ensure continued enjoyment of your Nikon product, observe the following precautions when storing or using or storing the camera. These parts are being recorded or deleted.
User Manual
Page 7
...copyrighted creative works such as passes and meal coupons. • Comply with copyright notices The copying or reproduction of a scanner, digital camera or other device may be provided for business use this product for customers in a foreign country is governed by law from ...Items prohibited by national and international copyright laws. etc.), commuter passes, or coupon The copying or reproduction of material that has been digitally copied or repro- The copying or reproduction of stamps issued by the government and of necessary copies are stamped "Sample." v ATTENTION...
...copyrighted creative works such as passes and meal coupons. • Comply with copyright notices The copying or reproduction of a scanner, digital camera or other device may be provided for business use this product for customers in a foreign country is governed by law from ...Items prohibited by national and international copyright laws. etc.), commuter passes, or coupon The copying or reproduction of material that has been digitally copied or repro- The copying or reproduction of stamps issued by the government and of necessary copies are stamped "Sample." v ATTENTION...
User Manual
Page 8
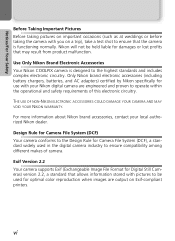
... are engineered and proven to the highest standards and includes complex electronic circuitry. For more information about Nikon brand accessories, contact your Nikon digital camera are output on a trip), take a test shot to ensure that may result from product malfunction....Camera File System (DCF) Your camera conforms to the Design Rule for Camera File System (DCF), a standard widely used for damages or lost profits that the camera is designed to operate within the operational and safety requirements of camera. Use Only Nikon Brand Electronic Accessories Your Nikon COOLPIX camera...
... are engineered and proven to the highest standards and includes complex electronic circuitry. For more information about Nikon brand accessories, contact your Nikon digital camera are output on a trip), take a test shot to ensure that may result from product malfunction....Camera File System (DCF) Your camera conforms to the Design Rule for Camera File System (DCF), a standard widely used for damages or lost profits that the camera is designed to operate within the operational and safety requirements of camera. Use Only Nikon Brand Electronic Accessories Your Nikon COOLPIX camera...
User Manual
Page 9
Frame the Picture 18 Step 3 - Table of contents For Your Safety i Cautions ...iii Notices ...iv Before You Begin 1 Introduction 1 Parts of the Camera 2 The Monitor 4 The Mode Dial 6 Navigating the Menus 7 The Shutter-Release Button 7 First Steps 8 Inserting Batteries 8 Inserting Memory Cards 10 ... Close-up Mode 27 Assist and Scene Modes 28 Framing Assist 30 e Scene Mode 35 More on Playback 42 Viewing Pictures on the Camera 42 Cropping Pictures 44 Adjusting a picture tone automatically 45 Voice Memos: Recording and Playback (E5600 only 47 Viewing Pictures on TV 48 Viewing...
Frame the Picture 18 Step 3 - Table of contents For Your Safety i Cautions ...iii Notices ...iv Before You Begin 1 Introduction 1 Parts of the Camera 2 The Monitor 4 The Mode Dial 6 Navigating the Menus 7 The Shutter-Release Button 7 First Steps 8 Inserting Batteries 8 Inserting Memory Cards 10 ... Close-up Mode 27 Assist and Scene Modes 28 Framing Assist 30 e Scene Mode 35 More on Playback 42 Viewing Pictures on the Camera 42 Cropping Pictures 44 Adjusting a picture tone automatically 45 Voice Memos: Recording and Playback (E5600 only 47 Viewing Pictures on TV 48 Viewing...

User Manual
Page 10
... Interface...99 Auto Transfer 100 Reset All ...100 Battery Type 102 Menus...103 Firmware Version 104 Technical Notes 105 Optional Accessories 105 Caring for Your Camera 106 Error Messages 108 Troubleshooting 111 Specifications 114 Index ...116 viii
... Interface...99 Auto Transfer 100 Reset All ...100 Battery Type 102 Menus...103 Firmware Version 104 Technical Notes 105 Optional Accessories 105 Caring for Your Camera 106 Error Messages 108 Troubleshooting 111 Specifications 114 Index ...116 viii

User Manual
Page 11
...product. This icon marks notes, information that more Q information is available on the card instead of a Nikon COOLPIX5600 (E5600)/COOLPIX4600 (E4600) digital camera. Illustrations and on digital imaging and photography. Before You Begin Before You Begin Introduction Thank you for contact information: http://nikonimaging.com..., the Middle East, and Africa: http://www.nikon-asia.com/ Visit these sites to keep it easier to your camera. See the URL below for your Nikon digital camera. Internal Memory and SD Memory Card This camera uses both an internal memory and an SD memory...
...product. This icon marks notes, information that more Q information is available on the card instead of a Nikon COOLPIX5600 (E5600)/COOLPIX4600 (E4600) digital camera. Illustrations and on digital imaging and photography. Before You Begin Before You Begin Introduction Thank you for contact information: http://nikonimaging.com..., the Middle East, and Africa: http://www.nikon-asia.com/ Visit these sites to keep it easier to your camera. See the URL below for your Nikon digital camera. Internal Memory and SD Memory Card This camera uses both an internal memory and an SD memory...

User Manual
Page 12
Before You Begin Parts of the Camera Power switch Power-on lamp (Q 12) (Q 12) Shutter-release button (Q 7) Microphone (E5600 only) (Q 47) Built-in Speedlight (Q 24) Viewfinder (Q 18) Self-timer lamp (Q 26) Eyelet for camera strap Memory card slot cover (Q 10) Lens (Q 18) Power connector cover for AC adapter Attaching the Camera Strap 2
Before You Begin Parts of the Camera Power switch Power-on lamp (Q 12) (Q 12) Shutter-release button (Q 7) Microphone (E5600 only) (Q 47) Built-in Speedlight (Q 24) Viewfinder (Q 18) Self-timer lamp (Q 26) Eyelet for camera strap Memory card slot cover (Q 10) Lens (Q 18) Power connector cover for AC adapter Attaching the Camera Strap 2

User Manual
Page 13
Before You Begin Parts of the Camera Red (!) lamp (Q 20) Green (AF) lamp (Q 20) Viewfinder (Q 18) Monitor (Q 5, 18) Mode dial (Q 6) Zoom (l/O ) buttons (Q 18) Menu button (Q 65, 75) Multi selector (!/Y/&/V) (Q 7) u(delete) button (Q 22, 23) x(play) button (Q 22) Speaker (E5600 only) Battery-chamber cover (Q 8) Battery-chamber Tripod socket (Q 25, 26) cover latch (Q 8) Interface connector cover (Q 48, 50) Interface connector cover USB connector (Q 50, 56) Audio/video (AV) out connector (E5600 only) (Q 48)/ Video output connector (E4600 only) (Q 48) 3
Before You Begin Parts of the Camera Red (!) lamp (Q 20) Green (AF) lamp (Q 20) Viewfinder (Q 18) Monitor (Q 5, 18) Mode dial (Q 6) Zoom (l/O ) buttons (Q 18) Menu button (Q 65, 75) Multi selector (!/Y/&/V) (Q 7) u(delete) button (Q 22, 23) x(play) button (Q 22) Speaker (E5600 only) Battery-chamber cover (Q 8) Battery-chamber Tripod socket (Q 25, 26) cover latch (Q 8) Interface connector cover (Q 48, 50) Interface connector cover USB connector (Q 50, 56) Audio/video (AV) out connector (E5600 only) (Q 48)/ Video output connector (E4600 only) (Q 48) 3

User Manual
Page 14
... 999 13 12 1 Shooting mode 16 2 AE-L1 40 3 Focus indicator2 20 4 Zoom indicator2 18 5 Battery level indicator3 12 6 Internal memory/memory card indicator 16 7 Camera shake icon4 25 8 "Date not set" icon5 14 9 Time zone 91 10 Self-timer indicator 26 11 Date imprint indicator 93 1 Appears when taking pictures... shooting mode . . . . . 72 18 Best Shot Selector (BSS 73 19 White balance 69 20 Color options 74 21 Macro close-up mode 27 5 Appears when camera clock has not been set. 6 Indicates that...
... 999 13 12 1 Shooting mode 16 2 AE-L1 40 3 Focus indicator2 20 4 Zoom indicator2 18 5 Battery level indicator3 12 6 Internal memory/memory card indicator 16 7 Camera shake icon4 25 8 "Date not set" icon5 14 9 Time zone 91 10 Self-timer indicator 26 11 Date imprint indicator 93 1 Appears when taking pictures... shooting mode . . . . . 72 18 Best Shot Selector (BSS 73 19 White balance 69 20 Color options 74 21 Macro close-up mode 27 5 Appears when camera clock has not been set. 6 Indicates that...

User Manual
Page 16
... next to achieve the desired effect. P Auto (Q 16) Choose this mode to display the SETUP menu, where you can perform such tasks as setting the camera clock and adjusting monitor brightness. 6 i Portrait Assist N Landscape Assist j Sports Assist m Night Portrait Assist Use framing assist to help compose pictures suited to shooting conditions... a shooting mode according to a particular type of movies. Before You Begin f Setup (Q 87) Choose this mode to different subjects or shooting conditions and let the camera do the rest.
... next to achieve the desired effect. P Auto (Q 16) Choose this mode to display the SETUP menu, where you can perform such tasks as setting the camera clock and adjusting monitor brightness. 6 i Portrait Assist N Landscape Assist j Sports Assist m Night Portrait Assist Use framing assist to help compose pictures suited to shooting conditions... a shooting mode according to a particular type of movies. Before You Begin f Setup (Q 87) Choose this mode to different subjects or shooting conditions and let the camera do the rest.

User Manual
Page 17
Display sub-menu, move cursor left. Move cursor down . Before You Begin 7 The Shutter-Release Button Your camera has a two stage shutter-release button. To take the picture, press the shutter-release button the rest of the way down . Focus and exposure will... light when the focus operation is pressed halfway. Cancel and return to navigate through the camera menus. Move cursor up. The camera sets focus and exposure when the button is used to previous menu, or move cursor right, or make selection. Navigating the Menus...
Display sub-menu, move cursor left. Move cursor down . Before You Begin 7 The Shutter-Release Button Your camera has a two stage shutter-release button. To take the picture, press the shutter-release button the rest of the way down . Focus and exposure will... light when the focus operation is pressed halfway. Cancel and return to navigate through the camera menus. Move cursor up. The camera sets focus and exposure when the button is used to previous menu, or move cursor right, or make selection. Navigating the Menus...

User Manual
Page 18
...and change the setting (Q 102). 8 When any other type of battery is properly latched. First Steps Inserting Batteries Your camera uses: • LR6 (AA) alkaline batteries (×2), or • Nikon EN-MH1 rechargeable nickel-metal hydride (NiMH) batteries (×2), or • ZR6 (AA) nickel manganese batteries (×...chamber cover latch as shown in the label inside the battery chamber. The default setting is the type of battery currently inserted in the camera in until it in the SET-UP menu. AA batteries 1 2 3 Close the battery-chamber cover • Close the battery-chamber...
...and change the setting (Q 102). 8 When any other type of battery is properly latched. First Steps Inserting Batteries Your camera uses: • LR6 (AA) alkaline batteries (×2), or • Nikon EN-MH1 rechargeable nickel-metal hydride (NiMH) batteries (×2), or • ZR6 (AA) nickel manganese batteries (×...chamber cover latch as shown in the label inside the battery chamber. The default setting is the type of battery currently inserted in the camera in until it in the SET-UP menu. AA batteries 1 2 3 Close the battery-chamber cover • Close the battery-chamber...

User Manual
Page 19
... faulty insulation. • Batteries with insulation that covers only the sides of AC adapter. Alternative Power Sources To power the camera continuously for an extended period. Using batter- Read Battery Warnings Read and follow all warnings and instructions supplied by the battery ...insulation adequately covers the area around the negative terminal. • Batteries with different charges. Inserting Batteries Replacing Batteries Turn the camera off and make or model of the battery and not the area around the negative terminal. For more information on charging batteries...
... faulty insulation. • Batteries with insulation that covers only the sides of AC adapter. Alternative Power Sources To power the camera continuously for an extended period. Using batter- Read Battery Warnings Read and follow all warnings and instructions supplied by the battery ...insulation adequately covers the area around the negative terminal. • Batteries with different charges. Inserting Batteries Replacing Batteries Turn the camera off and make or model of the battery and not the area around the negative terminal. For more information on charging batteries...
User Manual
Page 20
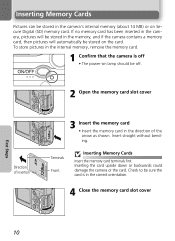
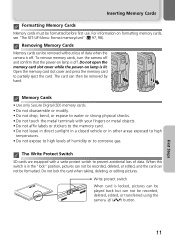
... as shown. Insert straight without bending. If no memory card has been inserted in the camera, pictures will be stored in the memory, and if the camera contains a memory card, then pictures will automatically be stored in the camera's internal memory (about 14 MB) or on lamp should be off. 2 Open the memory... 10 Terminals Front Inserting Memory Cards Insert the memory card terminals first. Check to be sure the card is off • The power-on Secure Digital (SD) memory card. Inserting the card upside down or backwards could damage the...
... as shown. Insert straight without bending. If no memory card has been inserted in the camera, pictures will be stored in the memory, and if the camera contains a memory card, then pictures will automatically be stored in the camera's internal memory (about 14 MB) or on lamp should be off. 2 Open the memory... 10 Terminals Front Inserting Memory Cards Insert the memory card terminals first. Check to be sure the card is off • The power-on Secure Digital (SD) memory card. Inserting the card upside down or backwards could damage the...
User Manual
Page 21
...the "lock" position, pictures can not be recorded, deleted, or edited, and the card can not be recorded, deleted, edited, or transferred using the camera I (V) button. 11 First Steps Do not lock the card when taking, deleting, or editing pictures. The card can not be formatted. When this switch... is off . Write protect switch When card is off . Memory Cards • Use only Secure Digital (SD) memory cards. • Do not disassemble or modify. • Do not drop, bend, or expose to water or strong physical shocks. •...
...the "lock" position, pictures can not be recorded, deleted, or edited, and the card can not be recorded, deleted, edited, or transferred using the camera I (V) button. 11 First Steps Do not lock the card when taking, deleting, or editing pictures. The card can not be formatted. When this switch... is off . Write protect switch When card is off . Memory Cards • Use only Secure Digital (SD) memory cards. • Do not disassemble or modify. • Do not drop, bend, or expose to water or strong physical shocks. •...
User Manual
Page 22
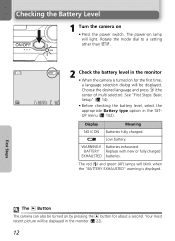
... the appropriate Battery type option in the monitor (Q 22). 12 Display Meaning NO ICON Batteries fully charged. WARNING!! First Steps The x Button The camera can also be displayed. The power-on for about a second. X Low battery. UP menu (Q 102). Batteries exhausted. The red (!) and green... warning is displayed. Your most recent picture will be turned on • Press the power switch. Checking the Battery Level 1 Turn the camera on by pressing the x button for the first time, a language selection dialog will be displayed in the SET- Choose the desired language ...
... the appropriate Battery type option in the monitor (Q 22). 12 Display Meaning NO ICON Batteries fully charged. WARNING!! First Steps The x Button The camera can also be displayed. The power-on for about a second. X Low battery. UP menu (Q 102). Batteries exhausted. The red (!) and green... warning is displayed. Your most recent picture will be turned on • Press the power switch. Checking the Battery Level 1 Turn the camera on by pressing the x button for the first time, a language selection dialog will be displayed in the SET- Choose the desired language ...
User Manual
Page 23
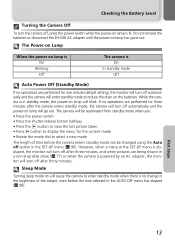
... mode Off Auto Power Off (Standby Mode) If no operations are performed for one minute (default setting), the monitor will turn off automatically and the camera will be reactivated from standby mode when you: • Press the power switch • Press the shutter-release button halfway • Press the x ... operations are performed for the current mode • Rotate the mode dial to select a new mode The length of the subject, even before the camera enters standby mode can be changed using the Auto off after three minutes, and when pictures are being shown in a non-stop slide show (Q ...
... mode Off Auto Power Off (Standby Mode) If no operations are performed for one minute (default setting), the monitor will turn off automatically and the camera will be reactivated from standby mode when you: • Press the power switch • Press the shutter-release button halfway • Press the x ... operations are performed for the current mode • Rotate the mode dial to select a new mode The length of the subject, even before the camera enters standby mode can be changed using the Auto off after three minutes, and when pictures are being shown in a non-stop slide show (Q ...


