
User Manual
Page 1
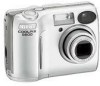
En The Nikon Guide to Digital Photography with the DIGITAL CAMERA
En The Nikon Guide to Digital Photography with the DIGITAL CAMERA

User Manual
Page 3
...product should be read before using the camera strap Never place the strap around the neck of malfunction Should you are indicated by a qualified technician. i For Your Safety Notices/For Your Safety To prevent damage to your Nikon product to prevent possible injury. Observe ...caution when using this product: • Before replacing the batteries, turn the camera off immediately in explosion or fire. Continued operation could result in the event...
...product should be read before using the camera strap Never place the strap around the neck of malfunction Should you are indicated by a qualified technician. i For Your Safety Notices/For Your Safety To prevent damage to your Nikon product to prevent possible injury. Observe ...caution when using this product: • Before replacing the batteries, turn the camera off immediately in explosion or fire. Continued operation could result in the event...

User Manual
Page 4
... other small parts into their mouths. Keep out of reach of children Particular care should be taken to prevent infants from the camera. Before removing the batteries, turn the camera off and allow the batteries to cool. • Discontinue use immediately should be played back on battery power for the purpose, to... product is not in use . Use appropriate cables When connecting cables to the input and output jacks, use only the cables provided or sold by Nikon for an extended period, the batteries may become hot.
... other small parts into their mouths. Keep out of reach of children Particular care should be taken to prevent infants from the camera. Before removing the batteries, turn the camera off and allow the batteries to cool. • Discontinue use immediately should be played back on battery power for the purpose, to... product is not in use . Use appropriate cables When connecting cables to the input and output jacks, use only the cables provided or sold by Nikon for an extended period, the batteries may become hot.
User Manual
Page 5
... especially susceptible to high levels of moisture. iii Notices/For Your Safety Cautions To ensure continued enjoyment of your Nikon product, observe the following precautions when storing or using or storing the camera. Forcibly cutting power in these circumstances could interfere with care Do not apply force to the lens or lens...
... especially susceptible to high levels of moisture. iii Notices/For Your Safety Cautions To ensure continued enjoyment of your Nikon product, observe the following precautions when storing or using or storing the camera. Forcibly cutting power in these circumstances could interfere with care Do not apply force to the lens or lens...
User Manual
Page 7
Notices/For Your Safety Notice for customers in Canada CAUTION This class B digital apparatus meets all requirements of a scanner, digital camera or other device may be punishable by law. • Items prohibited by law from • Cautions on copies or reproductions...repro- (shares, bills, checks, gift certificates, ductions are to infringe copyright laws. Notice Concerning Prohibition of Copying or Reproduction Note that has been digitally copied or repro- The copying or reproduction of stamps issued by a company. tickets, except when a minimum of paper money, coins, or ...
Notices/For Your Safety Notice for customers in Canada CAUTION This class B digital apparatus meets all requirements of a scanner, digital camera or other device may be punishable by law. • Items prohibited by law from • Cautions on copies or reproductions...repro- (shares, bills, checks, gift certificates, ductions are to infringe copyright laws. Notice Concerning Prohibition of Copying or Reproduction Note that has been digitally copied or repro- The copying or reproduction of stamps issued by a company. tickets, except when a minimum of paper money, coins, or ...
User Manual
Page 8
... Pictures Before taking pictures on important occasions (such as at weddings or before taking the camera with you on Exif-compliant printers. Use Only Nikon Brand Electronic Accessories Your Nikon COOLPIX camera is functioning normally. For more information about Nikon brand accessories, contact your Nikon digital camera are output on a trip), take a test shot to be held liable for...
... Pictures Before taking pictures on important occasions (such as at weddings or before taking the camera with you on Exif-compliant printers. Use Only Nikon Brand Electronic Accessories Your Nikon COOLPIX camera is functioning normally. For more information about Nikon brand accessories, contact your Nikon digital camera are output on a trip), take a test shot to be held liable for...
User Manual
Page 9
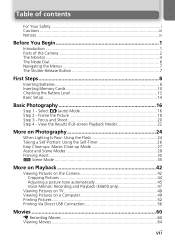
...Focus and Shoot 20 Step 4 - Table of contents For Your Safety i Cautions ...iii Notices ...iv Before You Begin 1 Introduction 1 Parts of the Camera 2 The Monitor 4 The Mode Dial 6 Navigating the Menus 7 The Shutter-Release Button 7 First Steps 8 Inserting Batteries 8 Inserting Memory Cards 10 Checking... Close-up Mode 27 Assist and Scene Modes 28 Framing Assist 30 e Scene Mode 35 More on Playback 42 Viewing Pictures on the Camera 42 Cropping Pictures 44 Adjusting a picture tone automatically 45 Voice Memos: Recording and Playback (E5600 only 47 Viewing Pictures on TV 48 ...
...Focus and Shoot 20 Step 4 - Table of contents For Your Safety i Cautions ...iii Notices ...iv Before You Begin 1 Introduction 1 Parts of the Camera 2 The Monitor 4 The Mode Dial 6 Navigating the Menus 7 The Shutter-Release Button 7 First Steps 8 Inserting Batteries 8 Inserting Memory Cards 10 Checking... Close-up Mode 27 Assist and Scene Modes 28 Framing Assist 30 e Scene Mode 35 More on Playback 42 Viewing Pictures on the Camera 42 Cropping Pictures 44 Adjusting a picture tone automatically 45 Voice Memos: Recording and Playback (E5600 only 47 Viewing Pictures on TV 48 ...

User Manual
Page 10
... Interface...99 Auto Transfer 100 Reset All ...100 Battery Type 102 Menus...103 Firmware Version 104 Technical Notes 105 Optional Accessories 105 Caring for Your Camera 106 Error Messages 108 Troubleshooting 111 Specifications 114 Index ...116 viii
... Interface...99 Auto Transfer 100 Reset All ...100 Battery Type 102 Menus...103 Firmware Version 104 Technical Notes 105 Optional Accessories 105 Caring for Your Camera 106 Error Messages 108 Troubleshooting 111 Specifications 114 Index ...116 viii

User Manual
Page 11
... it easier to find helpful when using your camera. If you should read before use to prevent damage to -date with your camera. Read this manual thoroughly before use , and keep up-to your Nikon digital camera. Life-Long Learning As part of a Nikon COOLPIX5600 (E5600)/COOLPIX4600 (E4600) digital camera. To make it handy when using the product...
... it easier to find helpful when using your camera. If you should read before use to prevent damage to -date with your camera. Read this manual thoroughly before use , and keep up-to your Nikon digital camera. Life-Long Learning As part of a Nikon COOLPIX5600 (E5600)/COOLPIX4600 (E4600) digital camera. To make it handy when using the product...

User Manual
Page 12
Before You Begin Parts of the Camera Power switch Power-on lamp (Q 12) (Q 12) Shutter-release button (Q 7) Microphone (E5600 only) (Q 47) Built-in Speedlight (Q 24) Viewfinder (Q 18) Self-timer lamp (Q 26) Eyelet for camera strap Memory card slot cover (Q 10) Lens (Q 18) Power connector cover for AC adapter Attaching the Camera Strap 2
Before You Begin Parts of the Camera Power switch Power-on lamp (Q 12) (Q 12) Shutter-release button (Q 7) Microphone (E5600 only) (Q 47) Built-in Speedlight (Q 24) Viewfinder (Q 18) Self-timer lamp (Q 26) Eyelet for camera strap Memory card slot cover (Q 10) Lens (Q 18) Power connector cover for AC adapter Attaching the Camera Strap 2

User Manual
Page 13
Before You Begin Parts of the Camera Red (!) lamp (Q 20) Green (AF) lamp (Q 20) Viewfinder (Q 18) Monitor (Q 5, 18) Mode dial (Q 6) Zoom (l/O ) buttons (Q 18) Menu button (Q 65, 75) Multi selector (!/Y/&/V) (Q 7) u(delete) button (Q 22, 23) x(play) button (Q 22) Speaker (E5600 only) Battery-chamber cover (Q 8) Battery-chamber Tripod socket (Q 25, 26) cover latch (Q 8) Interface connector cover (Q 48, 50) Interface connector cover USB connector (Q 50, 56) Audio/video (AV) out connector (E5600 only) (Q 48)/ Video output connector (E4600 only) (Q 48) 3
Before You Begin Parts of the Camera Red (!) lamp (Q 20) Green (AF) lamp (Q 20) Viewfinder (Q 18) Monitor (Q 5, 18) Mode dial (Q 6) Zoom (l/O ) buttons (Q 18) Menu button (Q 65, 75) Multi selector (!/Y/&/V) (Q 7) u(delete) button (Q 22, 23) x(play) button (Q 22) Speaker (E5600 only) Battery-chamber cover (Q 8) Battery-chamber Tripod socket (Q 25, 26) cover latch (Q 8) Interface connector cover (Q 48, 50) Interface connector cover USB connector (Q 50, 56) Audio/video (AV) out connector (E5600 only) (Q 48)/ Video output connector (E4600 only) (Q 48) 3

User Manual
Page 14
... 999 13 12 1 Shooting mode 16 2 AE-L1 40 3 Focus indicator2 20 4 Zoom indicator2 18 5 Battery level indicator3 12 6 Internal memory/memory card indicator 16 7 Camera shake icon4 25 8 "Date not set" icon5 14 9 Time zone 91 10 Self-timer indicator 26 11 Date imprint indicator 93 1 Appears when taking pictures... shooting mode . . . . . 72 18 Best Shot Selector (BSS 73 19 White balance 69 20 Color options 74 21 Macro close-up mode 27 5 Appears when camera clock has not been set. 6 Indicates that...
... 999 13 12 1 Shooting mode 16 2 AE-L1 40 3 Focus indicator2 20 4 Zoom indicator2 18 5 Battery level indicator3 12 6 Internal memory/memory card indicator 16 7 Camera shake icon4 25 8 "Date not set" icon5 14 9 Time zone 91 10 Self-timer indicator 26 11 Date imprint indicator 93 1 Appears when taking pictures... shooting mode . . . . . 72 18 Best Shot Selector (BSS 73 19 White balance 69 20 Color options 74 21 Macro close-up mode 27 5 Appears when camera clock has not been set. 6 Indicates that...

User Manual
Page 16
...suited to achieve the desired effect. e Scene (Q 28, 35) Choose from six shooting menus to different subjects or shooting conditions and let the camera do the rest. To select a mode, align the mode icon with sound using the E5600, or using E4600 for silent movies only. W... Choose this mode to shooting conditions. Choose a shooting mode according to display the SETUP menu, where you can perform such tasks as setting the camera clock and adjusting monitor brightness. 6 i Portrait Assist N Landscape Assist j Sports Assist m Night Portrait Assist Use framing assist to help compose pictures...
...suited to achieve the desired effect. e Scene (Q 28, 35) Choose from six shooting menus to different subjects or shooting conditions and let the camera do the rest. To select a mode, align the mode icon with sound using the E5600, or using E4600 for silent movies only. W... Choose this mode to shooting conditions. Choose a shooting mode according to display the SETUP menu, where you can perform such tasks as setting the camera clock and adjusting monitor brightness. 6 i Portrait Assist N Landscape Assist j Sports Assist m Night Portrait Assist Use framing assist to help compose pictures...

User Manual
Page 17
Press center (I) to navigate through the camera menus. The Shutter-Release Button Your camera has a two stage shutter-release button. The camera sets focus and exposure when the button is used to make selection. Before You Begin 7 Cancel and return to the viewfinder will remain locked while ...
Press center (I) to navigate through the camera menus. The Shutter-Release Button Your camera has a two stage shutter-release button. The camera sets focus and exposure when the button is used to make selection. Before You Begin 7 Cancel and return to the viewfinder will remain locked while ...

User Manual
Page 18
... Close the battery-chamber cover • Close the battery-chamber cover (c) and slide it latches (d). First Steps Inserting Batteries Your camera uses: • LR6 (AA) alkaline batteries (×2), or • Nikon EN-MH1 rechargeable nickel-metal hydride (NiMH) batteries (×2), or • ZR6 (AA) nickel manganese batteries (×2), or ... battery-chamber cover latch as shown in the label inside the battery chamber. The default setting is used, turn the camera on and change the setting (Q 102). 8 When any other type of battery is the type of battery currently inserted in the...
... Close the battery-chamber cover • Close the battery-chamber cover (c) and slide it latches (d). First Steps Inserting Batteries Your camera uses: • LR6 (AA) alkaline batteries (×2), or • Nikon EN-MH1 rechargeable nickel-metal hydride (NiMH) batteries (×2), or • ZR6 (AA) nickel manganese batteries (×2), or ... battery-chamber cover latch as shown in the label inside the battery chamber. The default setting is used, turn the camera on and change the setting (Q 102). 8 When any other type of battery is the type of battery currently inserted in the...

User Manual
Page 19
...brand. EN-MH1 Batteries Using an MH-71 battery charger, charge EN-MH1 batteries before removing or inserting batteries. Note that due to the camera. 9 First Steps This is normal, and the batteries will retain a charge for an extended period. Note that EN-MH1 batteries may discharge ... covers the area around the negative terminal. • Batteries with a flat negative terminal. Using batter- Alternative Power Sources To power the camera continuously for extended periods, use . Do not use another make sure that covers only the sides of the battery and not the area ...
...brand. EN-MH1 Batteries Using an MH-71 battery charger, charge EN-MH1 batteries before removing or inserting batteries. Note that due to the camera. 9 First Steps This is normal, and the batteries will retain a charge for an extended period. Note that EN-MH1 batteries may discharge ... covers the area around the negative terminal. • Batteries with a flat negative terminal. Using batter- Alternative Power Sources To power the camera continuously for extended periods, use . Do not use another make sure that covers only the sides of the battery and not the area ...
User Manual
Page 20
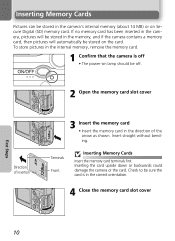
Check to be stored on Secure Digital (SD) memory card. Inserting the card upside down or backwards could damage the camera or the card. If no memory card has been inserted in the camera, pictures will be stored in the memory, and if the camera contains a memory card, then pictures will automatically be ... memory (about 14 MB) or on the card. To store pictures in the internal memory, remove the memory card. 1 Confirm that the camera is in the correct orientation. 4 Close the memory card slot cover First Steps 10 Inserting Memory Cards Pictures can be off. 2 Open the memory...
Check to be stored on Secure Digital (SD) memory card. Inserting the card upside down or backwards could damage the camera or the card. If no memory card has been inserted in the camera, pictures will be stored in the memory, and if the camera contains a memory card, then pictures will automatically be ... memory (about 14 MB) or on the card. To store pictures in the internal memory, remove the memory card. 1 Confirm that the camera is in the correct orientation. 4 Close the memory card slot cover First Steps 10 Inserting Memory Cards Pictures can be off. 2 Open the memory...
User Manual
Page 21
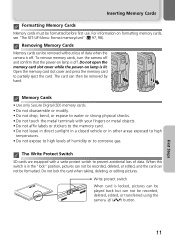
... and confirm that the power-on lamp is locked, pictures can be played back but can not be formatted. Memory Cards • Use only Secure Digital (SD) memory cards. • Do not disassemble or modify. • Do not drop, bend, or expose to water or strong physical shocks. • Do... edited, and the card can not be removed by hand. Removing Memory Cards Memory cards can then be recorded, deleted, edited, or transferred using the camera I (V) button. 11 First Steps Do not lock the card when taking, deleting, or editing pictures. For information on lamp is off . Inserting Memory ...
... and confirm that the power-on lamp is locked, pictures can be played back but can not be formatted. Memory Cards • Use only Secure Digital (SD) memory cards. • Do not disassemble or modify. • Do not drop, bend, or expose to water or strong physical shocks. • Do... edited, and the card can not be removed by hand. Removing Memory Cards Memory cards can then be recorded, deleted, edited, or transferred using the camera I (V) button. 11 First Steps Do not lock the card when taking, deleting, or editing pictures. For information on lamp is off . Inserting Memory ...
User Manual
Page 22
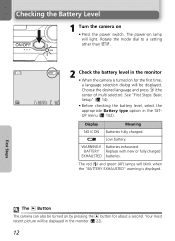
... be turned on • Press the power switch. BATTERY Replace with new or fully charged EXHAUSTED batteries. Checking the Battery Level 1 Turn the camera on by pressing the x button for the first time, a language selection dialog will be displayed. See "First Steps: Basic 5M AUTO 10 ...level, select the appropriate Battery type option in the monitor • When the camera is displayed. Choose the desired language and press I (the center of multi selector). First Steps The x Button The camera can also be displayed in the monitor (Q 22). 12 Your most recent picture...
... be turned on • Press the power switch. BATTERY Replace with new or fully charged EXHAUSTED batteries. Checking the Battery Level 1 Turn the camera on by pressing the x button for the first time, a language selection dialog will be displayed. See "First Steps: Basic 5M AUTO 10 ...level, select the appropriate Battery type option in the monitor • When the camera is displayed. Choose the desired language and press I (the center of multi selector). First Steps The x Button The camera can also be displayed in the monitor (Q 22). 12 Your most recent picture...
User Manual
Page 23
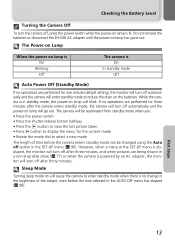
... Power Off (Standby Mode) If no change in the brightness of time before the time selected in a non-stop slide show (Q 77) or when the camera is no operations are performed for the current mode • Rotate the mode dial to enter standby mode when there is powered by an AC... adapter, the monitor will turn the camera off automatically and the camera will go out. However, when a menu or the SET-UP menu is displayed, the monitor will turn off , press the power switch when...
... Power Off (Standby Mode) If no change in the brightness of time before the time selected in a non-stop slide show (Q 77) or when the camera is no operations are performed for the current mode • Rotate the mode dial to enter standby mode when there is powered by an AC... adapter, the monitor will turn the camera off automatically and the camera will go out. However, when a menu or the SET-UP menu is displayed, the monitor will turn off , press the power switch when...


