
User Manual
Page 9
... Photography 23 Taking Pictures in Mode 24 Step 1-Select Mode 24 Step 2-Frame the Picture 26 Step 3-Focus and Shoot 28 Step 4-View the Results 31 Flash Photography 32 Focusing Near and Far 34 Self-Timer Mode 35 Exposure Compensation 36 Taking Pictures in Scene Mode 37 Taking Pictures for a Panorama 44 More on Photography 47 Controlling Exposure 48 P: Programmed Auto 49 S: Shutter-Priority Auto 50 A: Aperture-Priority Auto 51 M: Manual 52 Image Quality and Size 54 Image Quality 54 Image Size 55...
... Photography 23 Taking Pictures in Mode 24 Step 1-Select Mode 24 Step 2-Frame the Picture 26 Step 3-Focus and Shoot 28 Step 4-View the Results 31 Flash Photography 32 Focusing Near and Far 34 Self-Timer Mode 35 Exposure Compensation 36 Taking Pictures in Scene Mode 37 Taking Pictures for a Panorama 44 More on Photography 47 Controlling Exposure 48 P: Programmed Auto 49 S: Shutter-Priority Auto 50 A: Aperture-Priority Auto 51 M: Manual 52 Image Quality and Size 54 Image Quality 54 Image Size 55...

User Manual
Page 11
... Menu ...113 CF Card Format 114 The Playback Menu 115 Delete ...116 Folders ...118 Slide Show 123 Protect ...125 Hide Image 126 Print Set ...127 Auto Transfer 129 Move Image 131 CF Card Format 133 Small Pic ...133 The Setup Menu 134 Language ...135 Date...135 Folders ...135 Monitor Options 136 Seq. Numbers 138 Shutter Sound 139 Auto Off ...140 CF Card Format 140 Controls ...141 Shot Confirmation 143 info.txt ...143 USB...144 Video Mode 144 Reset All...144 Date Imprint 145 Firmware...
... Menu ...113 CF Card Format 114 The Playback Menu 115 Delete ...116 Folders ...118 Slide Show 123 Protect ...125 Hide Image 126 Print Set ...127 Auto Transfer 129 Move Image 131 CF Card Format 133 Small Pic ...133 The Setup Menu 134 Language ...135 Date...135 Folders ...135 Monitor Options 136 Seq. Numbers 138 Shutter Sound 139 Auto Off ...140 CF Card Format 140 Controls ...141 Shot Confirmation 143 info.txt ...143 USB...144 Video Mode 144 Reset All...144 Date Imprint 145 Firmware...

User Manual
Page 15
Before Taking Important Pictures Before taking the camera on a trip), take a test shot to frequently-asked questions (FAQs), and general advice on digital imaging and photography. Life-Long Learning As part of Nikon's "Life-Long Learning" commitment to ongoing product support and education, continually-updated information is available on-line at weddings or before taking pictures on important occasions (such as at the following sites: • For users in...
Before Taking Important Pictures Before taking the camera on a trip), take a test shot to frequently-asked questions (FAQs), and general advice on digital imaging and photography. Life-Long Learning As part of Nikon's "Life-Long Learning" commitment to ongoing product support and education, continually-updated information is available on-line at weddings or before taking pictures on important occasions (such as at the following sites: • For users in...

User Manual
Page 20
Playback ( 75) Play pictures back in which grants access to display the setup menu, where you can perform such tasks as metering and image sharpening. ISO ( 59) Display a menu of digital cameras. Movie ( 88) Choose from fifteen "scenes" suited to the mode dial. Recommended for first-time users of sensitivity (ISO equivalency) options. WB ( 60) Display a menu of control over shutter speed and aperture. Before You Begin Exposure Mode ( 48) P, S, A, and M modes offer varying degrees...
Playback ( 75) Play pictures back in which grants access to display the setup menu, where you can perform such tasks as metering and image sharpening. ISO ( 59) Display a menu of digital cameras. Movie ( 88) Choose from fifteen "scenes" suited to the mode dial. Recommended for first-time users of sensitivity (ISO equivalency) options. WB ( 60) Display a menu of control over shutter speed and aperture. Before You Begin Exposure Mode ( 48) P, S, A, and M modes offer varying degrees...
User Manual
Page 22
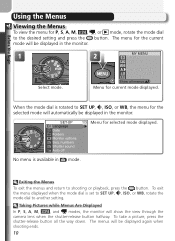
... desired setting and press the mode will be displayed again when shooting ends. 10 SET-UP En Language Date Folders Monitor options Seq. numbers Shutter sound Auto off 1/3 Menu for the current 1 Select mode. 2 MY MENU Metering Continuous BSS Image adjustment Saturation control User setting Show all the way down. To exit the menu displayed when the mode dial is available in the monitor. , or mode, rotate the mode dial button. Taking Pictures while Menus Are Displayed In P, S, A, M, , and modes, the...
... desired setting and press the mode will be displayed again when shooting ends. 10 SET-UP En Language Date Folders Monitor options Seq. numbers Shutter sound Auto off 1/3 Menu for the current 1 Select mode. 2 MY MENU Metering Continuous BSS Image adjustment Saturation control User setting Show all the way down. To exit the menu displayed when the mode dial is available in the monitor. , or mode, rotate the mode dial button. Taking Pictures while Menus Are Displayed In P, S, A, M, , and modes, the...
User Manual
Page 29
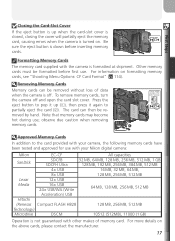
... Formatting Memory Cards The memory card supplied with other makes of data when the camera is off and open the card slot cover. Removing Memory Cards Memory cards can then be removed by hand. Be sure the eject button is down before first use. The card can be formatted before inserting memory cards. For more details on formatting memory cards, see "Shooting Menu Options: CF Card Format" ( 114). Approved Memory Cards In addition to the card provided with your camera, the following memory cards...
... Formatting Memory Cards The memory card supplied with other makes of data when the camera is off and open the card slot cover. Removing Memory Cards Memory cards can then be removed by hand. Be sure the eject button is down before first use. The card can be formatted before inserting memory cards. For more details on formatting memory cards, see "Shooting Menu Options: CF Card Format" ( 114). Approved Memory Cards In addition to the card provided with your camera, the following memory cards...

User Manual
Page 39
... fingernails in focus. Using the Diopter Control When operating the diopter control with your eye to the viewfinder, care should be taken to see the display in the viewfinder, make sure the focus brackets are simply enlarged, producing a slightly "grainy" image. Digital Zoom In digital zoom, data from the camera's image sensor are in the storage position. 27 Framing Pictures in the Viewfinder •...
... fingernails in focus. Using the Diopter Control When operating the diopter control with your eye to the viewfinder, care should be taken to see the display in the viewfinder, make sure the focus brackets are simply enlarged, producing a slightly "grainy" image. Digital Zoom In digital zoom, data from the camera's image sensor are in the storage position. 27 Framing Pictures in the Viewfinder •...

User Manual
Page 47
.... Basic Photography Self-Timer Mode The self-timer is generally used for delay of seconds remaining until and icons are displayed in the shooting menu is automatically set to turn self-timer off. just settings and frame picture. Check focus. 3 Start timer. The Self-Timer The Continuous option in monitor. Manual Focus Select the self-timer before choosing a focus distance. Press once for delay of about 10 s, twice for self-portraits or when taking low-light or close-up shots without...
.... Basic Photography Self-Timer Mode The self-timer is generally used for delay of seconds remaining until and icons are displayed in the shooting menu is automatically set to turn self-timer off. just settings and frame picture. Check focus. 3 Start timer. The Self-Timer The Continuous option in monitor. Manual Focus Select the self-timer before choosing a focus distance. Press once for delay of about 10 s, twice for self-portraits or when taking low-light or close-up shots without...

User Manual
Page 79
... monitor when the camera is ," without further modification. More on a computer. A icon appears in combination with digital zoom, white balance, white-balance bracketing, or a Lens setting of detail. SATURATION CONTROL Maximum Enhanced Normal Moderate Minimum Black&white Option +2 Maximum +1 Enhanced 0 Normal -1 Moderate -2 Minimum Black&white Description Use for vivid, photoprint effect when taking pictures that will later be printed "as color images, but show a higher level of Slide copy adptr.
... monitor when the camera is ," without further modification. More on a computer. A icon appears in combination with digital zoom, white balance, white-balance bracketing, or a Lens setting of detail. SATURATION CONTROL Maximum Enhanced Normal Moderate Minimum Black&white Option +2 Maximum +1 Enhanced 0 Normal -1 Moderate -2 Minimum Black&white Description Use for vivid, photoprint effect when taking pictures that will later be printed "as color images, but show a higher level of Slide copy adptr.

User Manual
Page 98
...-compatible device and the pictures printed directly from a computer (see the Nikon View Reference Manual, on CD-ROM) To print the time and date of prints, and the information to be printed • The print order is not copied to the computer when pictures are taken ( 145) • if the photo printer or print service supports Digital Print Order Format (DPOF), use the Date option in the Print set > Print selection menu ( 127) • transfer the pictures using Nikon View and print them using the Nikon View date imprint...
...-compatible device and the pictures printed directly from a computer (see the Nikon View Reference Manual, on CD-ROM) To print the time and date of prints, and the information to be printed • The print order is not copied to the computer when pictures are taken ( 145) • if the photo printer or print service supports Digital Print Order Format (DPOF), use the Date option in the Print set > Print selection menu ( 127) • transfer the pictures using Nikon View and print them using the Nikon View date imprint...
User Manual
Page 126
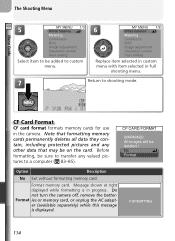
... right displayed while formatting is displayed. Do not turn the camera off, remove the batterFormat ies or memory card, or unplug the AC adapter (available separately) while this message is in progress. All images will be sure to transfer any other data that formatting memory cards permanently deletes all data they contain, including protected pictures and any valued pictures to a computer ( 83-85). Before formatting, be deleted ! Menu Guide The Shooting Menu 5 MY MENU 1/3 White balance Metering Continuous BSS Image adjustment Saturation control User setting Select...
... right displayed while formatting is displayed. Do not turn the camera off, remove the batterFormat ies or memory card, or unplug the AC adapter (available separately) while this message is in progress. All images will be sure to transfer any other data that formatting memory cards permanently deletes all data they contain, including protected pictures and any valued pictures to a computer ( 83-85). Before formatting, be deleted ! Menu Guide The Shooting Menu 5 MY MENU 1/3 White balance Metering Continuous BSS Image adjustment Saturation control User setting Select...

User Manual
Page 137
... deleted by icon. 3 4 Repeat steps 1 and 2 to playback menu. 125 To deselect picture, highlight and press multi selector up PLAYBACK MENU 1/2 Delete Folders Slide show Protect or down. Print set Auto transfer Complete operation and return to select additional pictures. Done Select Set Done Select highlighted picture. To exit without Hide image changing protected status of pictures, press button. Selected pictures marked by pressing the AF ( ) button or using the delete options in the playback and folder menus. Menu Guide The Playback Menu Protect Protected...
... deleted by icon. 3 4 Repeat steps 1 and 2 to playback menu. 125 To deselect picture, highlight and press multi selector up PLAYBACK MENU 1/2 Delete Folders Slide show Protect or down. Print set Auto transfer Complete operation and return to select additional pictures. Done Select Set Done Select highlighted picture. To exit without Hide image changing protected status of pictures, press button. Selected pictures marked by pressing the AF ( ) button or using the delete options in the playback and folder menus. Menu Guide The Playback Menu Protect Protected...

User Manual
Page 138
... playback menu. Note, however, that hidden pictures will be deleted when the memory card is used to reveal some of pictures, press button. To exit without chang- Selected pictures marked by pressing the AF ( ) button or using the delete options in quick review and full-frame playback. Hidden pictures are hidden, the message "ALL IMAGES ARE HIDDEN" will be displayed in the playback and folder menus. Done Select Set Done Select highlighted picture. Print set Auto transfer Complete operation and...
... playback menu. Note, however, that hidden pictures will be deleted when the memory card is used to reveal some of pictures, press button. To exit without chang- Selected pictures marked by pressing the AF ( ) button or using the delete options in quick review and full-frame playback. Hidden pictures are hidden, the message "ALL IMAGES ARE HIDDEN" will be displayed in the playback and folder menus. Done Select Set Done Select highlighted picture. Print set Auto transfer Complete operation and...
User Manual
Page 142
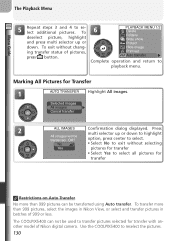
... images. Print set Auto transfer Complete operation and return to select. Selected images All images Cancel transfer 2 ALL IMAGES Confirmation dialog displayed. Use the COOLPIX5400 to select additional pictures. Marking All Pictures for transfer with another model of pictures, press button. Press multi selector up or down to highlight All images will be used to select all pictures for transfer Restrictions on Auto Transfer No more than 999 pictures can not be tranferred. Menu Guide...
... images. Print set Auto transfer Complete operation and return to select. Selected images All images Cancel transfer 2 ALL IMAGES Confirmation dialog displayed. Use the COOLPIX5400 to select additional pictures. Marking All Pictures for transfer with another model of pictures, press button. Press multi selector up or down to highlight All images will be used to select all pictures for transfer Restrictions on Auto Transfer No more than 999 pictures can not be tranferred. Menu Guide...

User Manual
Page 152
... menu. Standby Mode In standby mode, all camera functions are deactivated and the camera itself is connected to a video device, video output will not enter standby mode while connected to five minutes or less when using this type of the setting chosen in the camera. Menu Guide The Setup Menu Auto Off When operated on battery power, the camera AUTO OFF will remain on for three minutes when menus are displayed. No Format 2CR5 (DL245) Batteries...
... menu. Standby Mode In standby mode, all camera functions are deactivated and the camera itself is connected to a video device, video output will not enter standby mode while connected to five minutes or less when using this type of the setting chosen in the camera. Menu Guide The Setup Menu Auto Off When operated on battery power, the camera AUTO OFF will remain on for three minutes when menus are displayed. No Format 2CR5 (DL245) Batteries...

User Manual
Page 164
... pictures in camera, or error oc- deleting picture. 125 LENS ERROR Lens operation error. Turn camera off , unplug optional AC adapter (if us- battery, and turn camera era's internal circuitry. from Folders menu. 122 Select another folder or ALL IMAGES ARE HIDDEN All pictures in cam- FILE CONTAINS File created by computer or View file on again. ing), remove and reinsert SYSTEM ERROR Error has occurred in current fold- curred while saving pic- hidden status of camera. on memory To view pictures, select CARD...
... pictures in camera, or error oc- deleting picture. 125 LENS ERROR Lens operation error. Turn camera off , unplug optional AC adapter (if us- battery, and turn camera era's internal circuitry. from Folders menu. 122 Select another folder or ALL IMAGES ARE HIDDEN All pictures in cam- FILE CONTAINS File created by computer or View file on again. ing), remove and reinsert SYSTEM ERROR Error has occurred in current fold- curred while saving pic- hidden status of camera. on memory To view pictures, select CARD...

User Manual
Page 165
... •Ambient lighting is too bright: move to darker lo- 27 cation or use viewfinder. • Display options require adjustment. 136-137 • Monitor is not correctly inserted or battery-cham- Data already recorded to the memory card at the time the problem occurred. Press shutter-release button halfway. • Monitor is in the loss of any data not recorded to the memory card will not...
... •Ambient lighting is too bright: move to darker lo- 27 cation or use viewfinder. • Display options require adjustment. 136-137 • Monitor is not correctly inserted or battery-cham- Data already recorded to the memory card at the time the problem occurred. Press shutter-release button halfway. • Monitor is in the loss of any data not recorded to the memory card will not...

User Manual
Page 166
No picture is taken •Green (AF) lamp flickers: camera unable to record picture at slow shutter speeds: ◆Use Best Shot Selector (BSS) ◆Mount camera on tripod and use in your camera. • Message "NO CARD PRESENT" appears in monitor: no memory card in moni- button is pressed •Message "CARD IS NOT FORMATTED" appears in monitor: memory card is not formatted for use self-timer 75 18 25 28 28 114 16 32...
No picture is taken •Green (AF) lamp flickers: camera unable to record picture at slow shutter speeds: ◆Use Best Shot Selector (BSS) ◆Mount camera on tripod and use in your camera. • Message "NO CARD PRESENT" appears in monitor: no memory card in moni- button is pressed •Message "CARD IS NOT FORMATTED" appears in monitor: memory card is not formatted for use self-timer 75 18 25 28 28 114 16 32...

User Manual
Page 167
...; Sensitivity (ISO equivalency) too high. 58-59 bright pixels appear • Shutter speed too slow. Video cable not correctly connected, TV not tuned eo cable connected to video channel, or Video mode not set correctly. 82, 144 • Camera is off automatically when: 32-33 ◆Focus mode is set to computer running Windows 2000 memory card in image ("noise") or slower, turn noise reduction on movies, small pictures, or pic- See Nikon View Reference Manual (on...
...; Sensitivity (ISO equivalency) too high. 58-59 bright pixels appear • Shutter speed too slow. Video cable not correctly connected, TV not tuned eo cable connected to video channel, or Video mode not set correctly. 82, 144 • Camera is off automatically when: 32-33 ◆Focus mode is set to computer running Windows 2000 memory card in image ("noise") or slower, turn noise reduction on movies, small pictures, or pic- See Nikon View Reference Manual (on...

User Manual
Page 172
.../off, see Power switch Optional accessories, 107, 148 P P, see Video mode Number of exposures remain- See also Date imprint, DPOF Print set, 86, 115, 127-128 Protect, 115, 125 Protected pictures, 117, 121, 125 Q Quality, see Image quality button, 5, 74 Quick review, 74 Quick Time, see Movies QVGA, see Continuous connecting to 82 R Red-eye reduction, 32 Release speed, 136 Repeating flash, 32, 107 Reset, 95, 112 Reset all menus, 94 149, 156 Shutter-release button, 4, 9, focus, 27...
.../off, see Power switch Optional accessories, 107, 148 P P, see Video mode Number of exposures remain- See also Date imprint, DPOF Print set, 86, 115, 127-128 Protect, 115, 125 Protected pictures, 117, 121, 125 Q Quality, see Image quality button, 5, 74 Quick review, 74 Quick Time, see Movies QVGA, see Continuous connecting to 82 R Red-eye reduction, 32 Release speed, 136 Repeating flash, 32, 107 Reset, 95, 112 Reset all menus, 94 149, 156 Shutter-release button, 4, 9, focus, 27...


