X3-10 Quick Start Guide (English)
Page 1
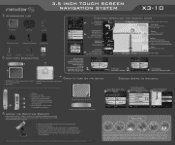
... X3- 1 0 ACCESSORIES LIST 3.5" GPS Device Carry Pouch Car Adaptor Dashboard Mount Disk Windshield Mounting Bracket Mounting Cradle Lij Stylus Pen USB Cable Power Adaptor UNIT VIEW DESCRIPTION IOW SD card with maps m Route Information (total) 405 ' ,,ti Rockfield Blvd 20:46 0:09 4.5mi Fastest 11 Settings Plan on top of such damages. You will also be given the option to add your current position to favorites and to check nearby POIs Menu...
... X3- 1 0 ACCESSORIES LIST 3.5" GPS Device Carry Pouch Car Adaptor Dashboard Mount Disk Windshield Mounting Bracket Mounting Cradle Lij Stylus Pen USB Cable Power Adaptor UNIT VIEW DESCRIPTION IOW SD card with maps m Route Information (total) 405 ' ,,ti Rockfield Blvd 20:46 0:09 4.5mi Fastest 11 Settings Plan on top of such damages. You will also be given the option to add your current position to favorites and to check nearby POIs Menu...

X3-10 Hardware Manual
Page 2
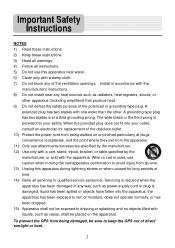
... reduce the risk of important operating and maintenance (servicing) instructions in the operating instructions unless you have been made. The exclamation point within an equilateral triangle, is not used for a long time, disconnect the plug from the outlet. NO USE-SERVICEABLE PARTS INSIDE. Important Safety Instructions , CAUTION: TO REDUCE THE RISK OF ELECTRIC SHOCK, DO NOT REMOVE COVER (OR BACK). The lightning...
... reduce the risk of important operating and maintenance (servicing) instructions in the operating instructions unless you have been made. The exclamation point within an equilateral triangle, is not used for a long time, disconnect the plug from the outlet. NO USE-SERVICEABLE PARTS INSIDE. Important Safety Instructions , CAUTION: TO REDUCE THE RISK OF ELECTRIC SHOCK, DO NOT REMOVE COVER (OR BACK). The lightning...
X3-10 Hardware Manual
Page 3
...Servicing is required when the apparatus has been damaged in accordance with the manufacturer's instructions. 8) Do not install near water. 6) Clean only with the apparatus. To prevent the GPS from the apparatus. 11) Only use... the safety purpose of time. 14) Refer all instructions. 5) Do not use this apparatus during lightning storms or when unused for replacement of the obsolete outlet. 10) Protect the power cord from being damaged...the apparatus, the apparatus has been exposed to rain or moisture, does not operate normally, or has been dropped. 15) Apparatus shall not be exposed to ...
...Servicing is required when the apparatus has been damaged in accordance with the manufacturer's instructions. 8) Do not install near water. 6) Clean only with the apparatus. To prevent the GPS from the apparatus. 11) Only use... the safety purpose of time. 14) Refer all instructions. 5) Do not use this apparatus during lightning storms or when unused for replacement of the obsolete outlet. 10) Protect the power cord from being damaged...the apparatus, the apparatus has been exposed to rain or moisture, does not operate normally, or has been dropped. 15) Apparatus shall not be exposed to ...
X3-10 Hardware Manual
Page 4
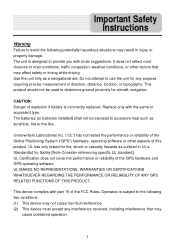
... or road conditions, traffic congestion, weather conditions, or other aspects of the GPS hardware and GPS operating software. Do not attempt to use the unit for fire, shock or casualty hazards as a navigational aid. Underwriters Laboratories Inc. ("UL") has not tested the performance or reliability of the Global Positioning System ("GPS") hardware, operating software or other factors that may affect safety or timing while driving. UL...
... or road conditions, traffic congestion, weather conditions, or other aspects of the GPS hardware and GPS operating software. Do not attempt to use the unit for fire, shock or casualty hazards as a navigational aid. Underwriters Laboratories Inc. ("UL") has not tested the performance or reliability of the Global Positioning System ("GPS") hardware, operating software or other factors that may affect safety or timing while driving. UL...

X3-10 Hardware Manual
Page 5
... part 15 of the following measures: 1. Reorient or relocate the receiving antenna. 2. Connect the equipment into an outlet on , the user is connected. 3. These limits are for help. Important Safety Instructions Note: This equipment has been tested and found to comply with the instructions, may appear different from that to which can radiate radio frequency energy and, if not installed and used...
... part 15 of the following measures: 1. Reorient or relocate the receiving antenna. 2. Connect the equipment into an outlet on , the user is connected. 3. These limits are for help. Important Safety Instructions Note: This equipment has been tested and found to comply with the instructions, may appear different from that to which can radiate radio frequency energy and, if not installed and used...

X3-10 Hardware Manual
Page 6
Accessories Accessories List ITEM NAME Instruction Manual AC Adaptor Car Adaptor QTY 2 1 1 Mounting Bracket 1 Mounting Cradle 1 USB Cable 1 Stylus 1 Dashboard Mount Disk 1 SD Card 1 Pouch 1 NOTE Accessories and their parts numbers are subject to modification without prior notice due to improvements. 5
Accessories Accessories List ITEM NAME Instruction Manual AC Adaptor Car Adaptor QTY 2 1 1 Mounting Bracket 1 Mounting Cradle 1 USB Cable 1 Stylus 1 Dashboard Mount Disk 1 SD Card 1 Pouch 1 NOTE Accessories and their parts numbers are subject to modification without prior notice due to improvements. 5
X3-10 Hardware Manual
Page 7
Contents Important Safety Instructions Accessories View of Main Unit System Connections Power Supply Preparation General Setup Playing Music Photo Viewer Use of the Mount Accessories Troubleshooting Specifications 1 5 7 8 9 11 15 17 20 21 23 6
Contents Important Safety Instructions Accessories View of Main Unit System Connections Power Supply Preparation General Setup Playing Music Photo Viewer Use of the Mount Accessories Troubleshooting Specifications 1 5 7 8 9 11 15 17 20 21 23 6

X3-10 Hardware Manual
Page 8
When the earphones are connected to the supplied adaptor. 5. DC 5V Input Jack Used to connect to this jack, the speaker will be turned off automatically. 4. RESET Button Press to the USB device. 7. Card Slot Insert the SD card into the slot. 3. USB Port Used to connect to reset the system. 7 LCD Screen 6. Earphone Jack Used to connect earphones for a longer time to enter or exit the standby mode. 2. View of Main Unit 1. POWER Button Press for private listening.
When the earphones are connected to the supplied adaptor. 5. DC 5V Input Jack Used to connect to this jack, the speaker will be turned off automatically. 4. RESET Button Press to the USB device. 7. Card Slot Insert the SD card into the slot. 3. USB Port Used to connect to reset the system. 7 LCD Screen 6. Earphone Jack Used to connect earphones for a longer time to enter or exit the standby mode. 2. View of Main Unit 1. POWER Button Press for private listening.

X3-10 Hardware Manual
Page 9
... the unit for private listening. Inserting SD Card The unit is connected, the speakers will automatically turn down the volume before you to comfortable level. 8 When earphone is designed with your hearing. Connecting to Earphones Connect the earphones to any other external device connected to the unit are switched off . You can now remove the card. System Connections Always ensure that the unit and any external device.
... the unit for private listening. Inserting SD Card The unit is connected, the speakers will automatically turn down the volume before you to comfortable level. 8 When earphone is designed with your hearing. Connecting to Earphones Connect the earphones to any other external device connected to the unit are switched off . You can now remove the card. System Connections Always ensure that the unit and any external device.

X3-10 Hardware Manual
Page 10
...: Turn unit's power off before unplugging. When using the adaptor, the LCD screen will be brighter than with a Car Adaptor for viewing. Disconnect the unit from the Car Adaptor when starting the vehicle. Attention Place the unit in a proper position for powering while in the following segment. 9 Connect the Car Adaptor Power Plug to the unit's power jack and...
...: Turn unit's power off before unplugging. When using the adaptor, the LCD screen will be brighter than with a Car Adaptor for viewing. Disconnect the unit from the Car Adaptor when starting the vehicle. Attention Place the unit in a proper position for powering while in the following segment. 9 Connect the Car Adaptor Power Plug to the unit's power jack and...

X3-10 Hardware Manual
Page 11
... only be charged by using the supplied adaptor. . 10 Charging the Battery Pack The battery must be used and charged when temperatures are between 32-100F. Maintain well-ventilated conditions around the product to the product. When the battery is weak, an indication menu will appear on the LCD screen and the unit will power off automatically...
... only be charged by using the supplied adaptor. . 10 Charging the Battery Pack The battery must be used and charged when temperatures are between 32-100F. Maintain well-ventilated conditions around the product to the product. When the battery is weak, an indication menu will appear on the LCD screen and the unit will power off automatically...
X3-10 Hardware Manual
Page 13
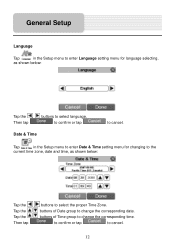
to confirm or tap Date & Time to cancel. 12 buttons of Date group to change the corresponding time. Tap in the Setup menu to enter Language setting menu for changing to the current time zone, date and time, as shown below : Tap the Tap the Tap the Then tap buttons to select the proper Time Zone. buttons of Time group to change the corresponding date. to confirm or tap to cancel. General Setup Language Tap in the Setup menu to enter Date & Time setting menu for language selecting, as shown below : Tap the , Then tap buttons to select language.
to confirm or tap Date & Time to cancel. 12 buttons of Date group to change the corresponding time. Tap in the Setup menu to enter Language setting menu for changing to the current time zone, date and time, as shown below : Tap the Tap the Tap the Then tap buttons to select the proper Time Zone. buttons of Time group to change the corresponding date. to confirm or tap to cancel. General Setup Language Tap in the Setup menu to enter Date & Time setting menu for language selecting, as shown below : Tap the , Then tap buttons to select language.
X3-10 Hardware Manual
Page 14
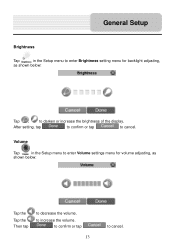
to cancel. to confirm or tap 13 to increase the volume. Volume Tap in the Setup menu to enter Brightness setting menu for volume adjusting, as shown below : Tap the Tap the Then tap to decrease the volume. General Setup Brightness Tap in the Setup menu to enter Volume settings menu for backlight adjusting, as shown below : Tap , to darken or increase the brightness of the display. After setting, tap to confirm or tap to cancel.
to cancel. to confirm or tap 13 to increase the volume. Volume Tap in the Setup menu to enter Brightness setting menu for volume adjusting, as shown below : Tap the Tap the Then tap to decrease the volume. General Setup Brightness Tap in the Setup menu to enter Volume settings menu for backlight adjusting, as shown below : Tap , to darken or increase the brightness of the display. After setting, tap to confirm or tap to cancel.

X3-10 Hardware Manual
Page 15
... unit's battery status. Repeat each time to the Display menu. When the battery is being charged, the Battery Status will be "Charging". 14 When tapping the screen on the final step, the new settings will be stored and you are between 0% and 100%, where 0% means the battery power has run out completely, and 100% represents a full battery power. Power Tap in the Setup menu to another position, tap and hold...
... unit's battery status. Repeat each time to the Display menu. When the battery is being charged, the Battery Status will be "Charging". 14 When tapping the screen on the final step, the new settings will be stored and you are between 0% and 100%, where 0% means the battery power has run out completely, and 100% represents a full battery power. Power Tap in the Setup menu to another position, tap and hold...
X3-10 Hardware Manual
Page 16
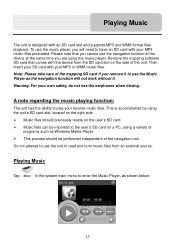
... same time you remove it . Playing Music The unit is accomplished by using the unit's SD card slot, located on the right side. Music files should be imported to play your MP3 music files preloaded. Playing Music Tap in the system main menu to read and burn music files from the SD card slot on a PC, using the music player. Remove the mapping software SD card that you cannot use the navigation function...
... same time you remove it . Playing Music The unit is accomplished by using the unit's SD card slot, located on the right side. Music files should be imported to play your MP3 music files preloaded. Playing Music Tap in the system main menu to read and burn music files from the SD card slot on a PC, using the music player. Remove the mapping software SD card that you cannot use the navigation function...
X3-10 Hardware Manual
Page 18
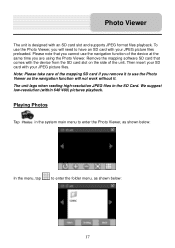
... use the Photo Viewer as shown below : In the menu, tap to have an SD card with your JPEG picture files preloaded. The unit lags when reading high-resolution JPEG files in the system main menu to enter the Photo Viewer, as shown below : 17 Remove the mapping software SD card that you will need to enter the folder menu, as the navigation function will not work...
... use the Photo Viewer as shown below : In the menu, tap to have an SD card with your JPEG picture files preloaded. The unit lags when reading high-resolution JPEG files in the system main menu to enter the Photo Viewer, as shown below : 17 Remove the mapping software SD card that you will need to enter the folder menu, as the navigation function will not work...
X3-10 Hardware Manual
Page 21
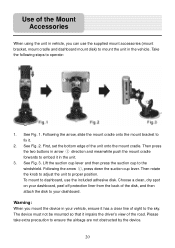
... the knob to adjust the unit to operate: 1. Use of the Mount Accessories When using the unit in vehicle, you mount the device in your dashboard. Take the following steps to proper position. See Fig. 1. First, set the bottom edge of sight to embed it in the vehicle. To mount to dashboard, use the supplied mount accessories (mount bracket, mount cradle and dashboard mount disk) to your...
... the knob to adjust the unit to operate: 1. Use of the Mount Accessories When using the unit in vehicle, you mount the device in your dashboard. Take the following steps to proper position. See Fig. 1. First, set the bottom edge of sight to embed it in the vehicle. To mount to dashboard, use the supplied mount accessories (mount bracket, mount cradle and dashboard mount disk) to your...
X3-10 Hardware Manual
Page 22
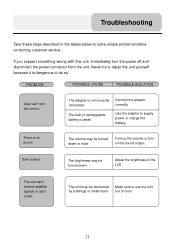
Never try to repair the unit yourself because it is dangerous to supply power or charge the battery. Dark screen. The unit can't receive satellite signals or can 't turn the unit on the sound output. The volume may be obstructed Make sure to solve simple problems before contacting customer service. The unit may be turned down or mute. The built-in the tables below to use the unit by buildings or metal...
Never try to repair the unit yourself because it is dangerous to supply power or charge the battery. Dark screen. The unit can't receive satellite signals or can 't turn the unit on the sound output. The volume may be obstructed Make sure to solve simple problems before contacting customer service. The unit may be turned down or mute. The built-in the tables below to use the unit by buildings or metal...
X3-10 Hardware Manual
Page 23
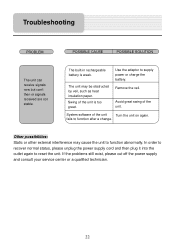
... or signals received are not stable. The built-in rechargeable battery is too great. Use the adaptor to function after a change. The unit may cause the unit to reset the unit. If the problems still exist, please cut off the power supply and consult your service center or a qualified technician. 22 Swing of the unit is weak. fails to supply power or charge the battery. System software...
... or signals received are not stable. The built-in rechargeable battery is too great. Use the adaptor to function after a change. The unit may cause the unit to reset the unit. If the problems still exist, please cut off the power supply and consult your service center or a qualified technician. 22 Swing of the unit is weak. fails to supply power or charge the battery. System software...

X3-10 Hardware Manual
Page 24
Specifications TFT screen size Frequency Response Audio Signal-to-noise Rate Audio distortion or noise Channel Separation Dynamic Range Power Power Consumption Dimensions Weight 3.5 inches 20Hz~20kHz ≥65dB ≤-20dB (1kHz) ≥70dB (1kHz) ≥80dB (1kHz) AC 100-240V ~ 50/60Hz; DC 5V < 8W 100mmX76mmX22mm (L*W*D) About 0.25kg DESIGN AND SPECIFICATIONS ARE SUBJECT TO CHANGE WITHOUT NOTICE NextarTM, a trademark of Nextar (Hong Kong) Limited. 23 X31008EH01
Specifications TFT screen size Frequency Response Audio Signal-to-noise Rate Audio distortion or noise Channel Separation Dynamic Range Power Power Consumption Dimensions Weight 3.5 inches 20Hz~20kHz ≥65dB ≤-20dB (1kHz) ≥70dB (1kHz) ≥80dB (1kHz) AC 100-240V ~ 50/60Hz; DC 5V < 8W 100mmX76mmX22mm (L*W*D) About 0.25kg DESIGN AND SPECIFICATIONS ARE SUBJECT TO CHANGE WITHOUT NOTICE NextarTM, a trademark of Nextar (Hong Kong) Limited. 23 X31008EH01


