Hardware Manual
Page 12
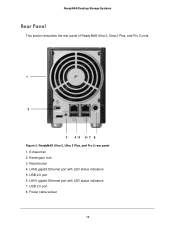
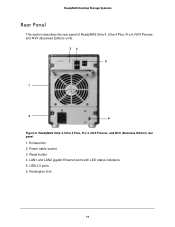
Kensington lock 3. USB 2.0 port 8. ReadyNAS Ultra 2, Ultra 2 Plus, and Pro 2 rear panel 1. Power cable socket 12 Exhaust fan 2. Reset button 4. LAN1 gigabit Ethernet port with LED status indicators 5. ReadyNAS Desktop Storage Systems Rear Panel This section describes the rear panel of ReadyNAS Ultra 2, Ultra 2 Plus, and Pro 2 units. 1 2 3 4/5 6/7 8 Figure 3. LAN2 gigabit Ethernet port with LED status indicators 7. USB 2.0 port 6.
Kensington lock 3. USB 2.0 port 8. ReadyNAS Ultra 2, Ultra 2 Plus, and Pro 2 rear panel 1. Power cable socket 12 Exhaust fan 2. Reset button 4. LAN1 gigabit Ethernet port with LED status indicators 5. ReadyNAS Desktop Storage Systems Rear Panel This section describes the rear panel of ReadyNAS Ultra 2, Ultra 2 Plus, and Pro 2 units. 1 2 3 4/5 6/7 8 Figure 3. LAN2 gigabit Ethernet port with LED status indicators 7. USB 2.0 port 6.
Hardware Manual
Page 14
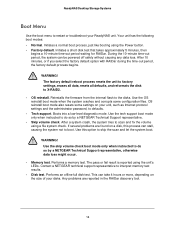
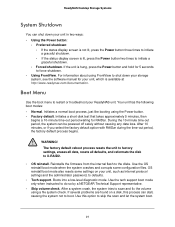
OS reinstall boot mode also resets some configuration files. Use this process can stall, causing the system not to do so by a NETGEAR Technical Support representative, otherwise data loss might occur. • Memory test. WARNING! WARNING! Use the skip volume check boot mode only when instructed to boot. ...
OS reinstall boot mode also resets some configuration files. Use this process can stall, causing the system not to do so by a NETGEAR Technical Support representative, otherwise data loss might occur. • Memory test. WARNING! WARNING! Use the skip volume check boot mode only when instructed to boot. ...
Hardware Manual
Page 15
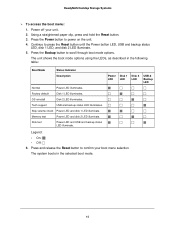
...LED illuminate. The system boots in the following table: Boot Mode Status Indicator Description Normal Power LED illuminates. Press the Backup button to press the Reset button until the Power button LED, USB and backup status LED, disk 1 LED, and disk 2 LED illuminate. 5. The unit shows the... using the LEDs, as described in the selected boot mode. 15 Memory test Power LED and disk 2 LED illuminate. Press and release the Reset button to power on the unit. 4. Skip volume check Power LED and disk 1 LED illuminate. Tech support USB and backup status LED illuminates...
...LED illuminate. The system boots in the following table: Boot Mode Status Indicator Description Normal Power LED illuminates. Press the Backup button to press the Reset button until the Power button LED, USB and backup status LED, disk 1 LED, and disk 2 LED illuminate. 5. The unit shows the... using the LEDs, as described in the selected boot mode. 15 Memory test Power LED and disk 2 LED illuminate. Press and release the Reset button to power on the unit. 4. Skip volume check Power LED and disk 1 LED illuminate. Tech support USB and backup status LED illuminates...
Hardware Manual
Page 19
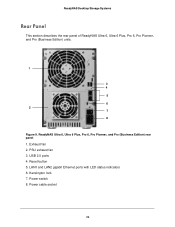
ReadyNAS Desktop Storage Systems Rear Panel This section describes the rear panel of ReadyNAS Ultra 4, Ultra 4 Plus, Pro 4, NVX Pioneer, and NVX (Business Edition) units. 34 5 1 2 6 Figure 6. Reset button 4. USB 2.0 ports 6. LAN1 and LAN2 gigabit Ethernet ports with LED status indicators 5. Exhaust fan 2. Power cable socket 3. ReadyNAS Ultra 4, Ultra 4 Plus, Pro 4, NVX Pioneer, and NVX (Business Edition) rear panel 1. Kensington lock 19
ReadyNAS Desktop Storage Systems Rear Panel This section describes the rear panel of ReadyNAS Ultra 4, Ultra 4 Plus, Pro 4, NVX Pioneer, and NVX (Business Edition) units. 34 5 1 2 6 Figure 6. Reset button 4. USB 2.0 ports 6. LAN1 and LAN2 gigabit Ethernet ports with LED status indicators 5. Exhaust fan 2. Power cable socket 3. ReadyNAS Ultra 4, Ultra 4 Plus, Pro 4, NVX Pioneer, and NVX (Business Edition) rear panel 1. Kensington lock 19
Hardware Manual
Page 21
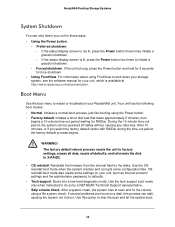
...administrator password, to skip the scan and let the system boot. 21 Reinstalls the firmware from the internal flash to do so by a NETGEAR Technical Support representative. • Skip volume check. Use the OS reinstall boot mode when the system crashes and corrupts some settings on a ...disk, this option to defaults. • Tech support. OS reinstall boot mode also resets some configuration files. If the unit is available at http://www.readynas.com/documentation. For information about using FrontView to shut down your ...
...administrator password, to skip the scan and let the system boot. 21 Reinstalls the firmware from the internal flash to do so by a NETGEAR Technical Support representative. • Skip volume check. Use the OS reinstall boot mode when the system crashes and corrupts some settings on a ...disk, this option to defaults. • Tech support. OS reinstall boot mode also resets some configuration files. If the unit is available at http://www.readynas.com/documentation. For information about using FrontView to shut down your ...

Hardware Manual
Page 22
...on the size of your boot menu selection. Performs a memory test. Any problems are reported on the unit. 4. Continue to do so by a NETGEAR Technical Support representative, otherwise data loss might occur. • Memory test. The status display screen shows the current boot mode option. 6. Performs an ... the status display screen shows a boot menu message. 5. When the status display screen shows the boot mode you need, press and release Reset button to confirm your disks. The system boots in the RAIDar discovery tool. To access the boot menu: 1. Press the Backup...
...on the size of your boot menu selection. Performs a memory test. Any problems are reported on the unit. 4. Continue to do so by a NETGEAR Technical Support representative, otherwise data loss might occur. • Memory test. The status display screen shows the current boot mode option. 6. Performs an ... the status display screen shows a boot menu message. 5. When the status display screen shows the boot mode you need, press and release Reset button to confirm your disks. The system boots in the RAIDar discovery tool. To access the boot menu: 1. Press the Backup...
Hardware Manual
Page 26
Exhaust fan 2. Kensington lock 7. Power cable socket 26 Reset button 5. ReadyNAS Ultra 6, Ultra 6 Plus, Pro 6, Pro Pioneer, and Pro (Business Edition) rear panel 1. USB 2.0 ports 4. Power switch 8. LAN1 and LAN2 gigabit Ethernet ports with LED status indicators 6. PSU exhaust fan 3. ReadyNAS Desktop Storage Systems Rear Panel This section describes the rear panel of ReadyNAS Ultra 6, Ultra 6 Plus, Pro 6, Pro Pioneer, and Pro (Business Edition) units. 1 3 4 5 6 2 7 8 Figure 9.
Exhaust fan 2. Kensington lock 7. Power cable socket 26 Reset button 5. ReadyNAS Ultra 6, Ultra 6 Plus, Pro 6, Pro Pioneer, and Pro (Business Edition) rear panel 1. USB 2.0 ports 4. Power switch 8. LAN1 and LAN2 gigabit Ethernet ports with LED status indicators 6. PSU exhaust fan 3. ReadyNAS Desktop Storage Systems Rear Panel This section describes the rear panel of ReadyNAS Ultra 6, Ultra 6 Plus, Pro 6, Pro Pioneer, and Pro (Business Edition) units. 1 3 4 5 6 2 7 8 Figure 9.
Hardware Manual
Page 28
...three times initiate a graceful shutdown. • If the status display screen is lit, press the Power button two times to do so by a NETGEAR Technical Support representative. • Skip volume check. Boots into a low-level diagnostic mode. For information about using FrontView to X-RAID2. •...short disk test that takes approximately 5 minutes, then begins a 10-minute time-out period waiting for RAIDar. OS reinstall boot mode also resets some configuration files. Reinstalls the firmware from the internal flash to defaults. • Tech support. Use the OS reinstall boot mode when ...
...three times initiate a graceful shutdown. • If the status display screen is lit, press the Power button two times to do so by a NETGEAR Technical Support representative. • Skip volume check. Boots into a low-level diagnostic mode. For information about using FrontView to X-RAID2. •...short disk test that takes approximately 5 minutes, then begins a 10-minute time-out period waiting for RAIDar. OS reinstall boot mode also resets some configuration files. Reinstalls the firmware from the internal flash to defaults. • Tech support. Use the OS reinstall boot mode when ...

Hardware Manual
Page 29
...the RAIDar discovery tool. To access the boot menu: 1. Performs a memory test. Press the Backup button to press the Reset button until the status display screen shows a boot menu message. 5. When the status display screen shows the boot mode you need, press and... release Reset button to do so by a NETGEAR Technical Support representative, otherwise data loss might occur. • Memory test. Power off your boot menu selection. This can ...
...the RAIDar discovery tool. To access the boot menu: 1. Performs a memory test. Press the Backup button to press the Reset button until the status display screen shows a boot menu message. 5. When the status display screen shows the boot mode you need, press and... release Reset button to do so by a NETGEAR Technical Support representative, otherwise data loss might occur. • Memory test. Power off your boot menu selection. This can ...
Hardware Manual
Page 43
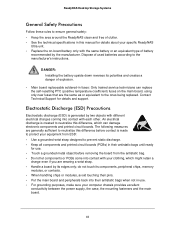
... removing the board from the antistatic bag. • Do not let components or PCBs come into contact with your clothing, which can replace the self-resetting PTC (positive temperature coefficient) fuses on -board battery only with each other. An electrical discharge is made to protect your equipment from ESD: • Use...
... removing the board from the antistatic bag. • Do not let components or PCBs come into contact with your clothing, which can replace the self-resetting PTC (positive temperature coefficient) fuses on -board battery only with each other. An electrical discharge is made to protect your equipment from ESD: • Use...


