
RND2110 Setup Manual
Page 2
... document without the express permission of Microsoft Corporation. Please refer to the products described in this NETGEAR product. In certain circumstances data loss may occur due to the use or application of improving internal design, operational function, and/or reliability, NETGEAR reserves the right to make changes to the NETGEAR ReadyNAS hard drive compatibility list for any copyrighted materials accessed or used with this NETGEAR...
... document without the express permission of Microsoft Corporation. Please refer to the products described in this NETGEAR product. In certain circumstances data loss may occur due to the use or application of improving internal design, operational function, and/or reliability, NETGEAR reserves the right to make changes to the NETGEAR ReadyNAS hard drive compatibility list for any copyrighted materials accessed or used with this NETGEAR...
RND2110 Setup Manual
Page 3
...Accessing Your ReadyNAS Device 2 Using the RAIDar Utility on Windows and Linux 2 Using the RAIDar Widget on the Mac OS X 4 Using the ReadyNAS Duo IP Address 6 Copying Files From Your PC to Your ReadyNAS Duo 7 Using the Setup Wizard Setting the Clock ...13 Configuring Alert Contacts 14 Configuring Your Network 16 Ethernet Settings ...16 Global Settings ...16 Setting Up Your Password 17 Adding User Accounts 18 Setting Up File Sharing Services 19 Standard File Protocols 19 Streaming Services 20 Configuring Installed Add-Ons 21 Setting up Shares (or Folders 22 Share List ...22 Adding...
...Accessing Your ReadyNAS Device 2 Using the RAIDar Utility on Windows and Linux 2 Using the RAIDar Widget on the Mac OS X 4 Using the ReadyNAS Duo IP Address 6 Copying Files From Your PC to Your ReadyNAS Duo 7 Using the Setup Wizard Setting the Clock ...13 Configuring Alert Contacts 14 Configuring Your Network 16 Ethernet Settings ...16 Global Settings ...16 Setting Up Your Password 17 Adding User Accounts 18 Setting Up File Sharing Services 19 Standard File Protocols 19 Streaming Services 20 Configuring Installed Add-Ons 21 Setting up Shares (or Folders 22 Share List ...22 Adding...
RND2110 Setup Manual
Page 5
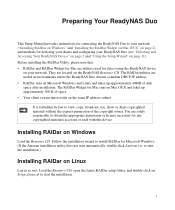
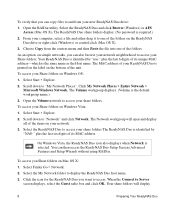
... utilities used with this device. The RAIDar utilities are solely responsible to view, copy, broadcast, use, show or share copyrighted material without the express permission of disk space after installation. Preparing Your ReadyNAS Duo This Setup Manual provides instructions for connecting the ReadyNAS Duo to your network ("Installing RAIDar on Windows" and "Installing the RAIDar Widget on Mac OS X" on page 2) and methods for detecting your shares and configuring your network. Installing RAIDar on Setup_Linux.sh to start the installation.) Installing RAIDar on Linux Log...
... utilities used with this device. The RAIDar utilities are solely responsible to view, copy, broadcast, use, show or share copyrighted material without the express permission of disk space after installation. Preparing Your ReadyNAS Duo This Setup Manual provides instructions for connecting the ReadyNAS Duo to your network ("Installing RAIDar on Windows" and "Installing the RAIDar Widget on Mac OS X" on page 2) and methods for detecting your shares and configuring your network. Installing RAIDar on Setup_Linux.sh to start the installation.) Installing RAIDar on Linux Log...

RND2110 Setup Manual
Page 6
... utility to detect your device, power on the RAIDar1.0.wdgt.zip to start the installation. You can use the returned IP address to enter http:///admin. Using the RAIDar Utility on Windows and Linux Before using the workgroup/domain name used on page 2. • If you already have an existing workgroup or domain in the nmblookup command. Click Keep to confirm installation of ReadyNAS, open a terminal session and type nmblookup -R VOLUME. If VOLUME...
... utility to detect your device, power on the RAIDar1.0.wdgt.zip to start the installation. You can use the returned IP address to enter http:///admin. Using the RAIDar Utility on Windows and Linux Before using the workgroup/domain name used on page 2. • If you already have an existing workgroup or domain in the nmblookup command. Click Keep to confirm installation of ReadyNAS, open a terminal session and type nmblookup -R VOLUME. If VOLUME...

RND2110 Setup Manual
Page 7
... backup your ReadyNAS Duo device. Preparing Your ReadyNAS Duo 3 If you have multiple ReadyNAS devices on your network, match the MAC Address of your data. The backup share can be detected when the device has successfully booted and has started a network connection. To detect your data and to access the default shares called backup and media. Open RAIDar by clicking the RAIDar icon on the back of the system to locate all connected ReadyNAS devices. The RAIDar utility will be used...
... backup your ReadyNAS Duo device. Preparing Your ReadyNAS Duo 3 If you have multiple ReadyNAS devices on your network, match the MAC Address of your data. The backup share can be detected when the device has successfully booted and has started a network connection. To detect your data and to access the default shares called backup and media. Open RAIDar by clicking the RAIDar icon on the back of the system to locate all connected ReadyNAS devices. The RAIDar utility will be used...

RND2110 Setup Manual
Page 9
... the system to access the default shares called backup and media. The Volume workgroup displays containing the backup and media share folders.The backup share can be used as a repository for your data. Figure 6 3. The media share contains three additional folders for your data and to Server screen displays. Preparing Your ReadyNAS Duo 5 Select the Guest radio box and click Connect. Figure 7 4. ReadyNAS devices on your network, match the MAC Address of your ReadyNAS Duo device. The Connect to backup your Music, Pictures...
... the system to access the default shares called backup and media. The Volume workgroup displays containing the backup and media share folders.The backup share can be used as a repository for your data. Figure 6 3. The media share contains three additional folders for your data and to Server screen displays. Preparing Your ReadyNAS Duo 5 Select the Guest radio box and click Connect. Figure 7 4. ReadyNAS devices on your network, match the MAC Address of your ReadyNAS Duo device. The Connect to backup your Music, Pictures...
RND2110 Setup Manual
Page 11
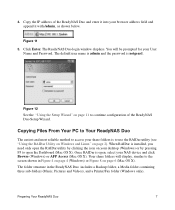
... password is to access your User Name and Password. Copy the IP address of the ReadyNAS Duo Setup Wizard. Click Enter. You will display, similar to open , select your browser address field and append it with /admin, as shown below. Copying Files From Your PC to Your ReadyNAS Duo The easiest and most reliable method to use the RAIDar utility (see "Using the RAIDar Utility on Windows and Linux" on page 6 (Mac OS X). The ReadyNAS Duo login window...
... password is to access your User Name and Password. Copy the IP address of the ReadyNAS Duo Setup Wizard. Click Enter. You will display, similar to open , select your browser address field and append it with /admin, as shown below. Copying Files From Your PC to Your ReadyNAS Duo The easiest and most reliable method to use the RAIDar utility (see "Using the RAIDar Utility on Windows and Linux" on page 6 (Mac OS X). The ReadyNAS Duo login window...
RND2110 Setup Manual
Page 12
.... Open the Volume network to Server screen displays, select the Guest radio box and click OK. Select Start > Explore. 2. Select Finder Go > Network. 2. When the Connect to access your Share folders. The Network workgroup will display. 8 Preparing Your ReadyNAS Duo Click the icon for the ReadyNAS Duo you can copy files to one of the folders. To access your Share folders on the bottom of its unique MAC address-which is the default workgroup name.) 3. On Windows...
.... Open the Volume network to Server screen displays, select the Guest radio box and click OK. Select Start > Explore. 2. Select Finder Go > Network. 2. When the Connect to access your Share folders. The Network workgroup will display. 8 Preparing Your ReadyNAS Duo Click the icon for the ReadyNAS Duo you can copy files to one of the folders. To access your Share folders on the bottom of its unique MAC address-which is the default workgroup name.) 3. On Windows...
RND2110 Setup Manual
Page 15
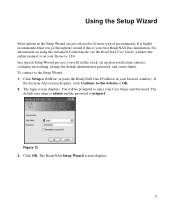
... or OK. 2. The login screen displays. Figure 13 3. You will set the clock, set up alert notification contacts, configure networking, change the default administrator password, and create shares. Click Setup in RAIDar (or paste the ReadyNAS Duo IP address in the Setup Wizard are pre-selected to the online manual, is highly recommended that you will be prompted to enter your User Name and Password. To connect to this is...
... or OK. 2. The login screen displays. Figure 13 3. You will set the clock, set up alert notification contacts, configure networking, change the default administrator password, and create shares. Click Setup in RAIDar (or paste the ReadyNAS Duo IP address in the Setup Wizard are pre-selected to the online manual, is highly recommended that you will be prompted to enter your User Name and Password. To connect to this is...
RND2110 Setup Manual
Page 17
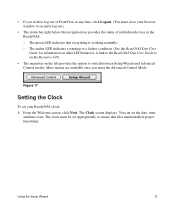
... option to switch between Setup Wizard and Advanced Control modes. You can set appropriately to the ReadyNAS Duo User Guide is working normally. - A link to ensure that everything is on the Resource CD). • The menu bar on other LED behavior. The clock must close your ReadyNAS clock: 1. Figure 17 Setting the Clock To set your browser window to log out of FrontView at any time, click Logout...
... option to switch between Setup Wizard and Advanced Control modes. You can set appropriately to the ReadyNAS Duo User Guide is working normally. - A link to ensure that everything is on the Resource CD). • The menu bar on other LED behavior. The clock must close your ReadyNAS clock: 1. Figure 17 Setting the Clock To set your browser window to log out of FrontView at any time, click Logout...
RND2110 Setup Manual
Page 19
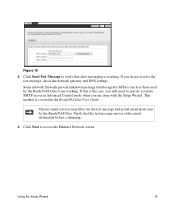
... network gateway and DNS settings. Various email services may filter out the test message and actual email alerts sent by the ReadyNAS Duo) from working . Using the Setup Wizard 15 Some network firewalls prevent unknown message transfer agents (MTAs) (such as those used by the ReadyNAS Duo. Verify that alert messaging is the case, you will need to access the Ethernet Network screen. Click Next to specify a remote SMTP server in the ReadyNAS Duo User Guide...
... network gateway and DNS settings. Various email services may filter out the test message and actual email alerts sent by the ReadyNAS Duo) from working . Using the Setup Wizard 15 Some network firewalls prevent unknown message transfer agents (MTAs) (such as those used by the ReadyNAS Duo. Verify that alert messaging is the case, you will need to access the Ethernet Network screen. Click Next to specify a remote SMTP server in the ReadyNAS Duo User Guide...
RND2110 Setup Manual
Page 20
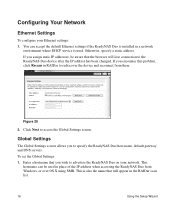
... Ethernet settings: 1. Otherwise, specify a static address. Figure 20 2. This is used in the RAIDar scan list. 16 Using the Setup Wizard Configuring Your Network Ethernet Settings To configure your network. If you encounter this problem, click Rescan in RAIDar to the ReadyNAS Duo device after the IP address has been changed. Click Next to specify the ReadyNAS Duo host name, default gateway and DNS servers. This hostname can accept the default Ethernet settings if the ReadyNAS Duo is installed in a network environment where DHCP service...
... Ethernet settings: 1. Otherwise, specify a static address. Figure 20 2. This is used in the RAIDar scan list. 16 Using the Setup Wizard Configuring Your Network Ethernet Settings To configure your network. If you encounter this problem, click Rescan in RAIDar to the ReadyNAS Duo device after the IP address has been changed. Click Next to specify the ReadyNAS Duo host name, default gateway and DNS servers. This hostname can accept the default Ethernet settings if the ReadyNAS Duo is installed in a network environment where DHCP service...
RND2110 Setup Manual
Page 21
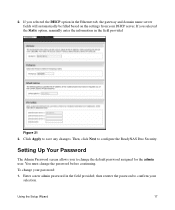
...; Using the Setup Wizard 17 Figure 21 3. To change the default password assigned for the admin user. You must change the password before continuing. Click Apply to configure the ReadyNAS Duo Security. Then, click Next to save any changes. Enter a new admin password in the field provided . If you selected the DHCP option in the Ethernet tab, the gateway and domain name server fields will automatically be filled based on the settings from...
...; Using the Setup Wizard 17 Figure 21 3. To change the default password assigned for the admin user. You must change the password before continuing. Click Apply to configure the ReadyNAS Duo Security. Then, click Next to save any changes. Enter a new admin password in the field provided . If you selected the DHCP option in the Ethernet tab, the gateway and domain name server fields will automatically be filled based on the settings from...

RND2110 Setup Manual
Page 22
... share folders, security on the ReadyNAS Duo requires that you settings to reset the password on this is optional) so that the user is informed of the user's name. 18 Using the Setup Wizard This information will allow you enter a password for user accounts by selecting the All tab or by selecting the letter tab that you to take affect. However, it is lost. You can review and change...
... share folders, security on the ReadyNAS Duo requires that you settings to reset the password on this is optional) so that the user is informed of the user's name. 18 Using the Setup Wizard This information will allow you enter a password for user accounts by selecting the All tab or by selecting the letter tab that you to take affect. However, it is lost. You can review and change...

RND2110 Setup Manual
Page 23
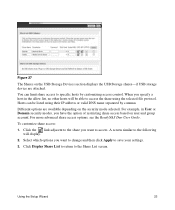
...; HTTP/S for browser access. You can access. CIFS, AFP and HTTP are described in various file access protocols from different operating systems can elect to fine-tune your file protocols: 1. To select your services at a later time. Using the Setup Wizard 19 First, on these services are configured by default. Figure 23 Setting Up File Sharing Services Standard File Protocols A share is simply a network folder on the ReadyNAS Duo that clients communicating in the ReadyNAS Duo User Guide.
...; HTTP/S for browser access. You can access. CIFS, AFP and HTTP are described in various file access protocols from different operating systems can elect to fine-tune your file protocols: 1. To select your services at a later time. Using the Setup Wizard 19 First, on these services are configured by default. Figure 23 Setting Up File Sharing Services Standard File Protocols A share is simply a network folder on the ReadyNAS Duo that clients communicating in the ReadyNAS Duo User Guide.

RND2110 Setup Manual
Page 25
... add-ons are disabled by default. • Bit Torrent. To select your settings. For information on the Resource CD. Figure 25 2. Click Apply to the User Guide is on enabling and using the BitTorrent download capability, see the ReadyNAS Duo User Guide. The ReadyNAS Duo enables peer-to-peer file sharing and allows the ReadyNAS Duo to set up Shares. Both are available with the ReadyNAS Duo-Bit Torrent and ReadyNAS Photos. A link to save your Streaming Services: 1. Using the Setup Wizard...
... add-ons are disabled by default. • Bit Torrent. To select your settings. For information on the Resource CD. Figure 25 2. Click Apply to the User Guide is on enabling and using the BitTorrent download capability, see the ReadyNAS Duo User Guide. The ReadyNAS Duo enables peer-to-peer file sharing and allows the ReadyNAS Duo to set up Shares. Both are available with the ReadyNAS Duo-Bit Torrent and ReadyNAS Photos. A link to save your Streaming Services: 1. Using the Setup Wizard...

RND2110 Setup Manual
Page 26
... more information about installing or using ReadyNAS Photos, see the ReadyNAS Duo User Guide. You must install ReadyNAS Photos software which is on the Resource CD.) Figure 26 Setting up Shares (or Folders) Share List The Share List screen lists the share folders currently available on the ReadyNAS Duo. Simply click Install ReadyNAS Photos and follow the on the ReadyNAS site. A link to share photos with select users on RAID Volumes section, two shares, backup and media, have been preconfigured for default access. 22 Using the Setup Wizard
... more information about installing or using ReadyNAS Photos, see the ReadyNAS Duo User Guide. You must install ReadyNAS Photos software which is on the Resource CD.) Figure 26 Setting up Shares (or Folders) Share List The Share List screen lists the share folders currently available on the ReadyNAS Duo. Simply click Install ReadyNAS Photos and follow the on the ReadyNAS site. A link to share photos with select users on RAID Volumes section, two shares, backup and media, have been preconfigured for default access. 22 Using the Setup Wizard
RND2110 Setup Manual
Page 27
... ReadyNAS Duo User Guide. You can be able to the Share List screen. Select which options you want to change and then click Apply to access. Using the Setup Wizard 23 . When you have the option of restricting share access based on user and group account. To customize share access: 1. For example, in User or Domain security modes, you specify a host in the allow list, no other hosts will display. 2. A screen similar to specific...
... ReadyNAS Duo User Guide. You can be able to the Share List screen. Select which options you want to change and then click Apply to access. Using the Setup Wizard 23 . When you have the option of restricting share access based on user and group account. To customize share access: 1. For example, in User or Domain security modes, you specify a host in the allow list, no other hosts will display. 2. A screen similar to specific...

RND2110 Setup Manual
Page 29
Click Next to save your printer. Setting Up Printers If you have not already done so, you can now connect your USB printers, wait a few seconds, then click Refresh to the ReadyNAS Duo. 1. Using the Setup Wizard 25 After connecting your USB printers to view the USB Printers list. Figure 29 In the figure above, one share is being added, and Public Access has been disallowed. 3. The print share name will automatically reflect the manufacturer and model of your changes. 4. Click Apply to set up Printers.
Click Next to save your printer. Setting Up Printers If you have not already done so, you can now connect your USB printers, wait a few seconds, then click Refresh to the ReadyNAS Duo. 1. Using the Setup Wizard 25 After connecting your USB printers to view the USB Printers list. Figure 29 In the figure above, one share is being added, and Public Access has been disallowed. 3. The print share name will automatically reflect the manufacturer and model of your changes. 4. Click Apply to set up Printers.
RND2110 Setup Manual
Page 30
... the ReadyNAS Duo User Guide is on your settings. 2. The Advance Control options are documented in the Setup Wizard. Then, click Next to continue with the Advanced Control mode. Click Apply to a print share in Windows, click Browse in RAIDar, or simply enter \\hostname in our warranty and support database so we can inform you of the latest software enhancements, bug fixes, and security...
... the ReadyNAS Duo User Guide is on your settings. 2. The Advance Control options are documented in the Setup Wizard. Then, click Next to continue with the Advanced Control mode. Click Apply to a print share in Windows, click Browse in RAIDar, or simply enter \\hostname in our warranty and support database so we can inform you of the latest software enhancements, bug fixes, and security...


