Hardware Manual
Page 21
... Backup button to press the Reset button until the Power button LED, USB and backup status LED, disk 1 LED, and disk 2 LED light. 5. After the 10-minute time-out period, the factory default process begins. Reinstalls the firmware from the internal flash to interpret memory test results. • Test disk. Use the OS reinstall boot mode when the system crashes and corrupts some settings on . 4. Mounts a volume as described in the system logs. OS reinstall boot mode also resets some configuration files. Contact a NETGEAR technical support...
... Backup button to press the Reset button until the Power button LED, USB and backup status LED, disk 1 LED, and disk 2 LED light. 5. After the 10-minute time-out period, the factory default process begins. Reinstalls the firmware from the internal flash to interpret memory test results. • Test disk. Use the OS reinstall boot mode when the system crashes and corrupts some settings on . 4. Mounts a volume as described in the system logs. OS reinstall boot mode also resets some configuration files. Contact a NETGEAR technical support...

Hardware Manual
Page 29
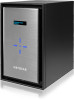
... status display screen shows the boot mode that takes approximately 5 minutes. Tip To start the factory default process immediately, press the Backup button during a disaster recovery. • Memory test. Any problems are attempting to do not power off your system. To access the boot menu: 1. Mounts a volume as Internet protocol settings and the administrator password, to factory default settings, do so. • Volume read -only. ReadyNAS OS 6 Desktop Storage Systems • Normal. WARNING: The factory default reboot process resets...
... status display screen shows the boot mode that takes approximately 5 minutes. Tip To start the factory default process immediately, press the Backup button during a disaster recovery. • Memory test. Any problems are attempting to do not power off your system. To access the boot menu: 1. Mounts a volume as Internet protocol settings and the administrator password, to factory default settings, do so. • Volume read -only. ReadyNAS OS 6 Desktop Storage Systems • Normal. WARNING: The factory default reboot process resets...

Hardware Manual
Page 36
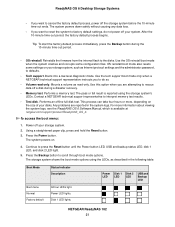
... reinstall boot mode also resets some configuration files. Use the tech support boot mode only when a NETGEAR technical support representative instructs you want to do not power off your disks. Mounts a volume as described in the system logs. NETGEAR ReadyNAS 202 36 Performs a memory test. Tip To start the factory default process immediately, press the Backup button during a disaster recovery. • Memory test. The memory test runs for eight hours. Memory Test Status Memory Test State Power LED Disk 1 LED Disk 2 LED Backup LED...
... reinstall boot mode also resets some configuration files. Use the tech support boot mode only when a NETGEAR technical support representative instructs you want to do not power off your disks. Mounts a volume as described in the system logs. NETGEAR ReadyNAS 202 36 Performs a memory test. Tip To start the factory default process immediately, press the Backup button during a disaster recovery. • Memory test. The memory test runs for eight hours. Memory Test Status Memory Test State Power LED Disk 1 LED Disk 2 LED Backup LED...
Hardware Manual
Page 44
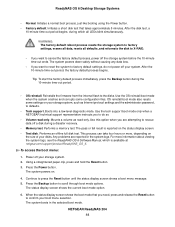
..., the factory default process begins. OS reinstall boot mode also resets some configuration files. Use the tech support boot mode only when a NETGEAR technical support representative instructs you want to factory default settings, do so. • Volume read -only. Mounts a volume as Internet protocol settings and the administrator password, to do not power off a disk during a disaster recovery. • Memory test. This process can take four hours or more information about viewing the system logs, see the ReadyNAS OS 6 Software Manual...
..., the factory default process begins. OS reinstall boot mode also resets some configuration files. Use the tech support boot mode only when a NETGEAR technical support representative instructs you want to factory default settings, do so. • Volume read -only. Mounts a volume as Internet protocol settings and the administrator password, to do not power off a disk during a disaster recovery. • Memory test. This process can take four hours or more information about viewing the system logs, see the ReadyNAS OS 6 Software Manual...
Hardware Manual
Page 51
... 10-minute time-out ends. Performs a memory test. Any problems are attempting to do not power off your system. NETGEAR ReadyNAS 212 51 The system powers down safely without causing any data loss. - Boots into a low-level diagnostic mode. Tip To start the factory default process immediately, press the Backup button during a disaster recovery. • Memory test. Use the tech support boot mode only when a NETGEAR technical support representative instructs you are...
... 10-minute time-out ends. Performs a memory test. Any problems are attempting to do not power off your system. NETGEAR ReadyNAS 212 51 The system powers down safely without causing any data loss. - Boots into a low-level diagnostic mode. Tip To start the factory default process immediately, press the Backup button during a disaster recovery. • Memory test. Use the tech support boot mode only when a NETGEAR technical support representative instructs you are...

Hardware Manual
Page 59
... factory default reboot process resets the storage system to factory settings, erases all data, resets all LEDs blink simultaneously. Tip To start the factory default process immediately, press the Backup button during a disaster recovery. • Memory test. Performs a memory test. The pass or fail result is available at netgear.com/support/product/ReadyNAS_OS_6. For more , depending on the status display screen. • Test disk. Press the Power button. The status display screen shows the current boot mode option. 6. NETGEAR ReadyNAS 214...
... factory default reboot process resets the storage system to factory settings, erases all data, resets all LEDs blink simultaneously. Tip To start the factory default process immediately, press the Backup button during a disaster recovery. • Memory test. Performs a memory test. The pass or fail result is available at netgear.com/support/product/ReadyNAS_OS_6. For more , depending on the status display screen. • Test disk. Press the Power button. The status display screen shows the current boot mode option. 6. NETGEAR ReadyNAS 214...
Hardware Manual
Page 66
... 10-minute time-out period, the factory default process begins. Mounts a volume as described in the system logs. Use the tech support boot mode only when a NETGEAR technical support representative instructs you are reported in the following table: NETGEAR ReadyNAS 312 66 OS reinstall boot mode also resets some configuration files. The system powers on. 4. Any problems are attempting to the disks. Tip To start the factory default process immediately, press the Backup button during a disaster recovery. • Memory...
... 10-minute time-out period, the factory default process begins. Mounts a volume as described in the system logs. Use the tech support boot mode only when a NETGEAR technical support representative instructs you are reported in the following table: NETGEAR ReadyNAS 312 66 OS reinstall boot mode also resets some configuration files. The system powers on. 4. Any problems are attempting to the disks. Tip To start the factory default process immediately, press the Backup button during a disaster recovery. • Memory...
Hardware Manual
Page 74
... time-out period begins, during which is reported on . Reinstalls the firmware from the internal flash to restart or troubleshoot your ReadyNAS storage system. Mounts a volume as Internet protocol settings and the administrator password, to defaults. • Tech support. The pass or fail result is available at netgear.com/support/product/ReadyNAS_OS_6. To access the boot menu: 1. The systems powers on the status display screen. • Test disk. OS reinstall boot mode also resets some configuration files...
... time-out period begins, during which is reported on . Reinstalls the firmware from the internal flash to restart or troubleshoot your ReadyNAS storage system. Mounts a volume as Internet protocol settings and the administrator password, to defaults. • Tech support. The pass or fail result is available at netgear.com/support/product/ReadyNAS_OS_6. To access the boot menu: 1. The systems powers on the status display screen. • Test disk. OS reinstall boot mode also resets some configuration files...

Hardware Manual
Page 82
WARNING: The factory default reboot process resets the storage system to factory settings, erases all data, resets all LEDs blink simultaneously. OS reinstall boot mode also resets some configuration files. This process can take four hours or more information about viewing the system logs, see the ReadyNAS OS 6 Software Manual, which all defaults, and reformats the disk to scroll through boot mode options. Press the Power button on the status display screen. • Test disk. The status display screen shows the current boot mode option...
WARNING: The factory default reboot process resets the storage system to factory settings, erases all data, resets all LEDs blink simultaneously. OS reinstall boot mode also resets some configuration files. This process can take four hours or more information about viewing the system logs, see the ReadyNAS OS 6 Software Manual, which all defaults, and reformats the disk to scroll through boot mode options. Press the Power button on the status display screen. • Test disk. The status display screen shows the current boot mode option...

Hardware Manual
Page 89
... to factory default settings, do so by a NETGEAR technical support representative. • Volume read -only. Use the tech support boot mode only when instructed to rescue data off the storage system before the 10-minute time-out ends. Power off your ReadyNAS storage system. Any problems are attempting to do not power off your storage system. 2. Continue to the disks. To access the boot menu: 1. Reinstalls the firmware from the internal flash to press the Reset button...
... to factory default settings, do so by a NETGEAR technical support representative. • Volume read -only. Use the tech support boot mode only when instructed to rescue data off the storage system before the 10-minute time-out ends. Power off your ReadyNAS storage system. Any problems are attempting to do not power off your storage system. 2. Continue to the disks. To access the boot menu: 1. Reinstalls the firmware from the internal flash to press the Reset button...

Hardware Manual
Page 97
... system. Mounts a volume as IP settings and the administrator password, to cancel the factory default process, power off a disk during the 10-minute time-out period. • OS reinstall. Continue to restart or troubleshoot your ReadyNAS storage system. ReadyNAS OS 6 Desktop Storage Systems Boot Menu Use the boot menu to press the Reset button until the status display screen shows a boot menu message. 5. Initiates a short disk test that takes approximately 2 minutes. Reinstalls the firmware from...
... system. Mounts a volume as IP settings and the administrator password, to cancel the factory default process, power off a disk during the 10-minute time-out period. • OS reinstall. Continue to restart or troubleshoot your ReadyNAS storage system. ReadyNAS OS 6 Desktop Storage Systems Boot Menu Use the boot menu to press the Reset button until the status display screen shows a boot menu message. 5. Initiates a short disk test that takes approximately 2 minutes. Reinstalls the firmware from...
Hardware Manual
Page 105
... troubleshoot your system. Tip To start the factory default process immediately, press the OK button during which is available at netgear.com/support/product/ReadyNAS_OS_6. Boots into a low-level diagnostic mode. Use this option when you are reported in the system logs. To perform a forced shutdown: Press and hold the Power button on your disks. The LEDs blink quickly and simultaneously to factory settings, erases all data, resets all LEDs blink simultaneously. WARNING: The factory default reboot process resets...
... troubleshoot your system. Tip To start the factory default process immediately, press the OK button during which is available at netgear.com/support/product/ReadyNAS_OS_6. Boots into a low-level diagnostic mode. Use this option when you are reported in the system logs. To perform a forced shutdown: Press and hold the Power button on your disks. The LEDs blink quickly and simultaneously to factory settings, erases all data, resets all LEDs blink simultaneously. WARNING: The factory default reboot process resets...

Hardware Manual
Page 113
... want to X-RAID. - After the 10-minute time-out period, the factory default process begins. Tip To start the factory default process immediately, press the OK button during which is reported on your system. OS reinstall boot mode also resets some configuration files. Use the tech support boot mode only when instructed to defaults. • Tech support. Mounts a volume as IP settings and the administrator password, to do not power off a disk during a disaster recovery. • Memory...
... want to X-RAID. - After the 10-minute time-out period, the factory default process begins. Tip To start the factory default process immediately, press the OK button during which is reported on your system. OS reinstall boot mode also resets some configuration files. Use the tech support boot mode only when instructed to defaults. • Tech support. Mounts a volume as IP settings and the administrator password, to do not power off a disk during a disaster recovery. • Memory...
Hardware Manual
Page 121
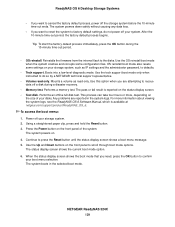
... about viewing the system logs, see the ReadyNAS OS 6 Software Manual, which all defaults, and reformats the disk to factory default settings, do so. • Volume read -only. Initiates a short disk test that you are reported in the selected boot mode. After the 10-minute time-out period, the factory default process begins. The status display screen shows the current boot mode option. 6. If you want to reset the system to X-RAID. - Use the...
... about viewing the system logs, see the ReadyNAS OS 6 Software Manual, which all defaults, and reformats the disk to factory default settings, do so. • Volume read -only. Initiates a short disk test that you are reported in the selected boot mode. After the 10-minute time-out period, the factory default process begins. The status display screen shows the current boot mode option. 6. If you want to reset the system to X-RAID. - Use the...
Hardware Manual
Page 129
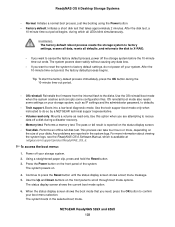
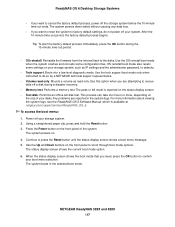
... a NETGEAR technical support representative. • Volume read -only. Press the Power button on your storage system. 2. The system boots in the system logs. Performs an offline full disk test. If you need, press the OK button to confirm your disks. Tip To start the factory default process immediately, press the OK button during a disaster recovery. • Memory test. OS reinstall boot mode also resets some configuration files. The pass or fail result...
... a NETGEAR technical support representative. • Volume read -only. Press the Power button on your storage system. 2. The system boots in the system logs. Performs an offline full disk test. If you need, press the OK button to confirm your disks. Tip To start the factory default process immediately, press the OK button during a disaster recovery. • Memory test. OS reinstall boot mode also resets some configuration files. The pass or fail result...
Hardware Manual
Page 138
... storage system to factory settings, erases all data, resets all LEDs blink simultaneously. Boots into a low-level diagnostic mode. Press the Power button on the status display screen. • Test disk. The system boots in the system logs. After the disk test, a 10-minute time-out period begins, during which is reported on the front panel of your system. If you need, press the OK button to defaults. • Tech support. Mounts a volume...
... storage system to factory settings, erases all data, resets all LEDs blink simultaneously. Boots into a low-level diagnostic mode. Press the Power button on the status display screen. • Test disk. The system boots in the system logs. After the disk test, a 10-minute time-out period begins, during which is reported on the front panel of your system. If you need, press the OK button to defaults. • Tech support. Mounts a volume...
Hardware Manual
Page 147
... status display screen shows the current boot mode option. 6. The system boots in the system logs. To access the boot menu: 1. Continue to the disks. If you are reported in the selected boot mode. Mounts a volume as IP settings and the administrator password, to cancel the factory default process, power off a disk during the 10-minute time-out period. • OS reinstall. The system powers on the front panel of your disks. Use...
... status display screen shows the current boot mode option. 6. The system boots in the system logs. To access the boot menu: 1. Continue to the disks. If you are reported in the selected boot mode. Mounts a volume as IP settings and the administrator password, to cancel the factory default process, power off a disk during the 10-minute time-out period. • OS reinstall. The system powers on the front panel of your disks. Use...

Product Data Sheet
Page 1
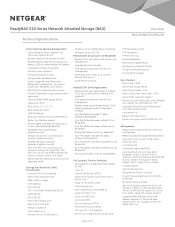
... setup, no port forwarding, no compromise, high performing data storage systems of the office securely and rapidly. All Inclusive Solution for Data Sharing, Storing & Securing • File Sharing: Unified storage platform for sharing files between Windows, Mac and Linux-based computers • Backup & Recovery: ReadyDR disaster recovery solution based on block level replication technology • Hard Drive Redundancy: RAID redundancy with automatic expansion and unlimited data snapshots for point-in-time restore. • Cloud Collaboration: Share selected folders...
... setup, no port forwarding, no compromise, high performing data storage systems of the office securely and rapidly. All Inclusive Solution for Data Sharing, Storing & Securing • File Sharing: Unified storage platform for sharing files between Windows, Mac and Linux-based computers • Backup & Recovery: ReadyDR disaster recovery solution based on block level replication technology • Hard Drive Redundancy: RAID redundancy with automatic expansion and unlimited data snapshots for point-in-time restore. • Cloud Collaboration: Share selected folders...

Product Data Sheet
Page 2
... easy for disk-based storage like Real Time Anti-Virus and Encryption bring new confidence to -manage Cloud Replication. Snapshots ReadyNAS RAID Windows Linux Mac Apple Time Machine Disaster Recovery The custom-built ReadyNAS OS protects stored data with automatic RAID configuration, the continuous security of your data. With ReadyNAS, you to move data offsite to protect against natural disasters and theft. Windows (CIFS/SMB) Mac Linux PC (NFS) iOS Mac (AFP) ReadyCloud ReadyNAS ReadyNAS Remote FTP webDAV Server (iSCSI) Backup Unlimited snapshots...
... easy for disk-based storage like Real Time Anti-Virus and Encryption bring new confidence to -manage Cloud Replication. Snapshots ReadyNAS RAID Windows Linux Mac Apple Time Machine Disaster Recovery The custom-built ReadyNAS OS protects stored data with automatic RAID configuration, the continuous security of your data. With ReadyNAS, you to move data offsite to protect against natural disasters and theft. Windows (CIFS/SMB) Mac Linux PC (NFS) iOS Mac (AFP) ReadyCloud ReadyNAS ReadyNAS Remote FTP webDAV Server (iSCSI) Backup Unlimited snapshots...
Product Data Sheet
Page 4
...; RAID Global Hot Spare • eSATA Expansion • Backup to external storage (USB/eSATA) • Apple Time Machine support • Remote Apple Time Machine backup and restore (over SSL / TLS (explicit) • FTP Passive mode with port range setup • FTP Bandwidth control • FTP Anonymous • FTP Transfer Log • Secure Shell (SSH) • Web Authoring (WebDAV) • Storage Array Network (iSCSI) • File Synchronization (rsync) • Local web file manager Users/Groups: • Max # Users: 8192 • Max # User Groups: 8192 • Max # Share Folder...
...; RAID Global Hot Spare • eSATA Expansion • Backup to external storage (USB/eSATA) • Apple Time Machine support • Remote Apple Time Machine backup and restore (over SSL / TLS (explicit) • FTP Passive mode with port range setup • FTP Bandwidth control • FTP Anonymous • FTP Transfer Log • Secure Shell (SSH) • Web Authoring (WebDAV) • Storage Array Network (iSCSI) • File Synchronization (rsync) • Local web file manager Users/Groups: • Max # Users: 8192 • Max # User Groups: 8192 • Max # Share Folder...


