PS113 Reference Manual
Page 2
Microsoft, Windows, and Windows NT are registered trademarks of NETGEAR, Inc. These limits are shielded against harmful interference in accordance with the instructions, may occur due to the following ... may not cause harmful interference. • This device must accept any liability that the NETGEAR Model PS104 Print Server, Model PS105 Print Server, Model PS110 Print Server, and Model PS113 Print Server are designed to provide Model PS110, and Model PS113 Print Servers tested to correct the interference by the application of their respective holders. However, there is...
Microsoft, Windows, and Windows NT are registered trademarks of NETGEAR, Inc. These limits are shielded against harmful interference in accordance with the instructions, may occur due to the following ... may not cause harmful interference. • This device must accept any liability that the NETGEAR Model PS104 Print Server, Model PS105 Print Server, Model PS110 Print Server, and Model PS113 Print Server are designed to provide Model PS110, and Model PS113 Print Servers tested to correct the interference by the application of their respective holders. However, there is...
PS113 Reference Manual
Page 11
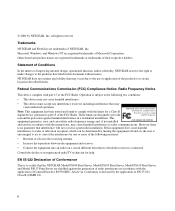
... Model PS113 Print Server 1-3 Rear Panel of the Model PS104 Print Server 1-6 Rear Panel of the Model PS105 Print Server 1-6 Rear Panel of the Model PS110 Print Server 1-7 Rear Panel of the Model PS113 Print Server 1-7 FirstGear Introductory Window 3-2 User Installation Option Window 3-3 NETGEAR Print Server Software Installation Window 3-4 Choose Destination Location Window 3-5 Select Program Folder Window 3-6 Setup Complete Window 3-7 Firstgear for Print Server Icon 3-8 Setup Icon 3-9 Setup Window 3-9 Printer Select Window (Add Port 3-10 ADDPORT Window (Epson...
... Model PS113 Print Server 1-3 Rear Panel of the Model PS104 Print Server 1-6 Rear Panel of the Model PS105 Print Server 1-6 Rear Panel of the Model PS110 Print Server 1-7 Rear Panel of the Model PS113 Print Server 1-7 FirstGear Introductory Window 3-2 User Installation Option Window 3-3 NETGEAR Print Server Software Installation Window 3-4 Choose Destination Location Window 3-5 Select Program Folder Window 3-6 Setup Complete Window 3-7 Firstgear for Print Server Icon 3-8 Setup Icon 3-9 Setup Window 3-9 Printer Select Window (Add Port 3-10 ADDPORT Window (Epson...
PS113 Reference Manual
Page 17
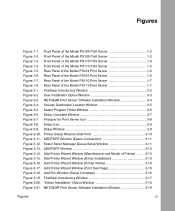
Audience To configure and install the print server, you are using Microsoft Windows 95, Windows 98, Windows NT, or Windows 2000, refer to the Model PS104/PS105/PS110/PS113 Print Server Quick Installation Guide (NETGEAR part number M1-PS100NA-1). Supporting multiple protocols and operating systems, these print servers provide an effective solution for networked PCs to connect...
Audience To configure and install the print server, you are using Microsoft Windows 95, Windows 98, Windows NT, or Windows 2000, refer to the Model PS104/PS105/PS110/PS113 Print Server Quick Installation Guide (NETGEAR part number M1-PS100NA-1). Supporting multiple protocols and operating systems, these print servers provide an effective solution for networked PCs to connect...
PS113 Reference Manual
Page 19
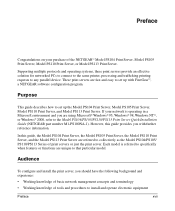
... the NetBEUI protocol, refer to the Model PS104/Model PS105/Model PS110/Model PS113 Print Server Installation Guide (document part number M1-PS100NA-1). Initial Caps Menu titles and window and button names. Related Publication If you are using the FirstGear Utility, a program developed by NETGEAR for fast and easy device configuration. This guide provides...
... the NetBEUI protocol, refer to the Model PS104/Model PS105/Model PS110/Model PS113 Print Server Installation Guide (document part number M1-PS100NA-1). Initial Caps Menu titles and window and button names. Related Publication If you are using the FirstGear Utility, a program developed by NETGEAR for fast and easy device configuration. This guide provides...

PS113 Reference Manual
Page 20
..., NETGEAR configuration software that assures fast and easy setup for Windows 95, Windows 98, and Window NT users • Support for 10BASE-T Ethernet connection with four 10BASE-T ports on the Model PS104 Print Server, four 10BASE-T ports and a BNC port on the Model PS105 Print Server, or 10/100BASE-T Ethernet connection on the Model PS110 and Model PS113 Print Server •...
..., NETGEAR configuration software that assures fast and easy setup for Windows 95, Windows 98, and Window NT users • Support for 10BASE-T Ethernet connection with four 10BASE-T ports on the Model PS104 Print Server, four 10BASE-T ports and a BNC port on the Model PS105 Print Server, or 10/100BASE-T Ethernet connection on the Model PS110 and Model PS113 Print Server •...

PS113 Reference Manual
Page 30
... section describes how to configure and use the NETGEAR Model PS104/PS105/PS110/ PS113 print server in Windows 95, Windows 98, or Windows 2000. Chapter 3 Microsoft Windows 95 and Windows 98 Printing This chapter describes how to install and set up a PC to the NETGEAR print server. • Admin Installation-this option is geared toward the user who is already connected to...
... section describes how to configure and use the NETGEAR Model PS104/PS105/PS110/ PS113 print server in Windows 95, Windows 98, or Windows 2000. Chapter 3 Microsoft Windows 95 and Windows 98 Printing This chapter describes how to install and set up a PC to the NETGEAR print server. • Admin Installation-this option is geared toward the user who is already connected to...
PS113 Reference Manual
Page 31
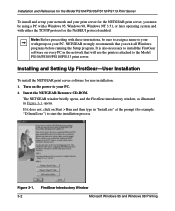
... on Start > Run and then type in Figure 3-1, opens. Installation and Reference for the Model PS104/PS105/PS110/PS113 Print Server To install and set up your network and your print server for the NETGEAR print server, you exit all Windows programs before running the Setup program. Insert the NETGEAR Resource CD-ROM. If it does not, click on your PC.
... on Start > Run and then type in Figure 3-1, opens. Installation and Reference for the Model PS104/PS105/PS110/PS113 Print Server To install and set up your network and your print server for the NETGEAR print server, you exit all Windows programs before running the Setup program. Insert the NETGEAR Resource CD-ROM. If it does not, click on your PC.
PS113 Reference Manual
Page 32
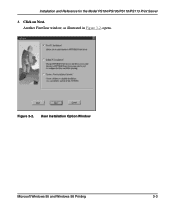
Click on Next. User Installation Option Window Microsoft Windows 95 and Windows 98 Printing 3-3 Installation and Reference for the Model PS104/PS105/PS110/PS113 Print Server 3. Another FirstGear window, as illustrated in Figure 3-2, opens. Figure 3-2.
Click on Next. User Installation Option Window Microsoft Windows 95 and Windows 98 Printing 3-3 Installation and Reference for the Model PS104/PS105/PS110/PS113 Print Server 3. Another FirstGear window, as illustrated in Figure 3-2, opens. Figure 3-2.

PS113 Reference Manual
Page 33
Choose "User PC Installation" and click on Next. The NETGEAR Print Server Software Installation window, as illustrated in Figure 3-3, opens. Figure 3-3. Installation and Reference for the Model PS104/PS105/PS110/PS113 Print Server 4. NETGEAR Print Server Software Installation Window 3-4 Microsoft Windows 95 and Windows 98 Printing
Choose "User PC Installation" and click on Next. The NETGEAR Print Server Software Installation window, as illustrated in Figure 3-3, opens. Figure 3-3. Installation and Reference for the Model PS104/PS105/PS110/PS113 Print Server 4. NETGEAR Print Server Software Installation Window 3-4 Microsoft Windows 95 and Windows 98 Printing
PS113 Reference Manual
Page 34
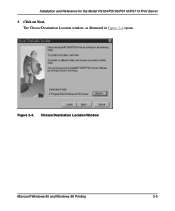
Choose Destination Location Window Microsoft Windows 95 and Windows 98 Printing 3-5 Click on Next. Figure 3-4. The Choose Destination Location window, as illustrated in Figure 3-4, opens. Installation and Reference for the Model PS104/PS105/PS110/PS113 Print Server 5.
Choose Destination Location Window Microsoft Windows 95 and Windows 98 Printing 3-5 Click on Next. Figure 3-4. The Choose Destination Location window, as illustrated in Figure 3-4, opens. Installation and Reference for the Model PS104/PS105/PS110/PS113 Print Server 5.

PS113 Reference Manual
Page 35
Click on Next. Figure 3-5. Installation and Reference for the Model PS104/PS105/PS110/PS113 Print Server 6. Select Program Folder Window 3-6 Microsoft Windows 95 and Windows 98 Printing The Select Program Folder window, as illustrated in Figure 3-5, opens.
Click on Next. Figure 3-5. Installation and Reference for the Model PS104/PS105/PS110/PS113 Print Server 6. Select Program Folder Window 3-6 Microsoft Windows 95 and Windows 98 Printing The Select Program Folder window, as illustrated in Figure 3-5, opens.

PS113 Reference Manual
Page 36
... FirstGear Print Server Program is now installed on a selection in the Program Folders entry field (default) or select a folder from the Existing Folders list. Click on Next. The Setup Complete window, as illustrated in the Program Folders entry field. 8. Microsoft Windows 95 and Windows 98 Printing 3-7 Installation and Reference for the Model PS104/PS105/PS110/PS113 Print Server...
... FirstGear Print Server Program is now installed on a selection in the Program Folders entry field (default) or select a folder from the Existing Folders list. Click on Next. The Setup Complete window, as illustrated in the Program Folders entry field. 8. Microsoft Windows 95 and Windows 98 Printing 3-7 Installation and Reference for the Model PS104/PS105/PS110/PS113 Print Server...
PS113 Reference Manual
Page 37
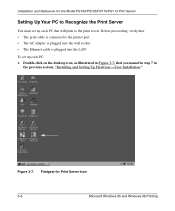
Figure 3-7. Firstgear for the Model PS104/PS105/PS110/PS113 Print Server Setting Up Your PC to Recognize the Print Server You must set up each PC: 1. Installation and Reference for Print Server Icon 3-8 Microsoft Windows 95 and Windows 98 Printing Before proceeding, verify that you named in step 7 in the previous section, "Installing and Setting Up FirstGear-User Installation." To set up...
Figure 3-7. Firstgear for the Model PS104/PS105/PS110/PS113 Print Server Setting Up Your PC to Recognize the Print Server You must set up each PC: 1. Installation and Reference for Print Server Icon 3-8 Microsoft Windows 95 and Windows 98 Printing Before proceeding, verify that you named in step 7 in the previous section, "Installing and Setting Up FirstGear-User Installation." To set up...

PS113 Reference Manual
Page 38
Double-click on . 4. Make sure that the NETGEAR print server and the printer that the cable connections between them are both powered on Setup in the Firstgear for Print Server window, as illustrated in Figure 3-8, opens. Installation and Reference for the Model PS104/PS105/PS110/PS113 Print Server The Firstgear for Print Server window. Figure 3-8. The Setup window opens, as illustrated in Figure 3-9. Microsoft Windows 95 and Windows 98 Printing 3-9 Setup Window 3. Make sure that connects to it are properly connected. Figure 3-9. Setup Icon 2.
Double-click on . 4. Make sure that the NETGEAR print server and the printer that the cable connections between them are both powered on Setup in the Firstgear for Print Server window, as illustrated in Figure 3-8, opens. Installation and Reference for the Model PS104/PS105/PS110/PS113 Print Server The Firstgear for Print Server window. Figure 3-8. The Setup window opens, as illustrated in Figure 3-9. Microsoft Windows 95 and Windows 98 Printing 3-9 Setup Window 3. Make sure that connects to it are properly connected. Figure 3-9. Setup Icon 2.
PS113 Reference Manual
Page 39
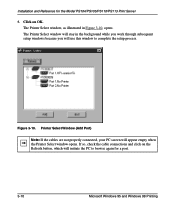
... Model PS104/PS105/PS110/PS113 Print Server 5. Printer Select Window (Add Port) Note: If the cables are not properly connected, your PC screen will initiate the PC to complete the setup process. If so, check the cable connections and click on OK. Figure 3-10. Installation and Reference for a port. 3-10 Microsoft Windows 95 and Windows 98 Printing Click on the...
... Model PS104/PS105/PS110/PS113 Print Server 5. Printer Select Window (Add Port) Note: If the cables are not properly connected, your PC screen will initiate the PC to complete the setup process. If so, check the cable connections and click on OK. Figure 3-10. Installation and Reference for a port. 3-10 Microsoft Windows 95 and Windows 98 Printing Click on the...
PS113 Reference Manual
Page 40
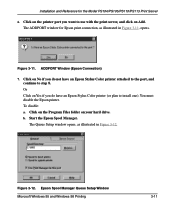
...Color printer attached to the port, and continue to install one). Installation and Reference for Epson print connection, as illustrated in Figure 3-11, opens. The ADDPORT window for the Model PS104/PS105/PS110/PS113 Print Server 6. Start the Epson Spool Manager. Figure 3-11. Click on No if you want to ...use with the print server, and click on Yes if you do not have an Epson Stylus Color printer (...
...Color printer attached to the port, and continue to install one). Installation and Reference for Epson print connection, as illustrated in Figure 3-11, opens. The ADDPORT window for the Model PS104/PS105/PS110/PS113 Print Server 6. Start the Epson Spool Manager. Figure 3-11. Click on No if you want to ...use with the print server, and click on Yes if you do not have an Epson Stylus Color printer (...
PS113 Reference Manual
Page 41
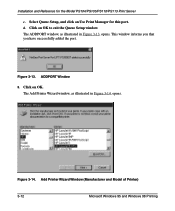
Select Queue Setup, and click on OK. This window informs you that you have successfully added the port. The Add Printer Wizard window, as illustrated in Figure 3-14, opens. Installation and Reference for this port. The ADDPORT window, as illustrated in Figure 3-13, opens. Figure 3-13. Figure 3-14. Click on Use Print Manager for the Model PS104/PS105/PS110/PS113 Print Server c. Click on OK to exit the Queue Setup window. Add Printer Wizard Window (Manufacturer and Model of Printer) 3-12 Microsoft Windows 95 and Windows 98 Printing d. ADDPORT Window 8.
Select Queue Setup, and click on OK. This window informs you that you have successfully added the port. The Add Printer Wizard window, as illustrated in Figure 3-14, opens. Installation and Reference for this port. The ADDPORT window, as illustrated in Figure 3-13, opens. Figure 3-13. Figure 3-14. Click on Use Print Manager for the Model PS104/PS105/PS110/PS113 Print Server c. Click on OK to exit the Queue Setup window. Add Printer Wizard Window (Manufacturer and Model of Printer) 3-12 Microsoft Windows 95 and Windows 98 Printing d. ADDPORT Window 8.
PS113 Reference Manual
Page 42
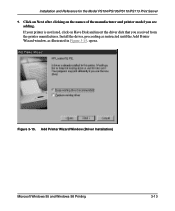
If your printer is not listed, click on the names of the manufacturer and printer model you received from the printer manufacturer. Figure 3-15. Add Printer Wizard Window (Driver Installation) Microsoft Windows 95 and Windows 98 Printing 3-13 Install the driver, proceeding as instructed until the Add Printer Wizard window, as illustrated in Figure 3-15, opens. Installation and Reference for the Model PS104/PS105/PS110/PS113 Print Server 9. Click on Next after clicking on Have Disk and insert the driver disk that you are adding.
If your printer is not listed, click on the names of the manufacturer and printer model you received from the printer manufacturer. Figure 3-15. Add Printer Wizard Window (Driver Installation) Microsoft Windows 95 and Windows 98 Printing 3-13 Install the driver, proceeding as instructed until the Add Printer Wizard window, as illustrated in Figure 3-15, opens. Installation and Reference for the Model PS104/PS105/PS110/PS113 Print Server 9. Click on Next after clicking on Have Disk and insert the driver disk that you are adding.

PS113 Reference Manual
Page 43
Installation and Reference for naming your printer, as illustrated in Figure 3-16, opens. Figure 3-16. Add Printer Wizard Window (Printer Name) 3-14 Microsoft Windows 95 and Windows 98 Printing If you have not installed the driver, do so now as prompted by the screen, as illustrated in Figure 3-15. The Add Printer Wizard window for the Model PS104/PS105/PS110/PS113 Print Server 10. If you have already installed the printer driver, select Keep existing driver (recommended), and click on Next.
Installation and Reference for naming your printer, as illustrated in Figure 3-16, opens. Figure 3-16. Add Printer Wizard Window (Printer Name) 3-14 Microsoft Windows 95 and Windows 98 Printing If you have not installed the driver, do so now as prompted by the screen, as illustrated in Figure 3-15. The Add Printer Wizard window for the Model PS104/PS105/PS110/PS113 Print Server 10. If you have already installed the printer driver, select Keep existing driver (recommended), and click on Next.

PS113 Reference Manual
Page 44
Figure 3-17. Add Printer Wizard Window (Print Test Page) Microsoft Windows 95 and Windows 98 Printing 3-15 Installation and Reference for printing a test page, as illustrated in Figure 3-17, opens. The Add Printer Wizard window for the Model PS104/PS105/PS110/PS113 Print Server 11. Type a name for the printer (if you want it to have a unique name) and decide if you want this printer to be your default printer; then click on Next.
Figure 3-17. Add Printer Wizard Window (Print Test Page) Microsoft Windows 95 and Windows 98 Printing 3-15 Installation and Reference for printing a test page, as illustrated in Figure 3-17, opens. The Add Printer Wizard window for the Model PS104/PS105/PS110/PS113 Print Server 11. Type a name for the printer (if you want it to have a unique name) and decide if you want this printer to be your default printer; then click on Next.

