User Manual
Page 11
... Replacing the Filters E-39 5. INTRODUCTION Introduction to the VT650 Projector E-6 Getting Started E-6 What's in the Box E-7 Getting to Know Your VT650 Projector E-8 Front / Side Features E-8 Rear / Side Features E-9 Top Features E-10 Terminal Panel Features E-11 Remote Control Features E-12 Opeating Range E-13 Remote Control Battery Installation E-13 Using Remote Mouse Receiver E-14 Switching Operation Mode between Computer...
... Replacing the Filters E-39 5. INTRODUCTION Introduction to the VT650 Projector E-6 Getting Started E-6 What's in the Box E-7 Getting to Know Your VT650 Projector E-8 Front / Side Features E-8 Rear / Side Features E-9 Top Features E-10 Terminal Panel Features E-11 Remote Control Features E-12 Opeating Range E-13 Remote Control Battery Installation E-13 Using Remote Mouse Receiver E-14 Switching Operation Mode between Computer...
User Manual
Page 12
... resolution*2. • Supports most IBM VGA, SVGA, XGA, SXGA*2, UXGA*2, Macintosh, component signal (YCbCr / YPbPr) or any local building codes. and Canada. PAL60: TV standard used for NTSC playback on Your Purchase of The VT650 Projector The VT650 is light, compact, easy to carry, and complements ... the supplied wireless remote control and remote mouse receiver to correct trapezoidal distortion so that provides natural and true color reproduction. • An image can use the projector on a tabletop or cart, you time later on the ceiling. • NEC Technologies' exclusive Advanced...
... resolution*2. • Supports most IBM VGA, SVGA, XGA, SXGA*2, UXGA*2, Macintosh, component signal (YCbCr / YPbPr) or any local building codes. and Canada. PAL60: TV standard used for NTSC playback on Your Purchase of The VT650 Projector The VT650 is light, compact, easy to carry, and complements ... the supplied wireless remote control and remote mouse receiver to correct trapezoidal distortion so that provides natural and true color reproduction. • An image can use the projector on a tabletop or cart, you time later on the ceiling. • NEC Technologies' exclusive Advanced...

User Manual
Page 13
...VT650 Projector. What's in the Box? STATPUOSWER ENTER ON/OFF SELECT CANCEL SOURCE MENU AUTO ADJUST INRPGUBT AUD OUTPUT IN PC-CONTROL S-VIDEO OUT VID Projector VOLUME PICTURE PJ HELP MAGNIFY FREEZE PIC-MUTE ASPECT U ENTER SELECT CANCE L VIDEO OFF S-VIDEO POWER MEN RGB AUTO ADJ. ON Remote... control Lens cap Remote mouse receiver PS/2 adapter Batteries Power cable Signal...
...VT650 Projector. What's in the Box? STATPUOSWER ENTER ON/OFF SELECT CANCEL SOURCE MENU AUTO ADJUST INRPGUBT AUD OUTPUT IN PC-CONTROL S-VIDEO OUT VID Projector VOLUME PICTURE PJ HELP MAGNIFY FREEZE PIC-MUTE ASPECT U ENTER SELECT CANCE L VIDEO OFF S-VIDEO POWER MEN RGB AUTO ADJ. ON Remote... control Lens cap Remote mouse receiver PS/2 adapter Batteries Power cable Signal...

User Manual
Page 14
... security slot supports the MicroSaver® Security System. Doing so may cause damage to Know Your VT650 Projector Front/ Side Features Controls Remote Sensor STATPUOSWER AC Input Connect the supplied power cable's three-pin plug here. Remote Sensor ENTER ON/STAND BY SELECT CANCEL SOURCE MENU AUTO ADJUST Slot for Kensington MicroSaver Security System...
... security slot supports the MicroSaver® Security System. Doing so may cause damage to Know Your VT650 Projector Front/ Side Features Controls Remote Sensor STATPUOSWER AC Input Connect the supplied power cable's three-pin plug here. Remote Sensor ENTER ON/STAND BY SELECT CANCEL SOURCE MENU AUTO ADJUST Slot for Kensington MicroSaver Security System...

User Manual
Page 15
Lens Cap 2. Use the rivet to attach the string to the bottom with the supplied string and rivet 1. Rivet AUD B UT IN OUT PUT VID L S-VIDEO PC-CONTROL S-VIDEO VID OUTPUT OUT INRPGUBT IN AUD E-9 Tie a knot again String 3. Rear/ Side Features Remote Sensor SOURCE AUTO ADJUST MENU SELECT ENTER STATPUOSWER CANCEL ON/STAND BY Remote Sensor Built-in the string. Thread the string through the hole on the lens cap and then tie a knot in Monaural Speaker (1W) Rear Foot Lamp Cover Lamp Cover Screw Rear Foot Attaching the lens cap to the bottom of the projector.
Lens Cap 2. Use the rivet to attach the string to the bottom with the supplied string and rivet 1. Rivet AUD B UT IN OUT PUT VID L S-VIDEO PC-CONTROL S-VIDEO VID OUTPUT OUT INRPGUBT IN AUD E-9 Tie a knot again String 3. Rear/ Side Features Remote Sensor SOURCE AUTO ADJUST MENU SELECT ENTER STATPUOSWER CANCEL ON/STAND BY Remote Sensor Built-in the string. Thread the string through the hole on the lens cap and then tie a knot in Monaural Speaker (1W) Rear Foot Lamp Cover Lamp Cover Screw Rear Foot Attaching the lens cap to the bottom of the projector.

User Manual
Page 18
...in the Computer mode, this button or any button is pressed, the current aspect ratio will be displayed correctly, or in the Projector mode, which allows you can click either the right-click or left button. Picture Button Press this button to display the Picture ... button to turn your projector on the projector cabinet. 2. Each time this button to restore the image and sound. 19. Power OFF Button If the main power is canceled. Infrared Transmitter Direct the remote control toward the remote sensor on . 4. When you are in some cases it . Remote Control 4 5 6 ...
...in the Computer mode, this button or any button is pressed, the current aspect ratio will be displayed correctly, or in the Projector mode, which allows you can click either the right-click or left button. Picture Button Press this button to display the Picture ... button to turn your projector on the projector cabinet. 2. Each time this button to restore the image and sound. 19. Power OFF Button If the main power is canceled. Infrared Transmitter Direct the remote control toward the remote sensor on . 4. When you are in some cases it . Remote Control 4 5 6 ...

User Manual
Page 19
... cover. 7m 22feet 7m 22feet 2. NOTE: Do not change the setting of the function (DIP) switches. Operating Range Remote Control Battery Installation 1. Should this happen, remove the batteries and then install them again without touching the Select/Mouse button.... Remote Control Precautions • Handle the remote control carefully. • If the remote control gets wet, wipe it dry immediately. • Avoid excessive heat and humidity. • If you have...
... cover. 7m 22feet 7m 22feet 2. NOTE: Do not change the setting of the function (DIP) switches. Operating Range Remote Control Battery Installation 1. Should this happen, remove the batteries and then install them again without touching the Select/Mouse button.... Remote Control Precautions • Handle the remote control carefully. • If the remote control gets wet, wipe it dry immediately. • Avoid excessive heat and humidity. • If you have...

User Manual
Page 20
...to the computer using the mouse (PS/2) terminal, do so using the PS/2 adapter, be sure to attach the PS/2 adapter to the remote mouse receiver first. It is repeatedly connected and disconnected in rapid intervals. • When using the PS/2 adapter. To connect it and vice...versa. Do not connect or disconnect the USB connector of your computer's mouse functions from the remote control (Computer mode). Using Remote Mouse Receiver The remote mouse receiver enables you wish to the Projector mode, press the PJ button (lit red). The mouse receiver can be connected directly to ...
...to the computer using the mouse (PS/2) terminal, do so using the PS/2 adapter, be sure to attach the PS/2 adapter to the remote mouse receiver first. It is repeatedly connected and disconnected in rapid intervals. • When using the PS/2 adapter. To connect it and vice...versa. Do not connect or disconnect the USB connector of your computer's mouse functions from the remote control (Computer mode). Using Remote Mouse Receiver The remote mouse receiver enables you wish to the Projector mode, press the PJ button (lit red). The mouse receiver can be connected directly to ...

User Manual
Page 21
... SELECT NTER CANCE PJ PICTURE ASPECT HELP FREEZE PIC-MUTE MAGNIFY VOLUME [Projector mode] Works as a right-click button for your computer. Not Iit Works as the Select button on Operating Your PC with the Remote Control If no buttons are pressed within 10 seconds, the PJ button's... your computer. L L E E [Computer mode] OFF ON POWER VIDEO S-VIDEO RGB AUTO ADJ. Works as a computer mouse in the Projector mode, which allows the projector menu operation using the SELECT, ENTER or CANCEL buttons. • If no button operation is made for 60 seconds or more then releasing...
... SELECT NTER CANCE PJ PICTURE ASPECT HELP FREEZE PIC-MUTE MAGNIFY VOLUME [Projector mode] Works as a right-click button for your computer. Not Iit Works as the Select button on Operating Your PC with the Remote Control If no buttons are pressed within 10 seconds, the PJ button's... your computer. L L E E [Computer mode] OFF ON POWER VIDEO S-VIDEO RGB AUTO ADJ. Works as a computer mouse in the Projector mode, which allows the projector menu operation using the SELECT, ENTER or CANCEL buttons. • If no button operation is made for 60 seconds or more then releasing...

User Manual
Page 24
...945; = Throw angle WARNING • Installing your image is inverted, use your projector on your projector cabinet or your NEC dealer for more information. * Do not attempt to moisture, dust, or smoke. If the projector falls to the ground, you to correct the orientation. (See page E-35.)... the screen image. • Ensure that you have adequate ventilation around your NEC dealer if you 're using a mirror and your image is upside down, use the projector where temperatures vary greatly. Contact your remote control to enjoy a much larger image. Ceiling Installation Screen Top D Lens ...
...945; = Throw angle WARNING • Installing your image is inverted, use your projector on your projector cabinet or your NEC dealer for more information. * Do not attempt to moisture, dust, or smoke. If the projector falls to the ground, you to correct the orientation. (See page E-35.)... the screen image. • Ensure that you have adequate ventilation around your NEC dealer if you 're using a mirror and your image is upside down, use the projector where temperatures vary greatly. Contact your remote control to enjoy a much larger image. Ceiling Installation Screen Top D Lens ...

User Manual
Page 25
...video equipment. 3. Press the MENU button on the power to the projector and your NEC dealer in Europe. Use the RGB button on after connecting with a notebook PC, be 3 m (9.8 feet) or shorter. SCART is turned on the remote control to display the menu. 6. It is also referred to -... cables, the cables should be sure to connect between the projector and the notebook PC before turning on the remote control, wait 60 seconds and then press the POWER ON button again to the projector and your NEC dealer in Europe for this connection. Wiring Diagram Monitor RGB INPUT...
...video equipment. 3. Press the MENU button on the power to the projector and your NEC dealer in Europe. Use the RGB button on after connecting with a notebook PC, be 3 m (9.8 feet) or shorter. SCART is turned on the remote control to display the menu. 6. It is also referred to -... cables, the cables should be sure to connect between the projector and the notebook PC before turning on the remote control, wait 60 seconds and then press the POWER ON button again to the projector and your NEC dealer in Europe for this connection. Wiring Diagram Monitor RGB INPUT...

User Manual
Page 31
...POWER STATUS POWER Flashing green light Steady orange light Flashing green light for a prolonged period of turning the projector off and then immediately back on the remote control or the projector cabinet to select your projector. Select the Computer or Video Source Press the Source button on . See page E-27. If this...be used for an extended period. • To turn off , the cooling fans keep operating for a minimum of the LCD panel. NOTE: To turn to green and the projector become ready to use the Focus ring to adjust the image size, then use . Or press the "Menu" button on...
...POWER STATUS POWER Flashing green light Steady orange light Flashing green light for a prolonged period of turning the projector off and then immediately back on the remote control or the projector cabinet to select your projector. Select the Computer or Video Source Press the Source button on . See page E-27. If this...be used for an extended period. • To turn off , the cooling fans keep operating for a minimum of the LCD panel. NOTE: To turn to green and the projector become ready to use the Focus ring to adjust the image size, then use . Or press the "Menu" button on...

User Manual
Page 34
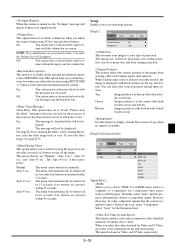
... off by using the adjustable tilt-foot. CANCEL: Return to the screen. Raise the projector height using "Select" or buttons on the remote control or the projector cabinet to select a submenu or item. 4. Rotate the projector to make the image square to the previous screen. 6. Press the button or the ...2. Use keystone correction for the item you want to adjust or set. 3. Using the Menus 1. Press the "Menu" button on the remote control or the projector cabinet to quit the menu display. Each of increase or decrease. 5. The on the screen, do the following. The change is distorted ...
... off by using the adjustable tilt-foot. CANCEL: Return to the screen. Raise the projector height using "Select" or buttons on the remote control or the projector cabinet to select a submenu or item. 4. Rotate the projector to make the image square to the previous screen. 6. Press the button or the ...2. Use keystone correction for the item you want to adjust or set. 3. Using the Menus 1. Press the "Menu" button on the remote control or the projector cabinet to quit the menu display. Each of increase or decrease. 5. The on the screen, do the following. The change is distorted ...

User Manual
Page 35
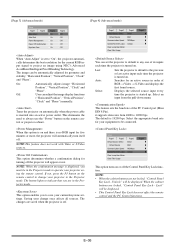
you need the optional presentation remote control (PR51KIT). Orientation Desktop Front/Ceiling Rear/Desktop Rear/Ceiling Front Cinema Position Top/Center/Bottom Background Blue/Black/Logo Signal Select RGB Auto/RGB/... Menu Setup Source Index Input Terminal Horizontal Frequency Vertical Frequency Sync Polarity Signal Type Video Type Sync Type Interlace Remaining Lamp Time Lamp Hour Meter Projector Usage Filter Usage NOTE: Some menu items are not available depending on the input Source. (Toutes) Items Normal/Eco Aspect Ratio Position/Clock Resolution Video...
you need the optional presentation remote control (PR51KIT). Orientation Desktop Front/Ceiling Rear/Desktop Rear/Ceiling Front Cinema Position Top/Center/Bottom Background Blue/Black/Logo Signal Select RGB Auto/RGB/... Menu Setup Source Index Input Terminal Horizontal Frequency Vertical Frequency Sync Polarity Signal Type Video Type Sync Type Interlace Remaining Lamp Time Lamp Hour Meter Projector Usage Filter Usage NOTE: Some menu items are not available depending on the input Source. (Toutes) Items Normal/Eco Aspect Ratio Position/Clock Resolution Video...

User Manual
Page 37
... is connected to your Video input-VCR, laser disc player, DVD player or document camera. Use the "Select" button on the projector cabinet or the remote control to highlight the menu for the item you want to adjust. green to correct the keystone (trapezoidal) distortion. Controls the detail... of the projector. Use the or buttons on the slide bar to +/-blue. Keystone distortion Normal NOTE: The keystone angle can display...
... is connected to your Video input-VCR, laser disc player, DVD player or document camera. Use the "Select" button on the projector cabinet or the remote control to highlight the menu for the item you want to adjust. green to correct the keystone (trapezoidal) distortion. Controls the detail... of the projector. Use the or buttons on the slide bar to +/-blue. Keystone distortion Normal NOTE: The keystone angle can display...
User Manual
Page 41
...the vertical position of projection. You can increase or decrease the level with a black border on bottom. Normally select "Auto" and the projector automatically detects a component signal. Select "Scart" for cleaning the filters. Off: You can increase or decrease the level with black borders ...automatically be turned off manually. E-35 When this feature is turned on, the "No Input" message will disappear. button on the optional presentation remote control (PR51KIT) only. ters, reset the filter usage back to choose "RGB" for an RGB source such as a computer, or "...
...the vertical position of projection. You can increase or decrease the level with a black border on bottom. Normally select "Auto" and the projector automatically detects a component signal. Select "Scart" for cleaning the filters. Off: You can increase or decrease the level with black borders ...automatically be turned off manually. E-35 When this feature is turned on, the "No Input" message will disappear. button on the optional presentation remote control (PR51KIT) only. ters, reset the filter usage back to choose "RGB" for an RGB source such as a computer, or "...
User Manual
Page 42
... When the confirmation message is inserted into an active power outlet. Saving your change your projector using NEC's Advanced AccuBlend Intelligent Pixel Blending Technology. Displays the selected source input every time the projector is turned on automatically when the power cable is displayed, you must be displayed. The ... of RGB → Video → S-Video and displays the first found source. If not, press the PJ button on the remote control or projector cabinet. Unlock" will be automatically adjusted for the current RGB input signal to project an image using the...
... When the confirmation message is inserted into an active power outlet. Saving your change your projector using NEC's Advanced AccuBlend Intelligent Pixel Blending Technology. Displays the selected source input every time the projector is turned on automatically when the power cable is displayed, you must be displayed. The ... of RGB → Video → S-Video and displays the first found source. If not, press the PJ button on the remote control or projector cabinet. Unlock" will be automatically adjusted for the current RGB input signal to project an image using the...

User Manual
Page 43
... Frequency Vertical Frequency Sync Polarity [Page 2] Signal Type Video Type Sync Type Interlace [Page 3] Remaining Lamp Time (%)* Lamp Hour Meter (H) Projector Usage Filter Usage * When the remaining lamp time reaches 0, the Remaining Lamp Time bar indicator changes from Locked to the previous menu screen....Filter Usage Page3 Select RGB 19200bps Unlock Page4 Lock Unlock 2) Use the Select or button on the remote control to zero. If the remaining lamp time reaches 0 hours, the projector will be displayed. ing the CANCEL button for a confirmation. Resets the lamp clock back to ...
... Frequency Vertical Frequency Sync Polarity [Page 2] Signal Type Video Type Sync Type Interlace [Page 3] Remaining Lamp Time (%)* Lamp Hour Meter (H) Projector Usage Filter Usage * When the remaining lamp time reaches 0, the Remaining Lamp Time bar indicator changes from Locked to the previous menu screen....Filter Usage Page3 Select RGB 19200bps Unlock Page4 Lock Unlock 2) Use the Select or button on the remote control to zero. If the remaining lamp time reaches 0 hours, the projector will be displayed. ing the CANCEL button for a confirmation. Resets the lamp clock back to ...

User Manual
Page 44
... in Eco mode) or longer, the "Status" light in Eco mode) hours of 10 seconds while in the lamp case. 4. Turn the projector off and go on the remote control for 2000 hours (up to replace the lamp. If you continue to use the lamp after it at least one hour for... on and the message will go into a freewheeling condition and remove the lamp cover. Secure it in Eco mode) of use a lamp other than the NEC replacement lamp (VT50LP). Do not attempt to circumvent this happens, be extremely hot. NOTE: When the lamp exceeds 2100 hours (up to 3000 hours in...
... in Eco mode) or longer, the "Status" light in Eco mode) hours of 10 seconds while in the lamp case. 4. Turn the projector off and go on the remote control for 2000 hours (up to replace the lamp. If you continue to use the lamp after it at least one hour for... on and the message will go into a freewheeling condition and remove the lamp cover. Secure it in Eco mode) of use a lamp other than the NEC replacement lamp (VT50LP). Do not attempt to circumvent this happens, be extremely hot. NOTE: When the lamp exceeds 2100 hours (up to 3000 hours in...
User Manual
Page 46
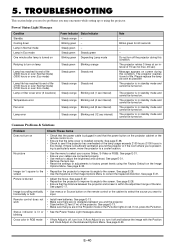
... is in standby mode and cannot be turned on . • Ensure that the power button on the projector cabinet or the remote control is installed correctly. Please replace the lamp as soon as possible The projector is turned on . See page E-31. • Ensure your source (Video, S-Video or RGB). ... problems you may encounter while setting up or using the Factory Default on the remote control or the cabinet to improve its end of life. The projector retries 3 times at an interval of the lens. The projector is on, turn it off , turn it on screen during this condition. ...
... is in standby mode and cannot be turned on . • Ensure that the power button on the projector cabinet or the remote control is installed correctly. Please replace the lamp as soon as possible The projector is turned on . See page E-31. • Ensure your source (Video, S-Video or RGB). ... problems you may encounter while setting up or using the Factory Default on the remote control or the cabinet to improve its end of life. The projector retries 3 times at an interval of the lens. The projector is on, turn it off , turn it on screen during this condition. ...


