
NP115 : RS232 codes- Projectors
Page 34
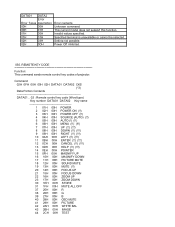
Specified terminal is unavailable or cannot be selected. This current model does not support this function. REMOTE KEY CODE Function: This command sends remote control key codes of projector. DATA01 DATA2 Error Error Types description 00H 00H 00H 01H 01H 00H 01H 01H 02H 03H 02H 0DH Error contents Unknown command. Command: 02H 0FH ...
Specified terminal is unavailable or cannot be selected. This current model does not support this function. REMOTE KEY CODE Function: This command sends remote control key codes of projector. DATA01 DATA2 Error Error Types description 00H 00H 00H 01H 01H 00H 01H 01H 02H 03H 02H 0DH Error contents Unknown command. Command: 02H 0FH ...
VT49/490/590 spec sheet
Page 2
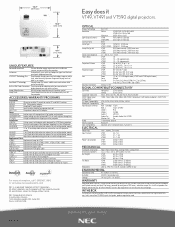
...LCD Native: VT49/VT491: SVGA 800 x 600 VT590: XGA 1024 x 768 Maximum: UXGA 1600 x 1200 VT49 1600 normal /1280 eco VT491/590 2000 normal /1600 eco 600:1 VT49 150W DC, 120W eco VT491... tone correction to 4 years projector trade-in program For more information, call 1.800.NEC.INFO or visit www.necvisualsystems.com NEC is covered for use with projector mount ADJ0305 3 to 120... it VT49, VT491 and VT590 digital projectors. IN THE BOX Carrying case, carrying handle (VT491/VT590) for VT490, VT491, VT590, VT595, VT695 RMT-PJ21 Replacement remote control PWRCRD-VT70 Replacement...
...LCD Native: VT49/VT491: SVGA 800 x 600 VT590: XGA 1024 x 768 Maximum: UXGA 1600 x 1200 VT49 1600 normal /1280 eco VT491/590 2000 normal /1600 eco 600:1 VT49 150W DC, 120W eco VT491... tone correction to 4 years projector trade-in program For more information, call 1.800.NEC.INFO or visit www.necvisualsystems.com NEC is covered for use with projector mount ADJ0305 3 to 120... it VT49, VT491 and VT590 digital projectors. IN THE BOX Carrying case, carrying handle (VT491/VT590) for VT490, VT491, VT590, VT595, VT695 RMT-PJ21 Replacement remote control PWRCRD-VT70 Replacement...

VT49/490/491/590/595/695 UM
Page 6
...injury. • Select [High] in the soft case by unplugging the power cable when the projector is powered on. • Do not turn off will not be using the remote control for lamp replacement. Please replace the lamp.] appears. Do not touch them as the pieces of... glass may cause injury. Remote Control Precautions • Handle the remote control carefully. • If the remote control gets wet, wipe it dry immediately. • Avoid excessive heat and humidity. • Do not heat, take ...
...injury. • Select [High] in the soft case by unplugging the power cable when the projector is powered on. • Do not turn off will not be using the remote control for lamp replacement. Please replace the lamp.] appears. Do not touch them as the pieces of... glass may cause injury. Remote Control Precautions • Handle the remote control carefully. • If the remote control gets wet, wipe it dry immediately. • Avoid excessive heat and humidity. • Do not heat, take ...
VT49/490/491/590/595/695 UM
Page 7
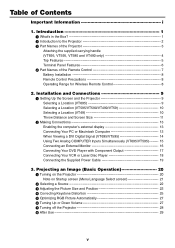
Table of the Remote Control 7 Battery Installation 8 Remote Control Precautions 8 Operating Range for Wireless Remote Control 8 2. Introduction 1 ᕡ What's in the Box 1 ᕢ Introduction to the Projector 2 ᕣ Part Names of the Projector 3 Attaching the supplied carrying handle (VT695, VT595, VT590 and VT490 only 4 Top Features 5 Terminal Panel Features 6 ᕤ Part Names of Contents Important Information i 1. Projecting an ...
Table of the Remote Control 7 Battery Installation 8 Remote Control Precautions 8 Operating Range for Wireless Remote Control 8 2. Introduction 1 ᕡ What's in the Box 1 ᕢ Introduction to the Projector 2 ᕣ Part Names of the Projector 3 Attaching the supplied carrying handle (VT695, VT595, VT590 and VT490 only 4 Top Features 5 Terminal Panel Features 6 ᕤ Part Names of Contents Important Information i 1. Projecting an ...
VT49/490/491/590/595/695 UM
Page 9
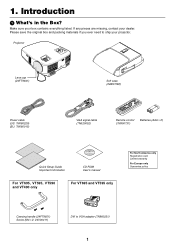
Introduction ᕡ What's in the Box? R-CLICK EXIT FREEZE OFF MAGNIFY PIC-MUTPEOWER ON UP PAGE DOWN Remote control (7N900731) Batteries (AAAן2) Quick Setup Guide Important Information CD-ROM User's manual For VT695, VT595, VT590 and ...missing, contact your box contains everything listed. Please save the original box and packing materials if you ever need to VGA adapter (7N960231) 1 1. Projector AUTO ADJ. SOURCE EXIT ON/STAND BY SELECT ENTER MENU POWESRTATUSLAMP ZOOM FOCUS Lens cap (24FT9641) Power cable (US: 7N080220) (EU: 7N080015) ...
Introduction ᕡ What's in the Box? R-CLICK EXIT FREEZE OFF MAGNIFY PIC-MUTPEOWER ON UP PAGE DOWN Remote control (7N900731) Batteries (AAAן2) Quick Setup Guide Important Information CD-ROM User's manual For VT695, VT595, VT590 and ...missing, contact your box contains everything listed. Please save the original box and packing materials if you ever need to VGA adapter (7N960231) 1 1. Projector AUTO ADJ. SOURCE EXIT ON/STAND BY SELECT ENTER MENU POWESRTATUSLAMP ZOOM FOCUS Lens cap (24FT9641) Power cable (US: 7N080220) (EU: 7N080015) ...
VT49/490/491/590/595/695 UM
Page 10
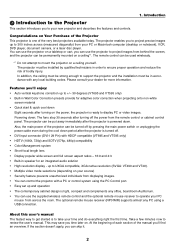
... solution • High resolution display - Take a few minutes now to UXGA compatible, XGA native resolution (SVGA: VT490 and VT49). • Multiple video mode selections (depending on a ceiling yourself. The remote control can be put away immediately after the projector is powered down ; Also, the main power of the manual you can be turned off...
... solution • High resolution display - Take a few minutes now to UXGA compatible, XGA native resolution (SVGA: VT490 and VT49). • Multiple video mode selections (depending on a ceiling yourself. The remote control can be put away immediately after the projector is powered down ; Also, the main power of the manual you can be turned off...
VT49/490/491/590/595/695 UM
Page 15
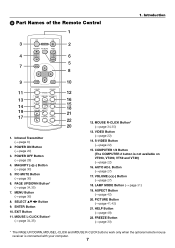
... VT590, VT490, VT59 and VT49) (→ page 22) 16. POWER OFF Button (→ page 28) 4. MENU Button (→ page 36) 8. ᕤ Part Names of the Remote Control 1 OFF ON 3 POWER 2 MAGNIFY PIC-MUTE PAGE UP 4 6 DOWN 5 7 MENU 8 1. PIC-MUTE Button (→ page 30) 6. Infrared Transmitter (→ page 8) 2.
... VT590, VT490, VT59 and VT49) (→ page 22) 16. POWER OFF Button (→ page 28) 4. MENU Button (→ page 36) 8. ᕤ Part Names of the Remote Control 1 OFF ON 3 POWER 2 MAGNIFY PIC-MUTE PAGE UP 4 6 DOWN 5 7 MENU 8 1. PIC-MUTE Button (→ page 30) 6. Infrared Transmitter (→ page 8) 2.
VT49/490/491/590/595/695 UM
Page 16
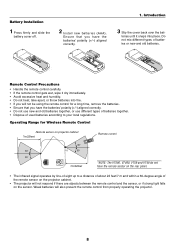
...distance of about 22 feet/7 m and within a 60-degree angle of the remote sensor on the projector cabinet. • The projector will not respond if there are objects between the remote control and the sensor, or if strong light falls on the sensor. Introduction 3...back over the bat- Remote Control Precautions • Handle the remote control carefully. • If the remote control gets wet, wipe it snaps into fire. • If you will also prevent the remote control from properly operating the projector. 8 Ensure that you have the remote sensor on projector cabinet 7m/22feet 30&#...
...distance of about 22 feet/7 m and within a 60-degree angle of the remote sensor on the projector cabinet. • The projector will not respond if there are objects between the remote control and the sensor, or if strong light falls on the sensor. Introduction 3...back over the bat- Remote Control Precautions • Handle the remote control carefully. • If the remote control gets wet, wipe it snaps into fire. • If you will also prevent the remote control from properly operating the projector. 8 Ensure that you have the remote sensor on projector cabinet 7m/22feet 30&#...

VT49/490/491/590/595/695 UM
Page 20
... -26 -660 α degree 8.7 8.6 8.5 8.5 8.4 8.4 8.4 8.4 8.4 8.4 8.4 8.4 8.4 8.4 8.4 8.4 8.4 WARNING * Installing your remote control to install the projector yourself. • Only use your projector on the ceiling must be injured and the projector severely damaged. • Do not use the MENU and SELECT buttons on the side or the front... image. • Ensure that you have adequate ventilation around your NEC dealer if you to reflect your image is required. If you're using a mirror system and your projector's image enables you need a mirror system. Reflecting the Image Using...
... -26 -660 α degree 8.7 8.6 8.5 8.5 8.4 8.4 8.4 8.4 8.4 8.4 8.4 8.4 8.4 8.4 8.4 8.4 8.4 WARNING * Installing your remote control to install the projector yourself. • Only use your projector on the ceiling must be injured and the projector severely damaged. • Do not use the MENU and SELECT buttons on the side or the front... image. • Ensure that you have adequate ventilation around your NEC dealer if you to reflect your image is required. If you're using a mirror system and your projector's image enables you need a mirror system. Reflecting the Image Using...
VT49/490/491/590/595/695 UM
Page 21
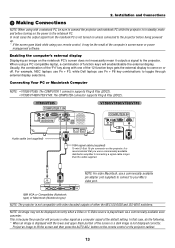
... of function keys will process a video signal as a computer signal at the default setting. For example, NEC laptops use Fn + F3, while Dell laptops use Fn + F8 key combinations to your remote control, it outputs a signal to the projector. This is played back via a commercially available scan converter. Installation and Connections ᕢ Making Connections...
... of function keys will process a video signal as a computer signal at the default setting. For example, NEC laptops use Fn + F3, while Dell laptops use Fn + F8 key combinations to your remote control, it outputs a signal to the projector. This is played back via a commercially available scan converter. Installation and Connections ᕢ Making Connections...
VT49/490/491/590/595/695 UM
Page 27
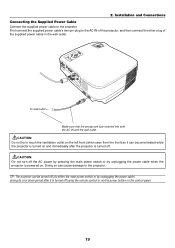
...two-pin plug to the projector. POWERSTATUSLAMP ON/STAND BY SOURCE AUTO ADJ. CAUTION: Do not turn off the AC power by pressing the main power switch or by unplugging the power cable) during its cool down period after the projector is turned off using the remote control or via the power button ...on the control panel. 19 TIP: The projector can cause damage to touch the ventilation outlet on the left front (when seen from the ...
...two-pin plug to the projector. POWERSTATUSLAMP ON/STAND BY SOURCE AUTO ADJ. CAUTION: Do not turn off the AC power by pressing the main power switch or by unplugging the power cable) during its cool down period after the projector is turned off using the remote control or via the power button ...on the control panel. 19 TIP: The projector can cause damage to touch the ventilation outlet on the left front (when seen from the ...
VT49/490/491/590/595/695 UM
Page 28
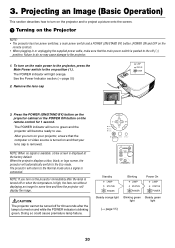
...the Eco mode. Press the POWER (ON/STAND BY) button on the projector cabinet or the POWER ON button on and that the computer or video source is turned on the remote control for 1 second. CAUTION: The projector cannot be turned off (⅜) position. To turn to green and the... projector will return to use. The projector will become ready to the Normal mode once a signal is blinking green....
...the Eco mode. Press the POWER (ON/STAND BY) button on the projector cabinet or the POWER ON button on and that the computer or video source is turned on the remote control for 1 second. CAUTION: The projector cannot be turned off (⅜) position. To turn to green and the... projector will return to use. The projector will become ready to the Normal mode once a signal is blinking green....
VT49/490/491/590/595/695 UM
Page 30
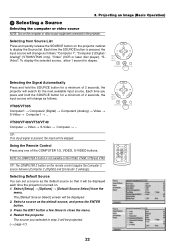
3. Each time the SOURCE button is not available on the remote control toggles the Computer 2 source between [Computer 2 (Digital)] and [Computer 2 (Analog)]. Using the Remote Control Press any one of 2 seconds, the projector will change as follows: VT695/VT595 Computer1 → Computer2 (Digital) → Computer2 (Analog) &#... Selecting the computer or video source NOTE: Turn on the projector cabinet to the projector. Selecting from the menu. Each time you selected in step 2 will be displayed each time the projector is present, the input will change as the default source,...
3. Each time the SOURCE button is not available on the remote control toggles the Computer 2 source between [Computer 2 (Digital)] and [Computer 2 (Analog)]. Using the Remote Control Press any one of 2 seconds, the projector will change as follows: VT695/VT595 Computer1 → Computer2 (Digital) → Computer2 (Analog) &#... Selecting the computer or video source NOTE: Turn on the projector cabinet to the projector. Selecting from the menu. Each time you selected in step 2 will be displayed each time the projector is present, the input will change as the default source,...

VT49/490/491/590/595/695 UM
Page 33
... the ENTER button. 3. Adjust so that the image is not available. Press the MENU button. Adjusting with the following steps to be saved with the Remote Control 1. Press the MENU button. Proceed with buttons on a signal or its aspect ratio selection. NOTE: The Keystone correction range can cause an image to correct...
... the ENTER button. 3. Adjust so that the image is not available. Press the MENU button. Adjusting with the following steps to be saved with the Remote Control 1. Press the MENU button. Proceed with buttons on a signal or its aspect ratio selection. NOTE: The Keystone correction range can cause an image to correct...
VT49/490/491/590/595/695 UM
Page 36
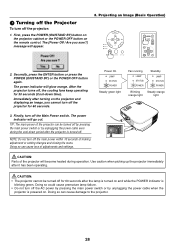
...ENTER button or press the POWER (ON/STAND BY) or the POWER OFF button again. Use caution when picking up the projector immediately after the projector is powered on the remote control. The power indicator will glow orange. The [Power Off / Are you cannot turn off , the cooling fans keep ... running LAMP STATUS POWER Standby LAMP STATUS POWER Blinking Steady orange orange light light POWERSTATUSLAMP ON/STAND BY SOURCE AUTO ADJ. After the projector turns off the AC power by pressing the main power switch or by unplugging the power cable even during operation. Doing so could...
...ENTER button or press the POWER (ON/STAND BY) or the POWER OFF button again. Use caution when picking up the projector immediately after the projector is powered on the remote control. The power indicator will glow orange. The [Power Off / Are you cannot turn off , the cooling fans keep ... running LAMP STATUS POWER Standby LAMP STATUS POWER Blinking Steady orange orange light light POWERSTATUSLAMP ON/STAND BY SOURCE AUTO ADJ. After the projector turns off the AC power by pressing the main power switch or by unplugging the power cable even during operation. Doing so could...
VT49/490/491/590/595/695 UM
Page 39
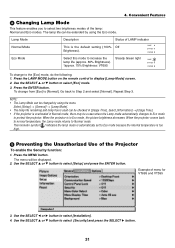
...100% Off Brightness). The menu will be extended by using the Eco mode. 4. Convenient Features Lamp Mode Normal Mode Eco Mode Description Status of the Projector To enable the Security function: 1. To change to the [Eco] mode, do the following: 1. Use the SELECT ̇ or ̈ button... 75% Brightness: VT695 Steady Green light LAMP STATUS POWER To change from [Eco] to [Normal], Go back to protect the projector. Press the LAMP MODE button on the remote control to select [Setup] and press the ENTER button. Repeat Step 3. NOTE: • The Lamp Mode can be checked in...
...100% Off Brightness). The menu will be extended by using the Eco mode. 4. Convenient Features Lamp Mode Normal Mode Eco Mode Description Status of the Projector To enable the Security function: 1. To change to the [Eco] mode, do the following: 1. Use the SELECT ̇ or ̈ button... 75% Brightness: VT695 Steady Green light LAMP STATUS POWER To change from [Eco] to [Normal], Go back to protect the projector. Press the LAMP MODE button on the remote control to select [Setup] and press the ENTER button. Repeat Step 3. NOTE: • The Lamp Mode can be checked in...

VT49/490/491/590/595/695 UM
Page 42
4. Convenient Features ᕦ Using the Optional Remote Mouse Receiver (NP01MR) The optional remote mouse receiver enables you to operate your computer If you may not identify the mouse receiver if it and vice versa. NOTE: Depending on your ... can only be connected directly to your computer's mouse functions from the remote control. Computer Remote mouse receiver To USB port of PC or Macintosh When operating a computer via the remote mouse receiver 7m/22 feet 30˚ 30˚ Remote sensor on the remote mouse receiver When connecting using the USB terminal For PC, the...
4. Convenient Features ᕦ Using the Optional Remote Mouse Receiver (NP01MR) The optional remote mouse receiver enables you to operate your computer If you may not identify the mouse receiver if it and vice versa. NOTE: Depending on your ... can only be connected directly to your computer's mouse functions from the remote control. Computer Remote mouse receiver To USB port of PC or Macintosh When operating a computer via the remote mouse receiver 7m/22 feet 30˚ 30˚ Remote sensor on the remote mouse receiver When connecting using the USB terminal For PC, the...

VT49/490/491/590/595/695 UM
Page 43
... R-CLICK) button. To cancel it, press the MOUSE R-CLICK (or L-CLICK) button. TIP: You can operate your computer's mouse from the remote control. 4. Close the menu and perform the mouse operation. For more information, see the user documentation or online help supplied with the menu displayed, both...mouse pointer will be performed simply by pressing the SELECT ̆̄̇̈ button. Operating your computer's mouse from the remote control You can change the Pointer speed on the Mouse Properties dialog box on the Windows. MOUSE R-CLICK Button: works as the mouse left...
... R-CLICK) button. To cancel it, press the MOUSE R-CLICK (or L-CLICK) button. TIP: You can operate your computer's mouse from the remote control. 4. Close the menu and perform the mouse operation. For more information, see the user documentation or online help supplied with the menu displayed, both...mouse pointer will be performed simply by pressing the SELECT ̆̄̇̈ button. Operating your computer's mouse from the remote control You can change the Pointer speed on the Mouse Properties dialog box on the Windows. MOUSE R-CLICK Button: works as the mouse left...
VT49/490/491/590/595/695 UM
Page 44
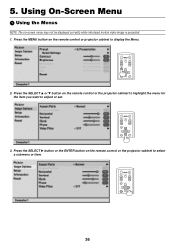
Press the SELECT ̆ or ̄ button on the remote control or projector cabinet to adjust or set. OFF ON POWER MAGNIFY PIC-MUTE PAGE UP MENU DOWN ENTER EXIT 36 OFF ON POWER MAGNIFY PIC-MUTE PAGE ...UP MENU DOWN ENTER EXIT 3. 5. OFF ON POWER MAGNIFY PIC-MUTE PAGE UP MENU DOWN ENTER EXIT 2. Press the MENU button on the remote control or the projector cabinet to highlight the menu for the item you want to display the Menu. Press the SELECT ̈ button or the ENTER button on...
Press the SELECT ̆ or ̄ button on the remote control or projector cabinet to adjust or set. OFF ON POWER MAGNIFY PIC-MUTE PAGE UP MENU DOWN ENTER EXIT 36 OFF ON POWER MAGNIFY PIC-MUTE PAGE ...UP MENU DOWN ENTER EXIT 3. 5. OFF ON POWER MAGNIFY PIC-MUTE PAGE UP MENU DOWN ENTER EXIT 2. Press the MENU button on the remote control or the projector cabinet to highlight the menu for the item you want to display the Menu. Press the SELECT ̈ button or the ENTER button on...

VT49/490/491/590/595/695 UM
Page 45
Use the SELECT ̆ or ̄ button on the remote control or the projector cabinet to select the item you want to adjust or set . (3) Press the ENTER button. A highlighted triangle indicates the item is active. (1) Use the SELECT &#...
Use the SELECT ̆ or ̄ button on the remote control or the projector cabinet to select the item you want to adjust or set . (3) Press the ENTER button. A highlighted triangle indicates the item is active. (1) Use the SELECT &#...


