
User Manual
Page 5
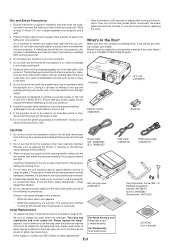
...projector is not to be used for purposes other than originally intended. If the projector is on board.) 5. Do not touch the power plug during a thunderstorm. The projector inside your VT660K/VT560/VT465 Projector...or screwdriver into the lens while the projector is sufficient ventilation and that might fall into your projector. Make sure your projector. 4. Remote control (7N900381) Lens cap (24F38091) Batteries ... objects that attach the carrying handle to your NEC dealer for 60 seconds after the projector is turned off the main power switch, disconnect...
...projector is not to be used for purposes other than originally intended. If the projector is on board.) 5. Do not touch the power plug during a thunderstorm. The projector inside your VT660K/VT560/VT465 Projector...or screwdriver into the lens while the projector is sufficient ventilation and that might fall into your projector. Make sure your projector. 4. Remote control (7N900381) Lens cap (24F38091) Batteries ... objects that attach the carrying handle to your NEC dealer for 60 seconds after the projector is turned off the main power switch, disconnect...

User Manual
Page 6
... the supplied carrying handle E-6 Top Features ...E-7 Terminal Panel Features E-8 Part Names of the Remote Control E-9 Battery Installation E-10 Remote Control Precautions E-10 Operating Range for Wireless Remote Control E-10 INSTALLATION AND CONNECTIONS E-11 Setting Up the Screen and the Projector E-11 Selecting a Location E-11 Throw Distance and Screen Size E-12 Making Connections ...E-13 Connecting Your PC or...
... the supplied carrying handle E-6 Top Features ...E-7 Terminal Panel Features E-8 Part Names of the Remote Control E-9 Battery Installation E-10 Remote Control Precautions E-10 Operating Range for Wireless Remote Control E-10 INSTALLATION AND CONNECTIONS E-11 Setting Up the Screen and the Projector E-11 Selecting a Location E-11 Throw Distance and Screen Size E-12 Making Connections ...E-13 Connecting Your PC or...

User Manual
Page 7
... used in Middle East countries. • The supplied remote control can be installed by unauthorized individuals. Features you can use the projector on VT465. The remote control can be the trademarks or registered trademarks of The VT660K/ VT560/VT465 Projector The VT660K/VT560/VT465 is to 300 inches across the room with NEC's Advanced AccuBlend on a tabletop or cart, you...
... used in Middle East countries. • The supplied remote control can be installed by unauthorized individuals. Features you can use the projector on VT465. The remote control can be the trademarks or registered trademarks of The VT660K/ VT560/VT465 Projector The VT660K/VT560/VT465 is to 300 inches across the room with NEC's Advanced AccuBlend on a tabletop or cart, you...

User Manual
Page 8
...outlet and turn on the working surface before turning the projector over to prevent scratching the top cover. The logo is a registered trademark of the Projector Monaural Speaker (1W) Lamp Cover (See page E-30) Lamp Cover Screw Controls (See page E-7) Ventilation (outlet) Heated air is ...exhausted from here Adjustable Tilt Foot Lever (See page E-18) Adjustable Tilt Foot (See page E-18) Remote Sensor (See page E-10) ...
...outlet and turn on the working surface before turning the projector over to prevent scratching the top cover. The logo is a registered trademark of the Projector Monaural Speaker (1W) Lamp Cover (See page E-30) Lamp Cover Screw Controls (See page E-7) Ventilation (outlet) Heated air is ...exhausted from here Adjustable Tilt Foot Lever (See page E-18) Adjustable Tilt Foot (See page E-18) Remote Sensor (See page E-10) ...

User Manual
Page 10
... player, laser disc player, or document camera here to an external monitor from an external source like a VCR. If you to output sound from the remote control. 8. VIDEO AUDIO Input Jacks R/L (RCA) These are on page E-37. USB (PC) Port (Type B) Connect this jack, both the right and left... Pin) You can be used as a DVD player. Output sound level can use this connector to control the projector. For example, when a cable mini-plug is inserted into this port to control your computer or other analog RGB equipment such as a component input connector that this port to connect your...
... player, laser disc player, or document camera here to an external monitor from an external source like a VCR. If you to output sound from the remote control. 8. VIDEO AUDIO Input Jacks R/L (RCA) These are on page E-37. USB (PC) Port (Type B) Connect this jack, both the right and left... Pin) You can be used as a DVD player. Output sound level can use this connector to control the projector. For example, when a cable mini-plug is inserted into this port to control your computer or other analog RGB equipment such as a component input connector that this port to connect your...

User Manual
Page 11
...mode, press the PJ button again. PIC-MUTE Button This button turns off the projector, press the POWER OFF button twice. 5. NOTE: The default is indicated by lighting the PJ button. Part Names of the Remote Control NOTE: If you are using a Macintosh computer, you can click either the CANCEL ...(right-click) or ENTER (left button. When no buttons are in the Projector mode, which is the Computer mode, which allows you to the...
...mode, press the PJ button again. PIC-MUTE Button This button turns off the projector, press the POWER OFF button twice. 5. NOTE: The default is indicated by lighting the PJ button. Part Names of the Remote Control NOTE: If you are using a Macintosh computer, you can click either the CANCEL ...(right-click) or ENTER (left button. When no buttons are in the Projector mode, which is the Computer mode, which allows you to the...

User Manual
Page 12
... 30˚ 30˚ 3. Do not mix different types of batteries together. 2. Remote Control Precautions • Handle the remote control carefully. • If the remote control gets wet, wipe it snaps into place. Weak batteries will also prevent the remote control from properly operating the projector. Press firmly and slide the battery cover off. Slip the cover back over...
... 30˚ 30˚ 3. Do not mix different types of batteries together. 2. Remote Control Precautions • Handle the remote control carefully. • If the remote control gets wet, wipe it snaps into place. Weak batteries will also prevent the remote control from properly operating the projector. Press firmly and slide the battery cover off. Slip the cover back over...

User Manual
Page 14
... 9.5 1840 9210 -11050 440 11.3 - 9.5 WARNING * Installing your remote control to install the projector yourself. • Only use the MENU and SELECT buttons on your projector cabinet or your projector on the ceiling must be done by a quali- Contact your NEC dealer for desktop) α = Throw angle NOTE: Distances may vary ...screen image. • Ensure that you 're using a mirror and your image is inverted, use your NEC dealer if you need a mirror. Tele Wide - Contact your projector on the side or the front of screen for more information. * Do not attempt to correct the ...
... 9.5 1840 9210 -11050 440 11.3 - 9.5 WARNING * Installing your remote control to install the projector yourself. • Only use the MENU and SELECT buttons on your projector cabinet or your projector on the ceiling must be done by a quali- Contact your NEC dealer for desktop) α = Throw angle NOTE: Distances may vary ...screen image. • Ensure that you 're using a mirror and your image is inverted, use your NEC dealer if you need a mirror. Tele Wide - Contact your projector on the side or the front of screen for more information. * Do not attempt to correct the ...
User Manual
Page 15
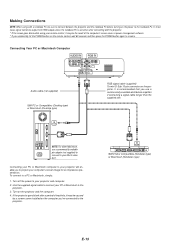
...the computer's screen-saver or power management software. * If you accidentally hit the POWER button on the remote control, wait 60 seconds and then press the POWER button again to your projector and computer. 2. Use the supplied signal cable to connect your PC or Macintosh to the...available distribution amplifier if connecting a signal cable longer than the supplied one. Turn on the projector. Making Connections NOTE: When using with the projector. * If the screen goes blank while using your remote control, it may be the result of inactivity, it may be caused by a screen saver ...
...the computer's screen-saver or power management software. * If you accidentally hit the POWER button on the remote control, wait 60 seconds and then press the POWER button again to your projector and computer. 2. Use the supplied signal cable to connect your PC or Macintosh to the...available distribution amplifier if connecting a signal cable longer than the supplied one. Turn on the projector. Making Connections NOTE: When using with the projector. * If the screen goes blank while using your remote control, it may be the result of inactivity, it may be caused by a screen saver ...
User Manual
Page 16
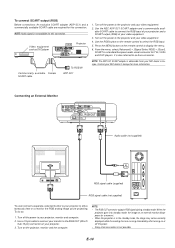
... required for TVs, VCRs and DVD players. Use the RGB button on the remote control to simultaneously view on a monitor the RGB analog image you're projecting. SCART is obtainable from your projector, monitor and computer. 2. Connecting an External Monitor Audio cable (not supplied) ...the RGB input. 5. Press the MENU button on the remote control to connect the RGB input of your projector and a SCART output (RGB) of your projector. 3. Sub 15 pin) connector on the projector, monitor and the computer. Use the NEC ADP-SC1 SCART adapter and a commercially available SCART cable ...
... required for TVs, VCRs and DVD players. Use the RGB button on the remote control to simultaneously view on a monitor the RGB analog image you're projecting. SCART is obtainable from your projector, monitor and computer. 2. Connecting an External Monitor Audio cable (not supplied) ...the RGB input. 5. Press the MENU button on the remote control to connect the RGB input of your projector and a SCART output (RGB) of your projector. 3. Sub 15 pin) connector on the projector, monitor and the computer. Use the NEC ADP-SC1 SCART adapter and a commercially available SCART cable ...
User Manual
Page 19
...: Immediately after you turn on your lens cap is too high, the projector detects abnormal high temperature. Before you press the POWER (ON/STAND BY) button on the projector cabinet or POWER ON button on the remote control for the projector's internal components to cool down. * When the lamp reaches its end ...of usable life, the projector will not turn on and that the main power switch is pushed...
...: Immediately after you turn on your lens cap is too high, the projector detects abnormal high temperature. Before you press the POWER (ON/STAND BY) button on the projector cabinet or POWER ON button on the remote control for the projector's internal components to cool down. * When the lamp reaches its end ...of usable life, the projector will not turn on and that the main power switch is pushed...

User Manual
Page 20
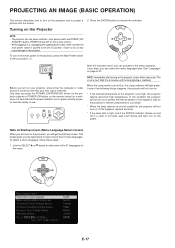
...factory preset). Lift the front edge of the projector to the desired height (max. 40mm/ 1.6") and release the Adjustable Tilt Foot Lever to lock the Adjustable tilt foot. Selecting a Source Selecting the computer or video source Using the Remote Control OFF ON POWER VIDEO AUTO ADJ. Lift the ...front edge of the projector to center the image horizontally on the screen. Push up and down the Adjustable Tilt Foot Levers....
...factory preset). Lift the front edge of the projector to the desired height (max. 40mm/ 1.6") and release the Adjustable Tilt Foot Lever to lock the Adjustable tilt foot. Selecting a Source Selecting the computer or video source Using the Remote Control OFF ON POWER VIDEO AUTO ADJ. Lift the ...front edge of the projector to center the image horizontally on the screen. Push up and down the Adjustable Tilt Foot Levers....

User Manual
Page 22
...OUT jack (Stereo mini) on the remote control. VOLUME increase volume decrease volume E-20 message will glow orange. Last unplug the power cable. Doing so can be necessary when you sure?" The power indicator will appear. After the projector turns off, the cooling fans keep... main power under any vertical banding that eliminate the horizontal banding in the image. Optimizing RGB Picture Automatically Turning off the Projector Adjusting the Image Using Auto Adjust Optimizing RGB image automatically Press the Auto Adjust button to optimize an RGB image automatically. ...
...OUT jack (Stereo mini) on the remote control. VOLUME increase volume decrease volume E-20 message will glow orange. Last unplug the power cable. Doing so can be necessary when you sure?" The power indicator will appear. After the projector turns off, the cooling fans keep... main power under any vertical banding that eliminate the horizontal banding in the image. Optimizing RGB Picture Automatically Turning off the Projector Adjusting the Image Using Auto Adjust Optimizing RGB image automatically Press the Auto Adjust button to optimize an RGB image automatically. ...

User Manual
Page 23
...lit OFF ON POWER VIDEO AUTO ADJ. PICTURE ASPECT HELP FREEZE PIC-MUTE MAGNIFY VOLUME Works as the SELECT button on the projector. To enable the projector menu operation again, press the PJ button to light red. • When the PJ button is a great convenience for ...PICTURE ASPECT HELP FREEZE PIC-MUTE MAGNIFY VOLUME L L E E Works as a right-click button for clicking through your computer's mouse functions from the remote control (Computer mode). S-VIDEO RGB MENU SELECT NTER CANCE PJ Works as a computer mouse in the Computer mode. During Computer mode: In Computer mode,...
...lit OFF ON POWER VIDEO AUTO ADJ. PICTURE ASPECT HELP FREEZE PIC-MUTE MAGNIFY VOLUME Works as the SELECT button on the projector. To enable the projector menu operation again, press the PJ button to light red. • When the PJ button is a great convenience for ...PICTURE ASPECT HELP FREEZE PIC-MUTE MAGNIFY VOLUME L L E E Works as a right-click button for clicking through your computer's mouse functions from the remote control (Computer mode). S-VIDEO RGB MENU SELECT NTER CANCE PJ Works as a computer mouse in the Computer mode. During Computer mode: In Computer mode,...

User Manual
Page 25
...slide bar will show you the amount of increase or decrease. 5. The on the remote control or projector cabinet to select a submenu or item. 4. CANCEL ........ Press the SELECT GH buttons on the remote control or the projector cabinet to display the Menu. 2. Changes are stored until you want to highlight the...adjust an additional item, or press the MENU button to the previous screen. Press the SELECT E button or the ENTER button on the remote control or the projector cabinet to adjust or set. 3. Adjust the level or turn the selected item on or off by using SELECT F or E buttons ...
...slide bar will show you the amount of increase or decrease. 5. The on the remote control or projector cabinet to select a submenu or item. 4. CANCEL ........ Press the SELECT GH buttons on the remote control or the projector cabinet to display the Menu. 2. Changes are stored until you want to highlight the...adjust an additional item, or press the MENU button to the previous screen. Press the SELECT E button or the ENTER button on the remote control or the projector cabinet to adjust or set. 3. Adjust the level or turn the selected item on or off by using SELECT F or E buttons ...
User Manual
Page 29
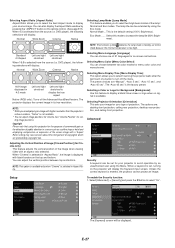
... can choose between top and bottom. Selecting Menu Color [Menu Color Select] You can choose one of 21 languages for on the remote control. (See page E-9). The preset choices are : desktop front projection, ceiling rear projection, desktop rear projection, and ceiling front projection... the default setting (100% Brightness). Advanced Adjusting the Vertical Position of Image [Cinema Position] (for Background [Background] Use this projector for Cinema. The [Keyword] screen will display the Keyword input screen. Selecting Menu Display Time [Menu Display Time] This option allows...
... can choose between top and bottom. Selecting Menu Color [Menu Color Select] You can choose one of 21 languages for on the remote control. (See page E-9). The preset choices are : desktop front projection, ceiling rear projection, desktop rear projection, and ceiling front projection... the default setting (100% Brightness). Advanced Adjusting the Vertical Position of Image [Cinema Position] (for Background [Background] Use this projector for Cinema. The [Keyword] screen will display the Keyword input screen. Selecting Menu Display Time [Menu Display Time] This option allows...
User Manual
Page 30
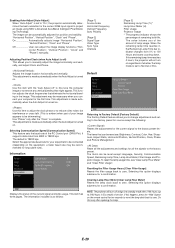
... Video and S-Video, select the video standard from the pull-down the temperature inside the projector quickly, select "On". NOTE: A keyword must be disabled. NOTE: * This Control Panel Key Lock does not affect the remote control and the PC Control functions. * When the cabinet buttons are disabled, pressing and holding the CANCEL button for fan...
... Video and S-Video, select the video standard from the pull-down the temperature inside the projector quickly, select "On". NOTE: A keyword must be disabled. NOTE: * This Control Panel Key Lock does not affect the remote control and the PC Control functions. * When the cabinet buttons are disabled, pressing and holding the CANCEL button for fan...
User Manual
Page 31
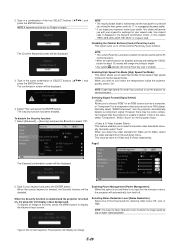
... off" to fine tune the computer image or to the factory preset. The value informs you to project an image using NEC's Advanced AccuBlend Intelligent Pixel Blending Technology. When the remaining lamp time reaches 0, the Remaining Lamp Time bar indicator changes from ... Remaining Lamp Time (%)* Lamp Hour Meter (H) Filter Usage Projector Usage * The progress indicator shows the percentage of service. Use this only after the "Clock" is set to 3100 hours in the image. The default is turned on the remote control for long cable runs). "Horizontal Position", "Vertical Position",...
... off" to fine tune the computer image or to the factory preset. The value informs you to project an image using NEC's Advanced AccuBlend Intelligent Pixel Blending Technology. When the remaining lamp time reaches 0, the Remaining Lamp Time bar indicator changes from ... Remaining Lamp Time (%)* Lamp Hour Meter (H) Filter Usage Projector Usage * The progress indicator shows the percentage of service. Use this only after the "Clock" is set to 3100 hours in the image. The default is turned on the remote control for long cable runs). "Horizontal Position", "Vertical Position",...
User Manual
Page 32
... lamp may still be extremely hot. Order this happens, press the Help button on the remote control for lamp replacement. 4. Turn the projector off, wait 60 seconds, turn on this happens, contact your NEC dealer. If you continue to cool before handling. • DO NOT REMOVE ANY SCREWS except...mode) of use a lamp other than the NEC replacement lamp (VT60LP). CAUTION Do not use , the lamp bulb may shatter, and pieces of service. CAUTION • DO NOT TOUCH THE LAMP immediately after 2000 hours (up to maintain optimal projector performance. If this interlock. Do not touch...
... lamp may still be extremely hot. Order this happens, press the Help button on the remote control for lamp replacement. 4. Turn the projector off, wait 60 seconds, turn on this happens, contact your NEC dealer. If you continue to cool before handling. • DO NOT REMOVE ANY SCREWS except...mode) of use a lamp other than the NEC replacement lamp (VT60LP). CAUTION Do not use , the lamp bulb may shatter, and pieces of service. CAUTION • DO NOT TOUCH THE LAMP immediately after 2000 hours (up to maintain optimal projector performance. If this interlock. Do not touch...
User Manual
Page 35
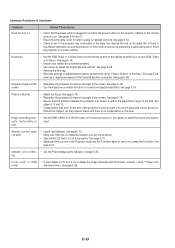
... • Ensure that the distance between you want to input. Indicator is within 22 feet (7 m) of the projector. E-33 No picture • Use the RGB, Video or S-Video button on the remote control or the cabinet to correct the trapezoid distortion. See page E-28. See page E-18. See page E-10....Does not turn on Check These Items • Check that the power cable is plugged in and that the power button on the projector cabinet or the remote control is off, turn it on or adjust the image manually with Horizontal / Vertical / Clock / Phase in the mode Advanced menu. ...
... • Ensure that the distance between you want to input. Indicator is within 22 feet (7 m) of the projector. E-33 No picture • Use the RGB, Video or S-Video button on the remote control or the cabinet to correct the trapezoid distortion. See page E-28. See page E-18. See page E-10....Does not turn on Check These Items • Check that the power cable is plugged in and that the power button on the projector cabinet or the remote control is off, turn it on or adjust the image manually with Horizontal / Vertical / Clock / Phase in the mode Advanced menu. ...


