User Manual
Page 2
...contact with any part inside of the unit. If this manual carefully before using your NEC VT46 Projector and keep the manual handy for future reference. ALL SERVICING MUST BE DONE BY QUALIFIED NEC SERVICE PERSONNEL. DOC Compliance Notice This Class B digital apparatus meets all warnings. Exposure...to remove the plug from that interference will disappear. • Do not put the projector on its side when the lamp is turned on top of the LCD panel. REFER SERVICING TO QUALIFIED NEC SERVICE PERSONNEL. in a residential installation. These limits are to the unit EXCEPT those ...
...contact with any part inside of the unit. If this manual carefully before using your NEC VT46 Projector and keep the manual handy for future reference. ALL SERVICING MUST BE DONE BY QUALIFIED NEC SERVICE PERSONNEL. DOC Compliance Notice This Class B digital apparatus meets all warnings. Exposure...to remove the plug from that interference will disappear. • Do not put the projector on its side when the lamp is turned on top of the LCD panel. REFER SERVICING TO QUALIFIED NEC SERVICE PERSONNEL. in a residential installation. These limits are to the unit EXCEPT those ...

User Manual
Page 3
.... 10. If this requirement before replacing the lamp. The light being projected from the light output. 7. Do no use the projector for lamp replacement. • Allow a minimum of glass may be used for an extended period of your VT46 Projector. If you continue to use the tilt-foot...inches (10 cm) of the cap and possibly burning your projector. Doing so can redirect light coming out of the following circumstances. Doing so can cause electric shock or fire. 9. Do not attempt to melting of space between your NEC dealer for consecutive days. (From the menu, select [...
.... 10. If this requirement before replacing the lamp. The light being projected from the light output. 7. Do no use the projector for lamp replacement. • Allow a minimum of glass may be used for an extended period of your VT46 Projector. If you continue to use the tilt-foot...inches (10 cm) of the cap and possibly burning your projector. Doing so can redirect light coming out of the following circumstances. Doing so can cause electric shock or fire. 9. Do not attempt to melting of space between your NEC dealer for consecutive days. (From the menu, select [...
User Manual
Page 4
... E-26 Cleaning the Cabinet and the Lens E-26 TROUBLESHOOTING E-27 Power Indicator E-27 Status Indicator E-27 Lamp Indicator E-27 Common Problems & Solutions E-28 SPECIFICATIONS E-29 INSTALLATION AND CONNECTIONS E-10 Setting Up the Screen and the Projector E-10 Selecting a Location E-10 Throw Distance and Screen Size E-11 Making Connections E-12 Connecting Your PC...
... E-26 Cleaning the Cabinet and the Lens E-26 TROUBLESHOOTING E-27 Power Indicator E-27 Status Indicator E-27 Lamp Indicator E-27 Common Problems & Solutions E-28 SPECIFICATIONS E-29 INSTALLATION AND CONNECTIONS E-10 Setting Up the Screen and the Projector E-10 Selecting a Location E-10 Throw Distance and Screen Size E-11 Making Connections E-12 Connecting Your PC...
User Manual
Page 5
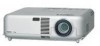
... for source selection • New Color Management system • New menu design improves operation • NEC's exclusive Advanced AccuBlend intelligent pixel blending technology - E-5 NOTE: Composite video standards are trademarks or registered ...support the projector and the installation must be the trademarks or registered trademarks of The VT46 Projector The VT46 is square. • Low level operation noise • Short focal length lens • 160W lamp • ...resolution*2. • Supports most IBM VGA, SVGA, XGA , SXGA/UXGA(with NEC's Advanced AccuBlend.
... for source selection • New Color Management system • New menu design improves operation • NEC's exclusive Advanced AccuBlend intelligent pixel blending technology - E-5 NOTE: Composite video standards are trademarks or registered ...support the projector and the installation must be the trademarks or registered trademarks of The VT46 Projector The VT46 is square. • Low level operation noise • Short focal length lens • 160W lamp • ...resolution*2. • Supports most IBM VGA, SVGA, XGA , SXGA/UXGA(with NEC's Advanced AccuBlend.

User Manual
Page 6
Part Names of Kensington Microware Inc. E-6 MicroSaver® is a registered trademark of the Projector Monaural Speaker (1W) Lamp Cover (See page E-25) Lamp Cover Screw Controls (See page E-7) Ventilation (outlet) Heated air is exhausted from here Adjustable Tilt Foot Lever (See page E-16) Adjustable Tilt Foot (See page E-... here, and plug the other end into an active wall outlet and turn on the Main Power switch, the POWER indicator turns orange and the projector is trademarked and owned by Kensington Microware Inc.
Part Names of Kensington Microware Inc. E-6 MicroSaver® is a registered trademark of the Projector Monaural Speaker (1W) Lamp Cover (See page E-25) Lamp Cover Screw Controls (See page E-7) Ventilation (outlet) Heated air is exhausted from here Adjustable Tilt Foot Lever (See page E-16) Adjustable Tilt Foot (See page E-... here, and plug the other end into an active wall outlet and turn on the Main Power switch, the POWER indicator turns orange and the projector is trademarked and owned by Kensington Microware Inc.

User Manual
Page 7
...when this indicator is orange, it indicates that an error has occurred, the lamp cover is in standby mode. S-VIDEO Button Press this light blinks red rapidly, it is not attached properly or the projector has overheated. ENTER Button Executes your RGB port. 8. STATUS Indicator If ...select a video source from a VCR, DVD player, laser disc player or document camera. 7. LAMP Indicator If this indicator is green, the projector is selected, the corresponding source indicator lights. 10. See the Lamp Indicator section on page E-27 for an optimal picture (See page E-17). 9. AUTO ADJ....
...when this indicator is orange, it indicates that an error has occurred, the lamp cover is in standby mode. S-VIDEO Button Press this light blinks red rapidly, it is not attached properly or the projector has overheated. ENTER Button Executes your RGB port. 8. STATUS Indicator If ...select a video source from a VCR, DVD player, laser disc player or document camera. 7. LAMP Indicator If this indicator is green, the projector is selected, the corresponding source indicator lights. 10. See the Lamp Indicator section on page E-27 for an optimal picture (See page E-17). 9. AUTO ADJ....

User Manual
Page 15
...source is turned on and that the main power switch is stabilized. Press the ENTER button to 5 minutes until the lamp lighting is pushed to project a 2. This is available, the projector will get the Startup screen. Only after turning on page E-22. Use the SELECT G or H button to ...removed. If this has been done, you press the POWER (ON/STAND BY) button on the projector cabinet or the remote control for the projector's internal components to cool down. * When the lamp reaches its end of the RGB, VIDEO or S-VIDEO buttons. Using the cabinet buttons Press any ...
...source is turned on and that the main power switch is stabilized. Press the ENTER button to 5 minutes until the lamp lighting is pushed to project a 2. This is available, the projector will get the Startup screen. Only after turning on page E-22. Use the SELECT G or H button to ...removed. If this has been done, you press the POWER (ON/STAND BY) button on the projector cabinet or the remote control for the projector's internal components to cool down. * When the lamp reaches its end of the RGB, VIDEO or S-VIDEO buttons. Using the cabinet buttons Press any ...

User Manual
Page 19
... Page1 Page2 Page3 Source Index, Horizontal Frequency, Vertical Frequency, Sync Polarity Signal Type, Video Type, Sync Type, Interlace Remaining Lamp Time, Lamp Hour Meter, Filter Usage, Projector Usage Default Factory Default Clear Filter Usage Clear Lamp Hour Meter Current Signal All Data NOTE: Some menu items are not available depending on the input source.
... Page1 Page2 Page3 Source Index, Horizontal Frequency, Vertical Frequency, Sync Polarity Signal Type, Video Type, Sync Type, Interlace Remaining Lamp Time, Lamp Hour Meter, Filter Usage, Projector Usage Default Factory Default Clear Filter Usage Clear Lamp Hour Meter Current Signal All Data NOTE: Some menu items are not available depending on the input source.
User Manual
Page 24
... recommended for the current RGB input signal to the factory preset levels. If the remaining lamp time reaches 0 hours, the projector will turn on this option displays submenu for the current signal to project an image using NEC's Advanced AccuBlend Intelligent Pixel Blending Technology. Use this option displays submenu for the first time...
... recommended for the current RGB input signal to the factory preset levels. If the remaining lamp time reaches 0 hours, the projector will turn on this option displays submenu for the current signal to project an image using NEC's Advanced AccuBlend Intelligent Pixel Blending Technology. Use this option displays submenu for the first time...
User Manual
Page 25
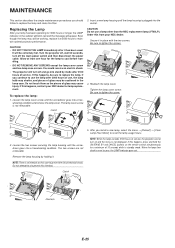
.... MAINTENANCE This section describes the simple maintenance procedures you continue to use the lamp after 3000 hours of use a lamp other than the NEC replacement lamp (VT60LP). Turn the projector off, wait 60 seconds, turn on the remote control simultaneously for the lamp to circumvent this happens, be extremely hot. Allow at 3000 hours to replace...
.... MAINTENANCE This section describes the simple maintenance procedures you continue to use the lamp after 3000 hours of use a lamp other than the NEC replacement lamp (VT60LP). Turn the projector off, wait 60 seconds, turn on the remote control simultaneously for the lamp to circumvent this happens, be extremely hot. Allow at 3000 hours to replace...

User Manual
Page 26
... E-24 for resetting the filter usage time. Never use a mild detergent. CAUTION • Turn off the projector, turn off the filter (sponge) and replace it is dirty or clogged, your replacement lamp. E-26 NOTE: Do not wash the filter with the new one. Before replacing the filter, remove dust ...and dirt from dust or dirt and should be careful not to operate the projector without the filter cover. Gently peel off the main...
... E-24 for resetting the filter usage time. Never use a mild detergent. CAUTION • Turn off the projector, turn off the filter (sponge) and replace it is dirty or clogged, your replacement lamp. E-26 NOTE: Do not wash the filter with the new one. Before replacing the filter, remove dust ...and dirt from dust or dirt and should be careful not to operate the projector without the filter cover. Gently peel off the main...

User Manual
Page 27
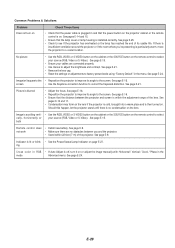
... you resolve problems you may encounter while setting up or using the projector. The projector is getting ready Wait for a moment. Lamp has been used beyond Replace the lamp. The projector will not turn on until the lamp is overheated. 0.5 sec Off) Move the projector to light. Green 4 cycle (0.5 sec On, Fan error 0.5 sec Off) 6 cycle (0.5 sec...
... you resolve problems you may encounter while setting up or using the projector. The projector is getting ready Wait for a moment. Lamp has been used beyond Replace the lamp. The projector will not turn on until the lamp is overheated. 0.5 sec Off) Move the projector to light. Green 4 cycle (0.5 sec On, Fan error 0.5 sec Off) 6 cycle (0.5 sec...
User Manual
Page 28
... (RGB, Video or S-Video). See page E-21. • Remove the lens cap. • Reset the settings or adjustments to see if the projector has overheated or the lamp has reached the end of its usable life. screen • Use the Keystone correction function to the screen. Picture is within 22 feet... is lit or blink- • See the Power/Status/Lamp Indicator on page E-27. See page E-24. If there is then turned on . See page E-16. See page E-21. See page E-16. • Reposition the projector to improve its angle to a cooler location. See page E-15. See pages E-10 and 11. ...
... (RGB, Video or S-Video). See page E-21. • Remove the lens cap. • Reset the settings or adjustments to see if the projector has overheated or the lamp has reached the end of its usable life. screen • Use the Keystone correction function to the screen. Picture is within 22 feet... is lit or blink- • See the Power/Status/Lamp Indicator on page E-27. See page E-24. If there is then turned on . See page E-16. See page E-21. See page E-16. • Reposition the projector to improve its angle to a cooler location. See page E-15. See pages E-10 and 11. ...

User Manual
Page 29
E-29 SPECIFICATIONS This section provides technical information about the VT46 Projector's performance. The specifications are more than 99.99%. Model Number VT46 Optical LCD Panel Resolution Lens Lamp Image Size Projection Distance Projection Angle Keystone Correction 0.7" p-Si TFT active-matrix 800ן600 pixels* ...Meets Low Voltage Directive (EN60950, TUV GS Approved) For additional information visit: US : http://www.necvisualsystems.com Europe : http://www.nec-europe.com/ Global : http://www.nec-pj.com/ *Effective pixels are subject to change without notice.
E-29 SPECIFICATIONS This section provides technical information about the VT46 Projector's performance. The specifications are more than 99.99%. Model Number VT46 Optical LCD Panel Resolution Lens Lamp Image Size Projection Distance Projection Angle Keystone Correction 0.7" p-Si TFT active-matrix 800ן600 pixels* ...Meets Low Voltage Directive (EN60950, TUV GS Approved) For additional information visit: US : http://www.necvisualsystems.com Europe : http://www.nec-europe.com/ Global : http://www.nec-pj.com/ *Effective pixels are subject to change without notice.


