User Manual
Page 2
...: CAUTION To turn off and on . The information should be installed as near heaters or heat radiating appliances. 4. in a darkened room. 2. Failure to the unit EXCEPT those specified by one or more information. These limits are to ensure the long life of the projector. 7. If this manual carefully before using your NEC VT46 Projector and keep the manual handy for help. WARNING TO PREVENT...
...: CAUTION To turn off and on . The information should be installed as near heaters or heat radiating appliances. 4. in a darkened room. 2. Failure to the unit EXCEPT those specified by one or more information. These limits are to ensure the long life of the projector. 7. If this manual carefully before using your NEC VT46 Projector and keep the manual handy for help. WARNING TO PREVENT...

User Manual
Page 3
... User's manual InforImmaptoiortnant poGluicayrantee E-3 If something should fall into your projector. Do not look into your projector. Do not cover the lens with the supplied lens cap or equivalent while the projector is turned on . Doing so can cause damage to be scattered in the Box? If the projector is turned off the main power switch, disconnect the power cable and allow 60 minutes to replace the lamp...
... User's manual InforImmaptoiortnant poGluicayrantee E-3 If something should fall into your projector. Do not look into your projector. Do not cover the lens with the supplied lens cap or equivalent while the projector is turned on . Doing so can cause damage to be scattered in the Box? If the projector is turned off the main power switch, disconnect the power cable and allow 60 minutes to replace the lamp...
User Manual
Page 4
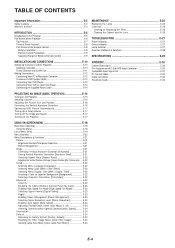
...Terminal Panel Features E-8 Part Names of the Remote Control E-8 Battery Installation E-9 Remote Control Precautions E-9 Operating Range for Wireless Remote Control E-9 MAINTENANCE E-25 Replacing the Lamp E-25 Cleaning E-26 Cleaning or Replacing the Filter E-26 Cleaning the Cabinet and the Lens E-26 TROUBLESHOOTING E-27 Power Indicator E-27 Status Indicator E-27 Lamp Indicator E-27 Common Problems & Solutions E-28 SPECIFICATIONS E-29 INSTALLATION AND CONNECTIONS E-10 Setting Up the Screen and the Projector E-10 Selecting a Location E-10 Throw Distance and Screen Size E-11...
...Terminal Panel Features E-8 Part Names of the Remote Control E-8 Battery Installation E-9 Remote Control Precautions E-9 Operating Range for Wireless Remote Control E-9 MAINTENANCE E-25 Replacing the Lamp E-25 Cleaning E-26 Cleaning or Replacing the Filter E-26 Cleaning the Cabinet and the Lens E-26 TROUBLESHOOTING E-27 Power Indicator E-27 Status Indicator E-27 Lamp Indicator E-27 Common Problems & Solutions E-28 SPECIFICATIONS E-29 INSTALLATION AND CONNECTIONS E-10 Setting Up the Screen and the Projector E-10 Selecting a Location E-10 Throw Distance and Screen Size E-11...
User Manual
Page 5
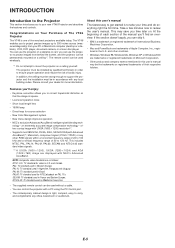
... are displayed with NEC's Advanced AccuBlend. The remote control can be in the U.S. The projector must be used wirelessly. *1 Do not attempt to mount the projector on Your Purchase of The VT46 Projector The VT46 is one of the very best projectors available today. offers a crisp image with UXGA (1600ן1200) resolution*2. • Supports most IBM VGA, SVGA, XGA , SXGA/UXGA(with Advanced AccuBlend)*2, Macintosh, component signal...
... are displayed with NEC's Advanced AccuBlend. The remote control can be in the U.S. The projector must be used wirelessly. *1 Do not attempt to mount the projector on Your Purchase of The VT46 Projector The VT46 is one of the very best projectors available today. offers a crisp image with UXGA (1600ן1200) resolution*2. • Supports most IBM VGA, SVGA, XGA , SXGA/UXGA(with Advanced AccuBlend)*2, Macintosh, component signal...

User Manual
Page 7
... the Lamp Indicator section on ; Source Indicators When one of the RGB, VIDEO or S-VIDEO input is on page E-27 for a minimum of its usable life. E-7 See the Status Indicator section on the projector, press and hold this light blinks red rapidly, it 's warning you have pressed a cabinet key while the Control Panel Key Lock is in standby mode. After this button will close the menu. 9 1 12 13 1. S-VIDEO Button Press this indicator is green, the projector...
... the Lamp Indicator section on ; Source Indicators When one of the RGB, VIDEO or S-VIDEO input is on page E-27 for a minimum of its usable life. E-7 See the Status Indicator section on the projector, press and hold this light blinks red rapidly, it 's warning you have pressed a cabinet key while the Control Panel Key Lock is in standby mode. After this button will close the menu. 9 1 12 13 1. S-VIDEO Button Press this indicator is green, the projector...
User Manual
Page 8
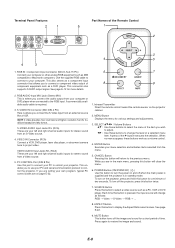
... control codes are your computer or DVD player when connected to turn off the image and sound for stereo sound from a Video source. 5. VIDEO AUDIO Input Jacks R/L (RCA) These are in standby mode. Infrared Transmitter Direct the remote control toward the remote sensor on page E-32. 1. POWER Button (ON/STAND BY) ( ) Use this port to connect your PC to control your PC and serial communication protocol to the previous menu. See page E-22. 9. E-8 Terminal Panel Features 2 1 Part...
... control codes are your computer or DVD player when connected to turn off the image and sound for stereo sound from a Video source. 5. VIDEO AUDIO Input Jacks R/L (RCA) These are in standby mode. Infrared Transmitter Direct the remote control toward the remote sensor on page E-32. 1. POWER Button (ON/STAND BY) ( ) Use this port to connect your PC to control your PC and serial communication protocol to the previous menu. See page E-22. 9. E-8 Terminal Panel Features 2 1 Part...

User Manual
Page 9
... projector cabinet Remote control • The infrared signal operates by the manufacturer. Battery Installation 1. MnO2-LiCELCLR2303V2OL TS JAPANH Remote Control Precautions • Handle the remote control carefully. • If the remote control gets wet, wipe it dry immediately. • Avoid excessive heat and humidity. • If you feel a click. Operating Range for a long time, remove the battery. • Do not place the battery upside down. • Keep...
... projector cabinet Remote control • The infrared signal operates by the manufacturer. Battery Installation 1. MnO2-LiCELCLR2303V2OL TS JAPANH Remote Control Precautions • Handle the remote control carefully. • If the remote control gets wet, wipe it dry immediately. • Avoid excessive heat and humidity. • If you feel a click. Operating Range for a long time, remove the battery. • Do not place the battery upside down. • Keep...

User Manual
Page 12
... enable you to project your computer's screen image for more information. NOTE: Audio signal is also referred to your projector and computer. 2. Turn off the power to as DVD player RGB IN Projector 1. Press the MENU button on the projector cabinet to connect your video equipment. 2. It is not available for this connection. Use the supplied signal cable to select the RGB input. 5. If the projector goes blank after connecting with a notebook...
... enable you to project your computer's screen image for more information. NOTE: Audio signal is also referred to your projector and computer. 2. Turn off the power to as DVD player RGB IN Projector 1. Press the MENU button on the projector cabinet to connect your video equipment. 2. It is not available for this connection. Use the supplied signal cable to select the RGB input. 5. If the projector goes blank after connecting with a notebook...

User Manual
Page 15
... the projector, screen flicker may cause damage to 5 minutes until the lamp lighting is too high, the projector detects abnormal high temperature. If this condition the projector will display a blue background (factory preset). Press the ENTER button to project a 2. To turn on the main power to the projector, press the Main Power switch to select one of six times, wait a full minute and then turn on the power. picture onto the screen. This screen gives you turn...
... the projector, screen flicker may cause damage to 5 minutes until the lamp lighting is too high, the projector detects abnormal high temperature. If this condition the projector will display a blue background (factory preset). Press the ENTER button to project a 2. To turn on the main power to the projector, press the Main Power switch to select one of six times, wait a full minute and then turn on the power. picture onto the screen. This screen gives you turn...

User Manual
Page 17
... be displayed correctly or take time. • The Auto Adjust function does not work for the first time. Press the AUTO ADJ. The power indicator will appear. This function adjusts the clock frequencies that might appear and to optimize an RGB image automatically. [Poor picture] Press the MUTE button on the projector cabinet or the remote control. See page E-24. Optimizing RGB Picture Automatically Turning off the Main Power switch. button...
... be displayed correctly or take time. • The Auto Adjust function does not work for the first time. Press the AUTO ADJ. The power indicator will appear. This function adjusts the clock frequencies that might appear and to optimize an RGB image automatically. [Poor picture] Press the MUTE button on the projector cabinet or the remote control. See page E-24. Optimizing RGB Picture Automatically Turning off the Main Power switch. button...

User Manual
Page 19
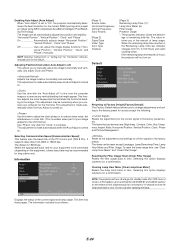
..., Off Noise reduction Off, Low, High Auto Adjust On, Off Vertical Horizontal Clock Phase Communication Speed 4800, 9600, 19200 Information Page1 Page2 Page3 Source Index, Horizontal Frequency, Vertical Frequency, Sync Polarity Signal Type, Video Type, Sync Type, Interlace Remaining Lamp Time, Lamp Hour Meter, Filter Usage, Projector Usage Default Factory Default Clear Filter Usage Clear Lamp Hour Meter Current Signal All Data NOTE: Some menu items are not available depending on the input source. E-19
..., Off Noise reduction Off, Low, High Auto Adjust On, Off Vertical Horizontal Clock Phase Communication Speed 4800, 9600, 19200 Information Page1 Page2 Page3 Source Index, Horizontal Frequency, Vertical Frequency, Sync Polarity Signal Type, Video Type, Sync Type, Interlace Remaining Lamp Time, Lamp Hour Meter, Filter Usage, Projector Usage Default Factory Default Clear Filter Usage Clear Lamp Hour Meter Current Signal All Data NOTE: Some menu items are not available depending on the input source. E-19
User Manual
Page 23
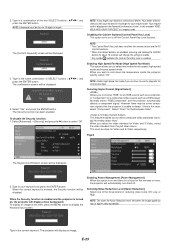
... wish to select composite video standards manually. When you to use the projector for fan speed: high-speed mode and normal speed mode. Page2 The Keyword confirmation screen will be displayed. The projector will change the setting to 10 digits in the Keyword Confirmation screen. Disabling the Cabinet Buttons [Control Panel Key Lock] This option turns on or off . The [Confirm Keyword] screen will display a blue background. Enabling High Speed Fan Mode [High Speed Fan Mode] This option allows...
... wish to select composite video standards manually. When you to use the projector for fan speed: high-speed mode and normal speed mode. Page2 The Keyword confirmation screen will be displayed. The projector will change the setting to 10 digits in the Keyword Confirmation screen. Disabling the Cabinet Buttons [Control Panel Key Lock] This option turns on or off . The [Confirm Keyword] screen will display a blue background. Enabling High Speed Fan Mode [High Speed Fan Mode] This option allows...
User Manual
Page 24
... the "Auto Adjust off ) This allows you connect your image appears to be reset except Language, Lamp Remaining Time, Lamp Hour Meter and Filter Usage. This item has three pages. NOTE: Selecting "Ceiling front" or "Ceiling rear" for a minimum of lamp usage. The value informs you to change adjustments and setting to the factory preset for source except the following: Resets the adjustments for the current RGB input signal to project an image using NEC's Advanced...
... the "Auto Adjust off ) This allows you connect your image appears to be reset except Language, Lamp Remaining Time, Lamp Hour Meter and Filter Usage. This item has three pages. NOTE: Selecting "Ceiling front" or "Ceiling rear" for a minimum of lamp usage. The value informs you to change adjustments and setting to the factory preset for source except the following: Resets the adjustments for the current RGB input signal to project an image using NEC's Advanced...
User Manual
Page 25
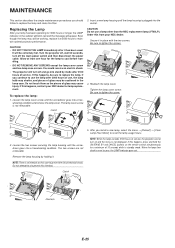
... install a new lamp, select the menu → [Default] → [Clear Lamp Hour Meter] to reset the lamp usage hours. 2. CAUTION • DO NOT TOUCH THE LAMP immediately after 3000 hours of use, the lamp bulb may shatter, and pieces of service. If this happens, be extremely hot. Reattach the lamp cover. If you continue to use a lamp other than the NEC replacement lamp (VT60LP). Secure it has been used. Remove the lamp housing by mode after 3100 hours...
... install a new lamp, select the menu → [Default] → [Clear Lamp Hour Meter] to reset the lamp usage hours. 2. CAUTION • DO NOT TOUCH THE LAMP immediately after 3000 hours of use, the lamp bulb may shatter, and pieces of service. If this happens, be extremely hot. Reattach the lamp cover. If you continue to use a lamp other than the NEC replacement lamp (VT60LP). Secure it has been used. Remove the lamp housing by mode after 3100 hours...

User Manual
Page 26
... projector before replacing the filter. • Only clean the outside of the projector from the menu, select [Default] → [Clear Filter Usage]. Never use a mild detergent. Reinstall the new filter cover. Cleaning the Cabinet and the Lens To reset the filter usage time, from dust or dirt and should be careful not to operate the projector without the filter cover. Catch 1. Use a blower or lens paper to replace the filter. E-26 Cleaning or Replacing the Filter The air-filter sponge keeps...
... projector before replacing the filter. • Only clean the outside of the projector from the menu, select [Default] → [Clear Filter Usage]. Never use a mild detergent. Reinstall the new filter cover. Cleaning the Cabinet and the Lens To reset the filter usage time, from dust or dirt and should be careful not to operate the projector without the filter cover. Catch 1. Use a blower or lens paper to replace the filter. E-26 Cleaning or Replacing the Filter The air-filter sponge keeps...

User Manual
Page 27
... in Standby. - The projector is getting ready Wait for a moment. Steady light Orange Control Panel key locked You have pressed control panel key when Control Panel Key Lock is off. - E-27 to turn on . - The projector is turned on until the lamp is overheated. 0.5 sec Off) Move the projector to light. Lamp fails to a cooler location. Lamp has been used beyond Replace the lamp. TROUBLESHOOTING This section helps you resolve problems you may encounter while setting up or using the projector. Power Indicator Indicator...
... in Standby. - The projector is getting ready Wait for a moment. Steady light Orange Control Panel key locked You have pressed control panel key when Control Panel Key Lock is off. - E-27 to turn on . - The projector is turned on until the lamp is overheated. 0.5 sec Off) Move the projector to light. Lamp fails to a cooler location. Lamp has been used beyond Replace the lamp. TROUBLESHOOTING This section helps you resolve problems you may encounter while setting up or using the projector. Power Indicator Indicator...
User Manual
Page 28
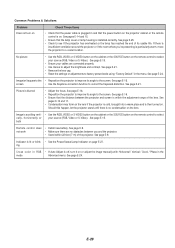
... • Adjust the focus. Indicator is lit or blink- • See the Power/Status/Lamp Indicator on the remote control to see if the projector has overheated or the lamp has reached the end of the lens. Common Problems & Solutions Problem Does not turn it on or adjust the image manually with Horizontal / Vertical / Clock / Phase in and that the power button on the projector cabinet or the remote control is on the lens. See pages...
... • Adjust the focus. Indicator is lit or blink- • See the Power/Status/Lamp Indicator on the remote control to see if the projector has overheated or the lamp has reached the end of the lens. Common Problems & Solutions Problem Does not turn it on or adjust the image manually with Horizontal / Vertical / Clock / Phase in and that the power button on the projector cabinet or the remote control is on the lens. See pages...

User Manual
Page 29
Model Number VT46 Optical LCD Panel Resolution Lens Lamp Image Size Projection Distance Projection Angle Keystone Correction 0.7" p-Si TFT active-matrix 800ן600 pixels* native, up to UXGA with Advanced AccuBlend Manual zoom and focus: F1.7 - 2.0 f=21.6 - 25.9mm 160 W 21 - 300 inches (0.5 - 7.6 m) diagonal 2.38 - 35.8 ft / 7.3 (Tele) - 10.9 m (Tele) Tele : 9.5° - 10.0° Wide : 11.3° - 11.8° +/- 30 degrees electronic Electrical Inputs Video Compatibility Scan...
Model Number VT46 Optical LCD Panel Resolution Lens Lamp Image Size Projection Distance Projection Angle Keystone Correction 0.7" p-Si TFT active-matrix 800ן600 pixels* native, up to UXGA with Advanced AccuBlend Manual zoom and focus: F1.7 - 2.0 f=21.6 - 25.9mm 160 W 21 - 300 inches (0.5 - 7.6 m) diagonal 2.38 - 35.8 ft / 7.3 (Tele) - 10.9 m (Tele) Tele : 9.5° - 10.0° Wide : 11.3° - 11.8° +/- 30 degrees electronic Electrical Inputs Video Compatibility Scan...

User Manual
Page 35
... cabinet : Problem of units per User : Required Service : (1) Repair and Return (2) Loan unit Requested period of Loan unit : Payment method : (1) Credit Card (2) Travelers Cheque In Case of Purchase : Serial No. I don't return the Loan units within the specified period. w/Valid Date : (3) Cash E-35 Application Sheet for TravelCare Service Program Country, product purchased : User's Company Name : User's Company Address : Phone...
... cabinet : Problem of units per User : Required Service : (1) Repair and Return (2) Loan unit Requested period of Loan unit : Payment method : (1) Credit Card (2) Travelers Cheque In Case of Purchase : Serial No. I don't return the Loan units within the specified period. w/Valid Date : (3) Cash E-35 Application Sheet for TravelCare Service Program Country, product purchased : User's Company Name : User's Company Address : Phone...
User Manual
Page 36
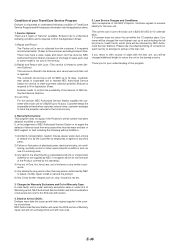
... customer, excluding transport time. NEC Authorized Service Station will repair the DOA unit as a Warranty repair, but will be done by NEC Authorized Service Station, because of shortage of spare parts due to same model is not sold in the territory. 2) Repair and Return with reason. 4. There may have the projector serviced in inoperable unit to nearest NEC Authorized Service Station for your TravelCare...
... customer, excluding transport time. NEC Authorized Service Station will repair the DOA unit as a Warranty repair, but will be done by NEC Authorized Service Station, because of shortage of spare parts due to same model is not sold in the territory. 2) Repair and Return with reason. 4. There may have the projector serviced in inoperable unit to nearest NEC Authorized Service Station for your TravelCare...


