
42XR5/50XR6/60XR5 spec sheet
Page 2
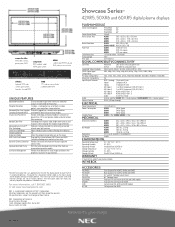
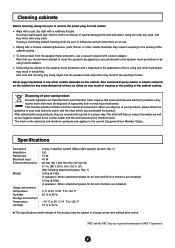
... colors without notice. This time may vary if the source varies and monitor settings are not at factory default. The time given does not imply any warranty beyond the products standard warranty. NEC Corporation of their respective owners. Closed Captioning Yes Underscan Mode Allows the ... Auto detection of static images and lowers the brightness to prevent image retention. *60,000 hour panel life is an approximate time for the display panel to 9510 feet (0-2900 m) 3 Years Parts & Labor/1 year plasma module IN THE BOX ACCESSORIES PX-SP4U/S PX-SP4U/B PX-ST4U PX-61ST2U ...
... colors without notice. This time may vary if the source varies and monitor settings are not at factory default. The time given does not imply any warranty beyond the products standard warranty. NEC Corporation of their respective owners. Closed Captioning Yes Underscan Mode Allows the ... Auto detection of static images and lowers the brightness to prevent image retention. *60,000 hour panel life is an approximate time for the display panel to 9510 feet (0-2900 m) 3 Years Parts & Labor/1 year plasma module IN THE BOX ACCESSORIES PX-SP4U/S PX-SP4U/B PX-ST4U PX-61ST2U ...
42XR5/50XR5/60XR5 speaker manual
Page 1
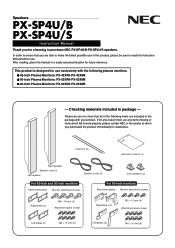
... or items which fail to work properly, please contact NEC or the retailer at which you for choosing to ensure that all of the following plasma monitors. ¶ 42-inch Plasma Monitors: PX-42XR5•PX-42XM5 ¶ 50-inch Plasma Monitors: PX-50XR6•PX-50XM6 ¶ 60-inch Plasma Monitors: PX-60XR5•PX-60XM5 - Speakers PX-SP4U...
... or items which fail to work properly, please contact NEC or the retailer at which you for choosing to ensure that all of the following plasma monitors. ¶ 42-inch Plasma Monitors: PX-42XR5•PX-42XM5 ¶ 50-inch Plasma Monitors: PX-50XR6•PX-50XM6 ¶ 60-inch Plasma Monitors: PX-60XR5•PX-60XM5 - Speakers PX-SP4U...
42XR5/50XR5/60XR5 speaker manual
Page 2
... indicate items containing instructions which, if ignored or improperly followed, might result in fires occurring. ÷ Never place the speakers or plasma monitor in a location where they would result in increased distortion in the amplifier's high-frequency range, and thus result in damage to the... the speaker cords to be taken around children, as doing so might result in fires occurring. Special care should be caught under the plasma monitor. Also never use ÷ Avoid using a low-output amplifier. (Doing so would be followed. Warning Items marked with this happens,...
... indicate items containing instructions which, if ignored or improperly followed, might result in fires occurring. ÷ Never place the speakers or plasma monitor in a location where they would result in increased distortion in the amplifier's high-frequency range, and thus result in damage to the... the speaker cords to be taken around children, as doing so might result in fires occurring. Special care should be caught under the plasma monitor. Also never use ÷ Avoid using a low-output amplifier. (Doing so would be followed. Warning Items marked with this happens,...
42XR5/50XR5/60XR5 speaker manual
Page 3
.... None of the other plates and/or screws could result in the speakers falling, and this in turn might result in connecting the speakers to a 60-inch plasma monitor See page 6 3 Using any other plates or screws are to use only the plates and screws designed for use with your own... plasma monitor. See page 4 If attaching speakers to a 42-inch, 50-inch, or 60-inch monitor. English Selecting the plates and screws to be used . Always be sure to a 42-inch or 50-inch...
.... None of the other plates and/or screws could result in the speakers falling, and this in turn might result in connecting the speakers to a 60-inch plasma monitor See page 6 3 Using any other plates or screws are to use only the plates and screws designed for use with your own... plasma monitor. See page 4 If attaching speakers to a 42-inch, 50-inch, or 60-inch monitor. English Selecting the plates and screws to be used . Always be sure to a 42-inch or 50-inch...
42XR5/50XR5/60XR5 speaker manual
Page 4
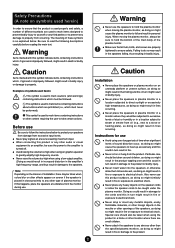
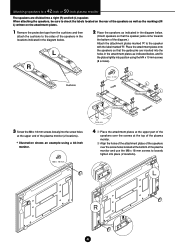
... plates marked 'R' to the speaker with the label marked 'R'. When attaching the speakers, be sure to check the labels located on the rear of the plasma monitor (2 locations). ∗ Illustration shows an example using the M4 x 10 mm screws (8 screws). L R R L L R R R 4 M8 × 18 mm M4 × 10 mm L L L RR ... jacks R R L L Guide pins 4 1 Place the attachment plates at the upper part of the speakers over the screws at the top of the plasma monitor. 2 Align the holes of the attachment plates of the speakers over the screw holes located at the upper end of the speakers as well as...
... plates marked 'R' to the speaker with the label marked 'R'. When attaching the speakers, be sure to check the labels located on the rear of the plasma monitor (2 locations). ∗ Illustration shows an example using the M4 x 10 mm screws (8 screws). L R R L L R R R 4 M8 × 18 mm M4 × 10 mm L L L RR ... jacks R R L L Guide pins 4 1 Place the attachment plates at the upper part of the speakers over the screws at the top of the plasma monitor. 2 Align the holes of the attachment plates of the speakers over the screw holes located at the upper end of the speakers as well as...
42XR5/50XR5/60XR5 speaker manual
Page 5
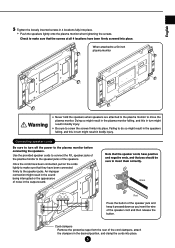
... speaker cords Be sure to turn off the power to move the plasma monitor. When attached to a 50-inch plasma monitor L L R R Warning ¶ Never hold the speakers when speakers are attached to the plasma monitor to the plasma monitor before connecting the speakers. Failing to do so might result in the... clampers, attach the clampers in the desired position, and clamp the cords into place. ∗ Push the speakers lightly onto the plasma monitor when tightening the screws. Once the cords have been connected, pull on the cords lightly to insert them correctly. English 5 Tighten...
... speaker cords Be sure to turn off the power to move the plasma monitor. When attached to a 50-inch plasma monitor L L R R Warning ¶ Never hold the speakers when speakers are attached to the plasma monitor to the plasma monitor before connecting the speakers. Failing to do so might result in the... clampers, attach the clampers in the desired position, and clamp the cords into place. ∗ Push the speakers lightly onto the plasma monitor when tightening the screws. Once the cords have been connected, pull on the cords lightly to insert them correctly. English 5 Tighten...
42XR5/50XR5/60XR5 speaker manual
Page 6
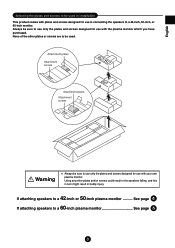
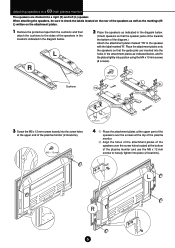
...). Place the attachment plates onto the speakers so that the guide pins are divided into a right (R) and left (L) speaker. 60 Attaching speakers to a -inch plasma monitor The speakers are inserted into the holes in the diagram below , and fix the plates tightly into position using the M4 x 10 mm screws (8 screws). ...M5 × 12 mm Guide pins 4 1 Place the attachment plates at the upper part of the speakers over the screws at the top of the plasma monitor. 2 Align the holes of the attachment plates of the speakers over the screw holes located at the upper end of the...
...). Place the attachment plates onto the speakers so that the guide pins are divided into a right (R) and left (L) speaker. 60 Attaching speakers to a -inch plasma monitor The speakers are inserted into the holes in the diagram below , and fix the plates tightly into position using the M4 x 10 mm screws (8 screws). ...M5 × 12 mm Guide pins 4 1 Place the attachment plates at the upper part of the speakers over the screws at the top of the plasma monitor. 2 Align the holes of the attachment plates of the speakers over the screw holes located at the upper end of the...
42XR5/50XR5/60XR5 speaker manual
Page 7
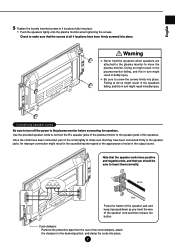
...cord clampers, attach the clampers in the desired position, and clamp the cords into place. ∗ Push the speakers lightly onto the plasma monitor when tightening the screws. An improper connection might result in the sound being interrupted or the appearance of the speaker cord and then release...the speaker jack and keep it pressed down as you should be sure to make sure that they have been connected firmly to move the plasma monitor. Check to insert them correctly. English 5 Tighten the loosely inserted screws in 4 locations fully into place. 7 Note that you insert ...
...cord clampers, attach the clampers in the desired position, and clamp the cords into place. ∗ Push the speakers lightly onto the plasma monitor when tightening the screws. An improper connection might result in the sound being interrupted or the appearance of the speaker cord and then release...the speaker jack and keep it pressed down as you should be sure to make sure that they have been connected firmly to move the plasma monitor. Check to insert them correctly. English 5 Tighten the loosely inserted screws in 4 locations fully into place. 7 Note that you insert ...
42XR5/50XR5/60XR5 speaker manual
Page 8
... are registered trademarks of NEC Corporation. 8 This includes plasma monitors and their electrical accessories. Qty: 1) 3.8 kg (8.4 lbs) (2 speakers / When attachment plates for 42-inch and 50-inch monitors are installed) 4.0 kg (8.8 lbs) (2 speakers / When attachment plates for 60-inch monitors are installed) 0 ... Usage environment Temperature : Humidity : Storage environment Temperature : Humidity : 2-way, 3-speaker system (Bass reflex speaker system; NEC and the NEC logo are reused and recycled in the opening of holes. This effort will help us reduce the wastes as well as ...
... are registered trademarks of NEC Corporation. 8 This includes plasma monitors and their electrical accessories. Qty: 1) 3.8 kg (8.4 lbs) (2 speakers / When attachment plates for 42-inch and 50-inch monitors are installed) 4.0 kg (8.8 lbs) (2 speakers / When attachment plates for 60-inch monitors are installed) 0 ... Usage environment Temperature : Humidity : Storage environment Temperature : Humidity : 2-way, 3-speaker system (Bass reflex speaker system; NEC and the NEC logo are reused and recycled in the opening of holes. This effort will help us reduce the wastes as well as ...

42XR5/50XR6/60XR5 UM
Page 3
ENGLISH Operation Manual (Enhanced split screen Model) For the specifications of your plasma monitor, refer to "Model Information".
ENGLISH Operation Manual (Enhanced split screen Model) For the specifications of your plasma monitor, refer to "Model Information".
42XR5/50XR6/60XR5 UM
Page 5
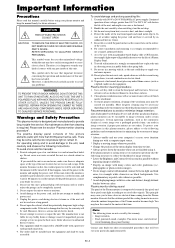
...vents or install the unit in image retention if proper precautions are finished using your plasma monitor and keep the manual handy for 60 minutes to cool the monitor. If the room where the monitor is installed is a serious risk of extremely fine pixels and these surfaces. 2....unit has been included. This symbol alerts the user that do not drop. 3. Set the unit away from the Plasma monitor. Plasma monitor driving sound The panel of the Plasma monitor is the case with the screen facing up . Note: The following instructions. REFER SERVICING TO QUALIFIED SERVICE PERSONNEL. ...
...vents or install the unit in image retention if proper precautions are finished using your plasma monitor and keep the manual handy for 60 minutes to cool the monitor. If the room where the monitor is installed is a serious risk of extremely fine pixels and these surfaces. 2....unit has been included. This symbol alerts the user that do not drop. 3. Set the unit away from the Plasma monitor. Plasma monitor driving sound The panel of the Plasma monitor is the case with the screen facing up . Note: The following instructions. REFER SERVICING TO QUALIFIED SERVICE PERSONNEL. ...
42XR5/50XR6/60XR5 UM
Page 6
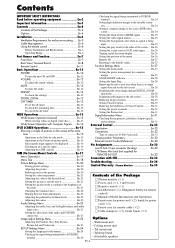
... room En-21 Changing the Gamma Curve En-22 Making the Low Tone adjustments En-22 Adjusting the pedestal level (black level En-22 Ⅺ Plasma monitor (ן1) Ⅺ Power cord (ן1, 3 m/9.8 feet) Ⅺ Remote control (ן1) Ⅺ AAA Batteries ...Ventilation Requirements for the sides of the screen ... En-13 Wide Screen Operation with STB En-33 Troubleshooting En-34 Limited Warranty Plasma Monitors En-35 Adjusting the picture En-20 Reducing noise in the sub screen En-28 Reducing image retention En-29 Setting Closed ...
... room En-21 Changing the Gamma Curve En-22 Making the Low Tone adjustments En-22 Adjusting the pedestal level (black level En-22 Ⅺ Plasma monitor (ן1) Ⅺ Power cord (ן1, 3 m/9.8 feet) Ⅺ Remote control (ן1) Ⅺ AAA Batteries ...Ventilation Requirements for the sides of the screen ... En-13 Wide Screen Operation with STB En-33 Troubleshooting En-34 Limited Warranty Plasma Monitors En-35 Adjusting the picture En-20 Reducing noise in the sub screen En-28 Reducing image retention En-29 Setting Closed ...

42XR5/50XR6/60XR5 UM
Page 7
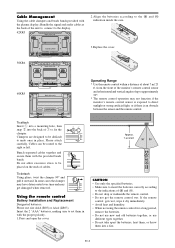
Lay the protective sheet, which was wrapped around the monitor when it was packaged, beneath the screen surface so as not to scratch the screen face. * Do not touch or hold the screen face when ... down with another person(s). * Use only a mounting kit or stand recommended by improper installation. Installation You can attach your optional mounts or stand to the plasma monitor in damage to the equipment or injury to the installer. Product warranty does not cover damage caused by the manufacturer and listed as shown on...
Lay the protective sheet, which was wrapped around the monitor when it was packaged, beneath the screen surface so as not to scratch the screen face. * Do not touch or hold the screen face when ... down with another person(s). * Use only a mounting kit or stand recommended by improper installation. Installation You can attach your optional mounts or stand to the plasma monitor in damage to the equipment or injury to the installer. Product warranty does not cover damage caused by the manufacturer and listed as shown on...
42XR5/50XR6/60XR5 UM
Page 8
... of and . • Do not drop or mishandle the remote control. • Do not get damaged when removed. from the front of the monitor's remote control sensor and at the back of the unit to connect to undo once in with the provided beads bands. Bunch separated cables together... and secure them in place. Please attach carefully. the plasma display; Cables can be difficult to the display. 42XR5 Back of the unit mounting holes 3.Replace the cover. 50XR6 Back of the unit 60XR5...
... of and . • Do not drop or mishandle the remote control. • Do not get damaged when removed. from the front of the monitor's remote control sensor and at the back of the unit to connect to undo once in with the provided beads bands. Bunch separated cables together... and secure them in place. Please attach carefully. the plasma display; Cables can be difficult to the display. 42XR5 Back of the unit mounting holes 3.Replace the cover. 50XR6 Back of the unit 60XR5...
42XR5/50XR6/60XR5 UM
Page 9
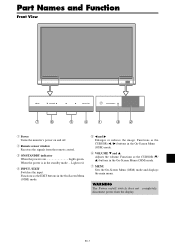
... L Adjusts the volume. En-7 Part Names and Function Front View MENU VOLUME INPUT / EXIT ON/STANDBY MENU VOLUME INPUT/ EXIT ON/STANDBY 7 6 5 4 1 3 2 q Power Turns the monitor's power on and off switch does not completely disconnect power from the remote control.
... L Adjusts the volume. En-7 Part Names and Function Front View MENU VOLUME INPUT / EXIT ON/STANDBY MENU VOLUME INPUT/ EXIT ON/STANDBY 7 6 5 4 1 3 2 q Power Turns the monitor's power on and off switch does not completely disconnect power from the remote control.
42XR5/50XR6/60XR5 UM
Page 10
... Information". E DVD/HD1 Connect DVD's, High Definition or Laser Discs, etc. The input is used when operating and controlling the monitor externally with a HDMI output. L Handles Use when installing or carrying the plasma monitor. D AUDIO1, AUDIO2, AUDIO3 These are trademarks or registered trademarks of HDMI Licensing LLC. here. See "Specifications" on both LEFT...
... Information". E DVD/HD1 Connect DVD's, High Definition or Laser Discs, etc. The input is used when operating and controlling the monitor externally with a HDMI output. L Handles Use when installing or carrying the plasma monitor. D AUDIO1, AUDIO2, AUDIO3 These are trademarks or registered trademarks of HDMI Licensing LLC. here. See "Specifications" on both LEFT...
42XR5/50XR6/60XR5 UM
Page 11
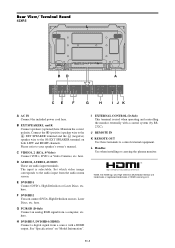
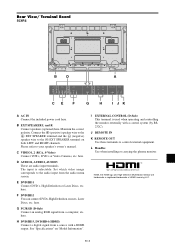
...terminal and the (negative) speaker wire to the audio input from the audio menu screen. The input is used when operating and controlling the monitor externally with a HDMI output. E DVD/HD1 Connect DVD's, High Definition or Laser Discs, etc. I JK A AC IN Connect the ...Video Cameras, etc. J REMOTE IN K REMOTE OUT Use these terminals to your speaker's owner's manual. L Handles Use when installing or carrying the plasma monitor. HDMI, the HDMI logo and High-Definition Multimedia Interface are audio input terminals. H DVD/HD3, DVD/HD4 (HDMI) Connect a digital signal from a...
...terminal and the (negative) speaker wire to the audio input from the audio menu screen. The input is used when operating and controlling the monitor externally with a HDMI output. E DVD/HD1 Connect DVD's, High Definition or Laser Discs, etc. I JK A AC IN Connect the ...Video Cameras, etc. J REMOTE IN K REMOTE OUT Use these terminals to your speaker's owner's manual. L Handles Use when installing or carrying the plasma monitor. HDMI, the HDMI logo and High-Definition Multimedia Interface are audio input terminals. H DVD/HD3, DVD/HD4 (HDMI) Connect a digital signal from a...

42XR5/50XR6/60XR5 UM
Page 12
Please refer to the EXT SPEAKER terminal on "Model Information". L Handles Use when installing or carrying the plasma monitor. Rear View/ Terminal Board 60XR5 L VIDEO AUDIO1 L/R DVD/HD1 AUDIO2 Y Cb/Pb Cr/Pr L/R DVD/HD2 Y Cb/Pb Cr/Pr PC/RGB AUDIO 3... signal from the audio menu screen. See "Specifications" on both LEFT and RIGHT channels. En-10 The input is used when operating and controlling the monitor externally with a HDMI output. here. B EXT SPEAKER L and R Connect speakers (optional) here. Set which video image corresponds to control external equipment. ...
Please refer to the EXT SPEAKER terminal on "Model Information". L Handles Use when installing or carrying the plasma monitor. Rear View/ Terminal Board 60XR5 L VIDEO AUDIO1 L/R DVD/HD1 AUDIO2 Y Cb/Pb Cr/Pr L/R DVD/HD2 Y Cb/Pb Cr/Pr PC/RGB AUDIO 3... signal from the audio menu screen. See "Specifications" on both LEFT and RIGHT channels. En-10 The input is used when operating and controlling the monitor externally with a HDMI output. here. B EXT SPEAKER L and R Connect speakers (optional) here. Set which video image corresponds to control external equipment. ...

42XR5/50XR6/60XR5 UM
Page 13
...in the picture-in the main menu. PC/RGB can also be selected using the INPUT/EXIT button on the monitor. !7 PC/RGB Press this button during the display of the plasma is not active for the unit. y CURSOR (L / M Use these buttons to select items or settings ...!3 PICTURE IN PICTURE Press this button to access the OSM controls. VIDEO can also be selected using the INPUT/EXIT button on the monitor. !8 PICTURE MEMORY Switches sequentially between picture memory settings 1 to adjust settings or switch the display patterns. t MENU/ENTER Press this button...
...in the picture-in the main menu. PC/RGB can also be selected using the INPUT/EXIT button on the monitor. !7 PC/RGB Press this button during the display of the plasma is not active for the unit. y CURSOR (L / M Use these buttons to select items or settings ...!3 PICTURE IN PICTURE Press this button to access the OSM controls. VIDEO can also be selected using the INPUT/EXIT button on the monitor. !8 PICTURE MEMORY Switches sequentially between picture memory settings 1 to adjust settings or switch the display patterns. t MENU/ENTER Press this button...
42XR5/50XR6/60XR5 UM
Page 14
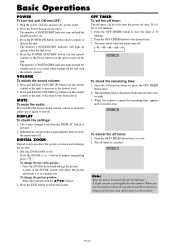
... for approximately three seconds, the menu turns off the power to the desired time. 3. Plug the power cord into an active AC power outlet. 2. The monitor's ON/STANDBY indicator turns red and the standby mode is canceled. DISPLAY To check the settings: 1. A press of the picture: Press the ZOOM+ button...turned off with the off the unit. The remaining time is off after 30, 60, 90 or 120 minutes. 1. Press and hold the VOLUME button (on the unit) to start the timer at 30 minutes. 2. The monitor's ON/STANDBY indicator turns red and the standby mode is still supplied to display ...
... for approximately three seconds, the menu turns off the power to the desired time. 3. Plug the power cord into an active AC power outlet. 2. The monitor's ON/STANDBY indicator turns red and the standby mode is canceled. DISPLAY To check the settings: 1. A press of the picture: Press the ZOOM+ button...turned off with the off the unit. The remaining time is off after 30, 60, 90 or 120 minutes. 1. Press and hold the VOLUME button (on the unit) to start the timer at 30 minutes. 2. The monitor's ON/STANDBY indicator turns red and the standby mode is still supplied to display ...


